
Have you ever noticed your weed eater lawn mower struggling to keep up? Just like any machine, your mower needs regular maintenance to run smoothly, and changing the oil is a key part of that. If you’ve been putting it off, you’re not alone. Many people overlook this simple task, but it can make a big difference in performance and longevity.
Key Takeaways
- Importance of Oil Changes: Regular oil changes are crucial for maintaining the performance and longevity of your weed eater lawn mower.
- Tools and Materials: Prepare essential tools such as an oil change container, wrench set, funnel, and the correct type of oil (SAE 30 or 10W-30) before starting.
- Step-by-Step Process: Follow a systematic approach: gather tools, drain old oil, replace the drain plug, add new oil, and check the oil level to ensure an efficient oil change.
- Avoid Common Mistakes: Refrain from overfilling the oil reservoir and using the wrong oil type, as these can lead to engine damage and decreased performance.
- Regular Maintenance: Schedule oil changes every 20 to 50 hours of operation and routinely check other mower components like air filters and blades for optimal performance.
- Refer to the Manual: Always consult your lawn mower’s owner’s manual for specific recommendations on oil type and maintenance intervals to ensure proper care.
Tools And Materials Needed
Changing the oil in your weed eater lawn mower requires specific tools and materials to ensure a smooth process. Having them ready makes the task more efficient.
Recommended Products
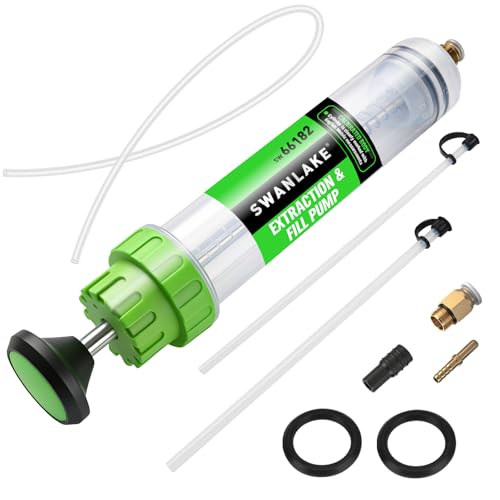
POWERFUL EXTRACTION - Delivers strong suction with its double-seal rubber rings, efficiently removing engine oil, transmission fluid, and coolant without leaks - perfect for car maintenance and lawn mower service with mess-free operation

SAE 10W-30 MOTOR OIL FOR SMALL ENGINES: One 32 fl oz bottle of STP Premium Synthetic Blend 4 Cycle Small Engine Oil SAE 10W-30, formulated for small engines in lawnmowers, generators, tractors, snow blowers, and other outdoor power equipment

HIGH-CAPACITY TRANSFER - This 200cc fluid extractor pump effectively removes and fills brake fluid, gear oil, antifreeze, and power steering fluid with precise control, making routine maintenance and fluid changes cleaner and more efficient
Oil Type Recommendations
Choose the right oil for optimal performance. Use SAE 30 or 10W-30 oil for most four-stroke engines, while two-stroke engines often require a mixture of oil and gasoline. Always consult the owner’s manual for specific oil recommendations suited to your mower’s model.
Equipment Checklist
Gather the following tools and materials before starting:
- Oil Change Container: To catch the old oil during the change.
- Wrench Set: For loosening the drain plug.
- Oil Filter Wrench: If your mower has an oil filter, this tool is essential.
- Funnel: To pour new oil without spills.
- New Oil: Ensure it’s the correct type for your mower.
- Shop Towels: For cleaning up any spilled oil.
- Protective Gloves: To keep your hands clean while you work.
- Safety Glasses: To protect your eyes from any debris.
Gathering these items in advance helps streamline the oil change process, reducing the chance of mistakes or accidents.
Step-By-Step Guide
Changing the oil in your weed eater lawn mower is straightforward. Follow these steps for a successful oil change.
Recommended Products

Wide Compatibility: The Oil Drain Tube 532148456, 148456 is Universally Compatible with Husqvarna, AYP, Craftsman, Poulan, Poulan Pro, Sears Craftsman, Roper, Weed Eater etc Lawn Mower Tractors and Chainsaw, Enhancing Maintenance Efficiency Across a Diverse Range of Models

Oil Drain Tube Replace Part Number: 532148456 148456

Universal Compatibility: The Oil Drain Tube 532148456, 148456, is Universally Compatible with Most Brands Models Including Husqvarna, AYP, Craftsman, Poulan, Poulan Pro, Sears Craftsman, Roper, Weed Eater etc Lawn Mower Tractors, Enhancing Maintenance Efficiency Across a Diverse Range of Models.
Preparing Your Weed Eater Lawn Mower
- Gather Tools and Materials: Collect the oil change container, wrench set, oil filter wrench, funnel, new oil, shop towels, protective gloves, and safety glasses.
- Ensure Safety: Turn off the mower and let it cool completely. Wear safety glasses and gloves to protect against spills.
- Find Level Ground: Place your mower on a flat surface to ensure proper drainage during the oil change.
Draining The Old Oil
- Locate the Oil Drain Plug: Identify the oil drain plug, usually found on the underside or side of the mower.
- Position the Container: Place the oil change container beneath the drain plug to catch the old oil.
- Remove the Drain Plug: Use the appropriate wrench to carefully unscrew the drain plug. Allow the old oil to completely drain out into the container.
- Clean Up: Wipe any spills with shop towels for a neat work area. Properly dispose of the used oil according to local regulations.
- Replace the Drain Plug: Once the old oil has drained, screw the drain plug back in securely.
- Select the Right Oil: Use SAE 30 or 10W-30 for most four-stroke engines, and a mix of oil and gasoline for two-stroke engines. Refer to your owner’s manual for specific recommendations.
- Pour in New Oil: Remove the oil fill cap and use a funnel to pour in the new oil. Fill to the recommended level, taking care not to overfill.
- Check Oil Level: Use the dipstick, if available, to confirm the oil level is correct.
- Secure the Cap: After adding the appropriate amount of oil, replace the oil fill cap, ensuring it’s tight.
Following these steps makes the oil change process efficient and ensures your weed eater lawn mower runs effectively.
Common Mistakes To Avoid
Changing oil in a weed eater lawn mower is straightforward, but mistakes can happen. Here are common pitfalls to avoid during the process.
Overfilling The Oil
Overfilling the oil reservoir can cause pressure buildup and lead to engine damage. Always check the oil level with the dipstick after filling. If the oil spills over, use a shop towel to clean it up promptly. Stick to the manufacturer’s recommended oil capacity and pour gradually.
Using The Wrong Oil Type
Using the incorrect oil type affects engine performance and can cause significant damage. Four-stroke engines typically require SAE 30 or 10W-30 oil, while two-stroke engines necessitate a proper mixture of oil and gasoline. Always consult your owner’s manual for guidance on the specific oil needed for your mower model. Checking the oil type before starting the change ensures optimal operation and efficiency.
Maintenance Tips
Regular maintenance keeps your weed eater lawn mower in top shape. Follow these guidelines for optimal performance and longevity.
Recommended Products

LONGER TUBES: The fluid transfer pump includes two extension hoses that can be connected for a reach of up to 23" and comes with tube caps that prevent fluid spillage. An additional 23" extension hose is included, which when connected, is sufficient to reach hard-to-reach locations
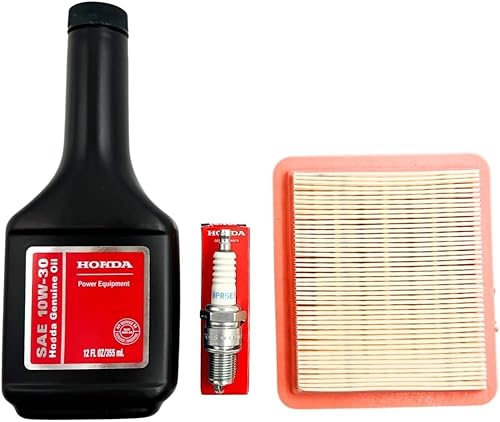
KIT INCLUDES: Genuine Honda 17211-Z8B-901 air filter, 98079-55846 Spark Plug, and 08213-10W30 12oz bottle of Honda 10W-30 Motor Oil

TRANSFER FLUID SMOOTHLY - Thorstone syringe style fluid evacuator comes with 0.24" OD and 0.32" OD extension tubes, up to 40 cm when connected, long enough to reach hard-to-reach locations for extracting and changing transmission fluid, power steering fluid, gear oil, anti-freeze and brake fluid.
Frequency Of Oil Changes
Change the oil every 20 to 50 hours of operation, depending on the manufacturer’s recommendations. Check the oil level before each use. If the oil looks dirty or smells burnt, it’s time for a change. Keep a log of your oil changes to help track maintenance intervals easily.
Additional Maintenance Practices
Perform routine checks on other key components of your mower.
- Air Filter: Clean or replace it every season to maintain airflow and engine efficiency.
- Spark Plug: Inspect and replace the spark plug annually for smooth starting.
- Blades: Sharpen blades every 20 to 25 hours of use for a clean cut.
- Fuel System: Use fresh fuel and consider adding a fuel stabilizer if storing the mower for extended periods.
These practices, combined with regular oil changes, promote a healthy mower and extend its lifespan.
Conclusion
Taking the time to change the oil in your weed eater lawn mower is a small task that pays off big in performance and longevity. By following the steps outlined and avoiding common mistakes you can keep your mower running smoothly season after season.
Regular maintenance not only enhances efficiency but also saves you from costly repairs down the line. Remember to gather your tools and materials ahead of time to make the process seamless.
With a little effort you’ll ensure your mower stays in top shape, ready to tackle your yard work whenever you need it. Happy mowing!
Frequently Asked Questions
How often should I change the oil in my weed eater lawn mower?
Changing the oil every 20 to 50 hours of operation is recommended. Regular oil changes help maintain your mower’s performance and extend its lifespan.
What tools do I need for an oil change on my mower?
You’ll need an oil change container, wrench set, oil filter wrench, funnel, new oil, shop towels, protective gloves, and safety glasses for an effective oil change.
What type of oil should I use for my lawn mower?
For most four-stroke engines, use SAE 30 or 10W-30 oil. For two-stroke engines, mix oil with gasoline. Always consult your owner’s manual for specific recommendations.
What are common mistakes to avoid during an oil change?
Avoid overfilling the oil reservoir, as this can lead to engine damage. Additionally, using the wrong oil type can cause performance issues, so always check your owner’s manual.
What other maintenance should I perform on my lawn mower?
In addition to oil changes, regularly check the oil level, clean or replace the air filter, inspect the spark plug annually, sharpen blades, and use fresh fuel with a stabilizer when storing.