
Is your lawn mower sputtering and struggling to start? A dirty carburetor might be the culprit. Over time, debris and old fuel can clog it up, leading to poor performance and frustrating mowing sessions.
Key Takeaways
- Importance of Carburetor: Understanding the carburetor’s role is key; it mixes air and fuel for combustion, crucial for optimal mower performance.
- Common Symptoms of a Dirty Carburetor: Look for signs like difficulty starting, sputtering engines, poor fuel economy, and rough idling to diagnose issues.
- Preparation is Essential: Gather necessary tools (screwdrivers, pliers, wrench) and safety gear (goggles, gloves) before cleaning the carburetor.
- Step-by-Step Cleaning Process: Follow a systematic approach: remove the carburetor, disassemble it, clean the parts, and reassemble to ensure effective cleaning.
- Troubleshooting: If problems persist post-cleaning, reevaluate for potential debris, fuel quality, air filter condition, and gasket integrity.
- Regular Maintenance: Incorporate routine carburetor cleaning and inspections as part of your lawn mower maintenance to enhance longevity and performance.
Understanding the Carburetor
The carburetor plays a significant role in your lawn mower’s operation. Understanding its function and common issues helps you maintain optimal performance.
Purpose of the Carburetor
The carburetor mixes air and fuel in the correct ratio for combustion. It ensures your lawn mower starts easily and runs smoothly. When functioning properly, it delivers the right amount of fuel to the engine based on your mowing demands. This mixture facilitates efficient ignition, providing power for your mowing tasks.
Common Issues with Dirty Carburetors
Dirty carburetors lead to several problems, including starting issues, engine sputtering, and reduced power. Common signs of a dirty carburetor include:
- Difficulty Starting: When the carburetor’s passages are clogged, it can’t deliver enough fuel for ignition.
- Sputtering Engine: Inconsistent fuel flow results in an unstable running engine.
- Poor Fuel Economy: If the carburetor is dirty, it can waste fuel by providing too much or too little to the engine.
- Rough Idling: A dirty carburetor can disrupt the air-fuel mixture, causing the engine to idle roughly.
Addressing these issues promptly keeps your mower running efficiently. Regular cleaning and maintenance of the carburetor prevent dirt and debris accumulation, ensuring a longer lifespan for your lawn mower.
Preparation for Cleaning
Before diving into cleaning your carburetor, proper preparation ensures a smoother process. You’ll need specific tools and supplies handy.
Recommended Products

ALL-IN-ONE CARBURETOR CLEANING KIT: Includes 13 Stainless Steel Wires, 10 Cleaning Needles, 5 Nylon Brushes, 1 Sharp Pick - All In Various Diameters. Efficiently Cleans Small Orifices And Tight Channels In Carburetors, Nozzles, And Throttle Bodies
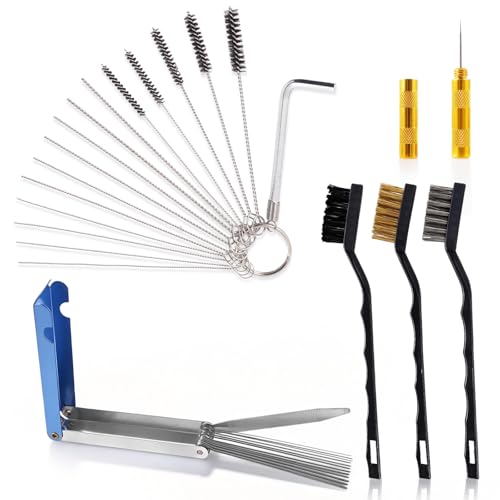
Versatile Cleaning Solution for Stubborn Clogs: Tackle clogging issues across multiple scenarios with one kit. Perfect for cleaning tiny jets in motorcycle carburetors and clearing carbon deposits from welding nozzles. This comprehensive set reduces the need for multiple scattered tools, serving both equipment maintenance and household cleaning needs.

【Save Your Time and Convenience】Will you be troubled by some small spaces that cannot be cleaned up? Our welding tip cleaner tools can just solve your troubles. 13 cleaning lines with different diameters, 10 cleaning needles with different diameters, 5 nylon brushes with different widths, and 1 pointed pick. This spray gun cleaning kit can easily help you clean up the corners that trouble you,making your work easier.
Necessary Tools and Supplies
- Screwdrivers: A flathead and a Phillips screwdriver help remove screws from the carburetor.
- Pliers: Use pliers for loosening fuel lines and clamps.
- Wrench: A socket or adjustable wrench assists in removing the carburetor from the engine.
- Cleaning Solution: Use a carburetor cleaner or a mixture of gasoline and oil to remove grime.
- Rags: Keep rags available to wipe surfaces and catch spills.
- Safety Goggles: Protect your eyes from debris and cleaning chemicals.
- Gloves: Wear disposable gloves to keep your hands clean and safe.
Safety Precautions
Taking safety precautions is essential during the cleaning process. Follow these steps to stay safe:
- Disconnect the Spark Plug: Always disconnect the spark plug wire to prevent accidental starts.
- Work in a Well-Ventilated Area: Ensure you work outdoors or in a garage with proper ventilation to avoid inhaling fumes.
- Avoid Open Flames: Keep any open flames or sparks away from your workspace, as cleaning solvents are flammable.
- Use Protective Gear: Wear safety goggles and gloves to protect your eyes and skin from cleaning agents and fuel.
- Store Chemicals Safely: Keep cleaning solutions in a secure place, out of reach of children and pets.
With the right tools and safety measures in place, you’re set to clean your carburetor effectively.
Step-by-Step Cleaning Process
Cleaning a dirty carburetor on your lawn mower requires a systematic approach. Follow these steps for an effective cleaning process.
Recommended Products

FIXES ROUGH RUNNING ENGINES – STA-BIL Fast Fix eats away at gum and varnish that cause rough starts and no starts in your small engine equipment. This easy-to-use fuel additive combats the effects of ethanol blended gasoline

SAVE YOUR TIME AND HANDY - Did you ever spend a lot of time on cleaning the ports? And the dock didn’t leave at all. These make cleaning a ethanol damaged or dirty carburetor a lot easier, working great and handy, never have a hard time cleaning the ports from now on.

【Material】Engineered for performance and longevity, our carburetor cleaning kit utilizes high-grade stainless steel and tough nylon. The stainless steel components offer reliable strength and are designed to maintain their integrity, while the nylon brushes effectively scrub sensitive parts without causing damage. This thoughtful material selection provides a consistent and dependable cleaning experience through repeated use on various projects.
Removing the Carburetor
- Disconnect the Spark Plug: Start by ensuring safety. Remove the spark plug to prevent accidental engine starts.
- Shut Off the Fuel Supply: Locate the fuel shut-off valve and turn it off. This step minimizes leaks.
- Detach Air Filter Assembly: Unscrew the air filter cover and remove the air filter. This gives you better access to the carburetor.
- Unscrew the Carburetor: Use a wrench to remove the bolts holding the carburetor to the engine. Gently pull the carburetor away from the engine, taking care not to damage any attached components.
Disassembling the Carburetor
- Remove the Float Bowl: Locate the screws on the bottom of the carburetor and carefully unscrew them to detach the float bowl.
- Take Out the Float: Gently lift the float and float needle, ensuring you don’t bend or damage them during removal.
- Detach the Jets: Unscrew the main and idle jets. Use a screwdriver for precision. Keep track of these small parts for reassembly.
Cleaning the Carburetor Parts
- Soak Parts in Cleaner: Place the float bowl, jets, and other small parts in a carburetor cleaning solution. Leave them to soak for about 15-30 minutes.
- Use a Brush for Scrubbing: After soaking, use a soft brush to scrub away any remaining debris from the parts. Pay special attention to jets.
- Blow Out Residue: Use compressed air to blow out any leftover grime from small passages and orifices. This step ensures all channels are clear.
- Install the Jets: Start by screwing in the clean jets back into the carburetor body. Ensure they’re tightly secured, but avoid overtightening.
- Replace the Float: Reinsert the float and float needle into the carburetor. Check that the float moves freely.
- Reattach the Float Bowl: Secure the float bowl by screwing it back onto the carburetor. Ensure a snug fit without crossing the threads.
- Reinstall the Carburetor: Attach the cleaned carburetor back to the engine, aligning it properly with the intake. Secure it using the previously removed bolts.
By following these steps, you can effectively clean your lawn mower’s carburetor, improving its performance and prolonging its life.
Troubleshooting Common Problems
When a lawn mower still shows signs of trouble, despite cleaning the carburetor, specific indicators can help diagnose the issue.
Recommended Products

Warm tip: New high quality 1/4-inch and 5/16-inch universal fuel inline filters, high quality aftermarket replacement parts please check your application whether the item will fit it

Complete 10-Piece Kit with Secure Clamps:Enjoy unmatched value and convenience with our all-inclusive kit. You get ten high-performance fuel filters paired with ten durable, reusable clamps. This ensures a tight, leak-proof seal every time, saving you the hassle of purchasing clamps separately and preparing you for multiple filtration sessions

Comapatible with BS Craftsman MTD Lawn Boy Murray Tory Bilt Cub Cadet Snapper Simplicity push and riding lawn mowers, small engines, generators, pressure washers, Lawn Tractor, snow blowers, tractors, snow throwers.
Signs of a Still Dirty Carburetor
- Difficulty Starting: If the mower struggles to start after a thorough cleaning, the carburetor may still harbor debris.
- Engine Sputtering: Persistent sputtering during operation often indicates that fuel and air aren’t mixing properly.
- Poor Fuel Economy: If you’re refueling frequently despite minimal use, the carburetor could be leaking fuel or running too rich.
- Rough Idling: Irregular engine behavior during idle can signal blockages or residual dirt in the carburetor.
- Use Fresh Fuel: Always use fresh gasoline mixed with an appropriate fuel stabilizer, as old fuel can gum up the carburetor.
- Inspect Fuel Filter: Check and replace the fuel filter regularly to prevent debris from reaching the carburetor.
- Clean Air Filter: A clogged air filter restricts airflow, affecting carburetor performance. Clean or replace it as needed.
- Check Gaskets and Seals: Inspect gaskets for wear and ensure seals are intact to prevent air leaks that can disrupt fuel flow.
- Conduct Regular Maintenance: Make cleaning the carburetor part of your routine maintenance schedule to keep your mower running smoothly.
Conclusion
Cleaning your lawn mower’s carburetor can make a world of difference in its performance. By taking the time to follow the steps outlined in this guide you can prevent frustrating issues like sputtering and hard starts. Regular maintenance not only keeps your mower running smoothly but also extends its lifespan.
Remember to use fresh fuel and check your filters regularly to keep everything in top shape. With a little effort you’ll enjoy a reliable mower that makes lawn care a breeze. Happy mowing!
Frequently Asked Questions
What causes a lawn mower to sputter?
A lawn mower typically sputters due to a dirty carburetor. Debris, old fuel, and other blockages can prevent the proper mixing of air and fuel, impacting engine performance and causing sputtering during operation.
How can I tell if my carburetor is dirty?
Signs of a dirty carburetor include difficulty starting the mower, engine sputtering, poor fuel economy, and rough idling. If you experience any of these issues, cleaning the carburetor may be necessary.
What tools do I need to clean a lawn mower carburetor?
To clean a lawn mower carburetor, you’ll need screwdrivers, pliers, a wrench, cleaning solutions, rags, safety goggles, and gloves. These tools will help you safely disassemble and clean the carburetor effectively.
How do I clean a lawn mower carburetor?
Start by disconnecting the spark plug and shutting off the fuel supply. Remove the carburetor and soak its parts in a cleaning solution. Scrub, rinse, and use compressed air to clear residue before reassembling and reinstalling.
What should I do if my mower still has issues after cleaning?
If the mower continues to sputter or has difficulty starting after cleaning the carburetor, check for fresh fuel, inspect the fuel and air filters, and ensure that all seals and gaskets are in good condition. Regular maintenance is key.