

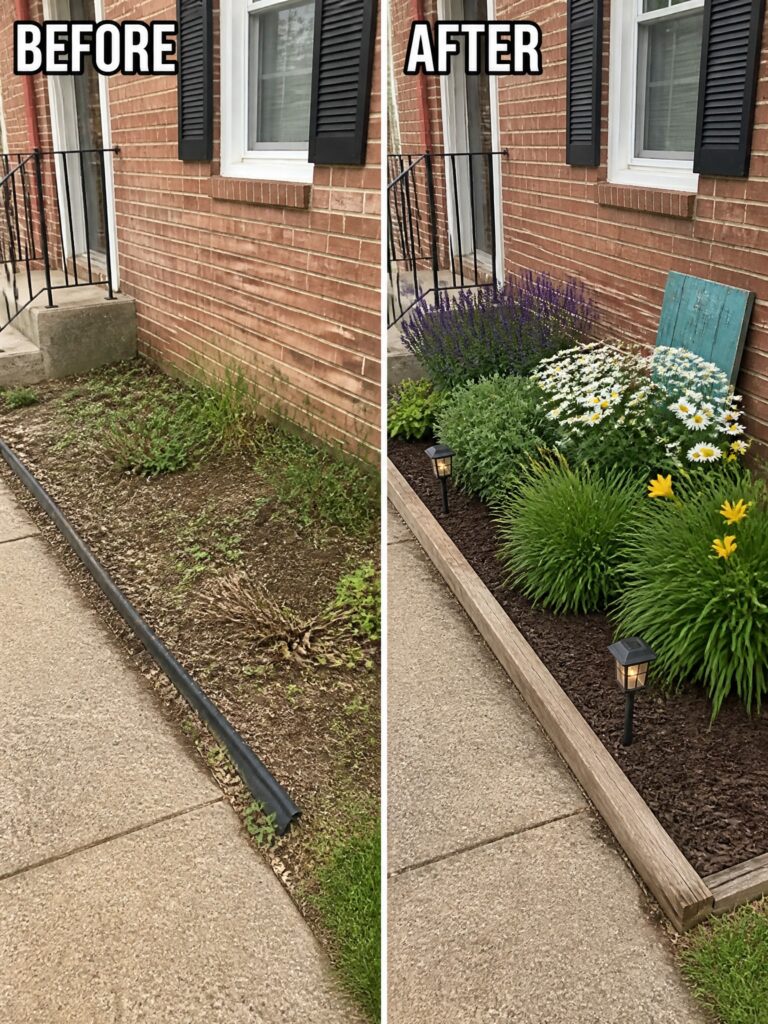
I often notice that front yard beds lose their shape after a while because the plants spill over and the soil edges start to wash away with rain.
Simple adjustments like adding cheap edging or thinning out crowded spots can help the beds sit better against the lawn and give the front of the house a steadier look.
In my yard I found that starting with a good cleanup of weeds and old leaves made the next planting choices much easier to figure out.
These beds tend to improve when you focus on structure first and then add color in layers rather than trying to fix everything at once.
Small tests like that usually show results faster than expected.
Define Front Beds With Simple Wood Edging
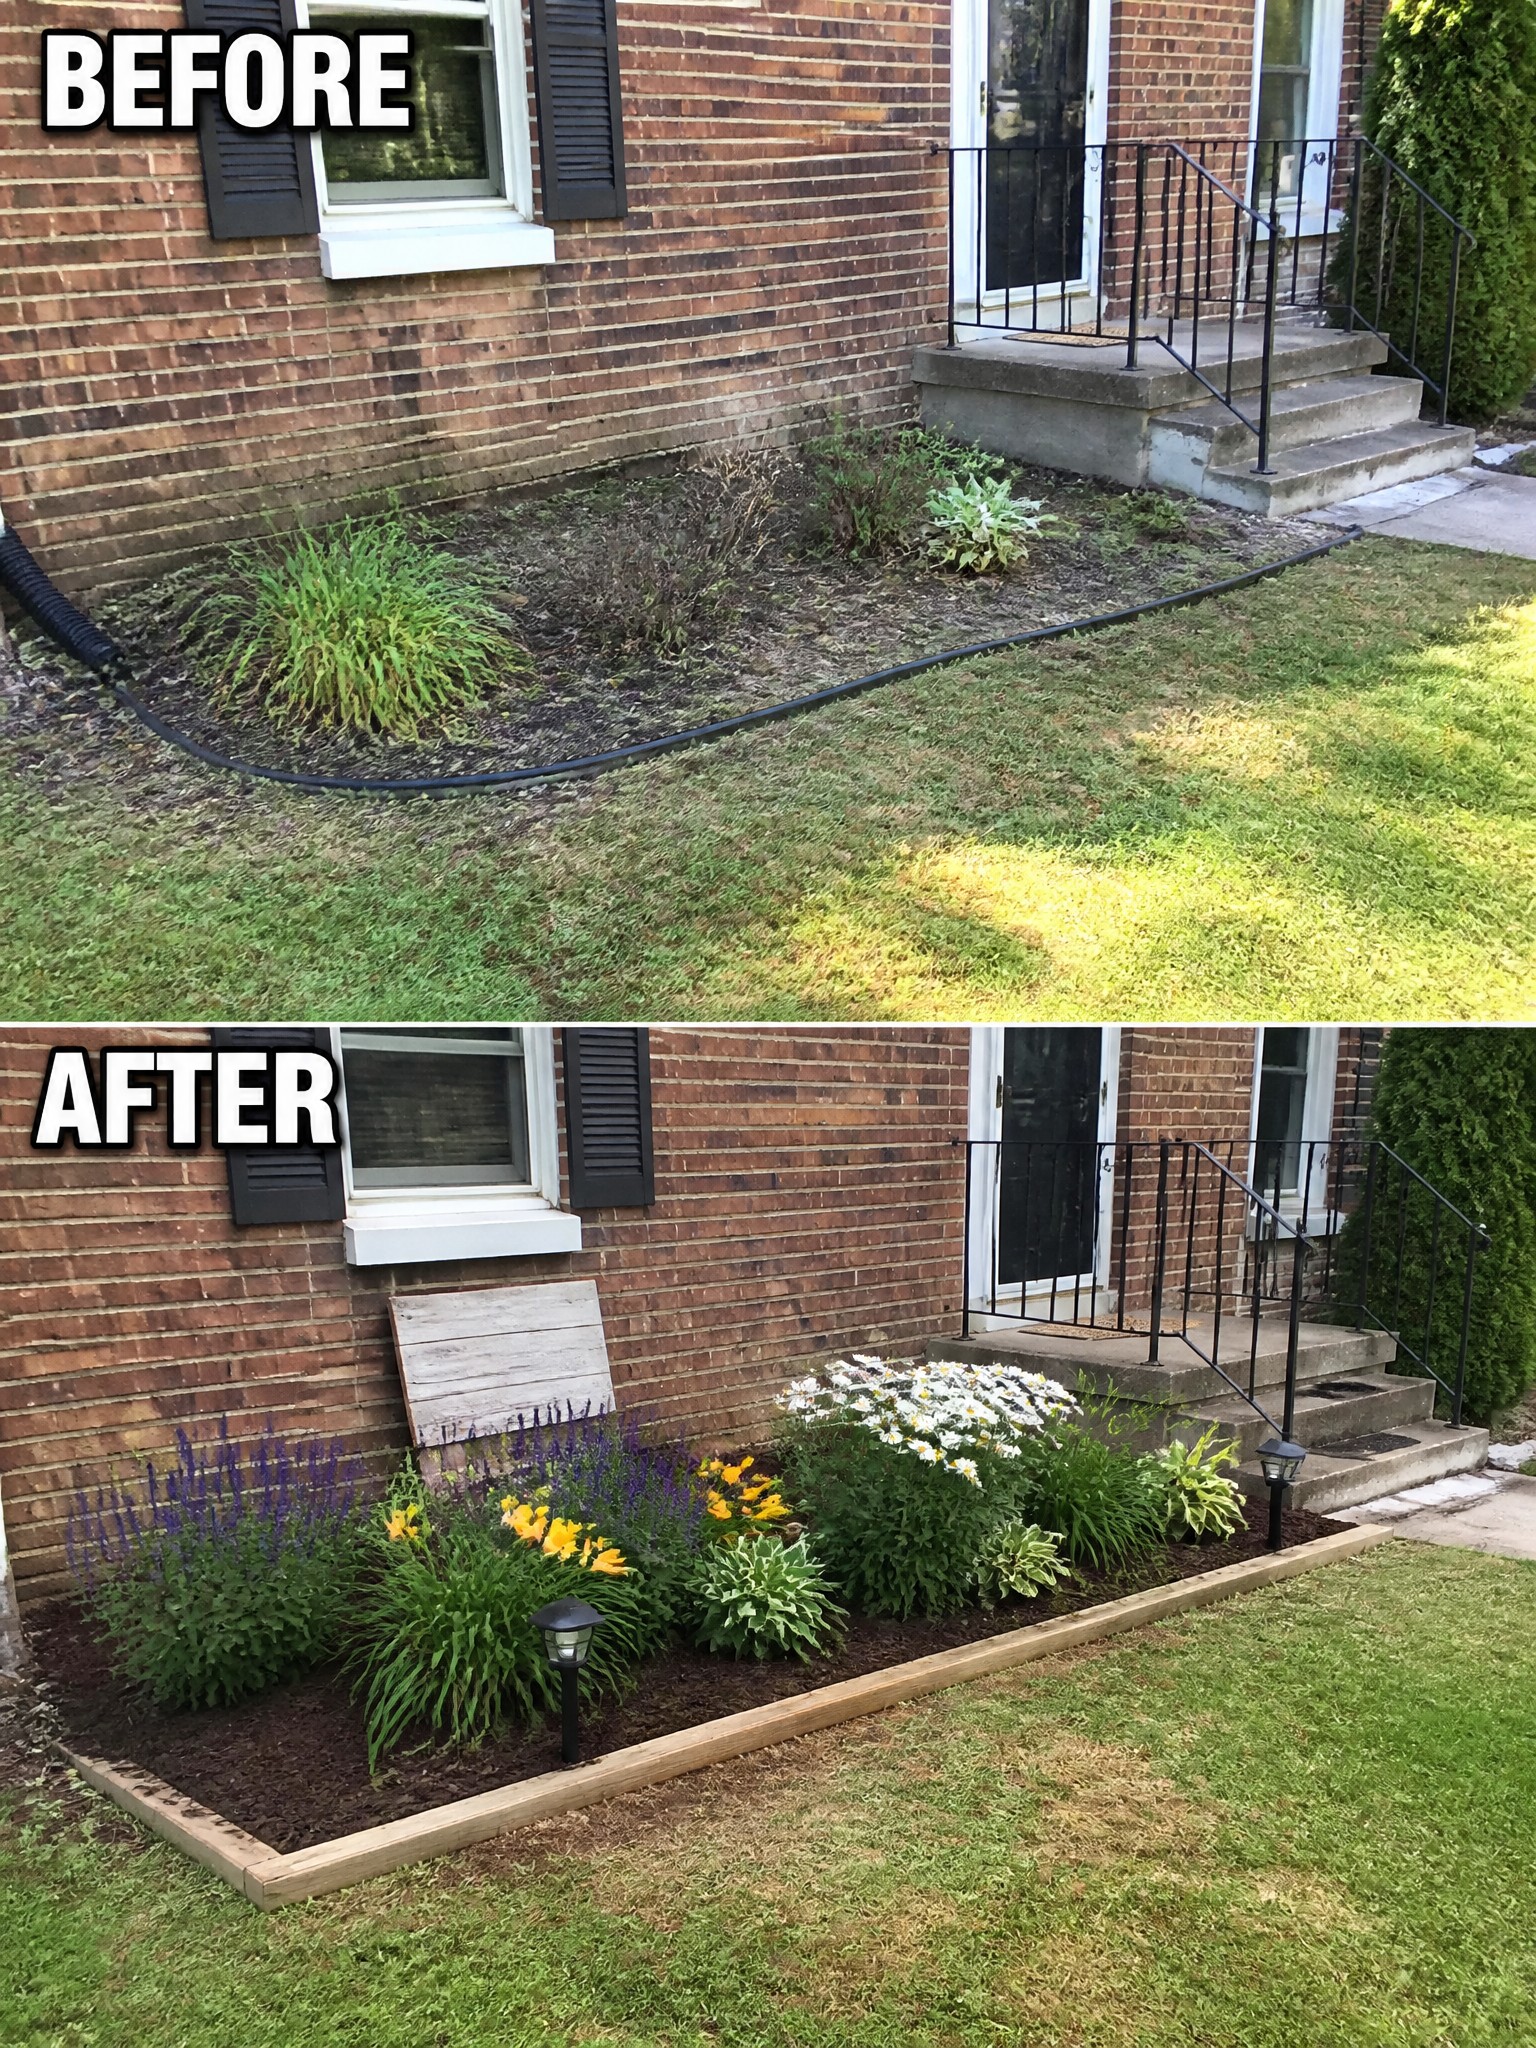
Adding a basic border turns an overgrown strip beside the house into a real garden bed. The before photo shows weeds, bare spots, and no clear edge, while the after shows a straight wood frame filled with mulch and grouped plants that stay in place.
This idea suits narrow areas along a foundation where the lawn keeps creeping in. Mark the shape first, then install the edging before planting so everything stays contained and easier to maintain over time.
Add Gravel Beds To Clean Up A Narrow Front Strip
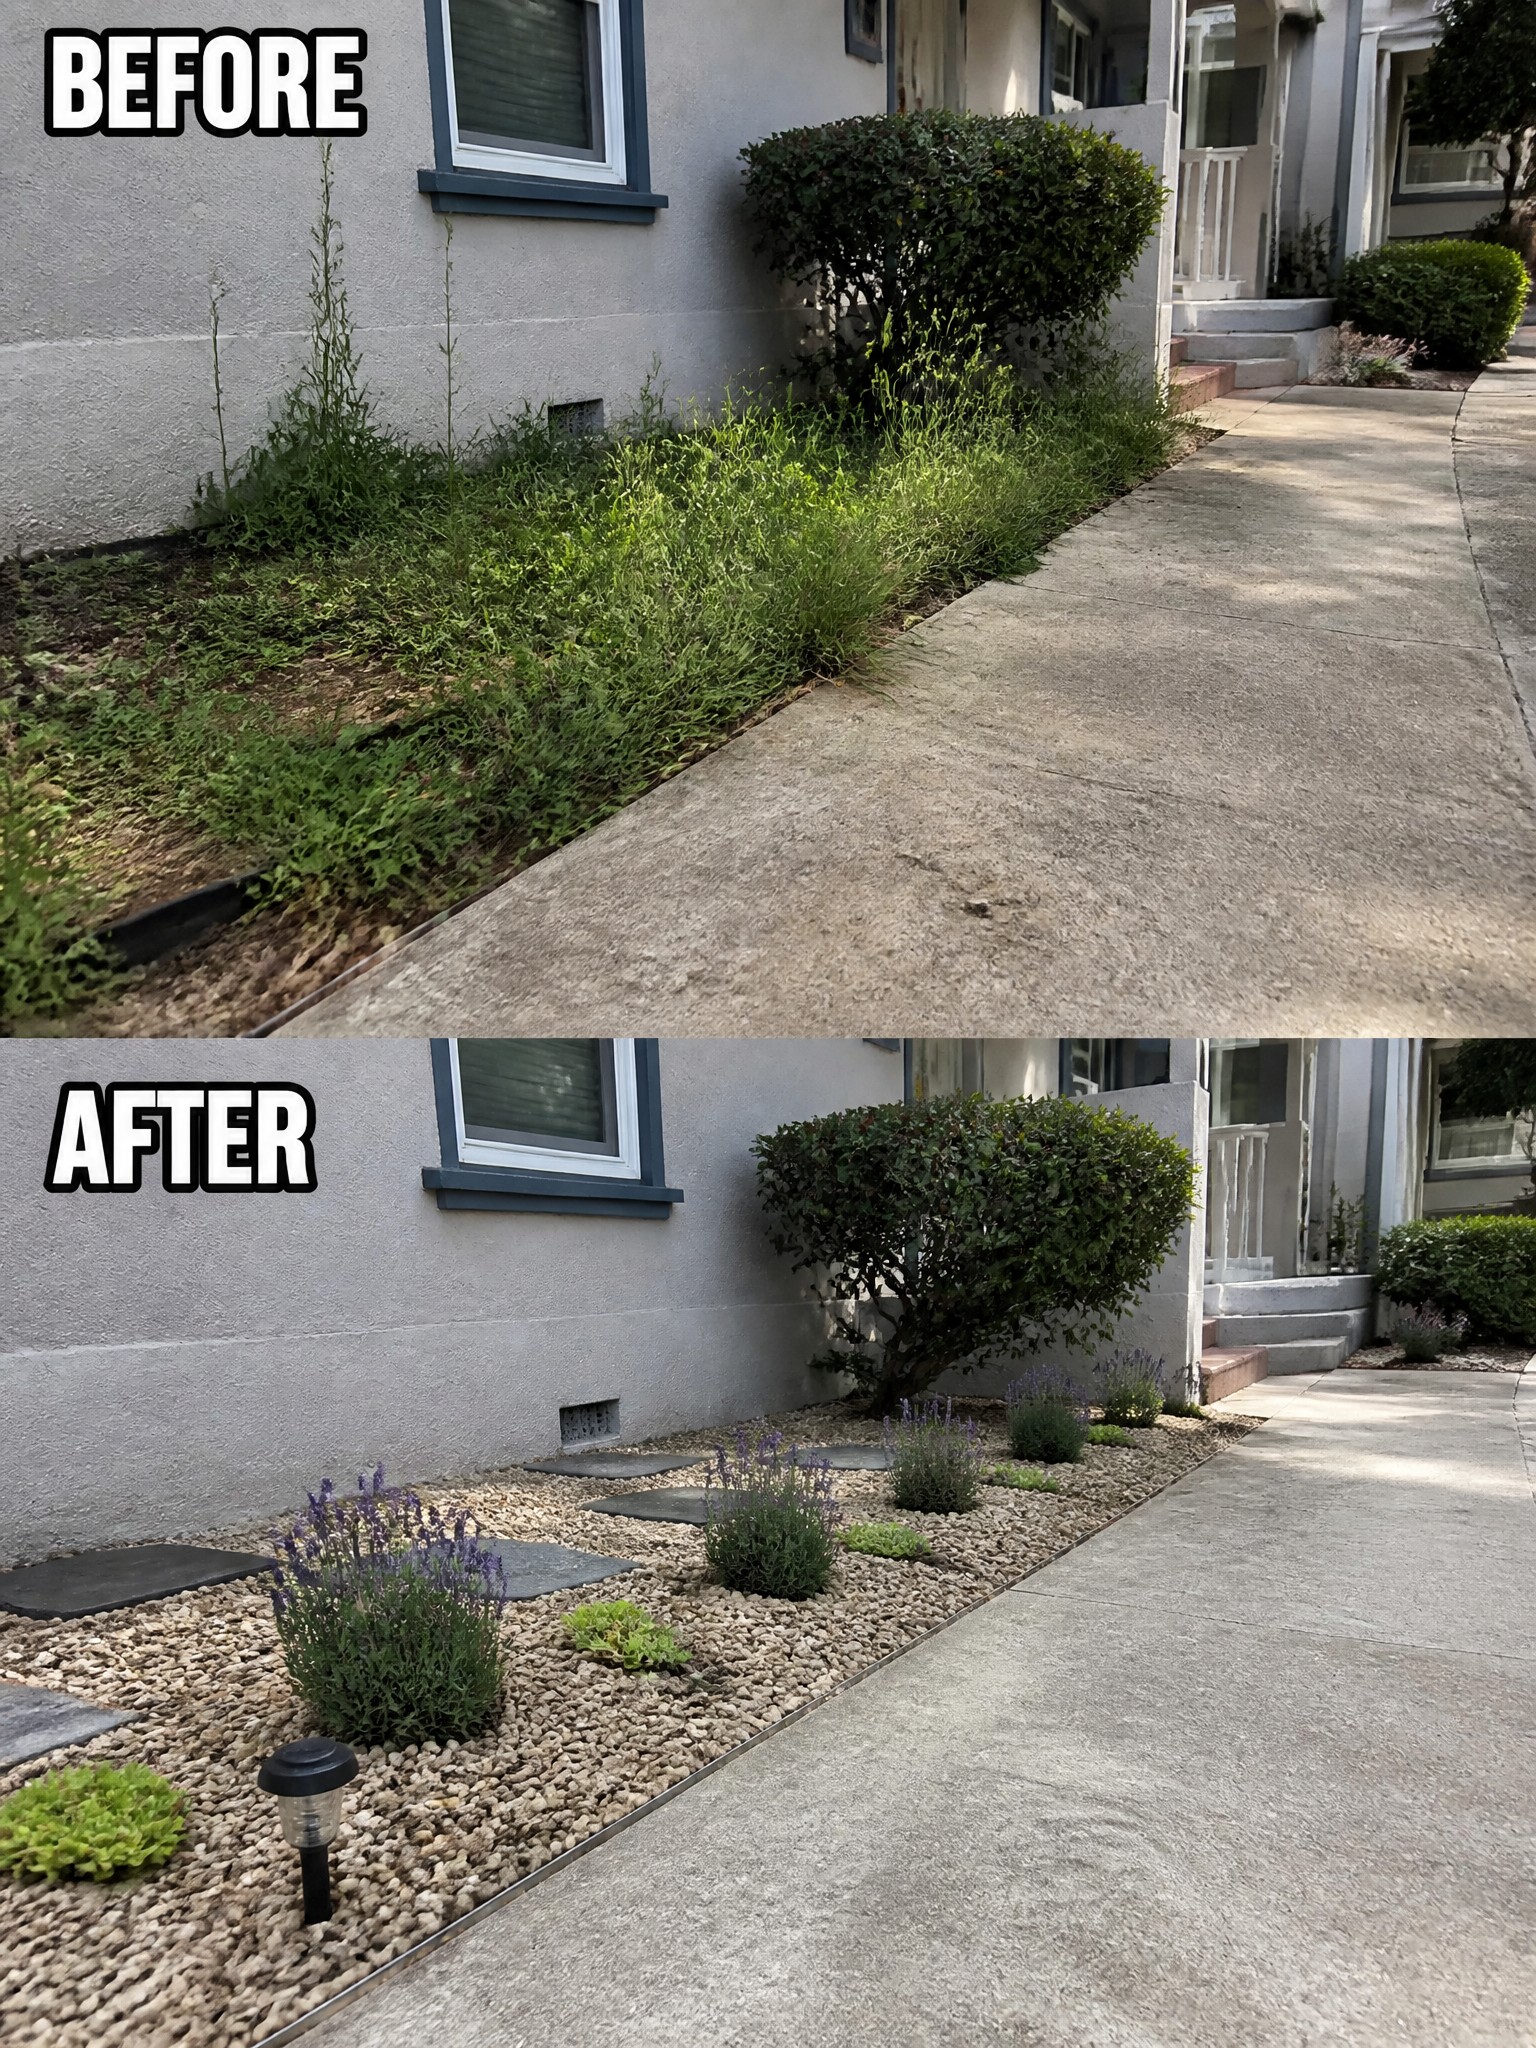
The before photo shows weeds and grass running wild right up against the house. In the after, the same narrow strip is covered in gravel with a few lavender plants and stepping stones set in place. The change turns a messy edge into something that looks planned and easy to keep up.
This idea works best along the front of a house where regular grass is hard to mow or water. Clear the area first, then lay gravel to hold the soil and stop new weeds. A few tough plants like lavender are enough to add color without crowding the space or needing much care.
Add Raised Beds To Clean Up Bare Foundation Areas
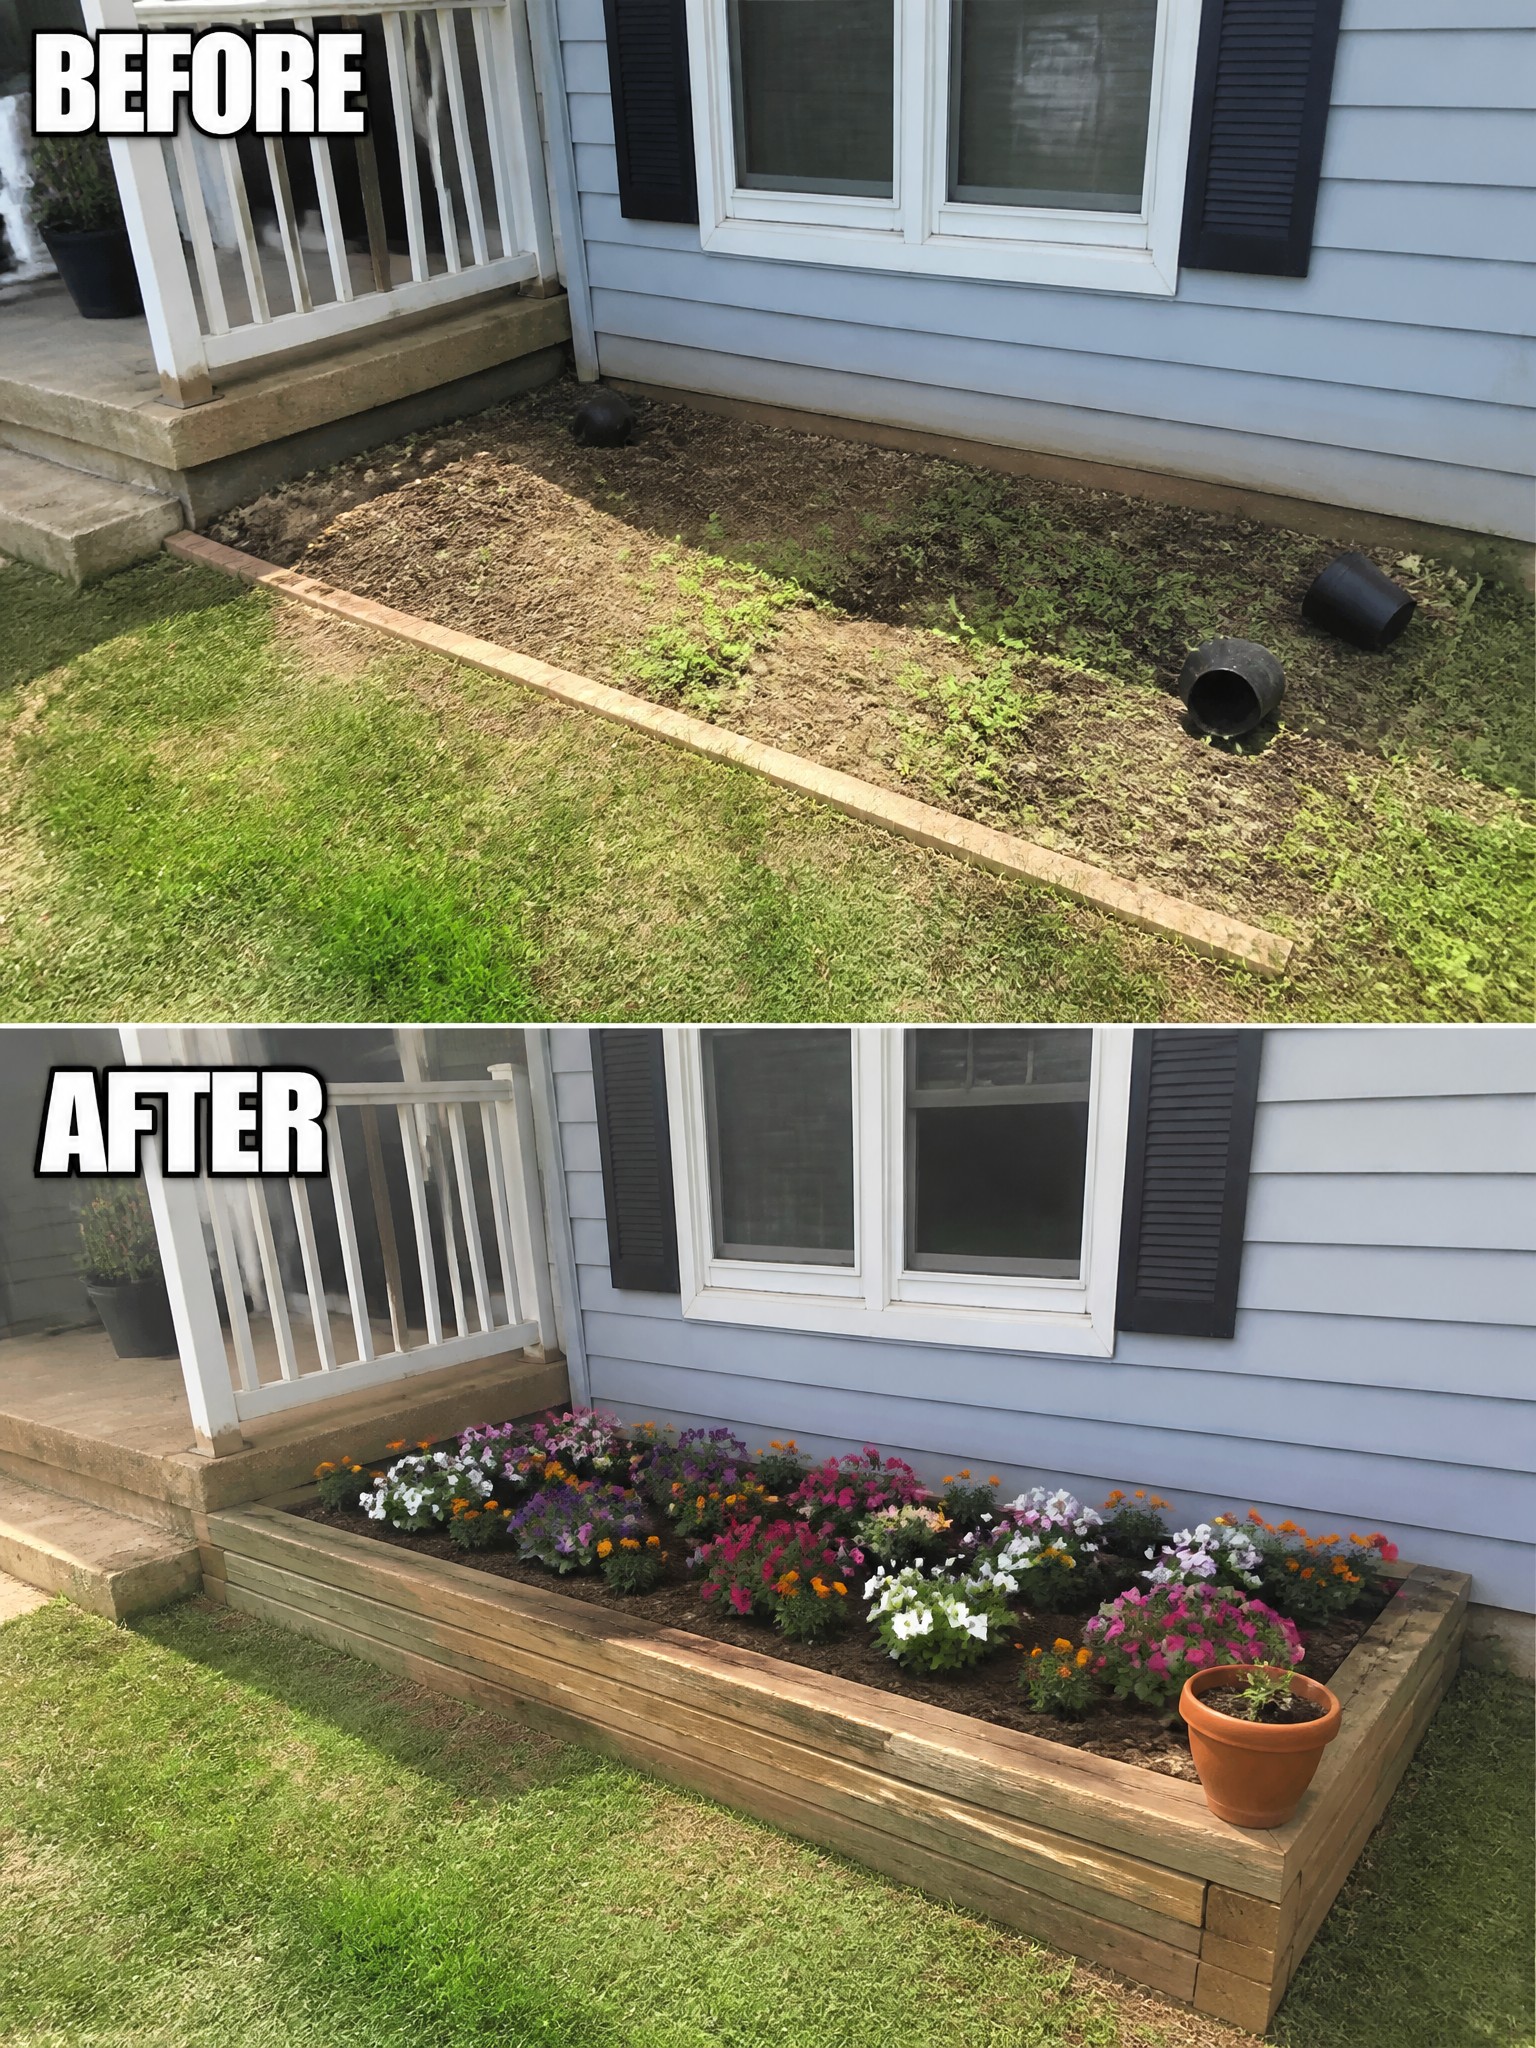
A bare dirt strip next to the house often looks unfinished and hard to maintain. Building a simple raised wooden bed gives the space clear edges and turns weedy ground into a place for flowers. The change from scattered pots and uneven soil to a contained planting area makes the whole side of the house look more cared for.
This works best along foundations where grass refuses to grow or where you want low-maintenance color. Use basic lumber for the frame, keep the height modest so it does not block windows, and fill it with soil that drains well. Stick to one or two plant types at first so the bed stays easy to manage.
Add Simple Edging To Shape Front Beds
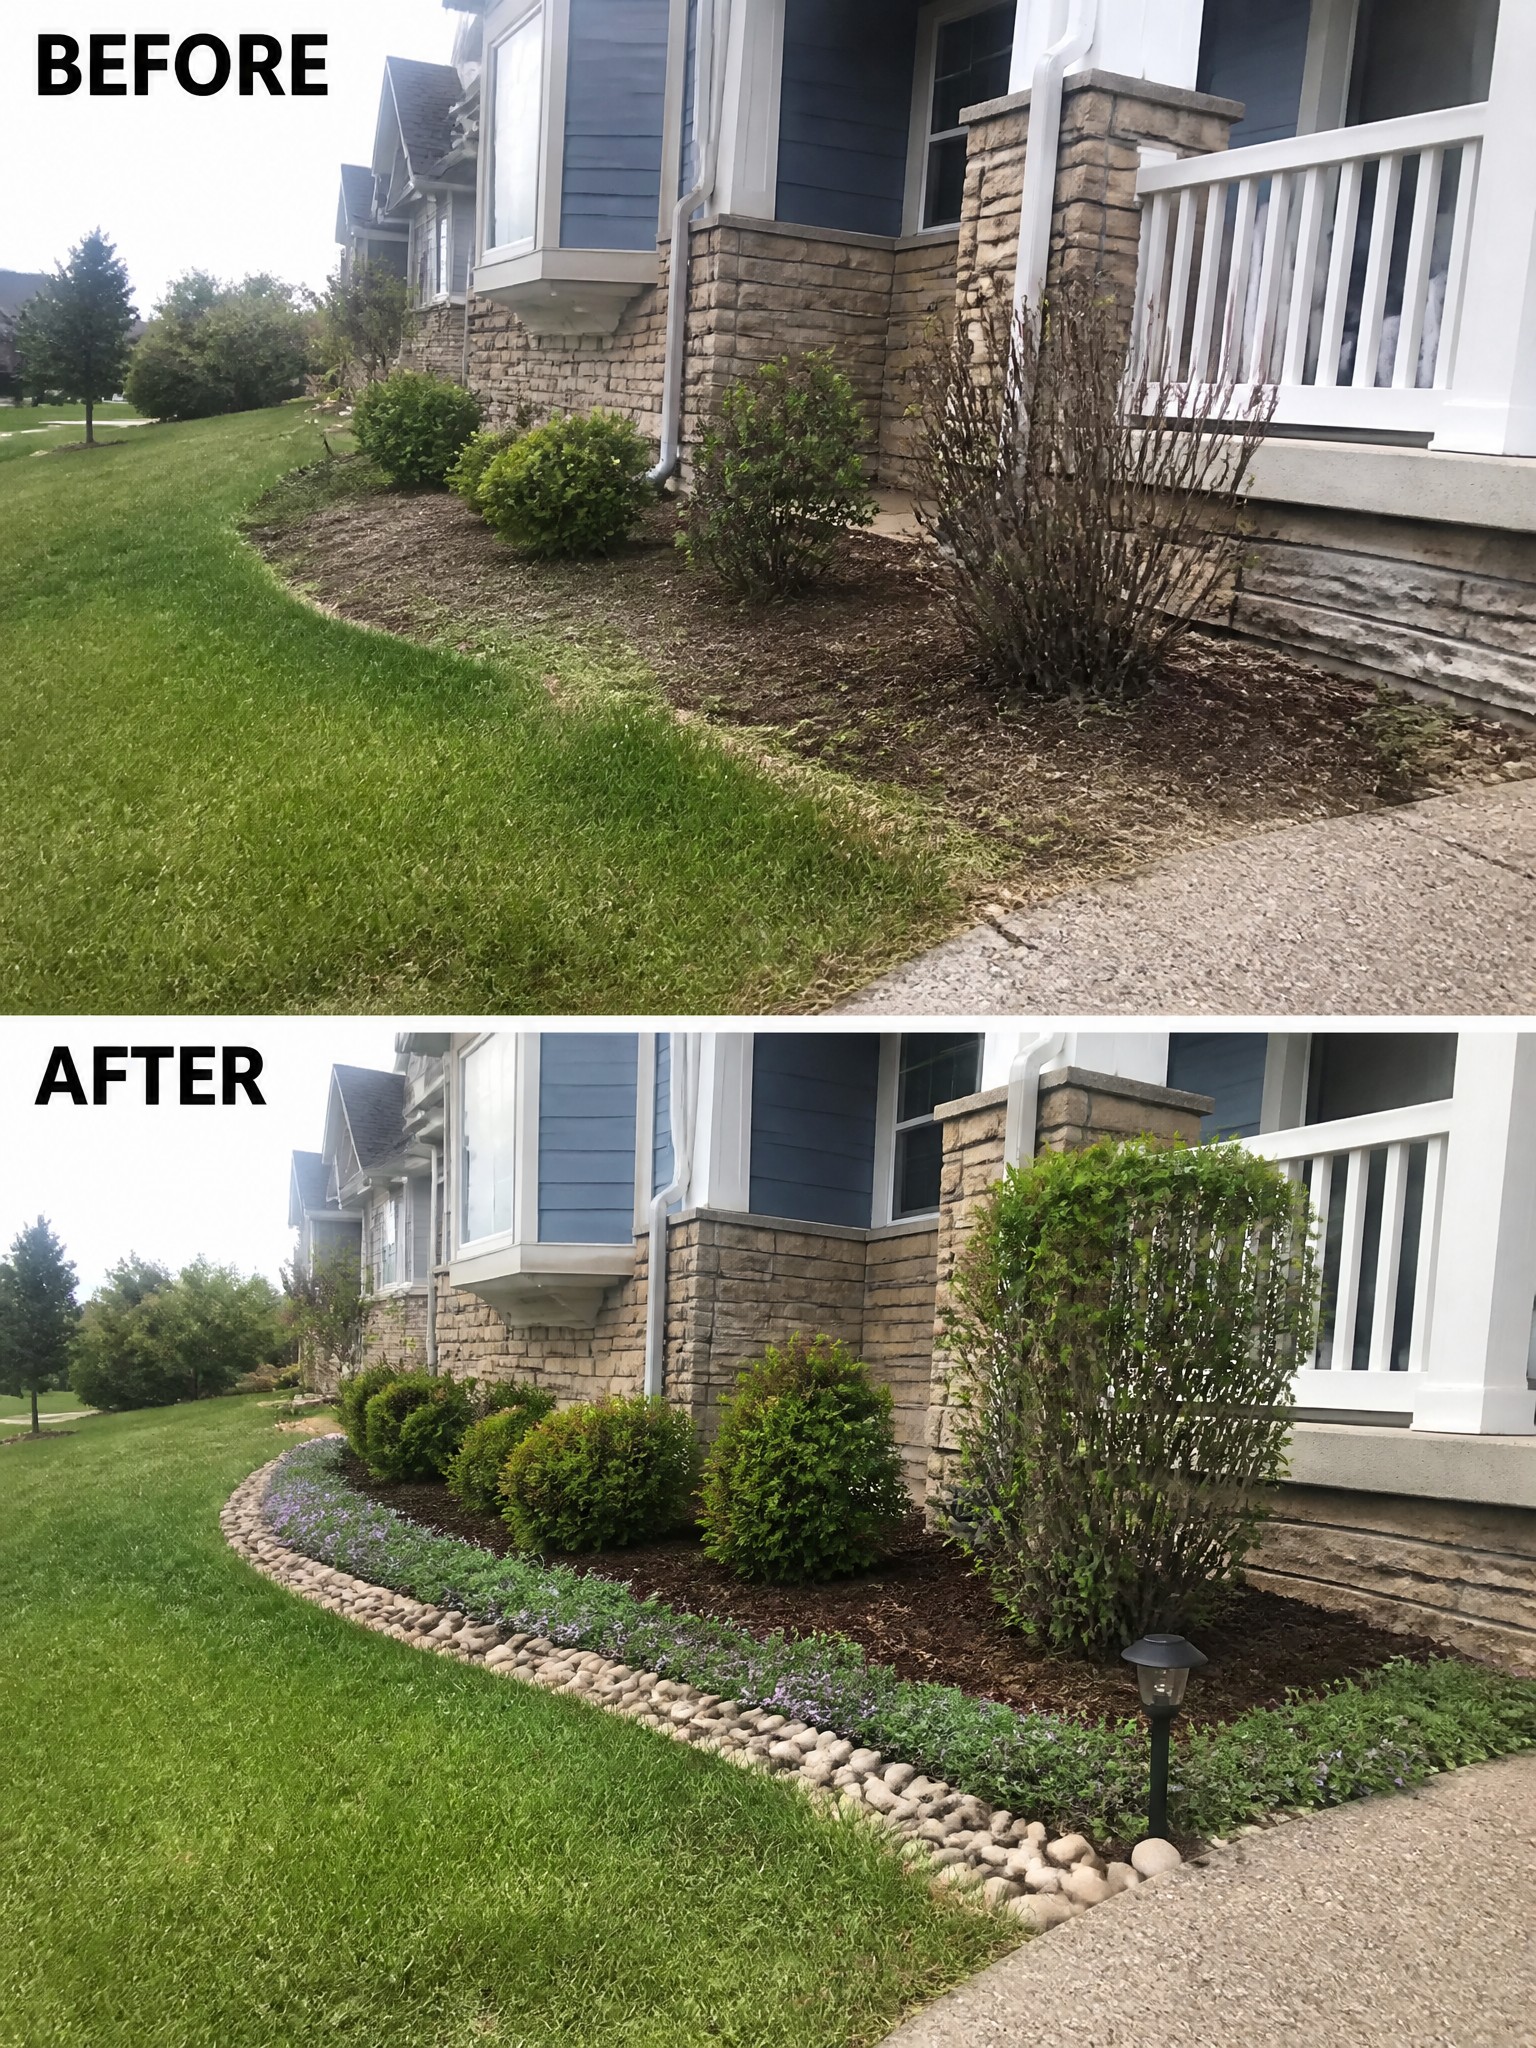
The main change here is turning a messy strip of dirt and scattered shrubs into a clear garden bed. Adding a low stone border gives the area a finished look and keeps mulch and plants from spilling onto the lawn. The plants stay the same in many spots, but the edge makes everything feel more intentional.
This idea works well on any home where the foundation planting looks a little loose. Start with a simple edging material that matches your house style, then fill in with a few layers of shrubs and ground cover. Keep the bed a consistent width so mowing stays easy and the whole front stays neat without much extra work.
Add Structure To An Overgrown Foundation Bed
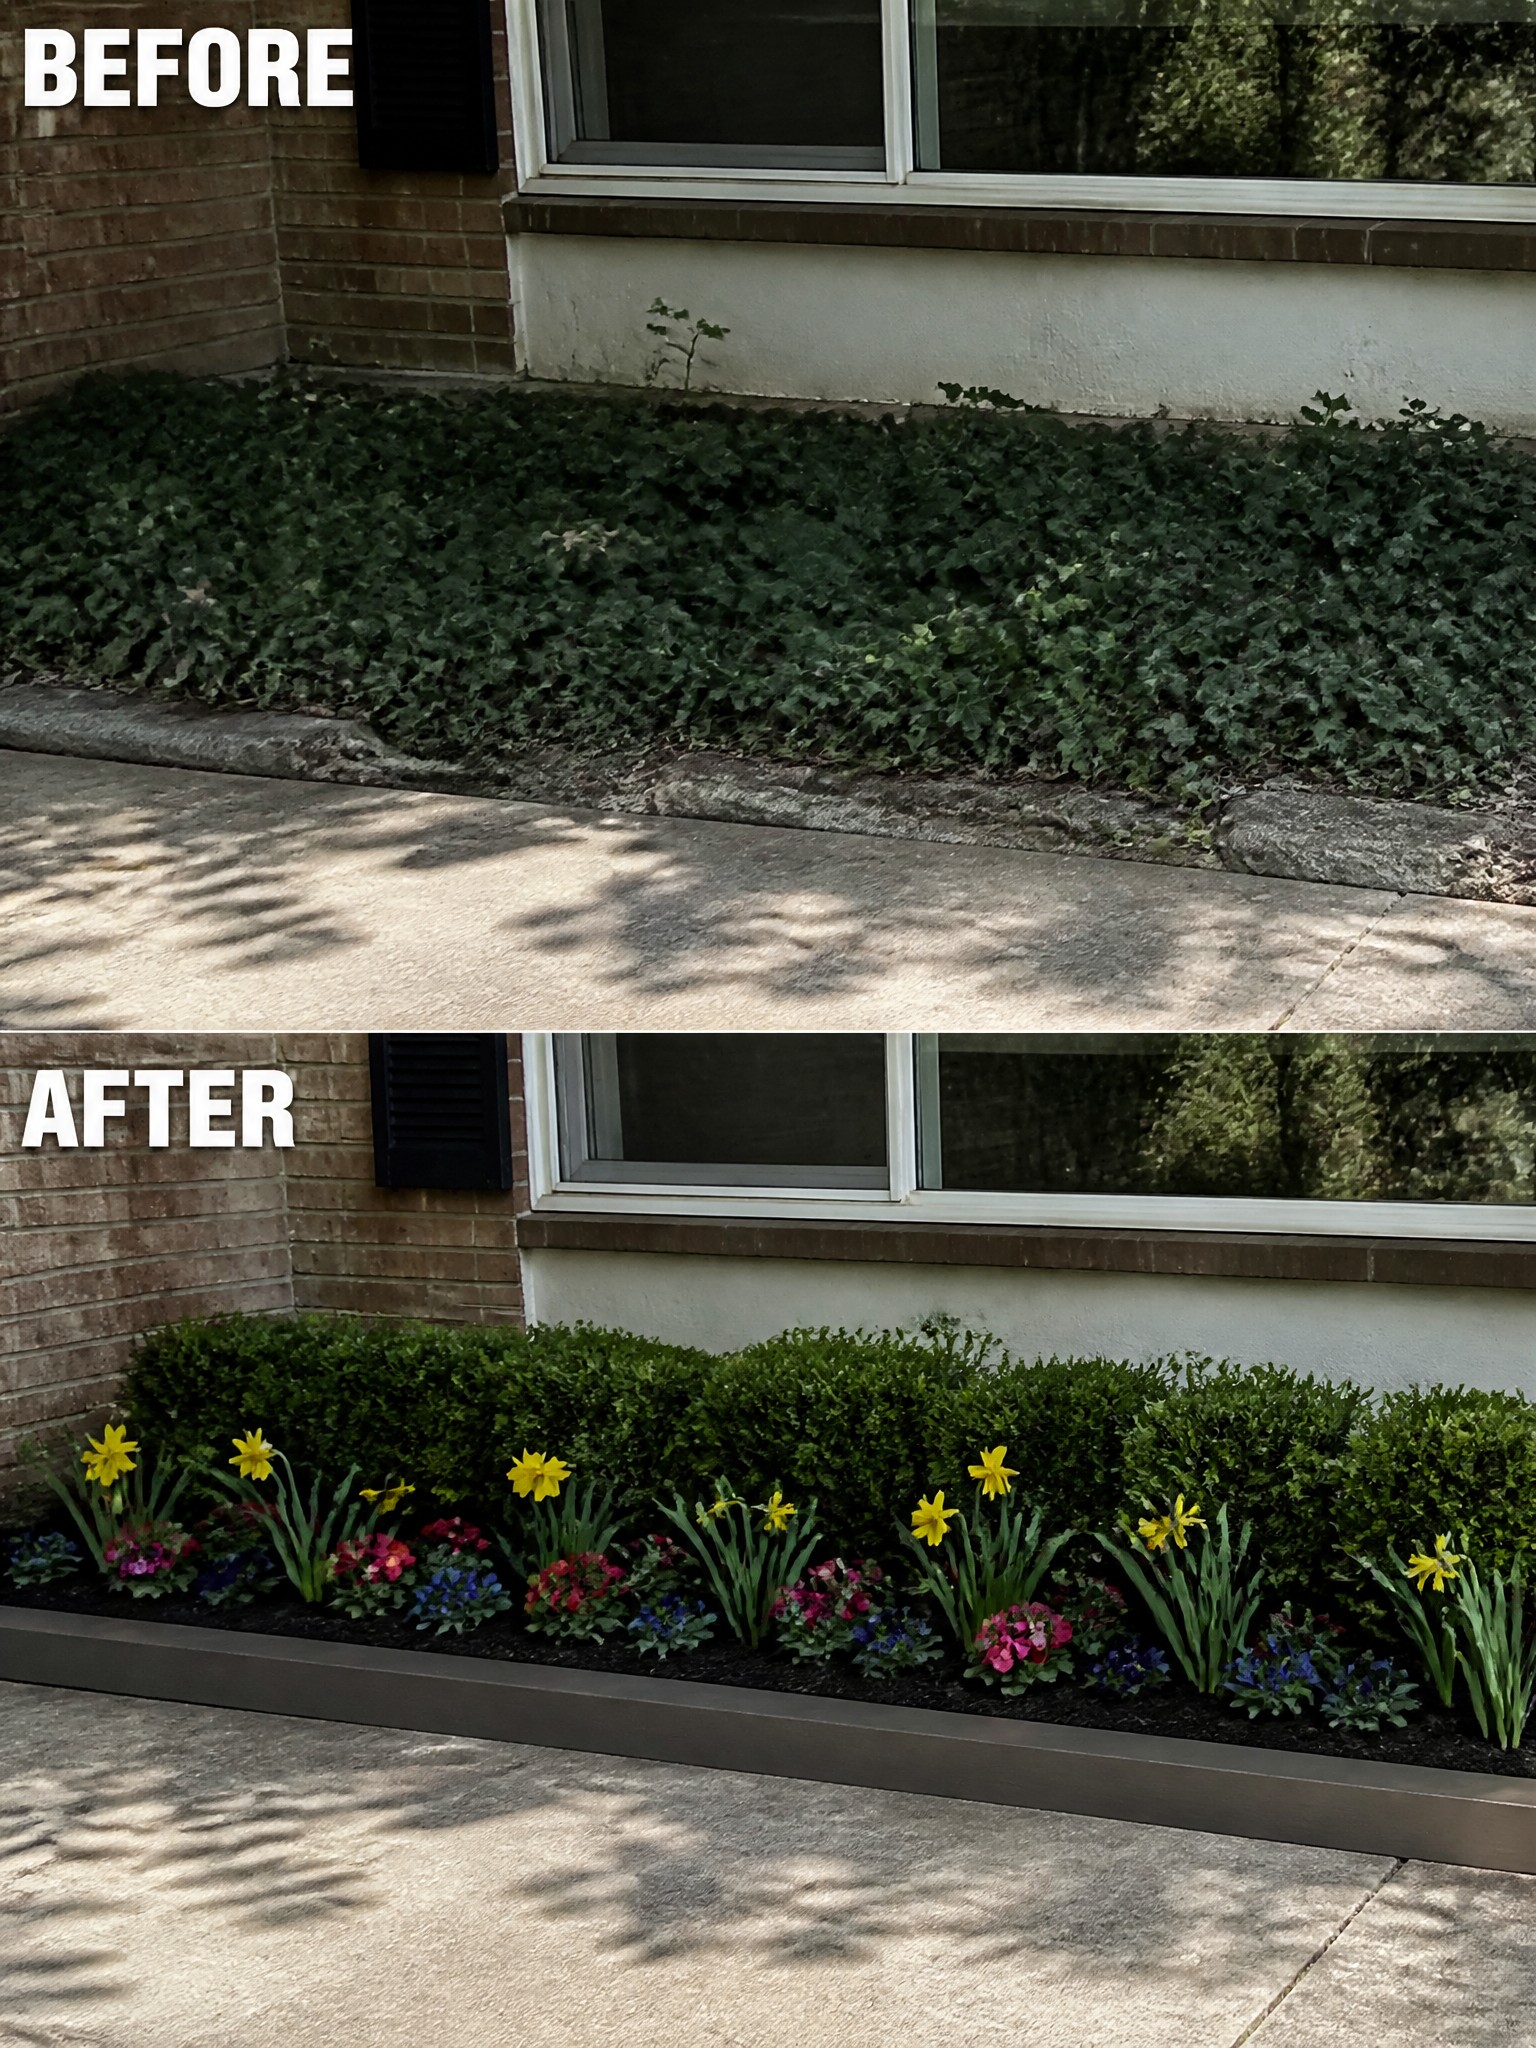
The before photo shows a thick mat of ivy running right up against the house with no clear edge or shape. In the after photo, a simple metal border and dark mulch create a clean line, while a mix of shrubs, daffodils, and smaller flowers fill the bed in layers. The change turns a messy strip into something that looks intentional and easier to maintain.
This approach works well along any house foundation where plants have grown out of control. Start by cutting back the overgrowth, then install a low edging to hold the shape. From there, plant taller shrubs at the back and smaller flowers toward the front so nothing crowds the wall or walkway.
Define Tree Beds With Simple Brick Edging
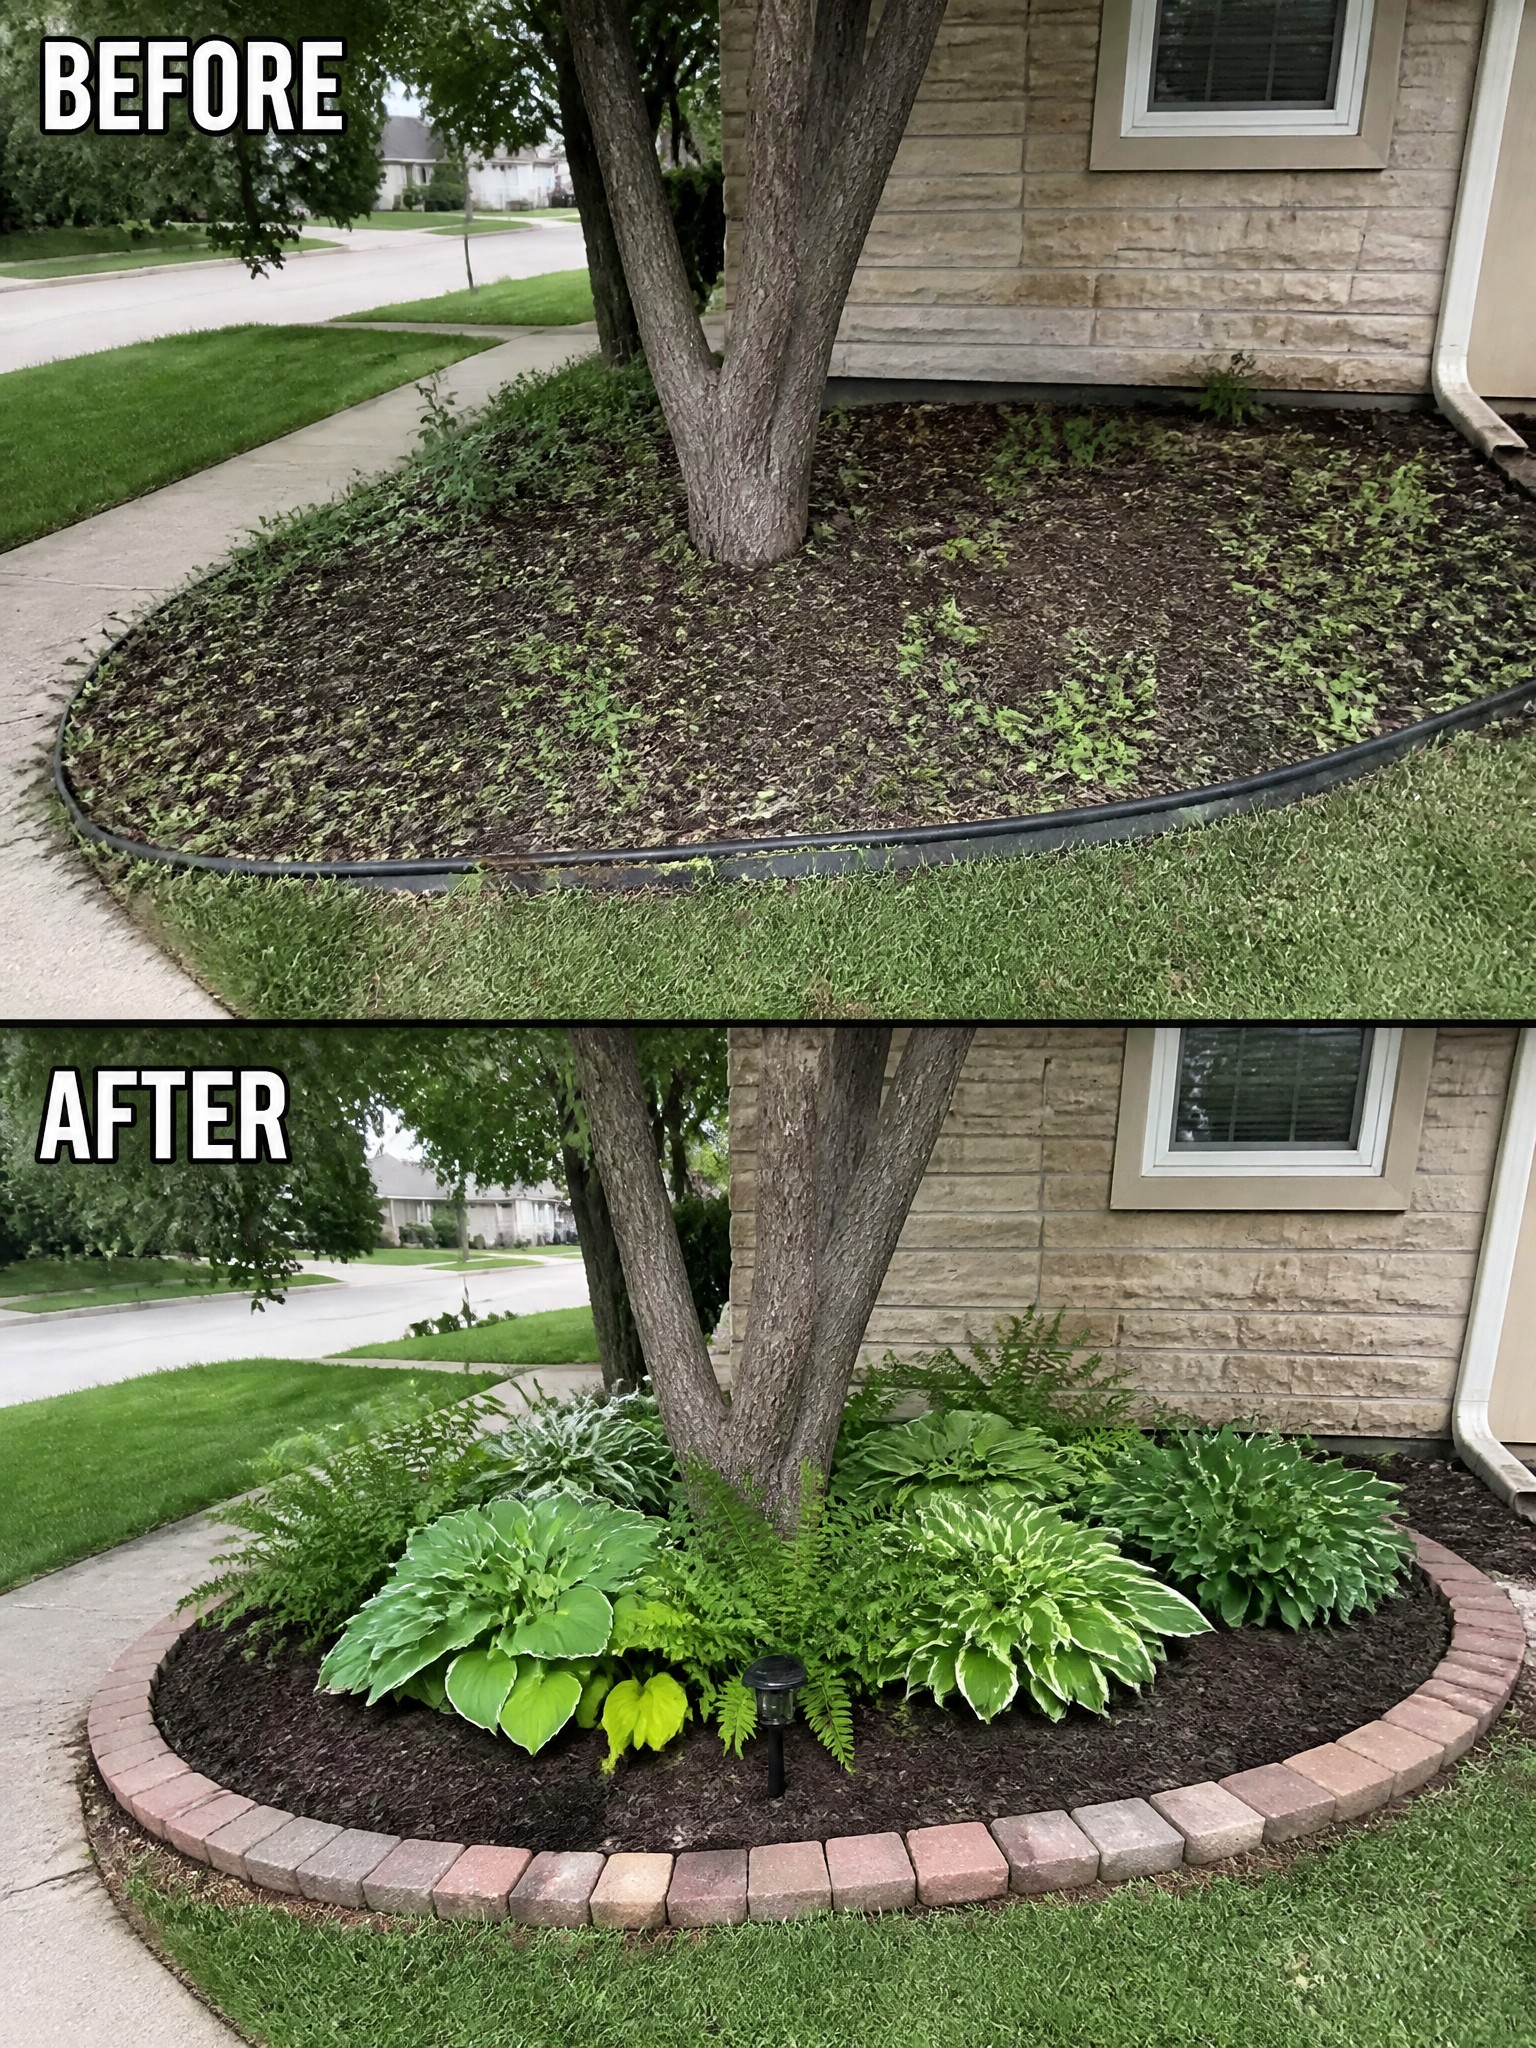
Adding a clear edge around a tree turns a messy patch of mulch into a real garden bed. The loose weeds and scattered mulch in the first photo give way to a tidy brick border that holds fresh mulch and a simple planting of hostas and ferns. The change makes the whole front look more cared for without moving the tree or changing the lawn.
This idea works best in older yards where trees sit right in the grass. Clean the area first, put down edging to hold the shape, then fill with shade plants that fit the spot. The border keeps mulch from spreading and makes the bed easier to maintain over time.
Add Structure To A Narrow Fence Border With Pots And Vines
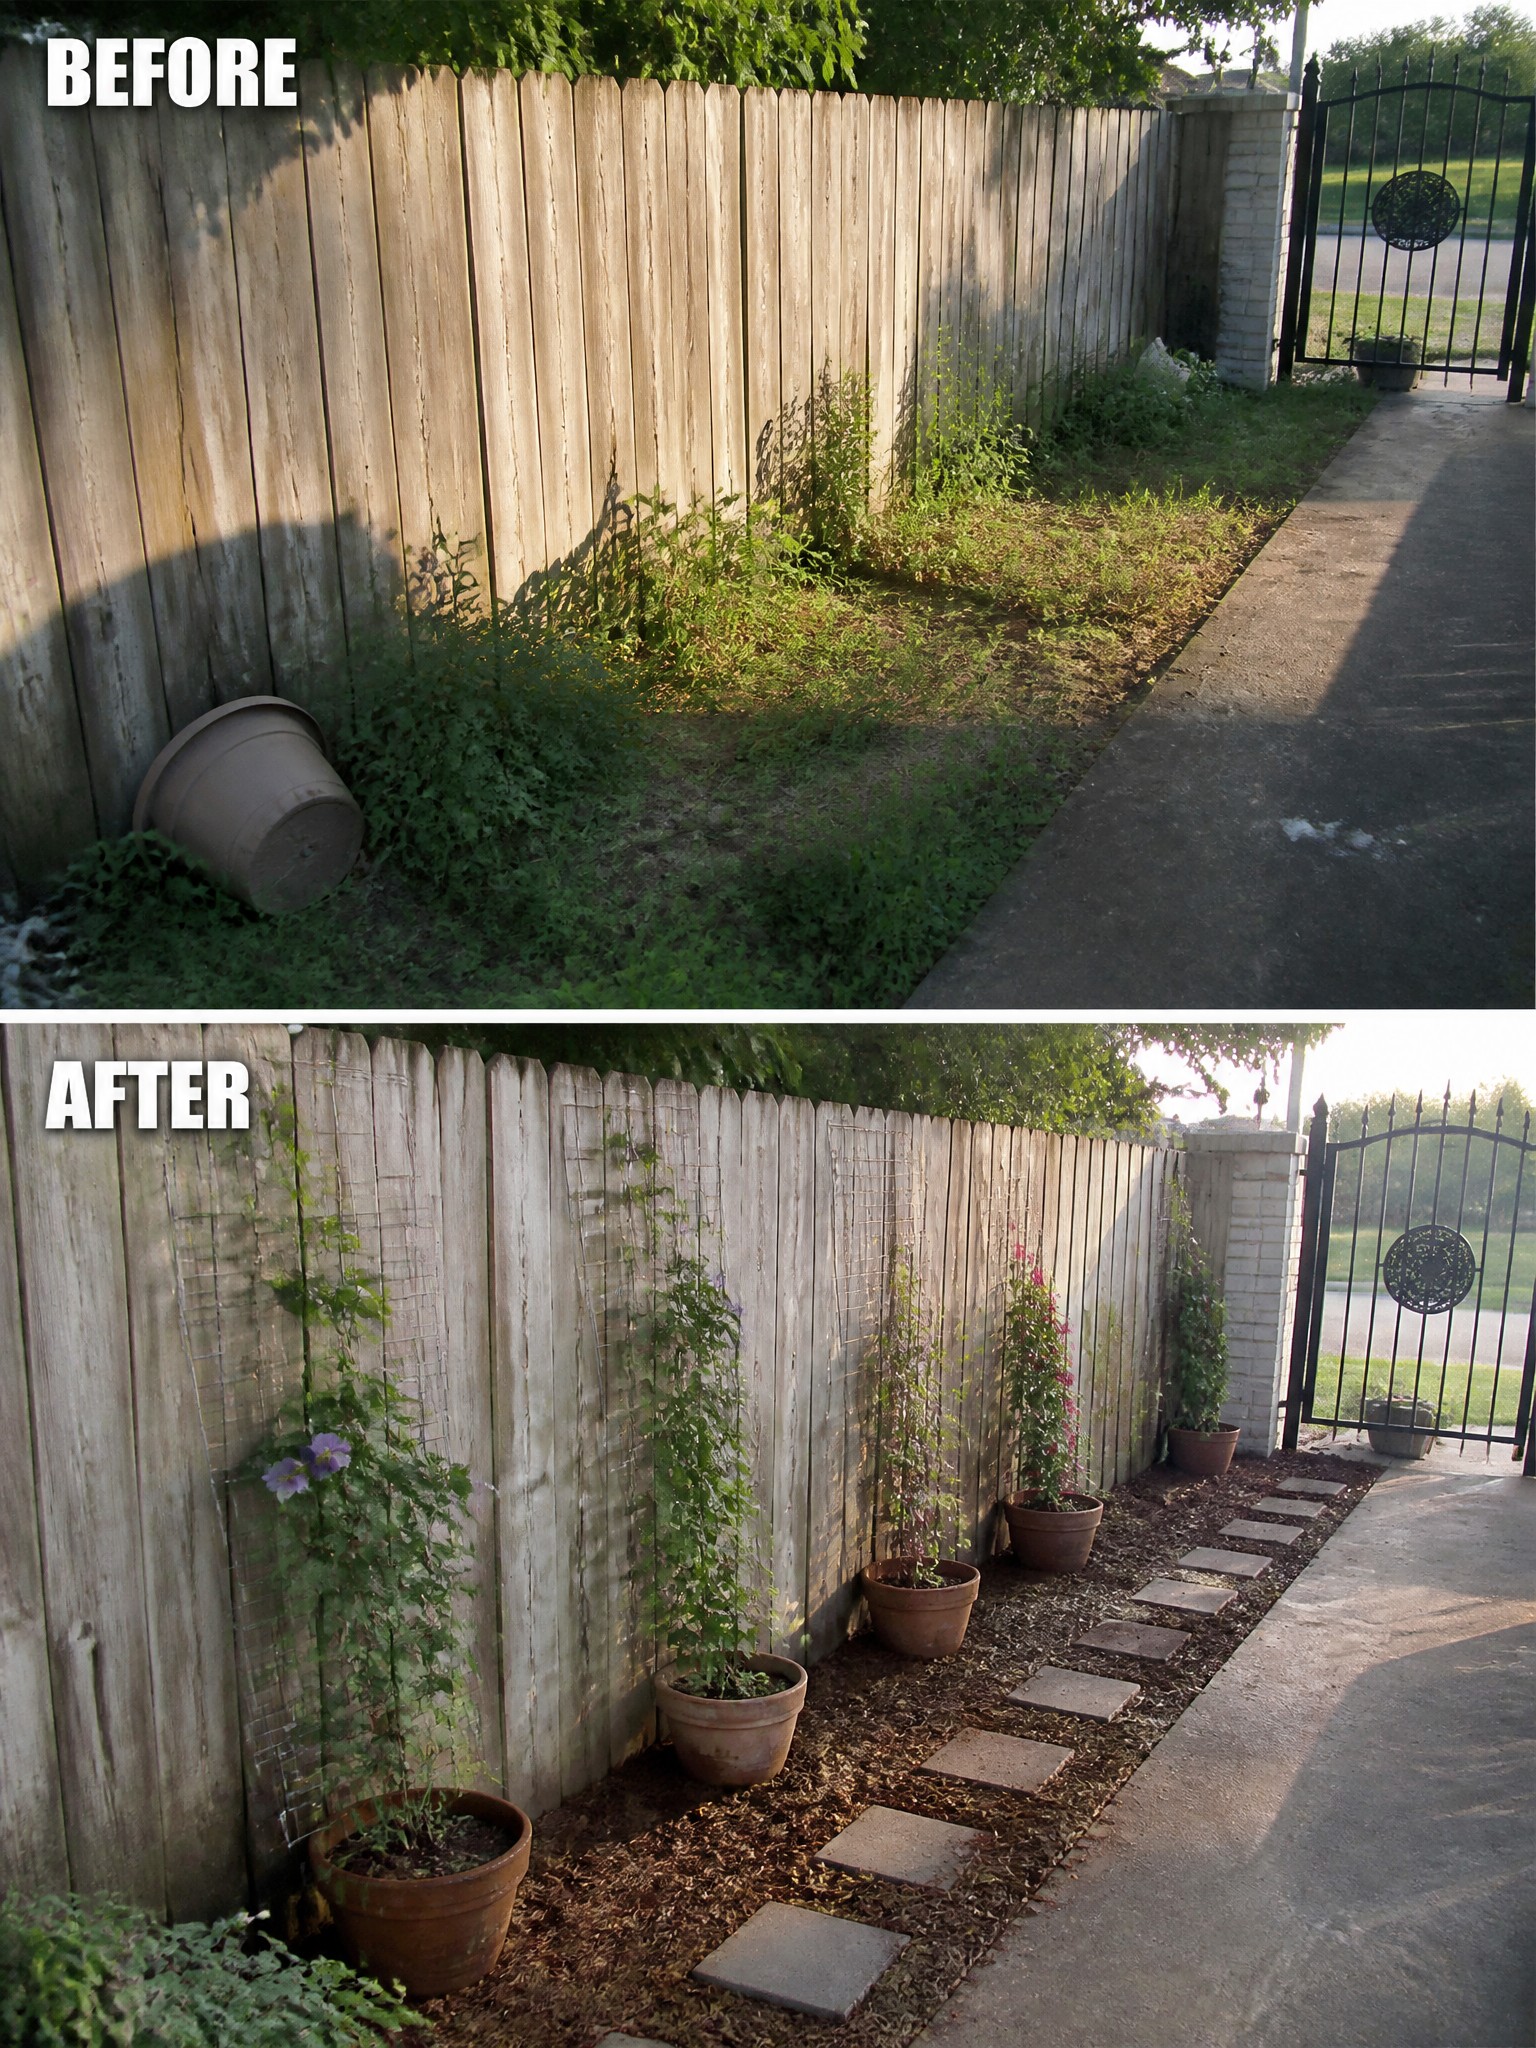
An overgrown strip along a fence often looks worse than it is. Clearing the weeds first, then setting down a few large pots and simple wire trellises, turns the same narrow space into something that feels planned. The vines quickly cover the fence and the pots keep everything contained so the area stays neat instead of spreading.
This approach works well on any long, skinny border where digging new beds is not practical. Start with a few matching pots in the same size, place them at even intervals, and add a basic trellis behind each one. Mulch the ground between the pots and lay a few stepping stones if you want a clear path. The result stays low-cost and easy to adjust later.
Define Front Beds With A Simple Path
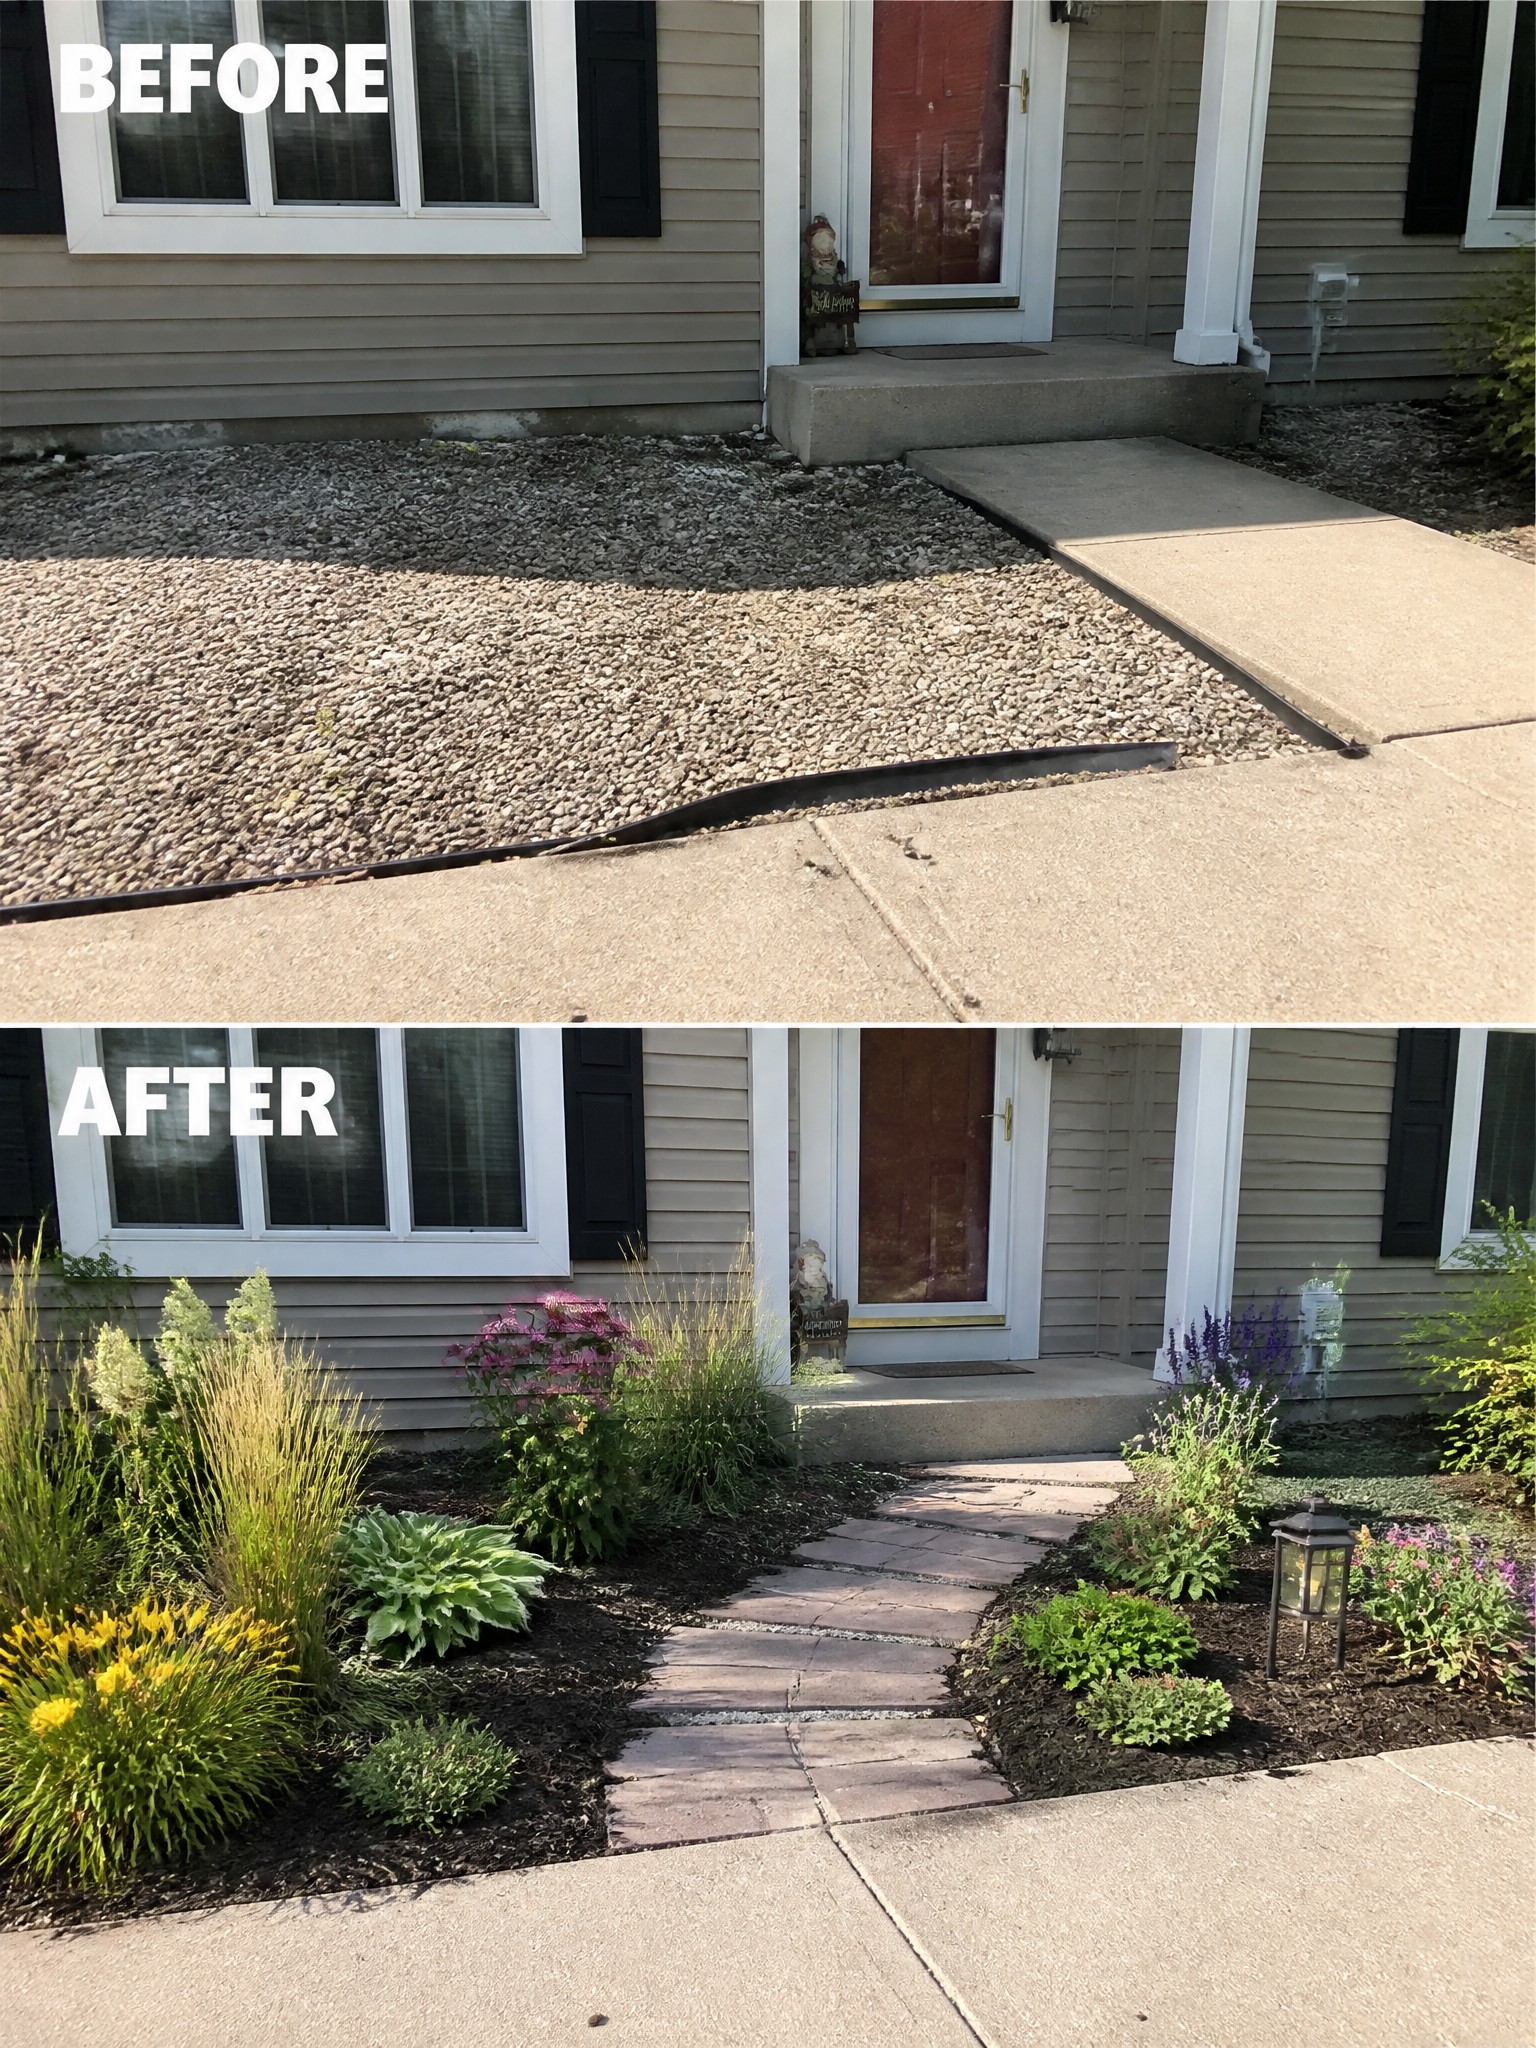
A wide stretch of gravel right against the house often leaves the front looking unfinished and hard to maintain. Adding a stone path and mulched beds on either side gives the space clear shape and turns the same area into something that feels intentional.
This approach works well on narrow front strips where you want planting without losing access to the door. Start with the path to set the layout, then fill the beds with mulch and a mix of low shrubs and perennials. The key is keeping the beds a consistent width so the whole front stays easy to mow around and weed.
Define A Foundation Bed With Edging And Gravel
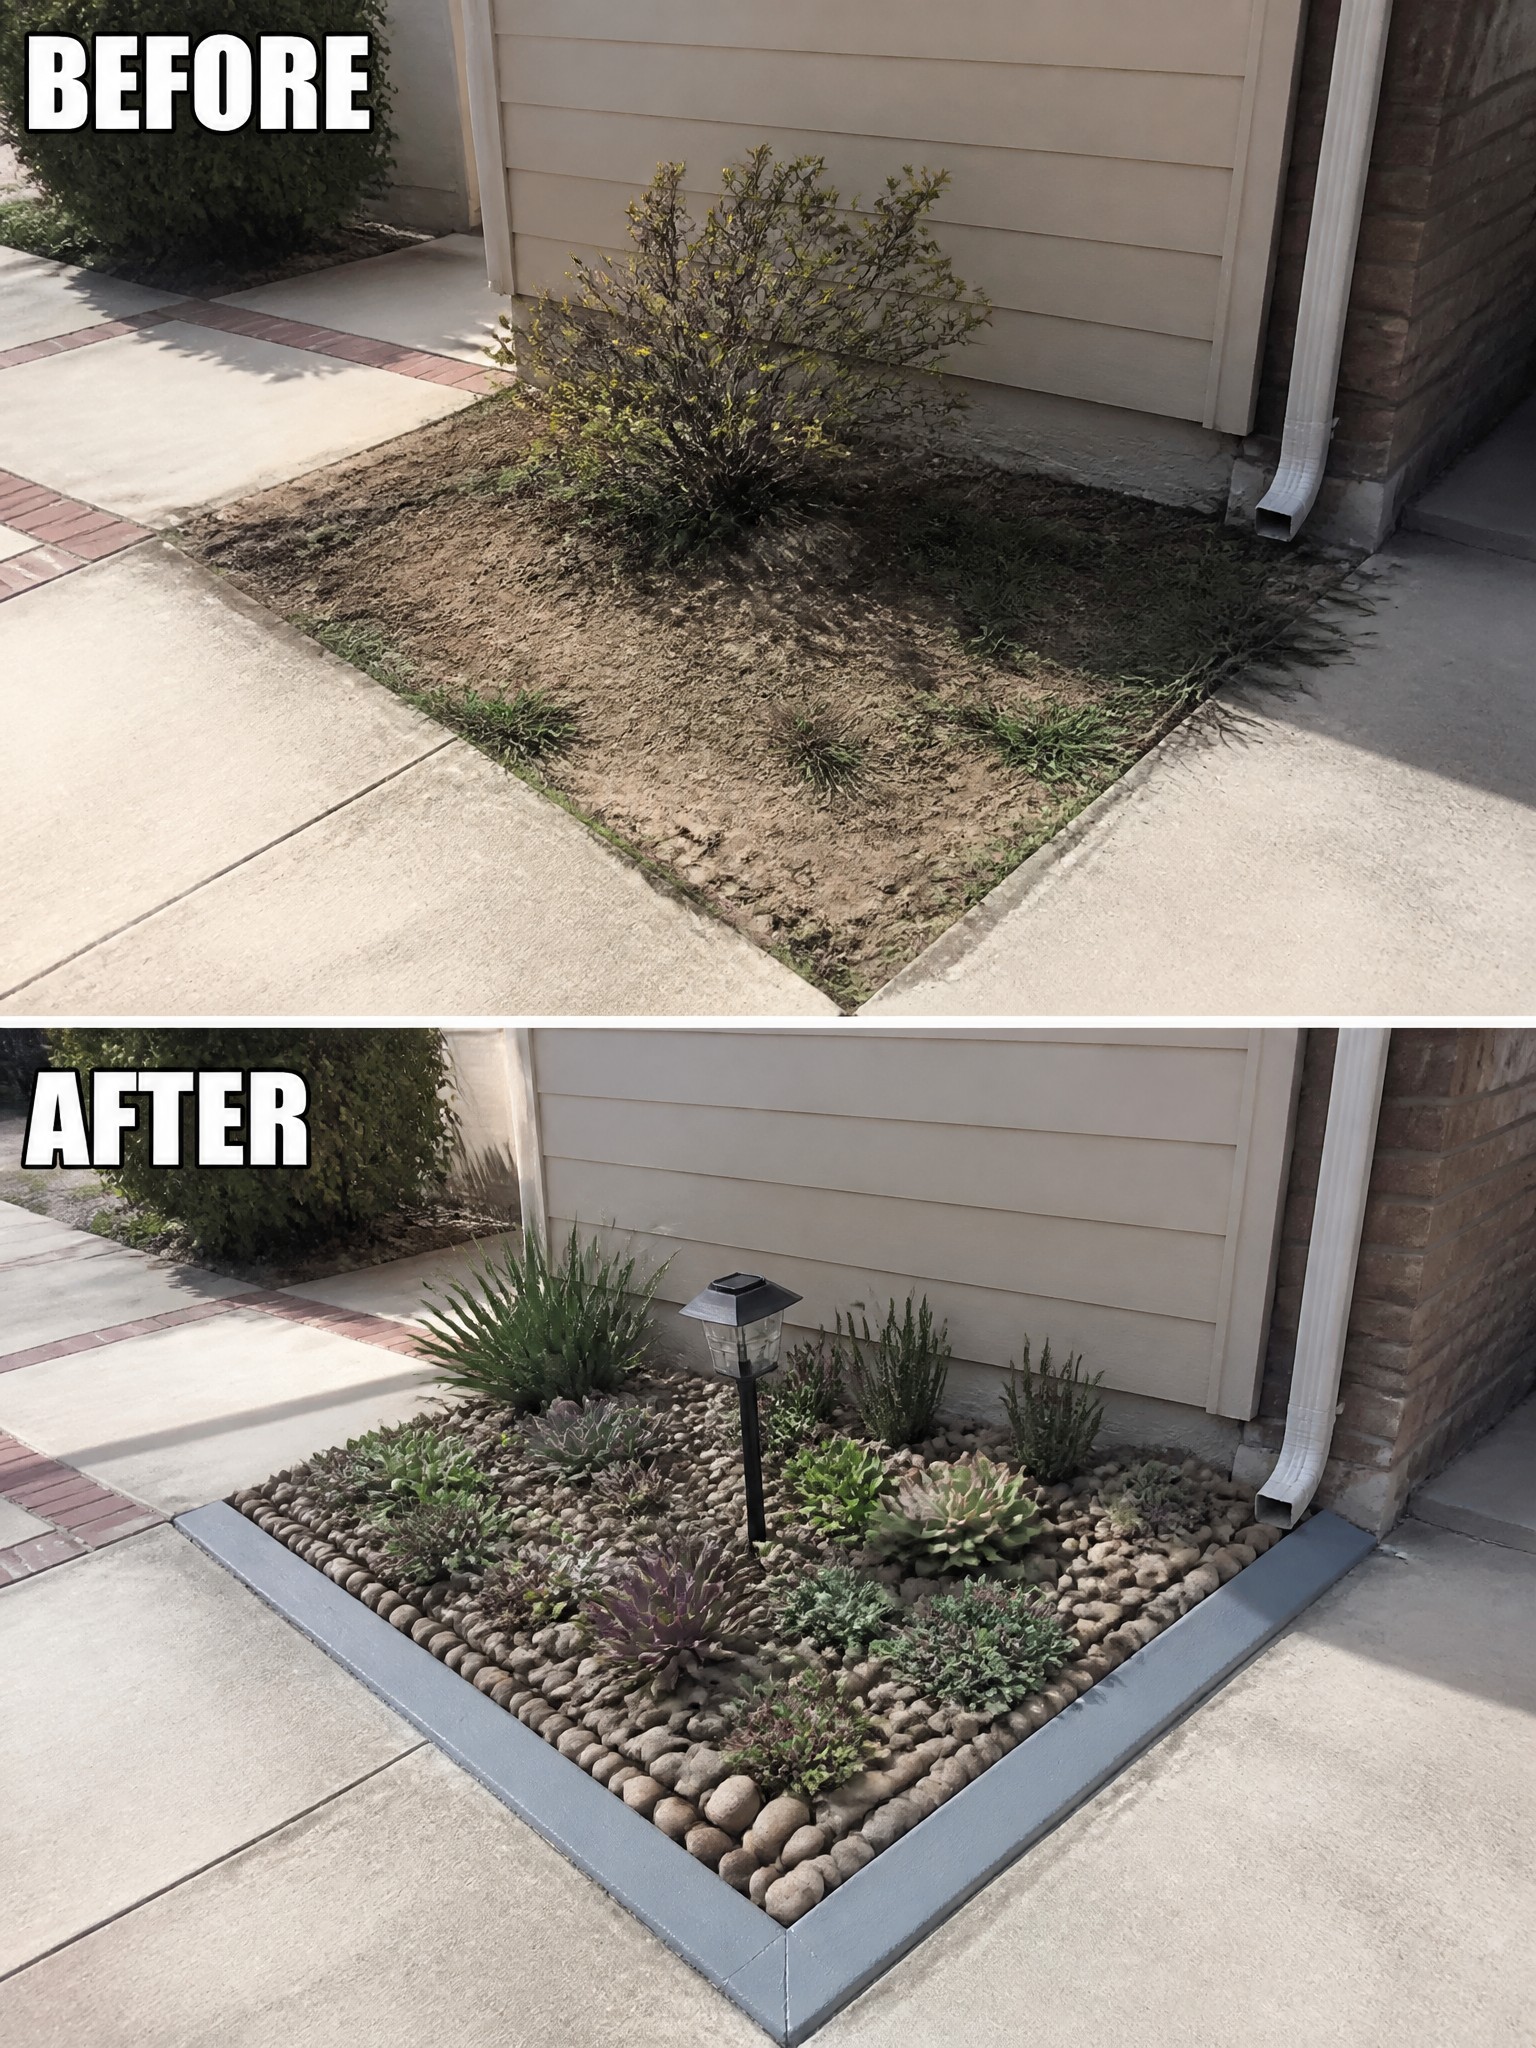
A bare, weedy strip along the house can look unfinished even if the rest of the yard is fine. Adding a simple border and filling the bed with gravel gives the area clear shape and keeps weeds down. The change from loose dirt to a contained rock bed makes the whole front look more intentional without needing a lot of new plants.
This approach works well on narrow strips next to siding or brick where grass struggles. Start by cleaning out the old growth, then install the edging before adding the gravel. It keeps maintenance low and gives you room to tuck in a few hardy plants later if you want color.
Clean Up Overgrown Beds Before Adding Plants
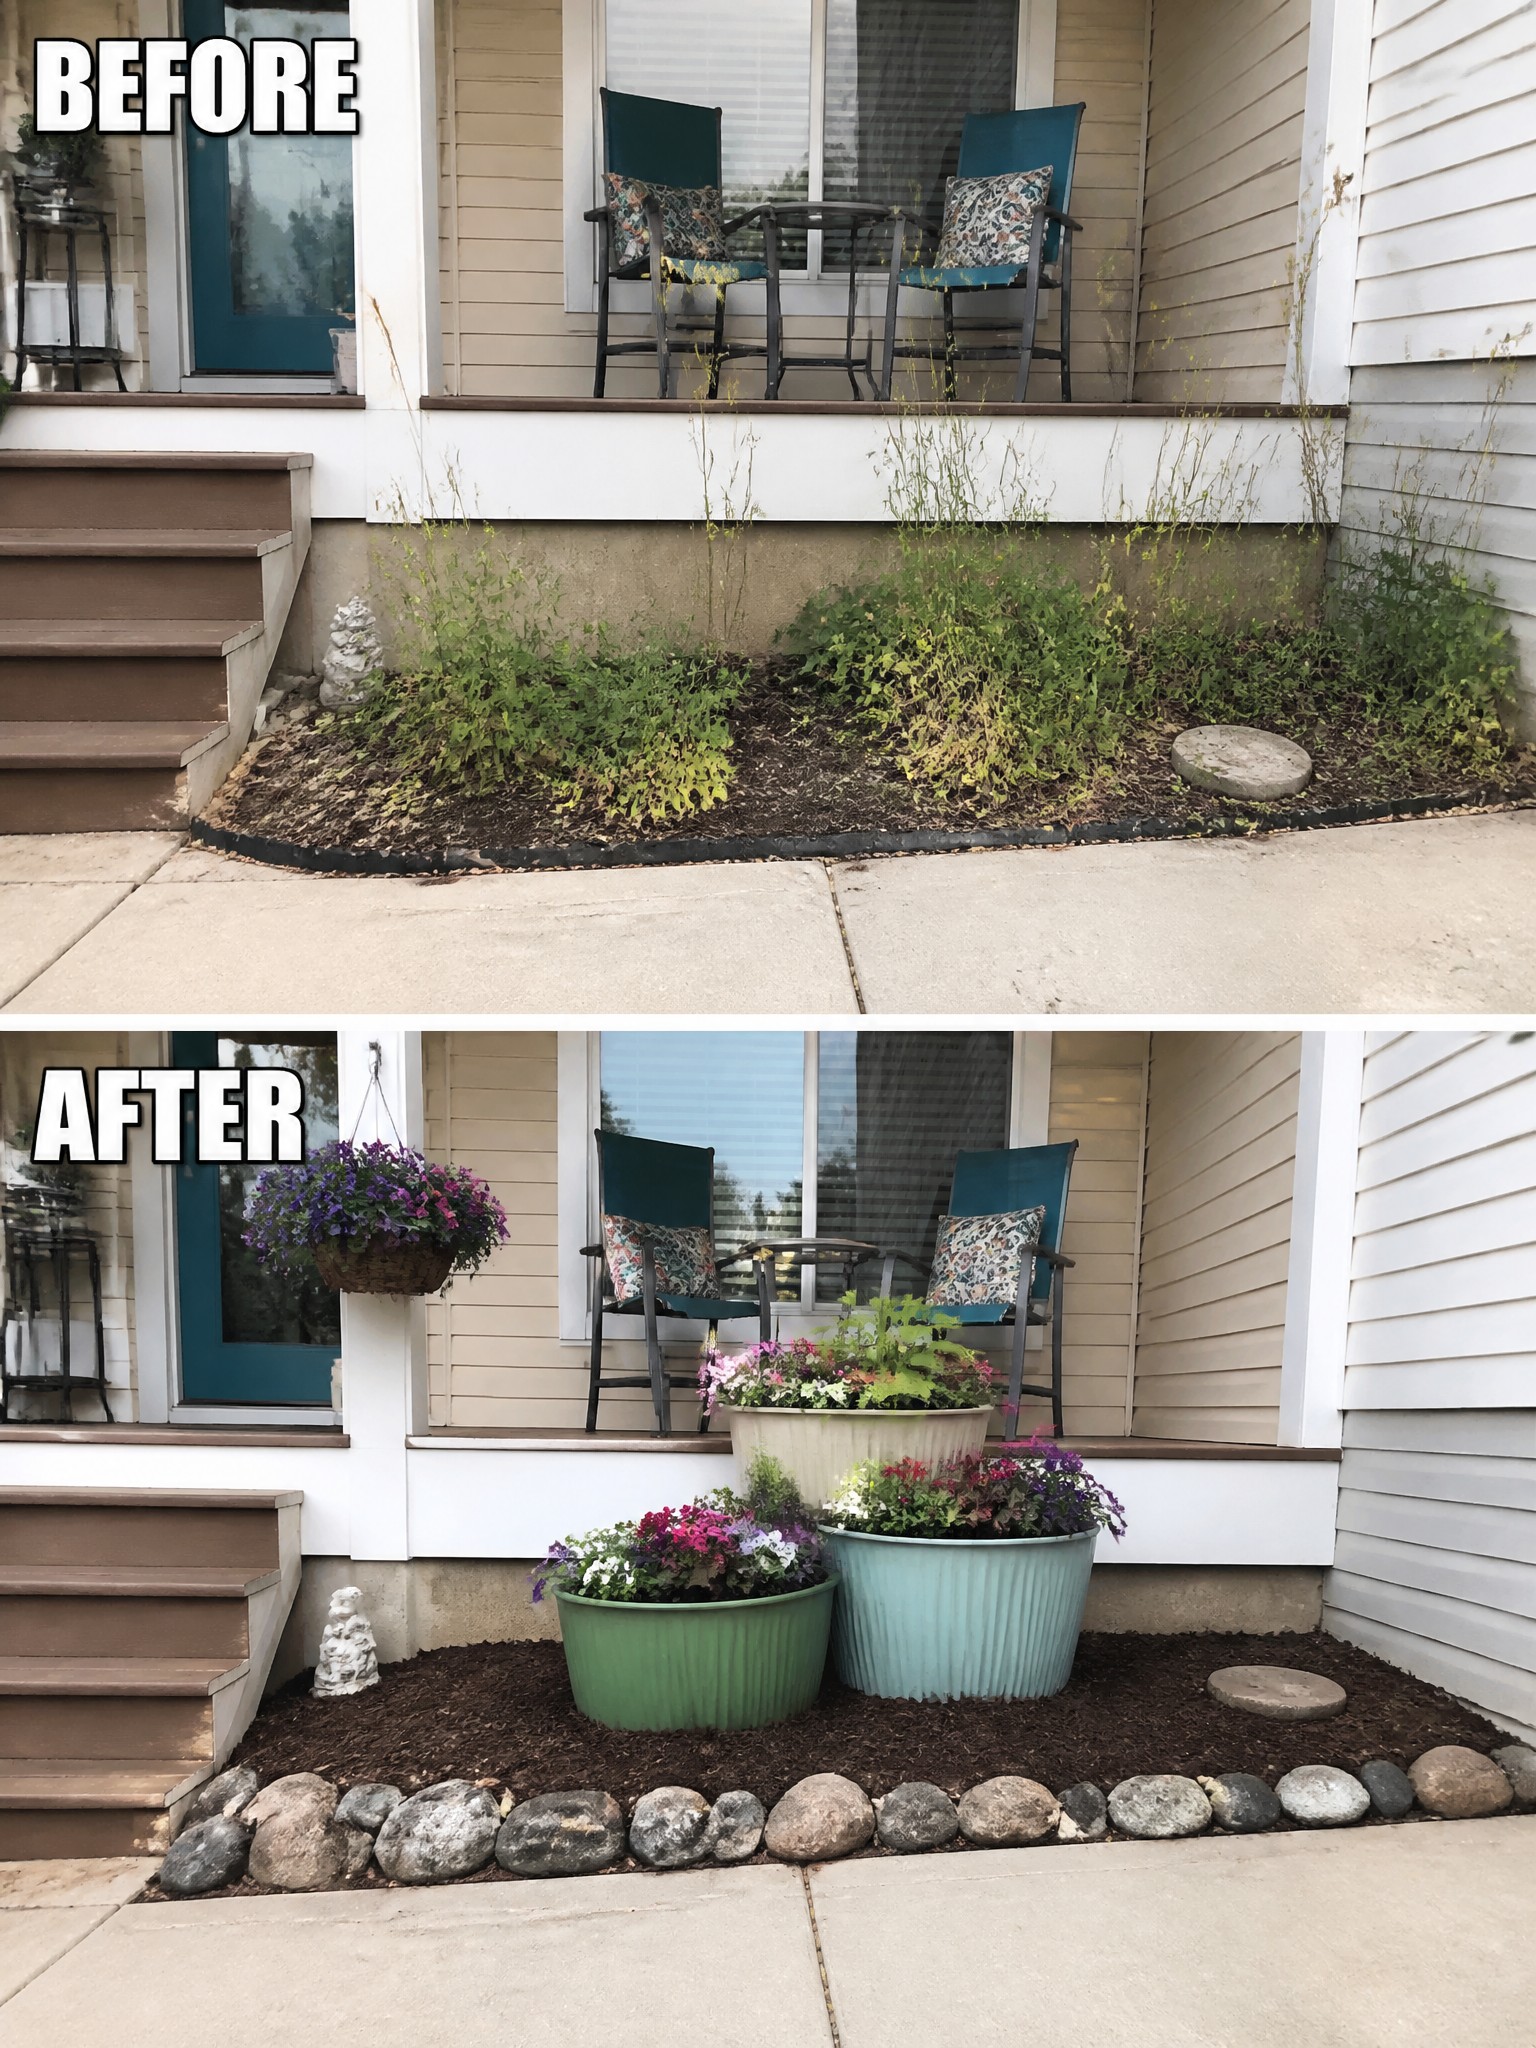
Clearing out the weeds and messy growth first made the biggest difference here. Once the bed was stripped back, a layer of dark mulch gave it a neat finish, and the simple stone border kept everything contained and looking intentional.
This approach works well along the front of a house where the bed is visible from the street. Start by removing the old plants completely, then add mulch and a basic edge before bringing in larger planters or flowers. It keeps the space from looking half done and makes any new additions stand out more.
Define Front Beds With Planting And A Path
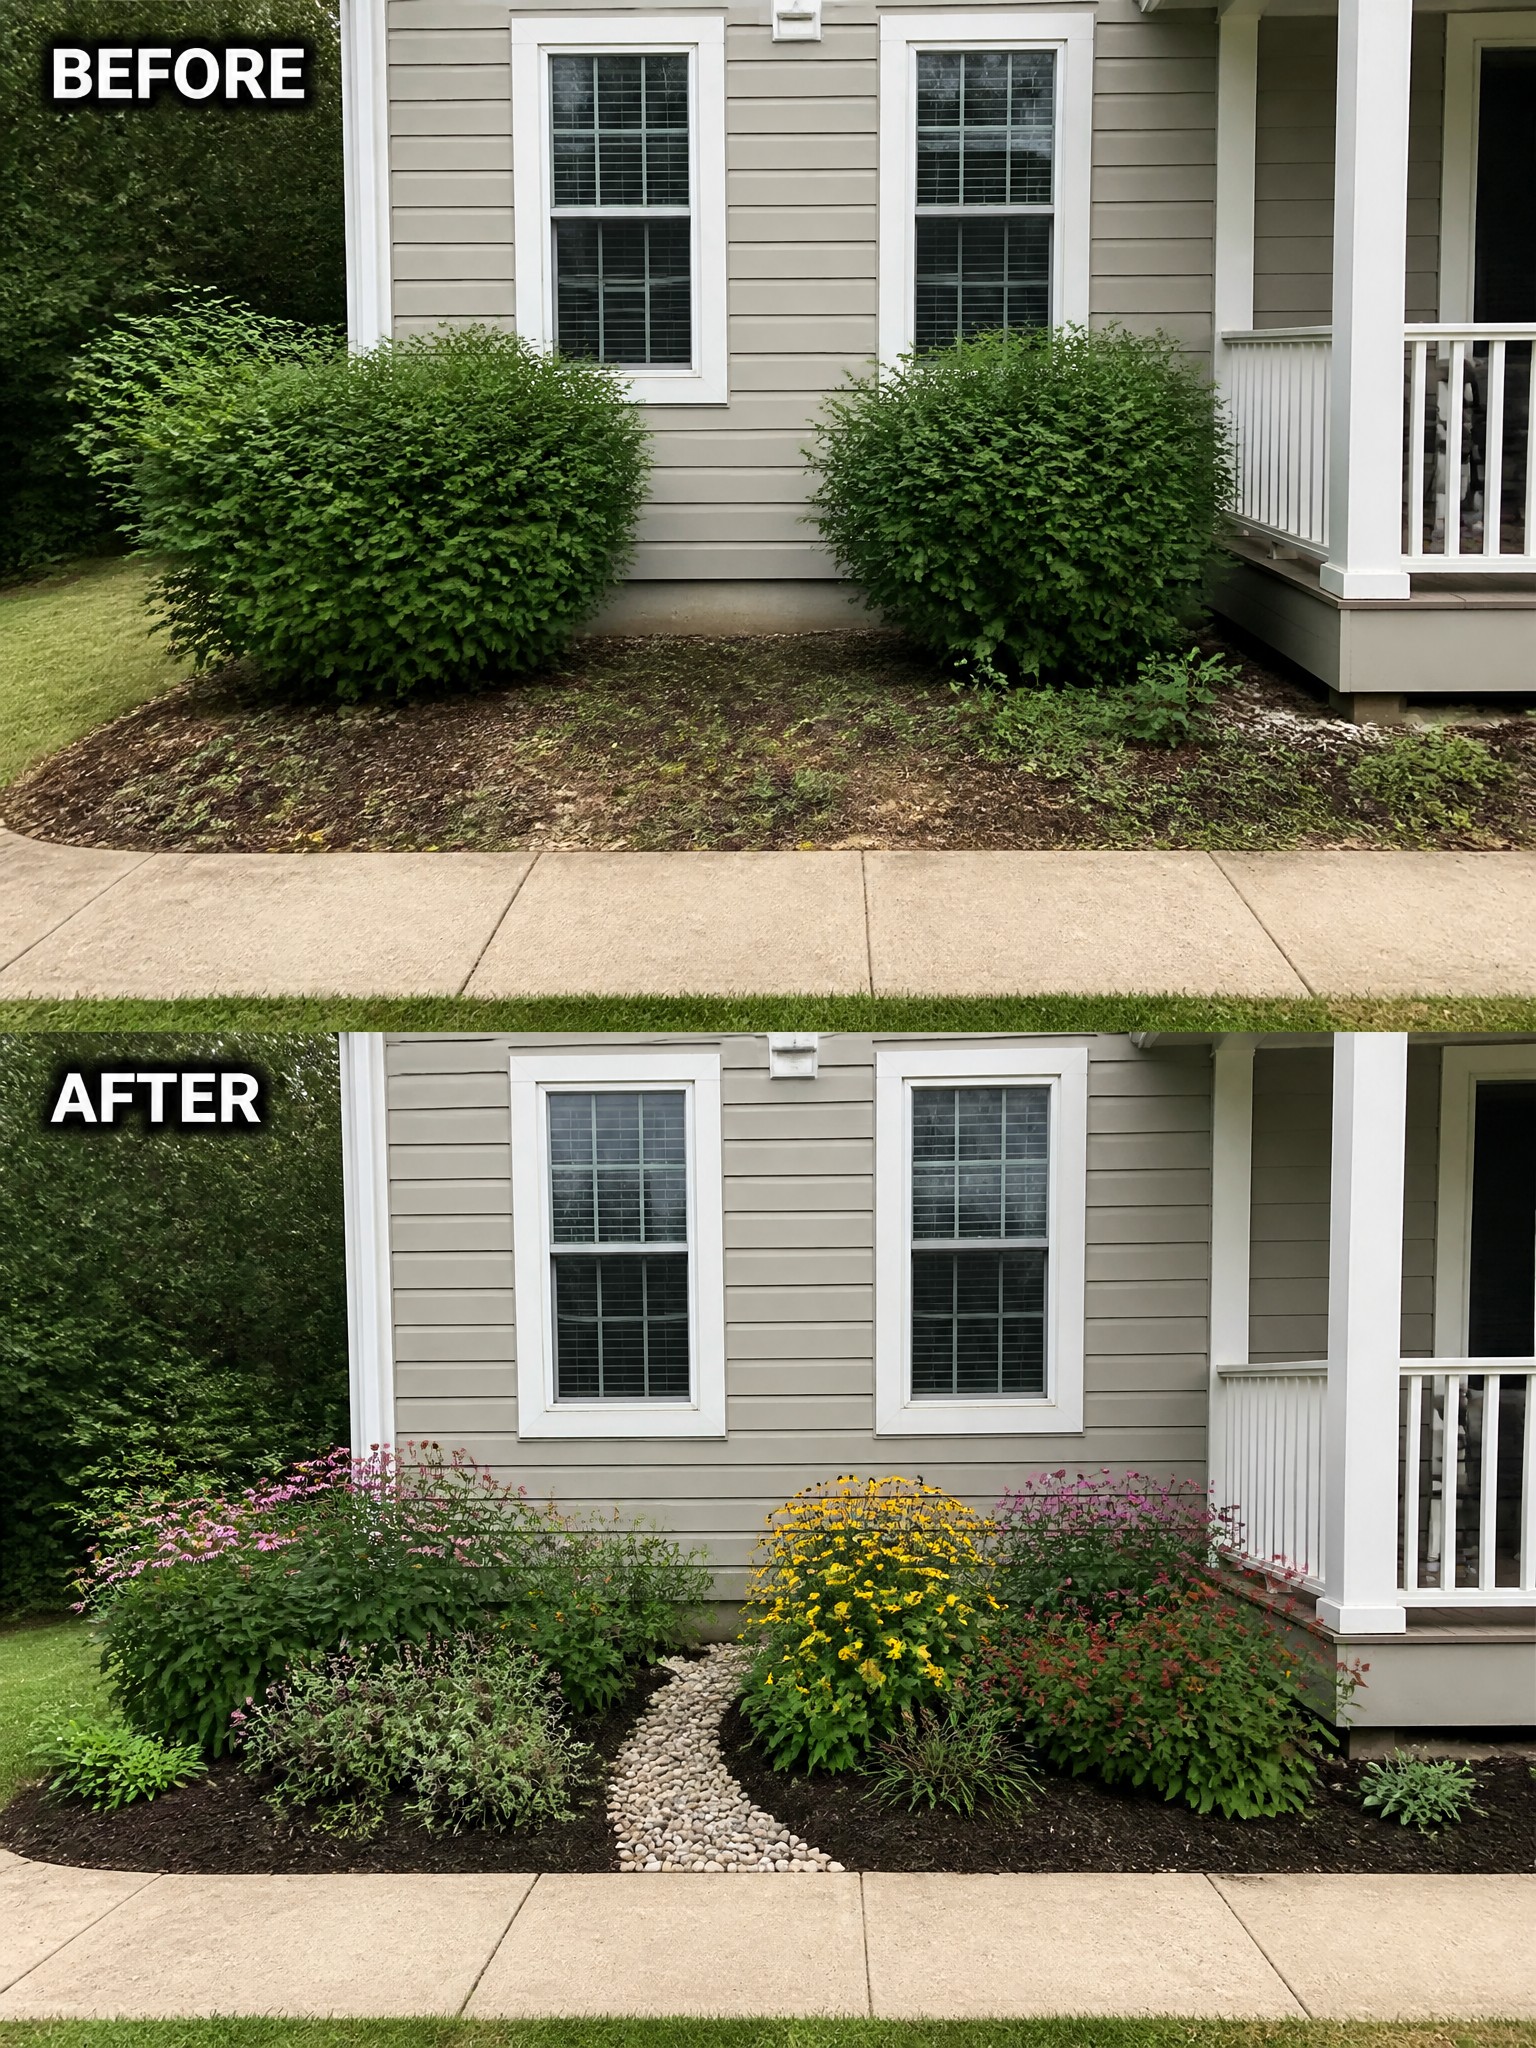
The before photo shows a front bed that had grown messy and shapeless, with large shrubs crowding the space and mulch that looked neglected. In the after photo, the same area now has clear edges, fresh mulch, a small pebble path running through the middle, and a mix of lower plants that fill the space without overwhelming the house.
This approach works well when a front bed has become too wild or undefined. Start by cutting back or removing the largest plants, then mark out beds with a simple curve or straight line. Add a path if the bed is wide, use mulch to keep the look clean, and plant in layers so nothing blocks the windows. It keeps the yard looking cared for without needing a big budget.
Define A Narrow Front Bed With Gravel And Pots
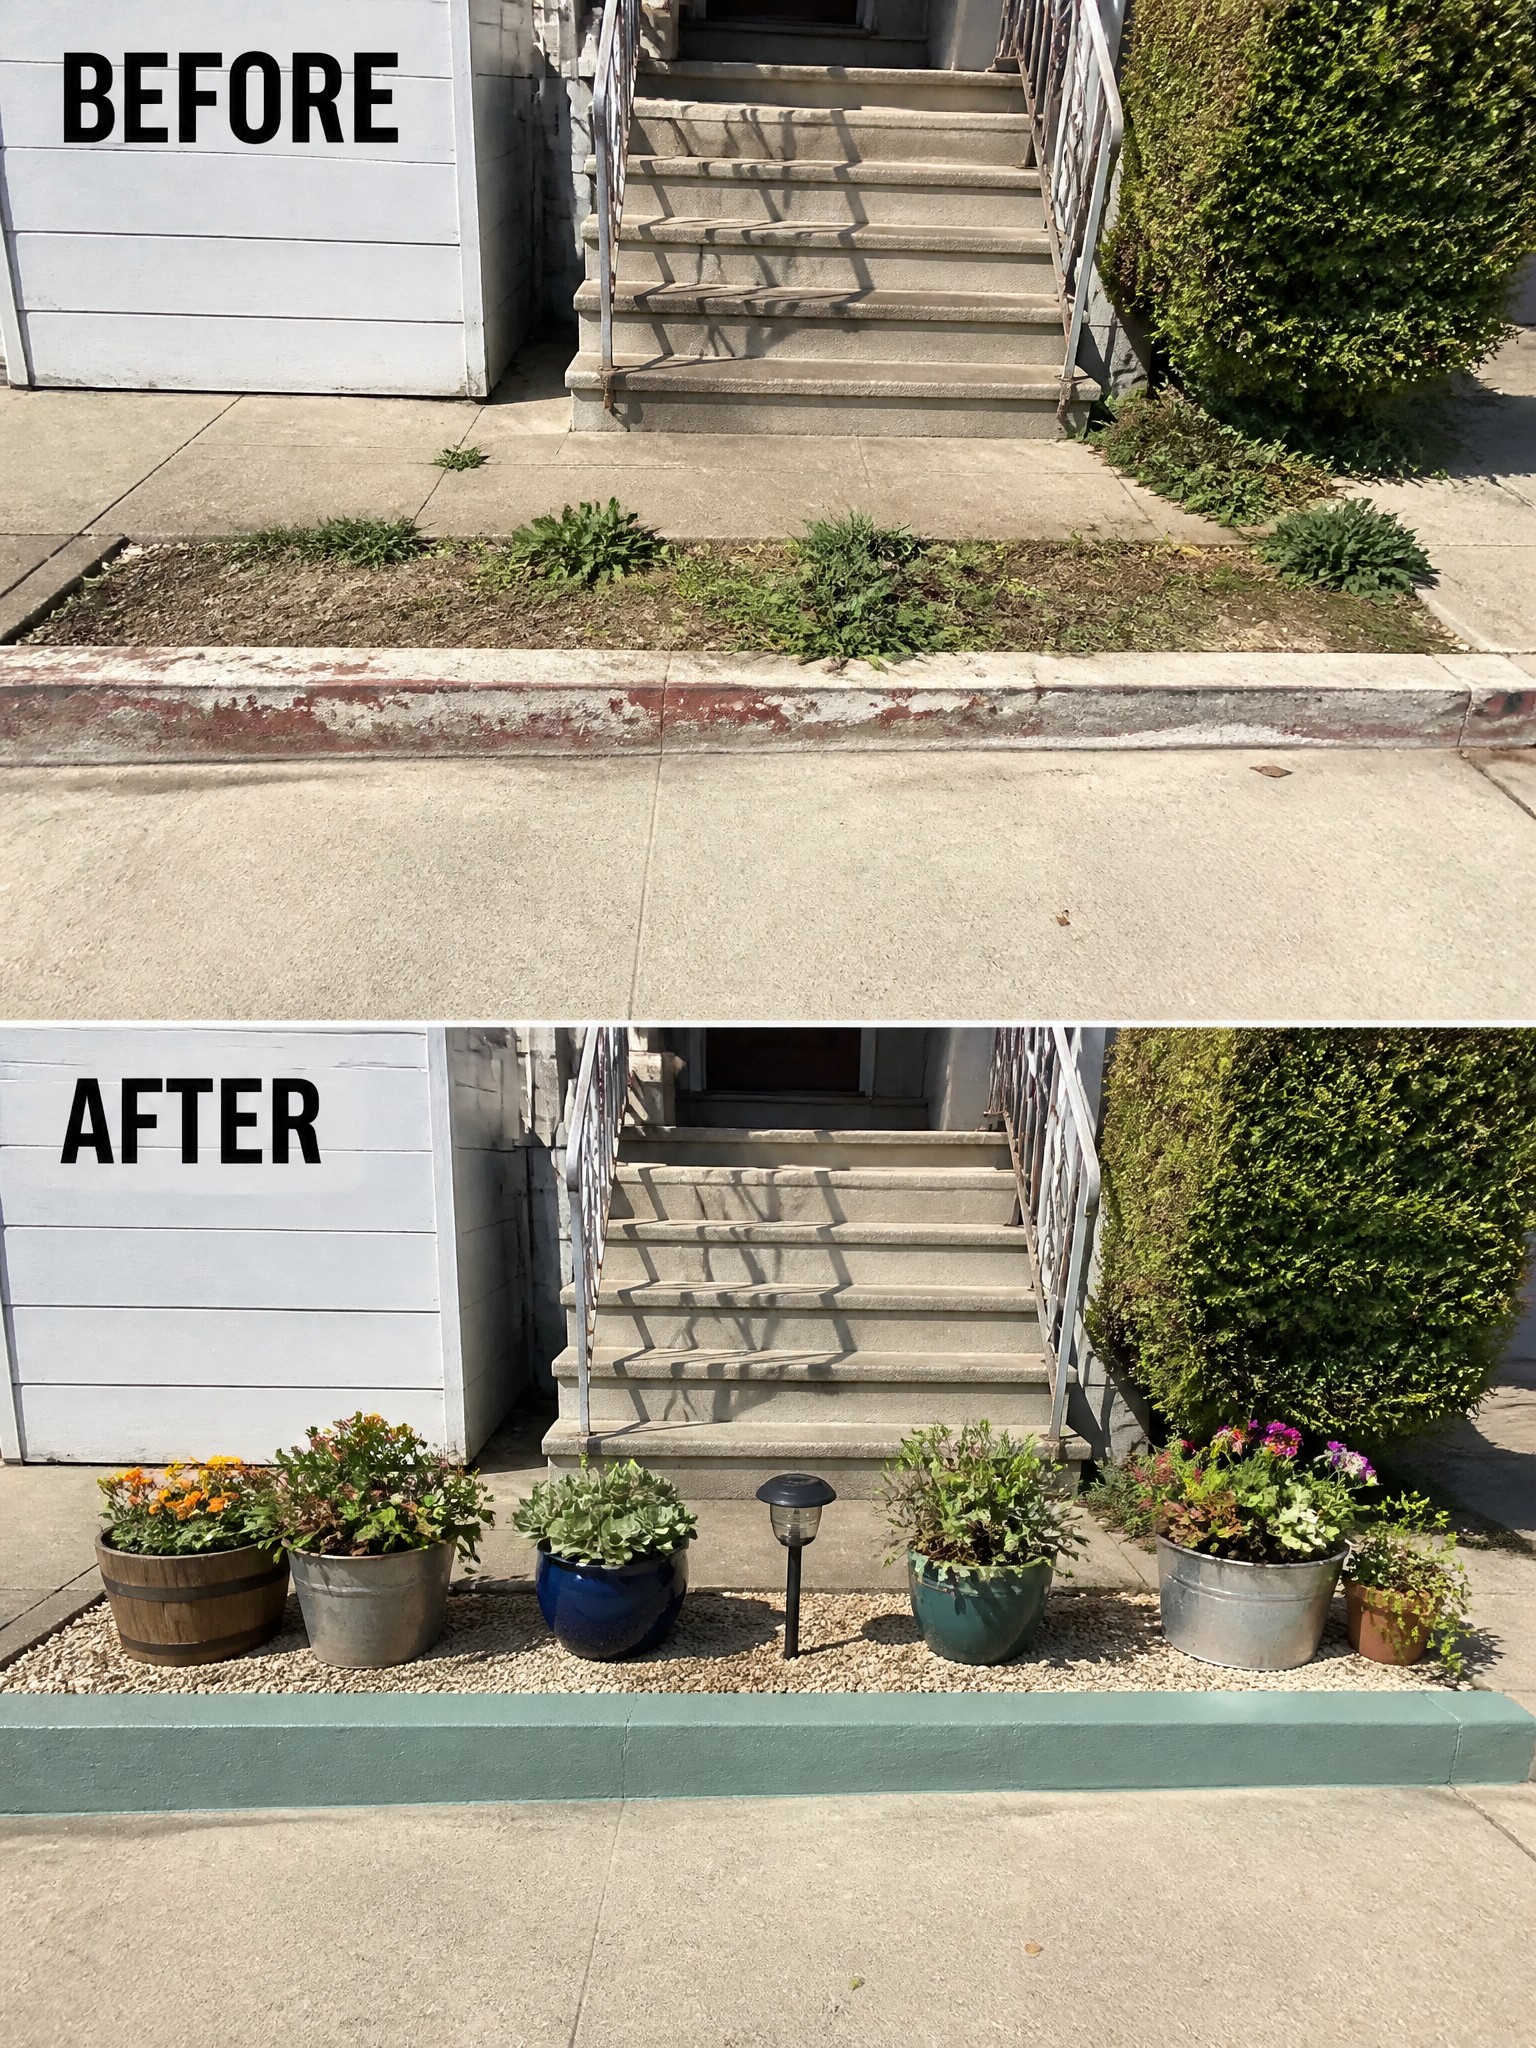
A weedy dirt strip next to the sidewalk does little for curb appeal. Adding a layer of gravel creates a clean edge that instantly makes the space look intentional and maintained. The pots add height and color without needing to dig new planting holes or deal with poor soil.
This approach works well along concrete foundations or narrow strips where in-ground planting feels limited. Use whatever containers you already have or can find cheaply, repeat a few colors for cohesion, and keep the gravel layer thin so water still drains. It is an easy weekend project that gives structure before you add more plants later.
Add Structure To A Bare Front Yard Bed
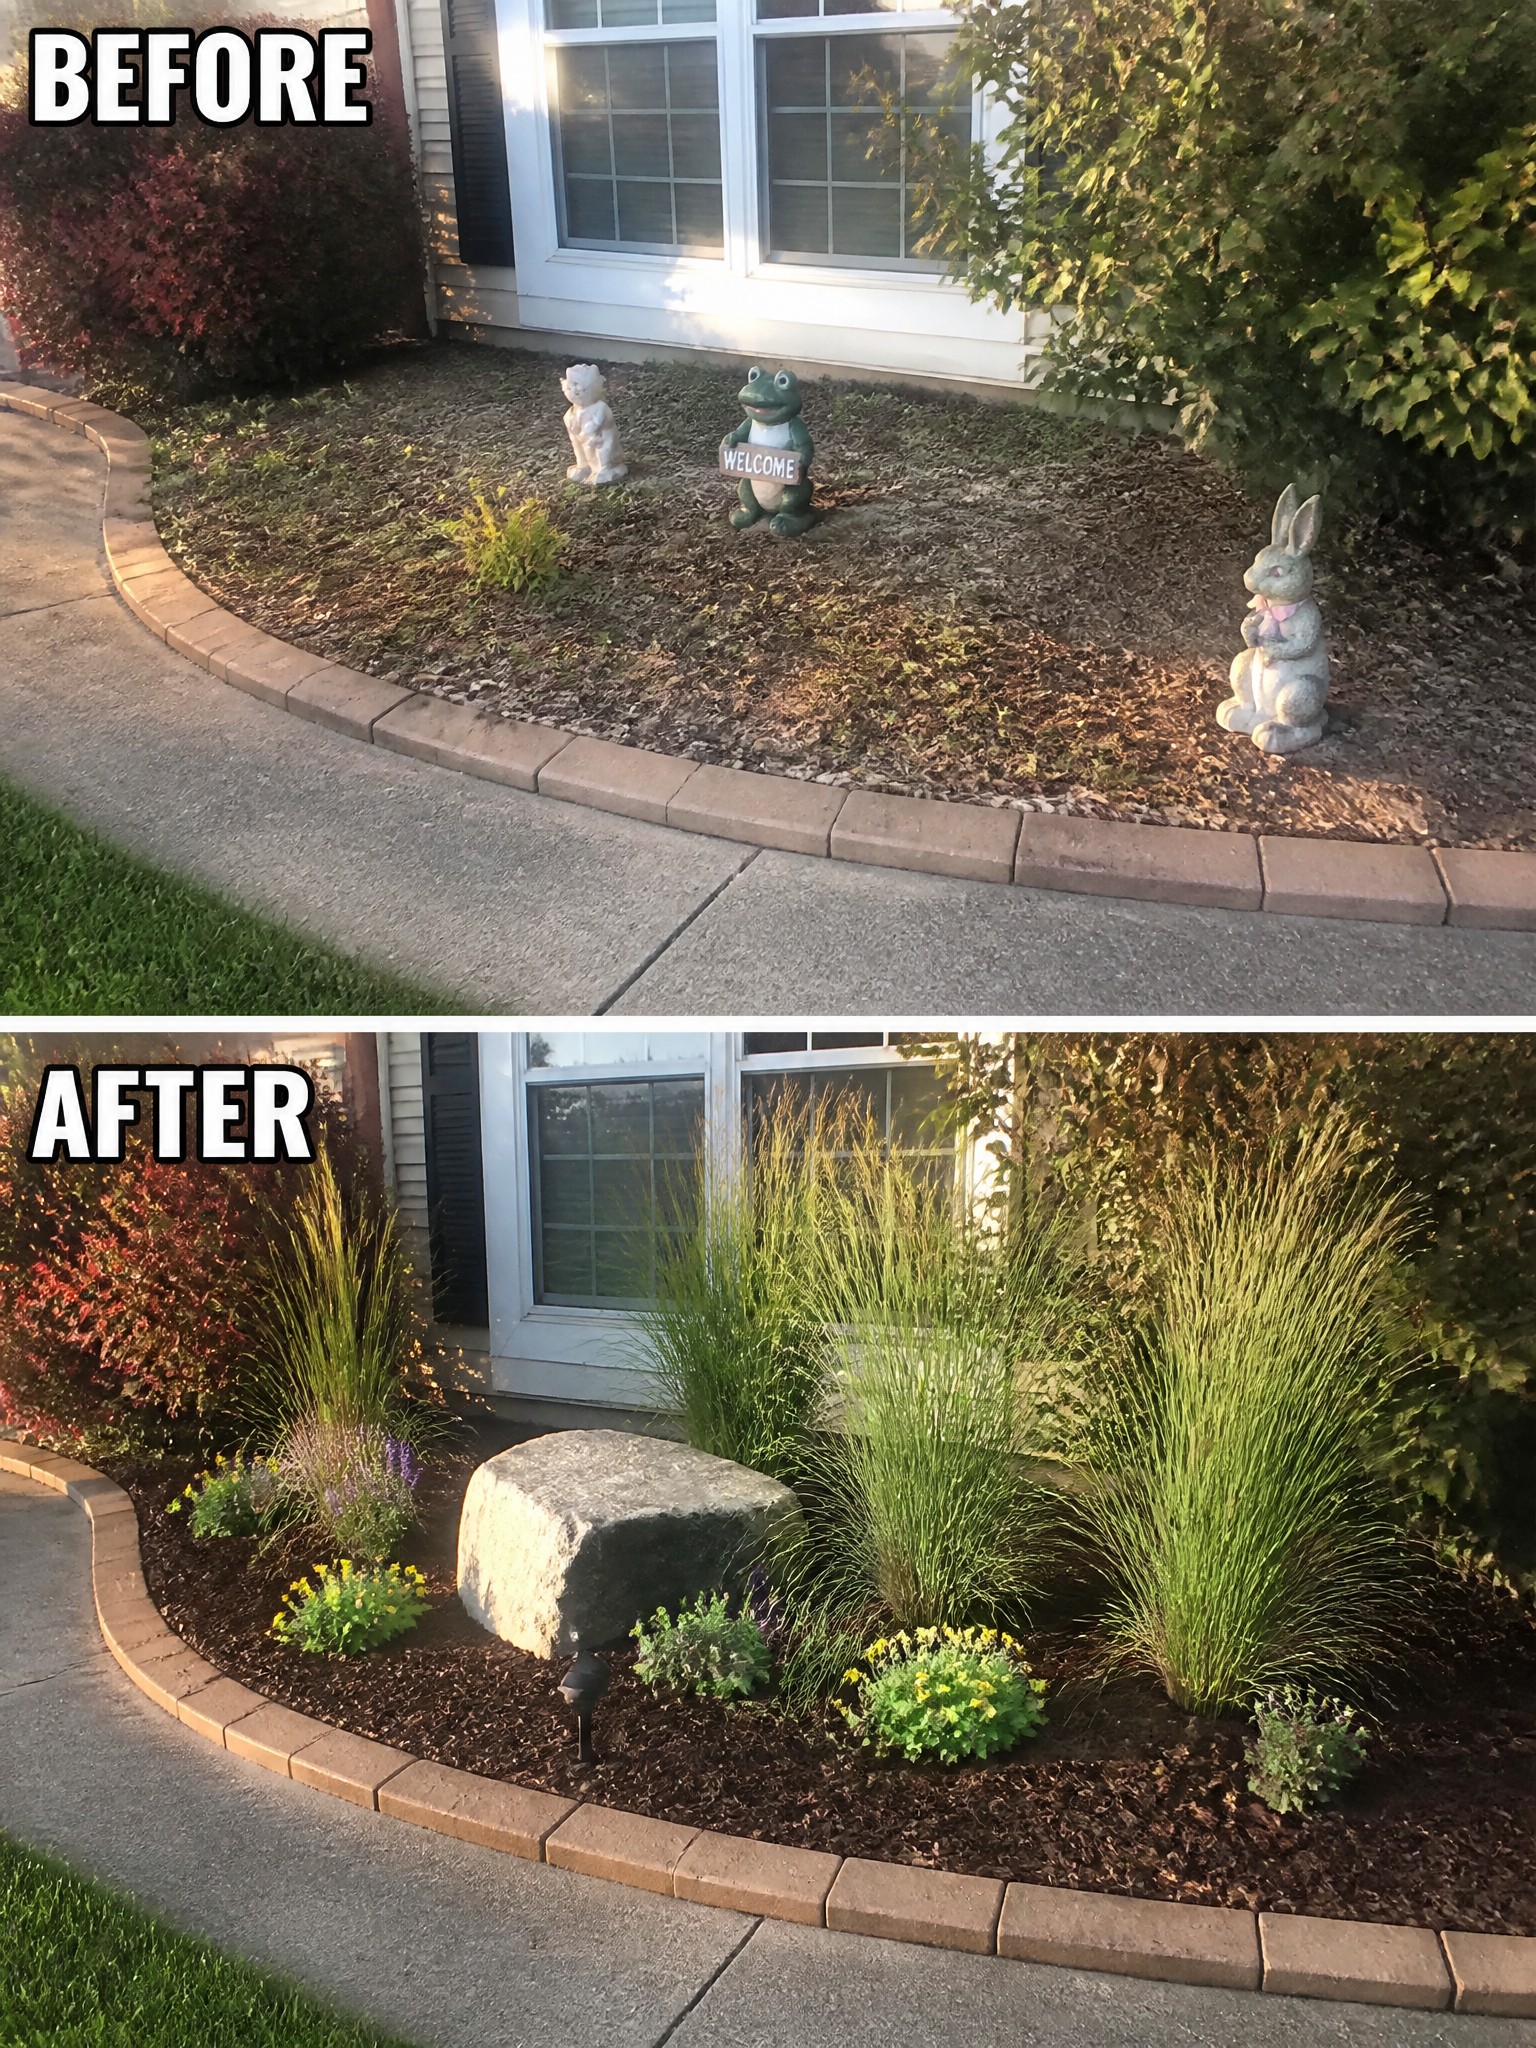
The before photo shows a thin strip of ground with just a few scattered statues and no real shape. In the after, the same area gets a clear edge, fresh mulch, grouped plants, and one large rock that pulls everything together. That simple shift turns an empty-looking space into something that feels planned without needing lots of new features.
This approach works well on small front beds where you want quick impact on a budget. Start by clearing the old look, lay down mulch to cover the soil, then add a mix of taller grasses and low flowers in clusters. The rock acts as an easy anchor so the bed does not feel scattered. It suits most suburban homes where the goal is a tidy view from the street.
Add Edging To Define Garden Beds
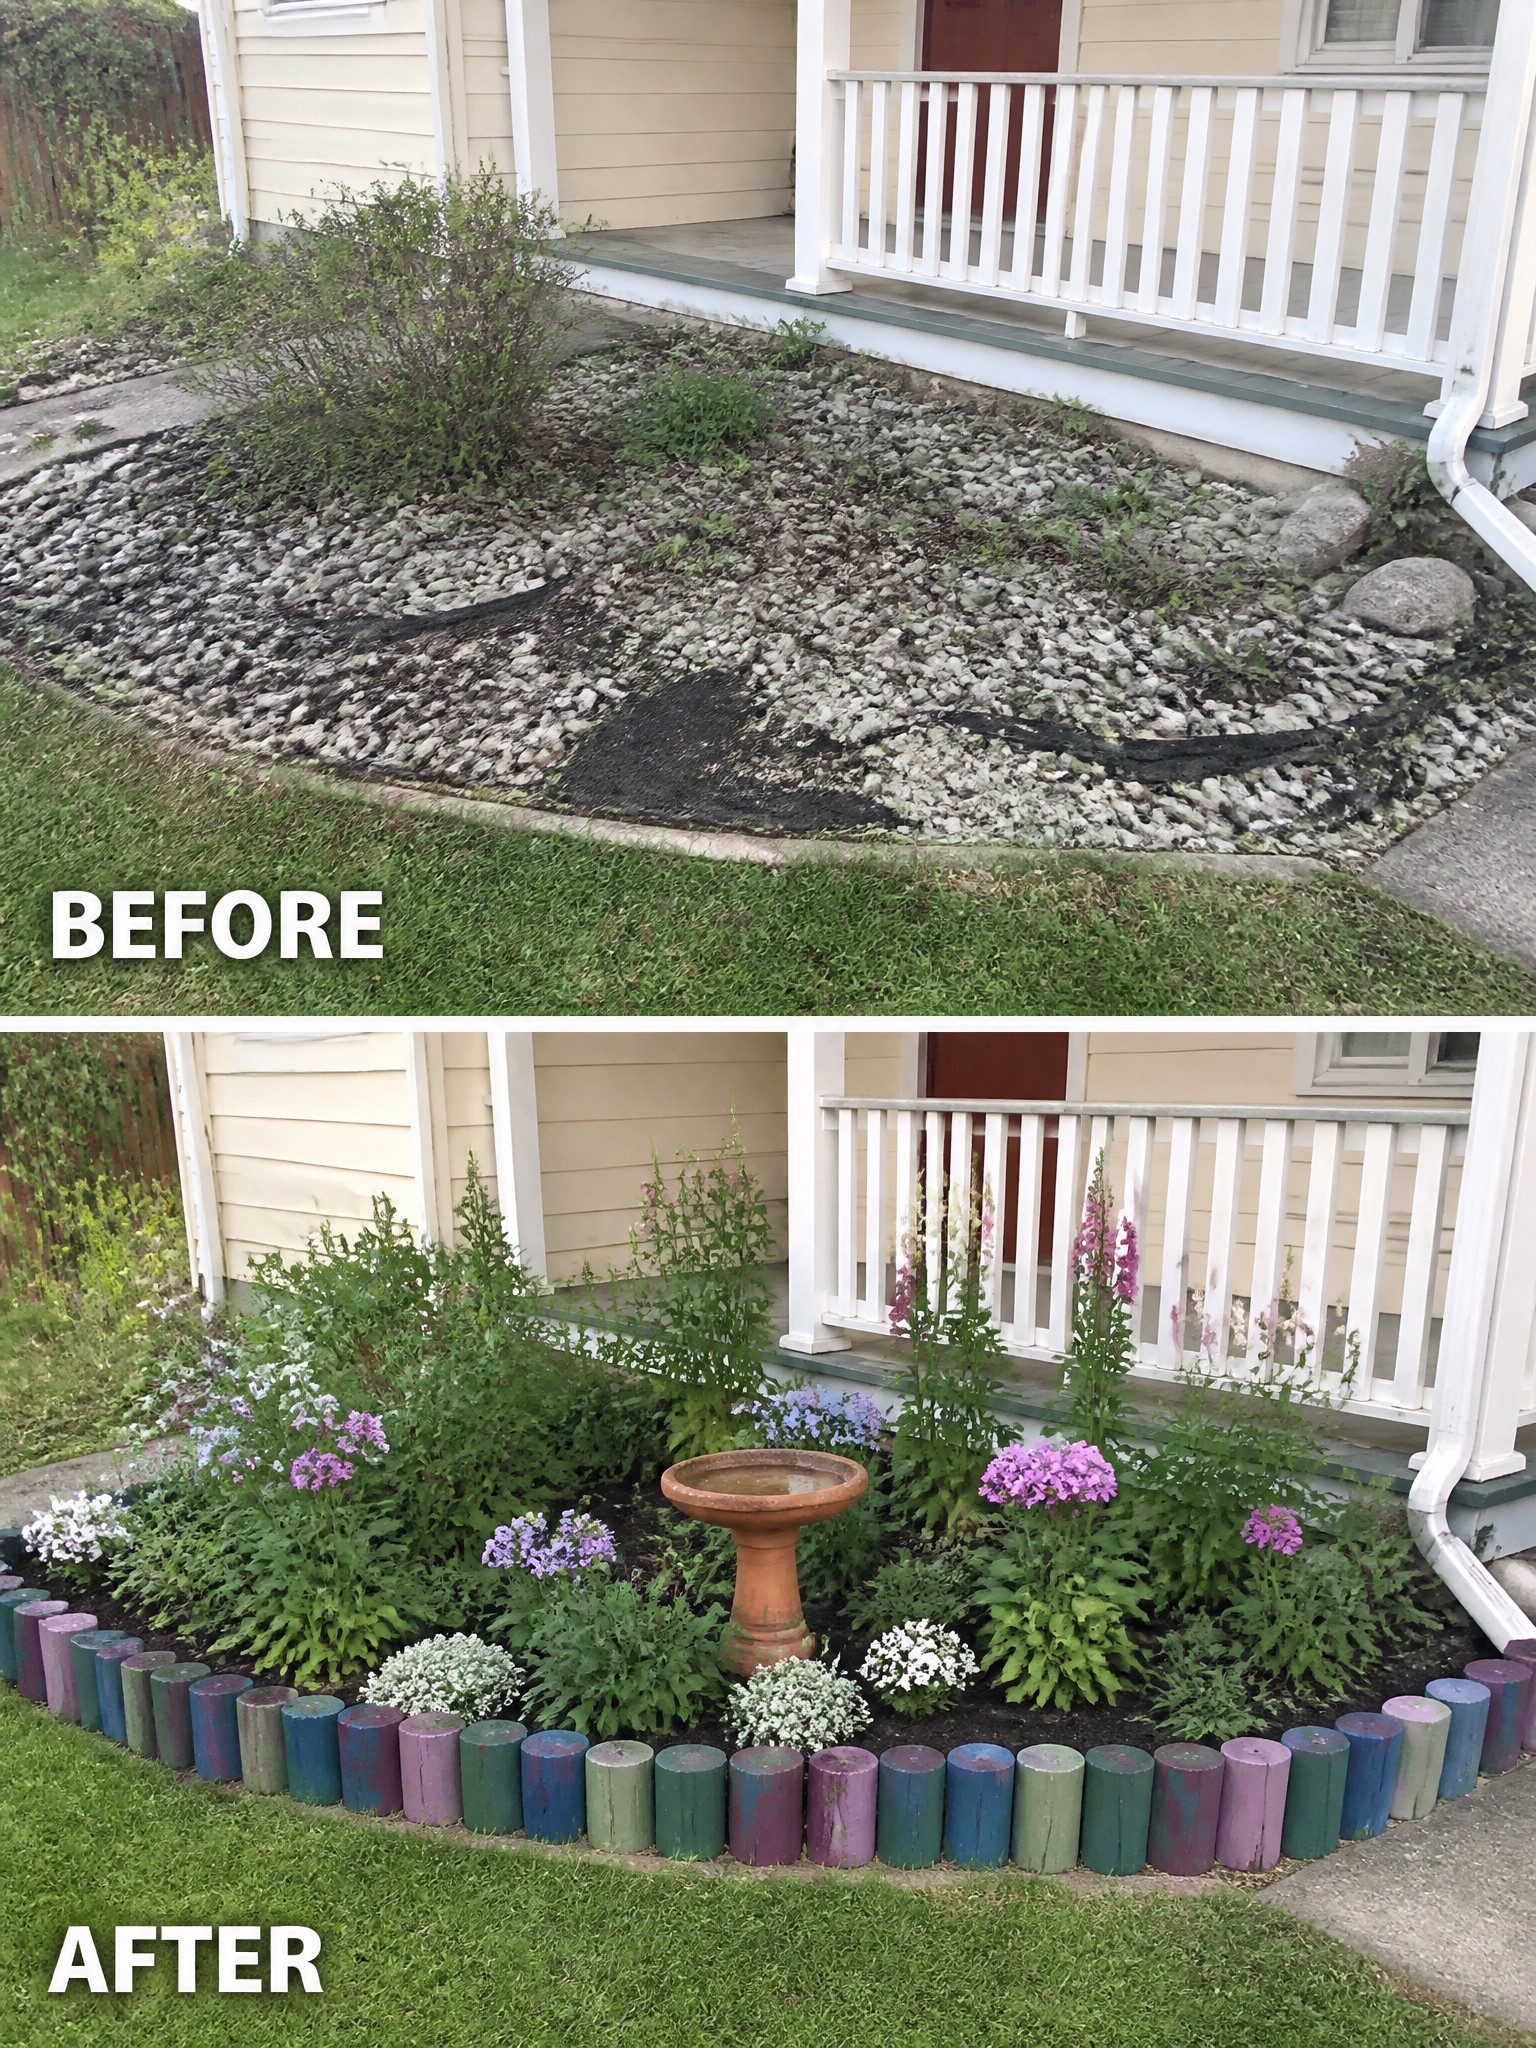
The gravel strip next to the porch had spread out and grown weedy with no clear shape. Placing a simple border of short painted logs gave the area a firm edge so new plants could be grouped inside it without looking scattered.
This works best along a house wall where grass meets bare ground. Lay out the curve first, then add the edging before planting. The border keeps the bed tidy and makes it easier to maintain over time.
Define Garden Beds With Simple Edging
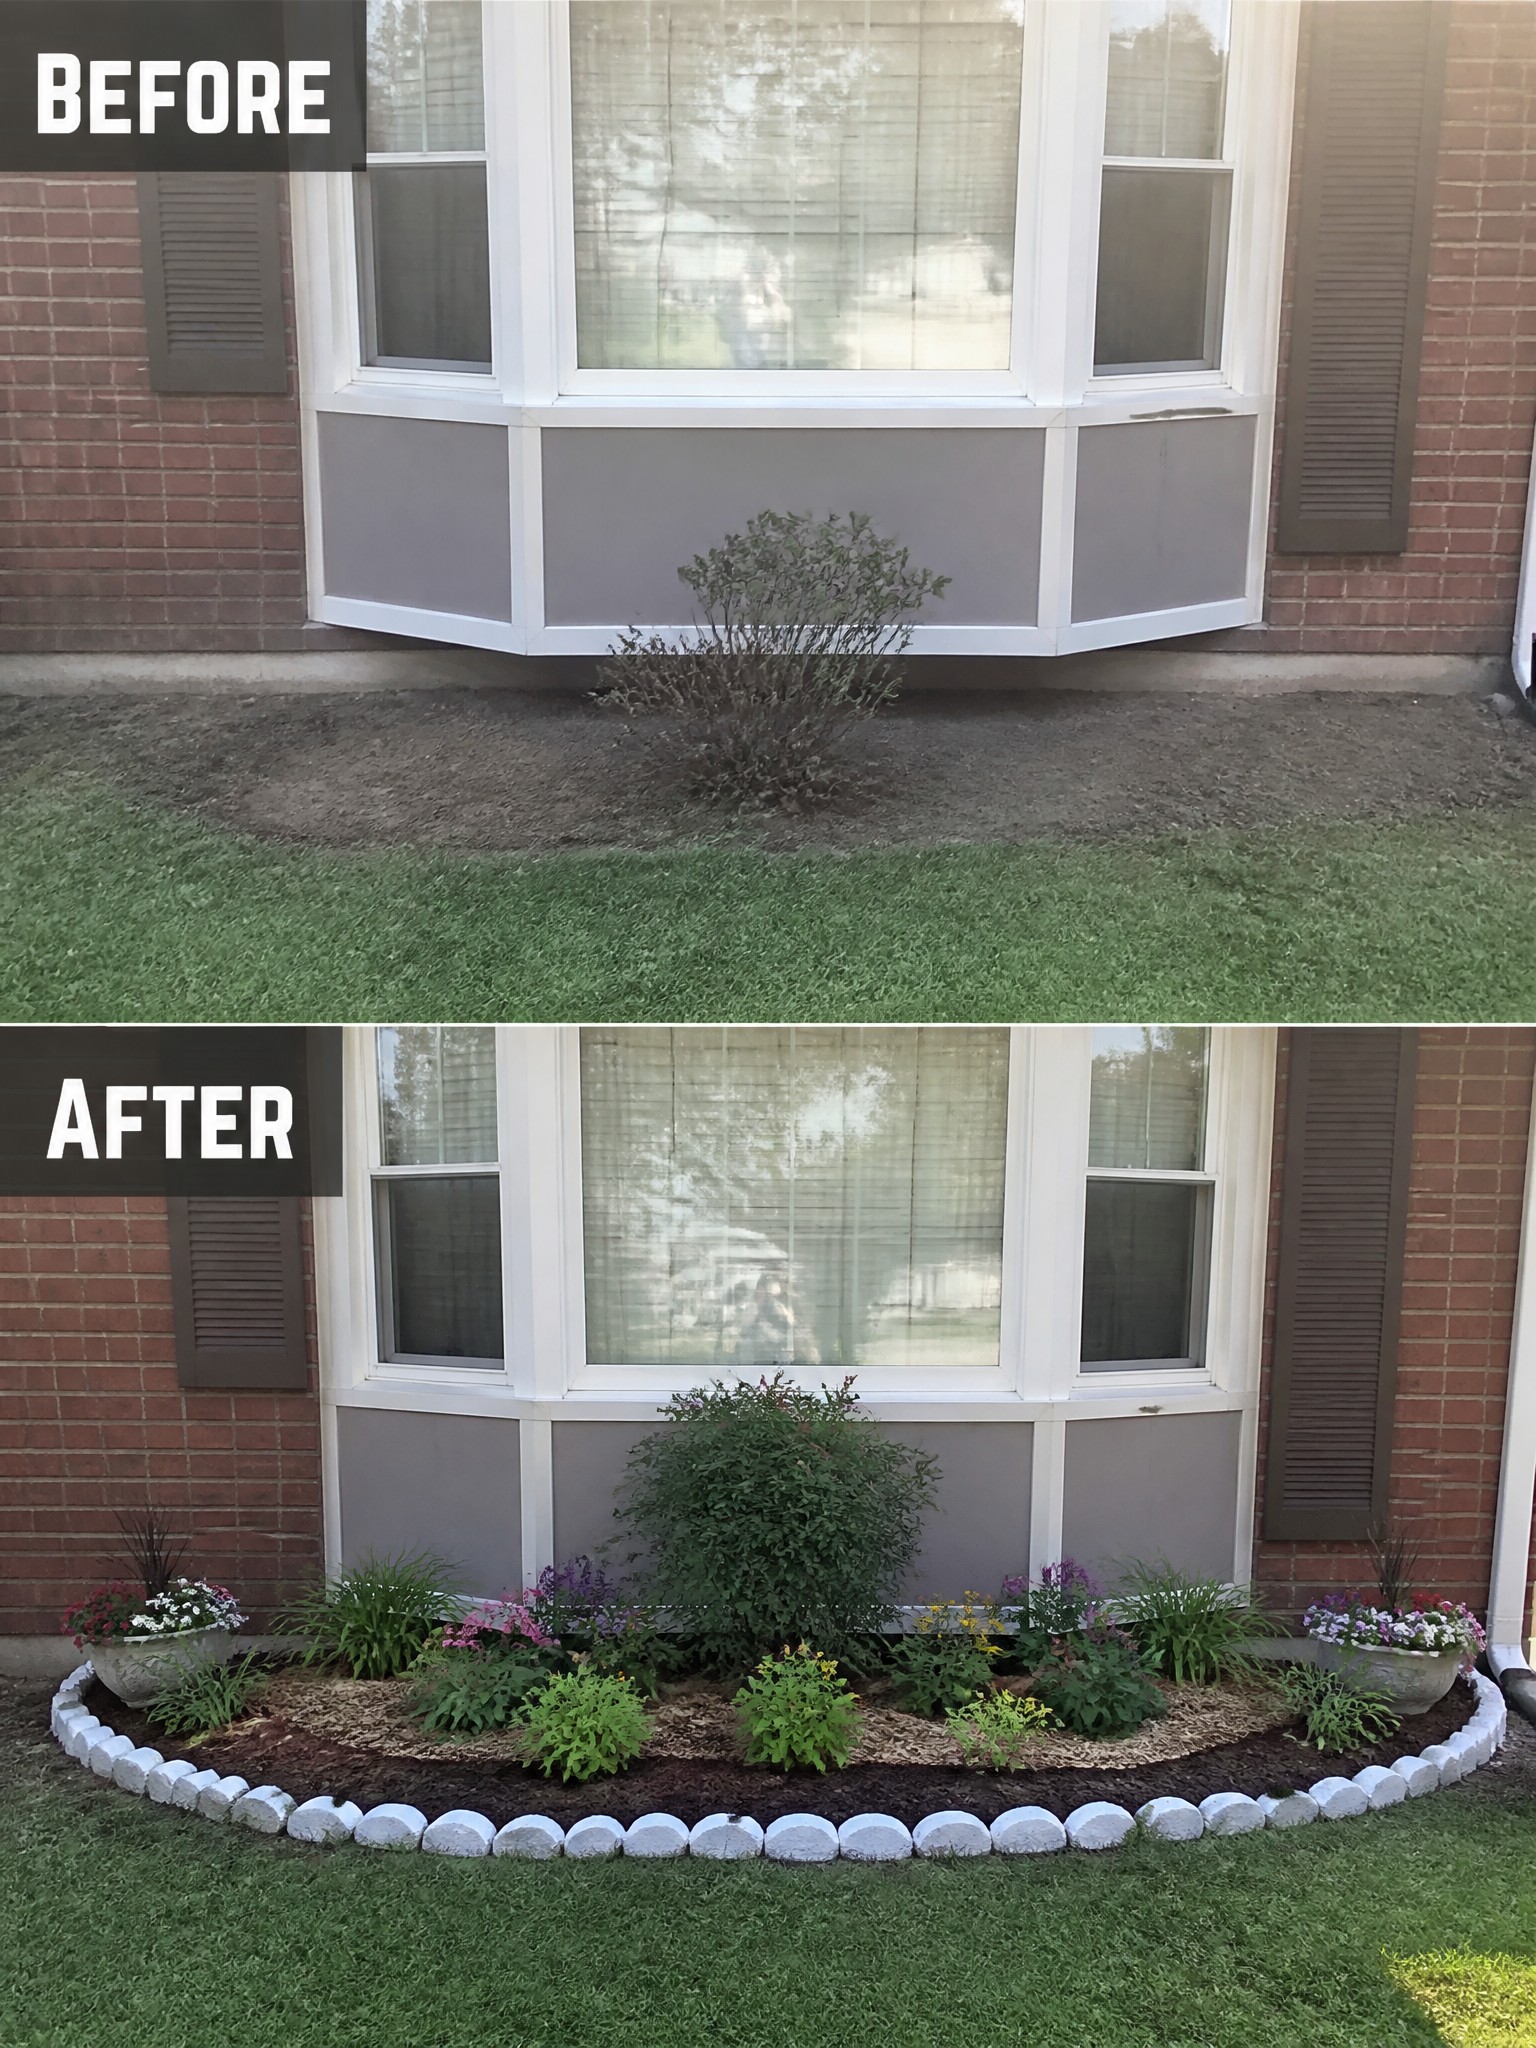
Adding a clear border turns a bare patch of dirt into a spot that looks planned instead of neglected. The white stones and layer of mulch give the area under the window a finished edge that ties the planting together.
This approach suits any house where the foundation meets open lawn. Lay out the shape first with the edging, spread mulch to keep weeds down, and then add plants. It works especially well on small front beds where you want structure without spending much.
Define Front Yard Beds With Rock Edging
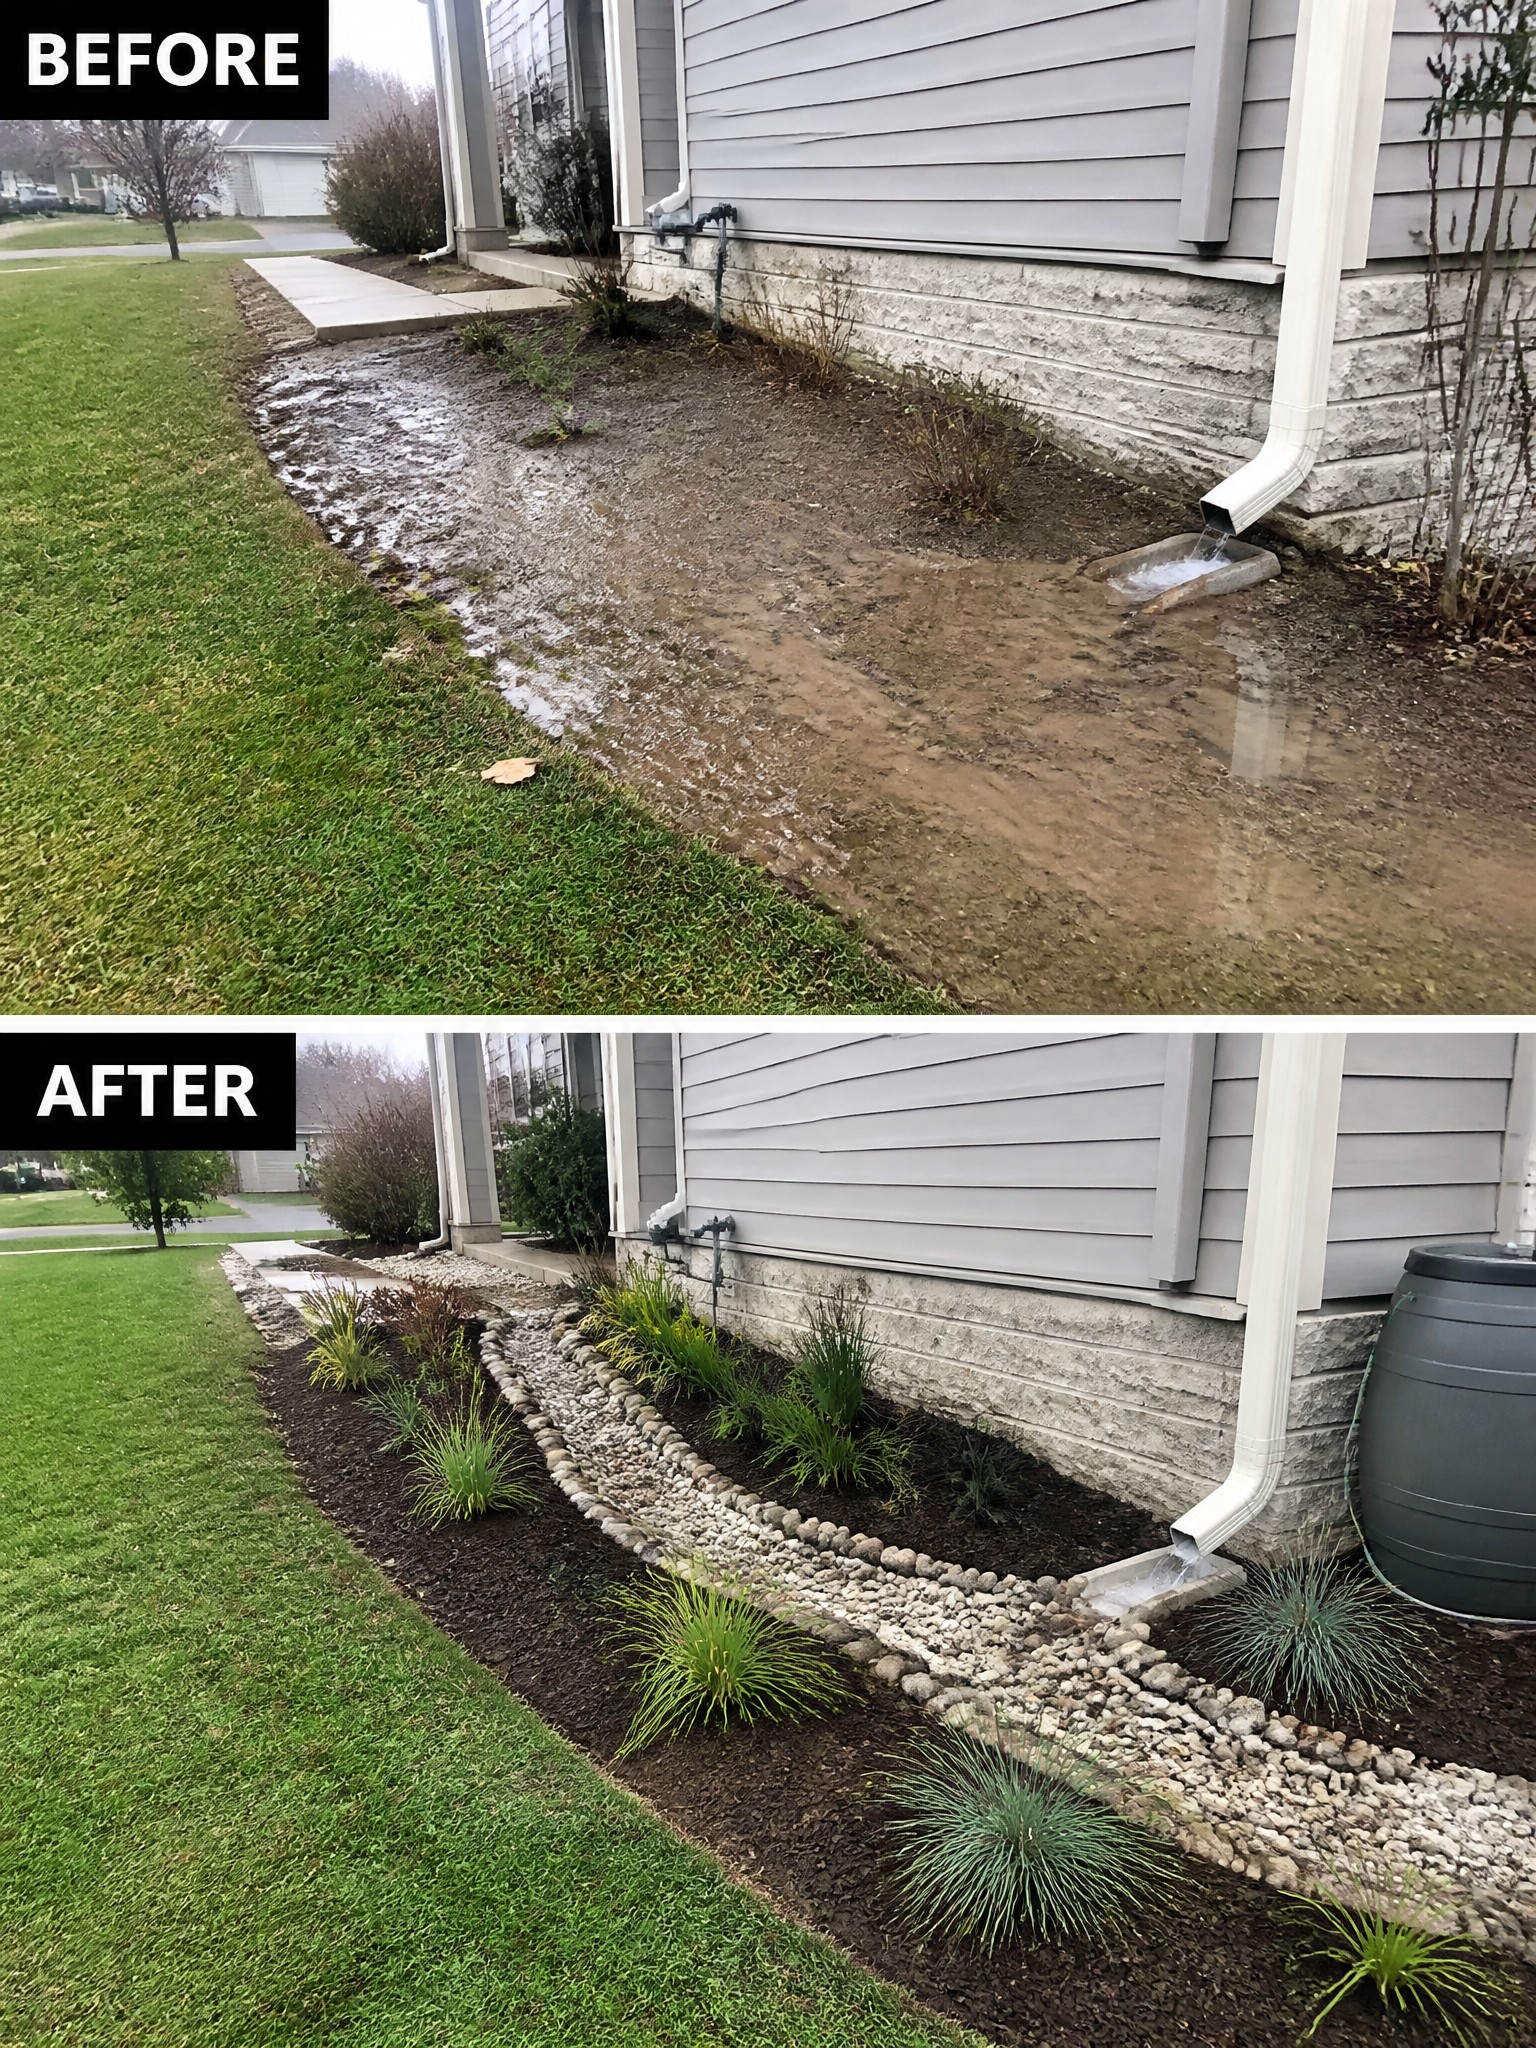
The area next to the house was collecting water and turning into a muddy path. Adding a simple rock border gave the bed a clear shape, helped direct runoff, and kept the soil from washing away.
This idea works best along a foundation where water from a downspout creates problems. Lay the rocks first to set the edge, then add mulch and plants that can handle occasional wet spots. It keeps the whole side of the house looking planned instead of neglected.
Add Structure To Overgrown Front Beds
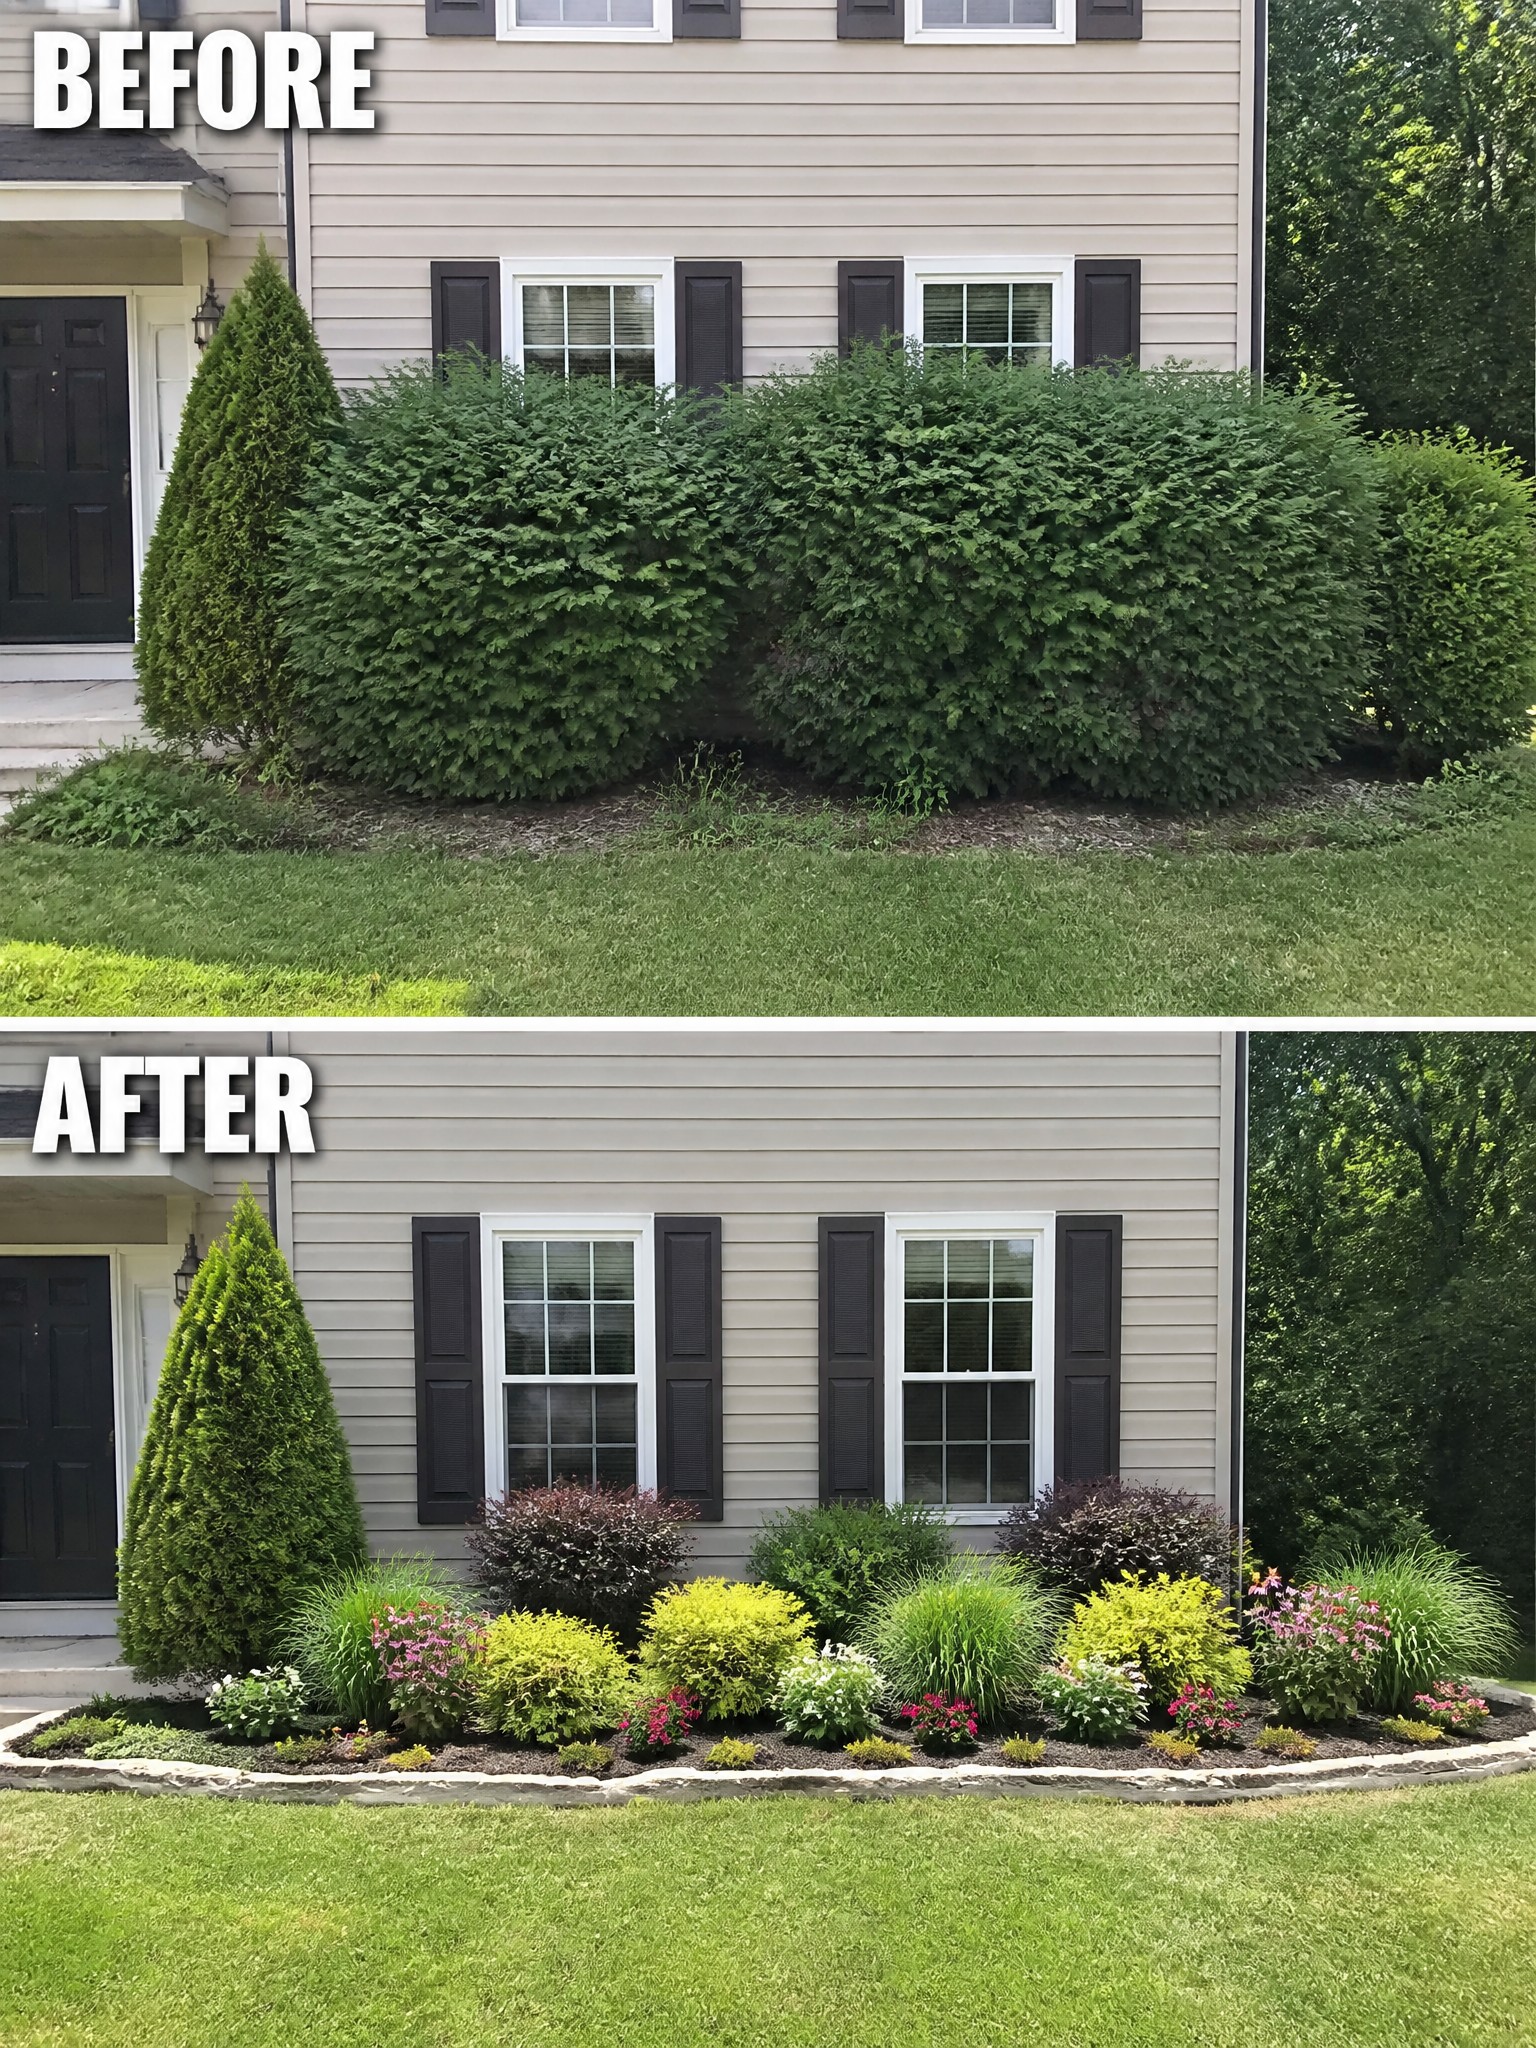
The before photo shows a row of tall, overgrown shrubs that hid the house and made the front look messy. In the after photo, those shrubs are gone and the space is now a neat row of edged beds with plants in different heights and colors. The edging and the mix of low, medium, and taller plants give the beds a clear shape that feels planned instead of wild.
This idea works well on any house where the front beds have grown out of control. Start by removing the biggest, shapeless plants first, then add a simple stone or metal edge to mark the bed. Fill in with a few groups of shrubs and flowers that stay at different heights so the bed still looks full but stays easy to maintain.
Add A Border Around Trees For Clean Garden Beds
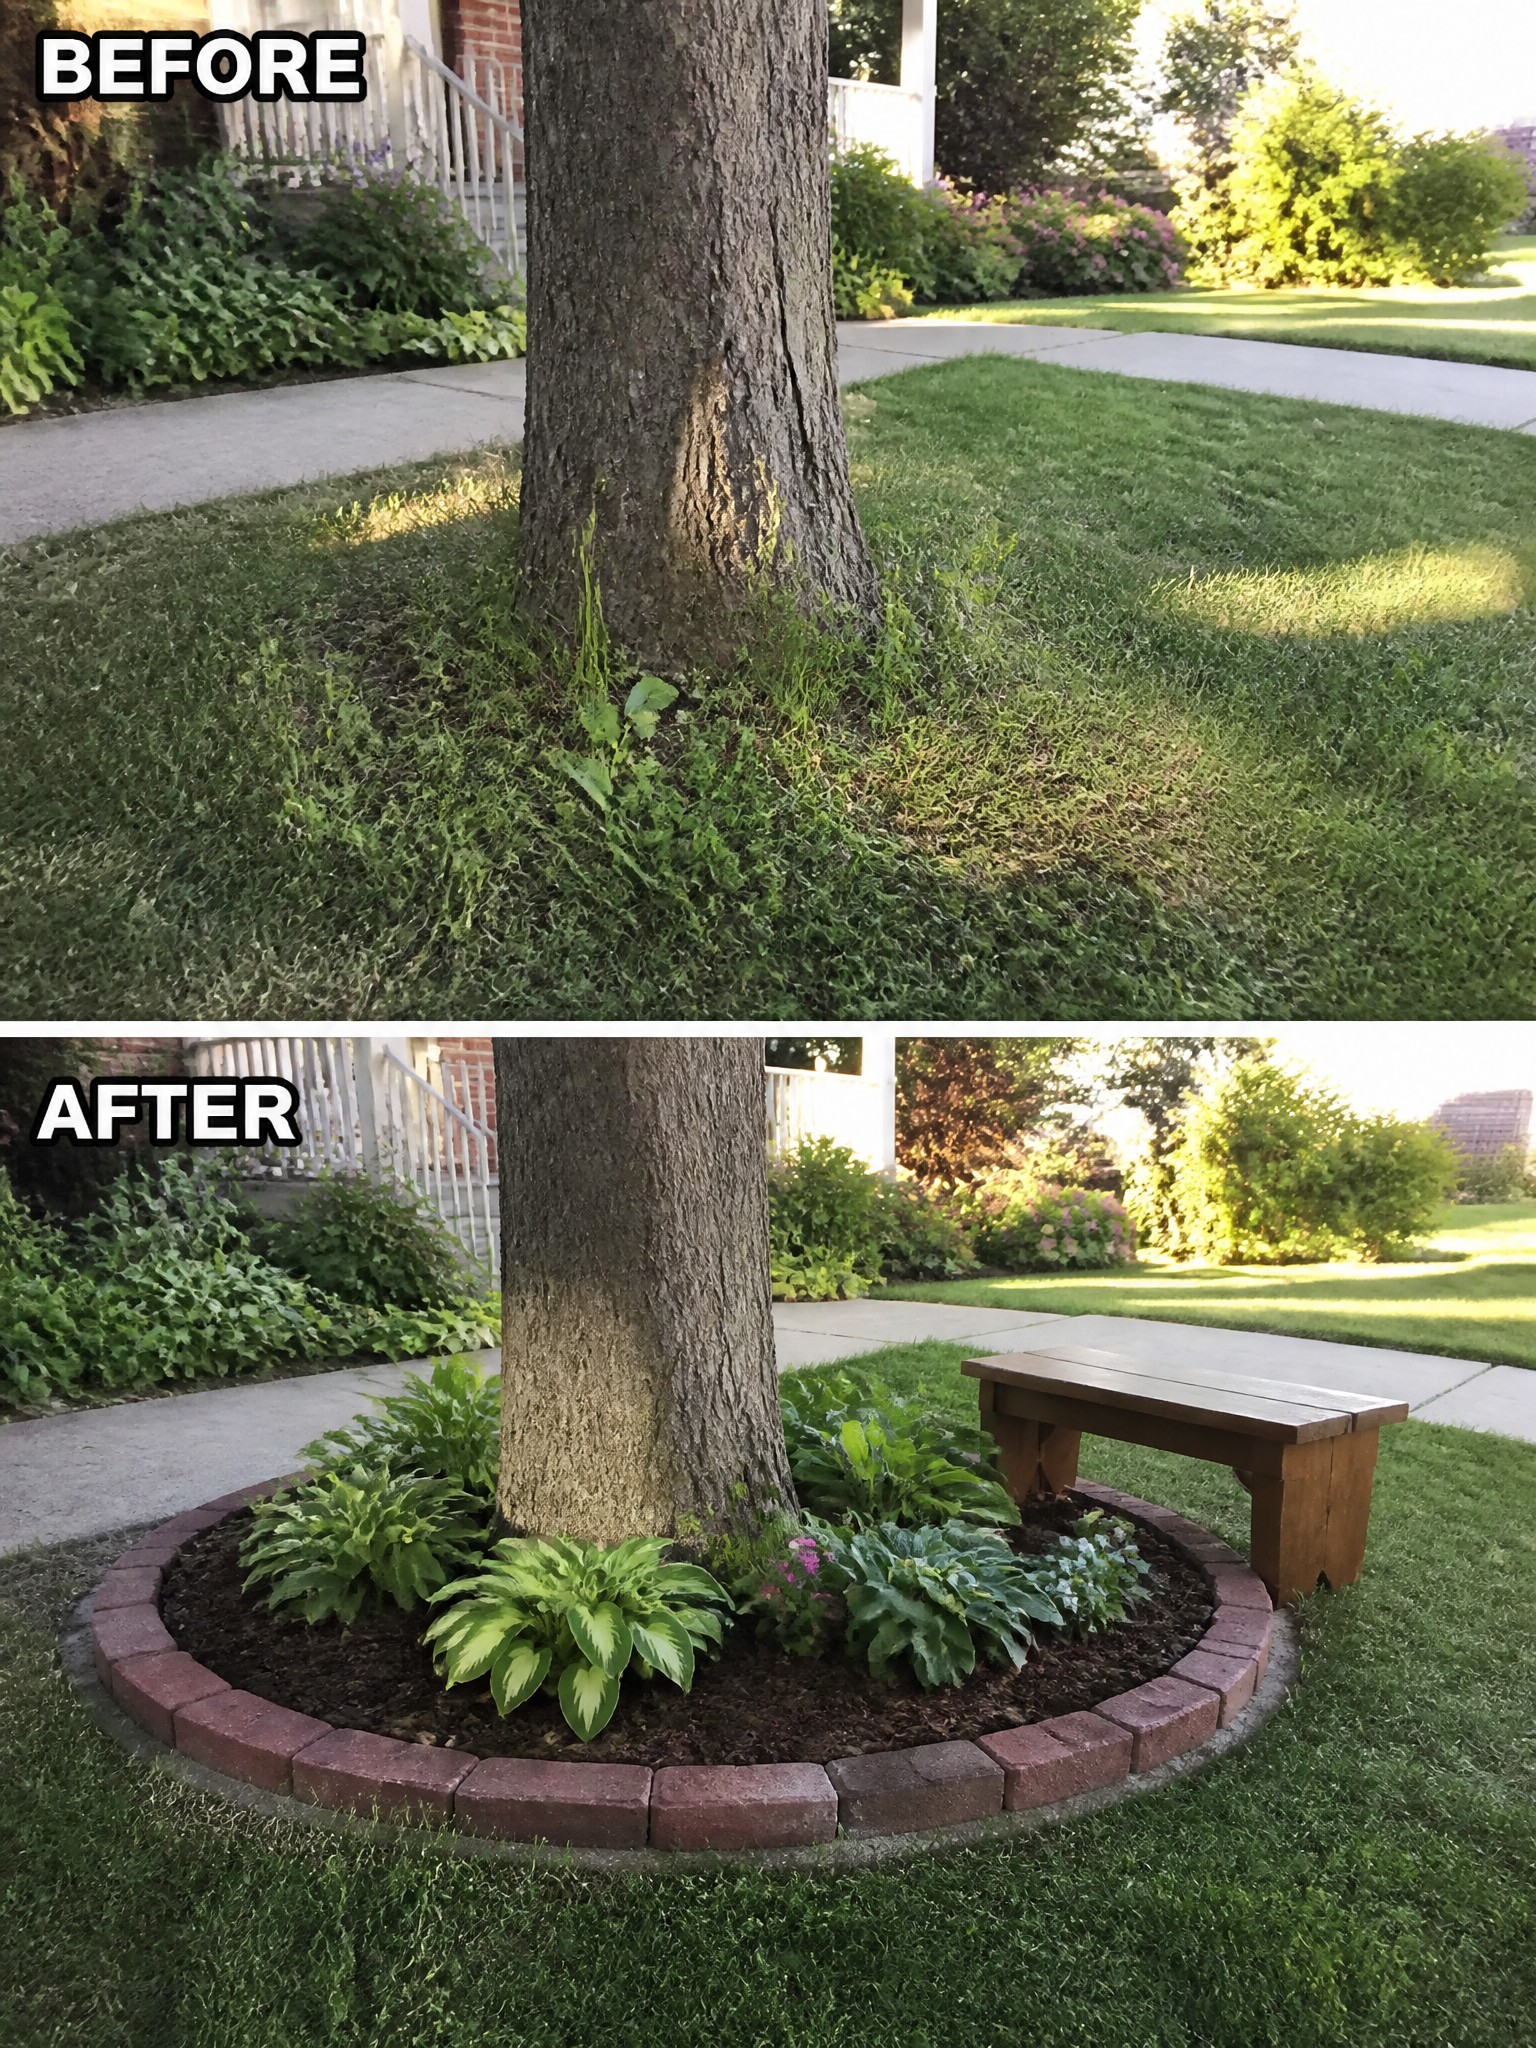
Clearing the grass right up to the trunk and adding a low brick border turns a messy patch into a real garden bed. Mulch and a few hostas keep the look simple while the edging stops the lawn from creeping back in.
This works well in front yards where trees sit in the middle of the grass. Start by cutting a clean circle, lay the border on level ground, and fill with mulch before adding plants. It keeps the bed looking intentional even when the rest of the yard stays basic.
Add Stepping Stones To Organize A Garden Bed
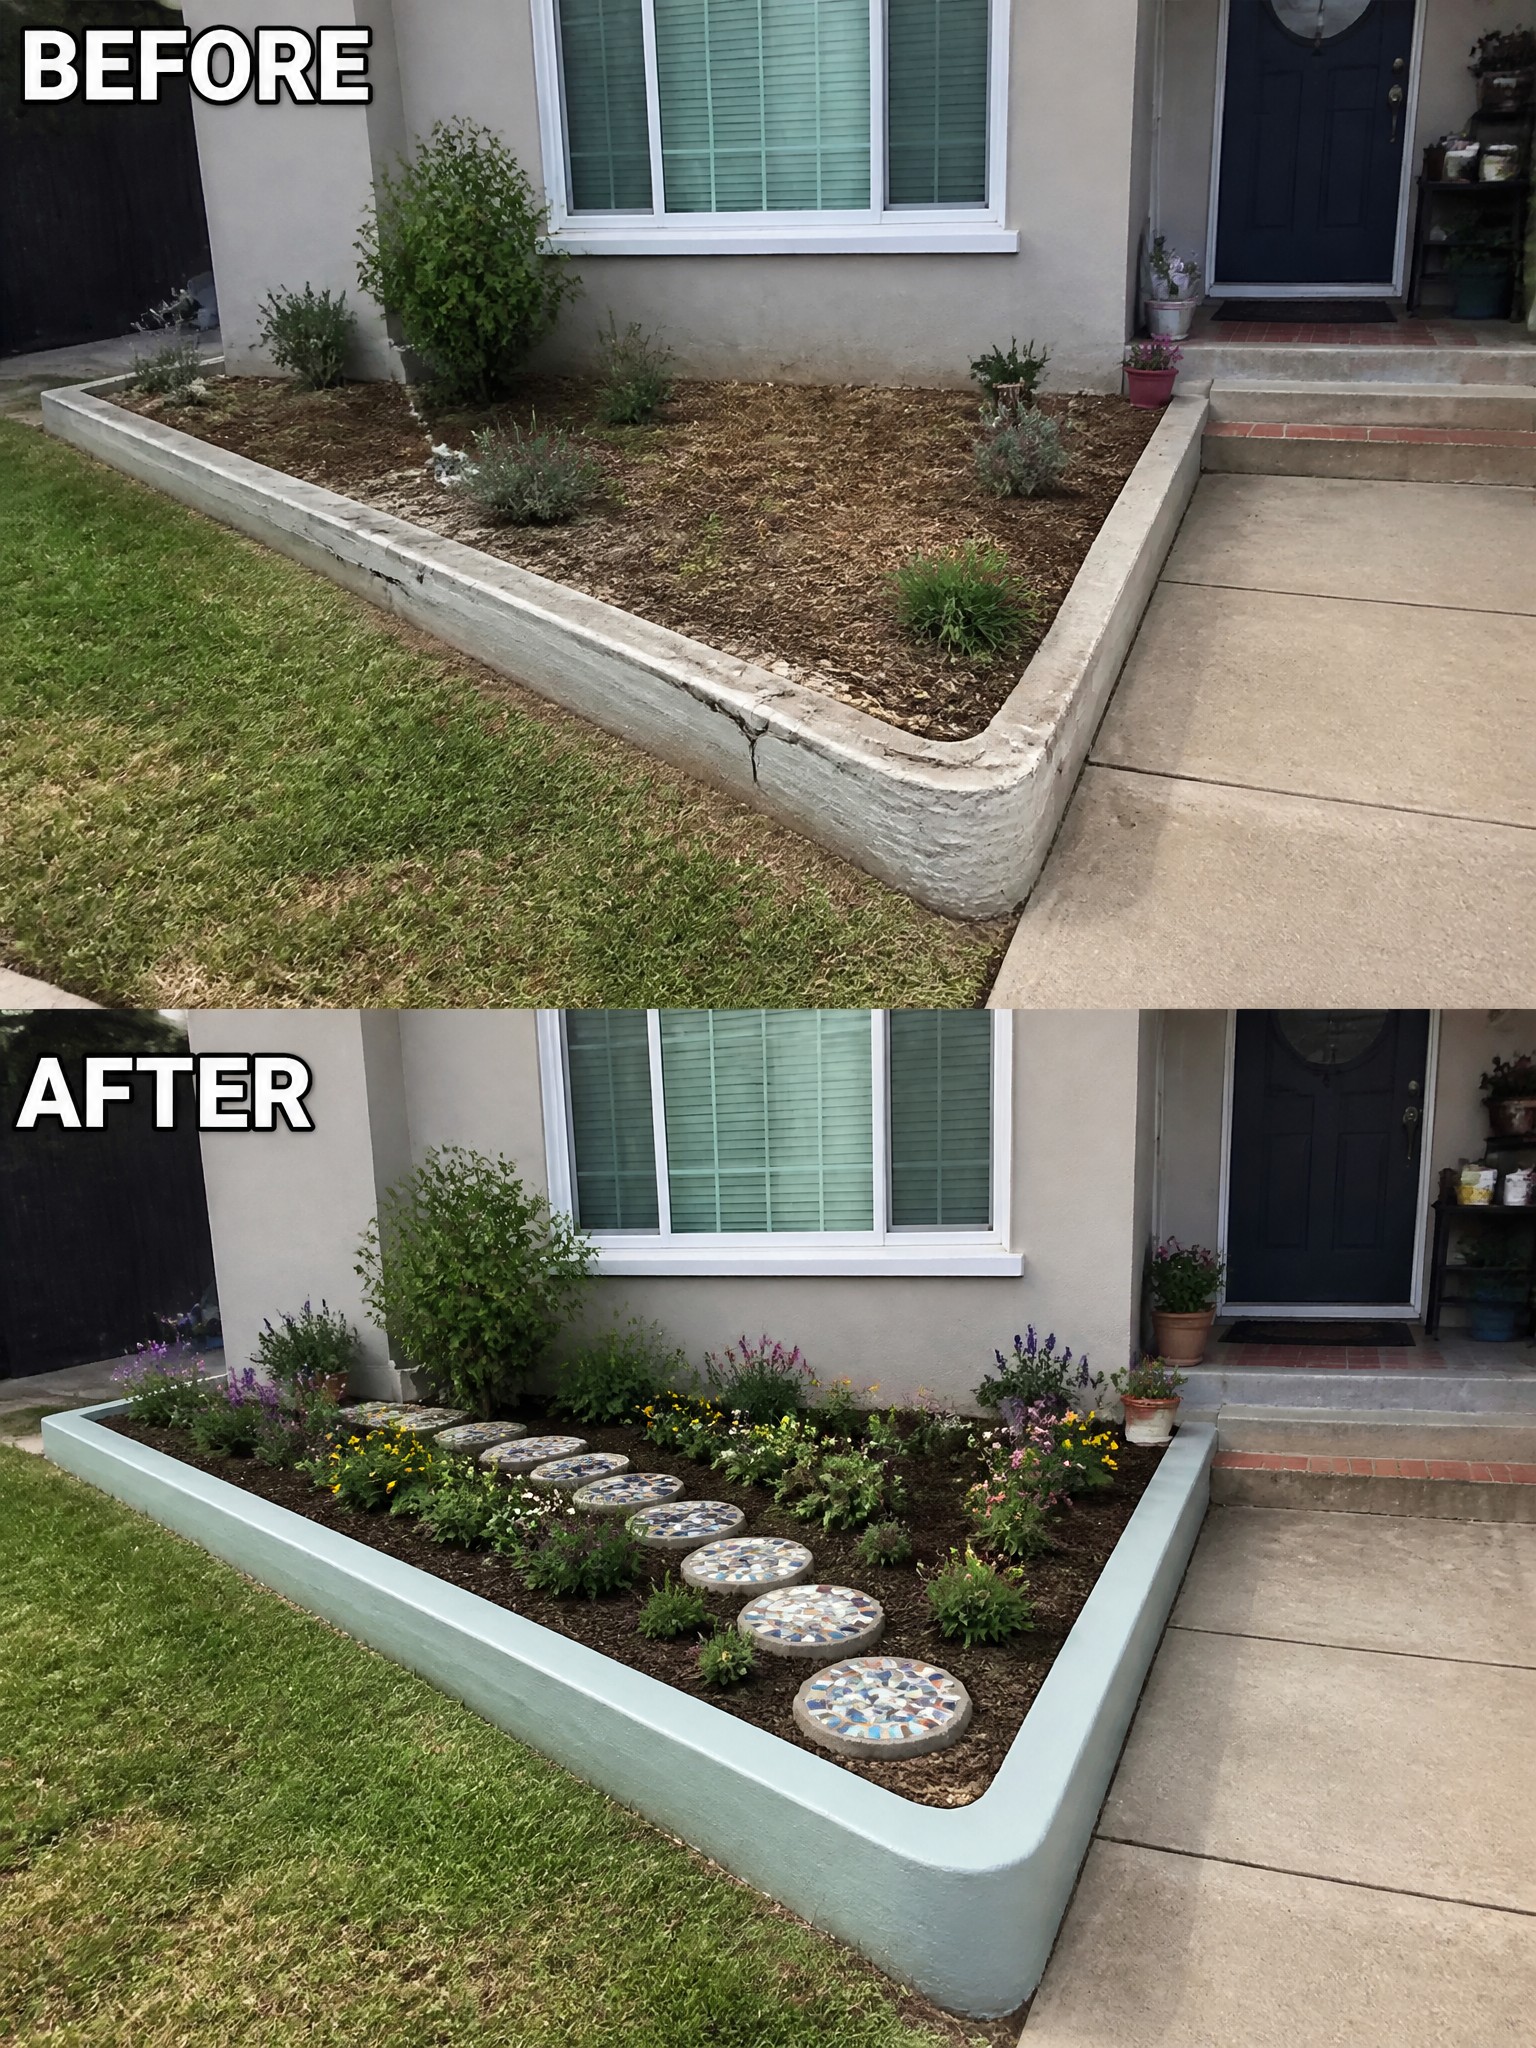
A tired garden bed often needs structure more than new plants. Adding stepping stones gives you a clear path through the bed so you can reach everything without stepping on soil or damaging roots. The fresh paint on the concrete border and the new mulch also help the whole area look intentional instead of neglected.
This works especially well in long, narrow beds next to the house where you still need access for watering and weeding. Place the stones first on bare soil to test the spacing, then add mulch around them so the path feels settled. Keep the curve gentle and leave enough room on both sides for plants to grow.
Frequently Asked Questions
Q: How do I keep the whole project cheap when I need edging for the beds? A: Scout curbside piles or local free groups for bricks and stones that people toss out. Stack them in a simple line to hold the soil and mulch in place. This adds structure without buying anything new.
Q: What plants actually fill in fast without costing much? A: Grab seed packets or tiny starters on sale and space them close together. Things like creeping thyme or daylilies spread on their own after the first season. Water them well at first and they take over the empty spots.
Q: How do I stop weeds from ruining the new look right away? A: Spread a thick layer of cardboard under the mulch before planting. It breaks down later but blocks weeds in the meantime. Pull stragglers by hand every week or so until the plants crowd them out.
