

I often find that an overgrown yard loses its shape when grass creeps into beds and leaves pile up along the edges.
Putting mulch down in those areas and adding a clean border helps the layout read as intentional again.
Cleanup matters most at the start.
I would probably test one border style along the back fence first to see how it holds up before doing the whole yard.
Over time those layers of edging and ground cover make the space feel more settled without needing constant work.
Define Overgrown Beds With Simple Borders
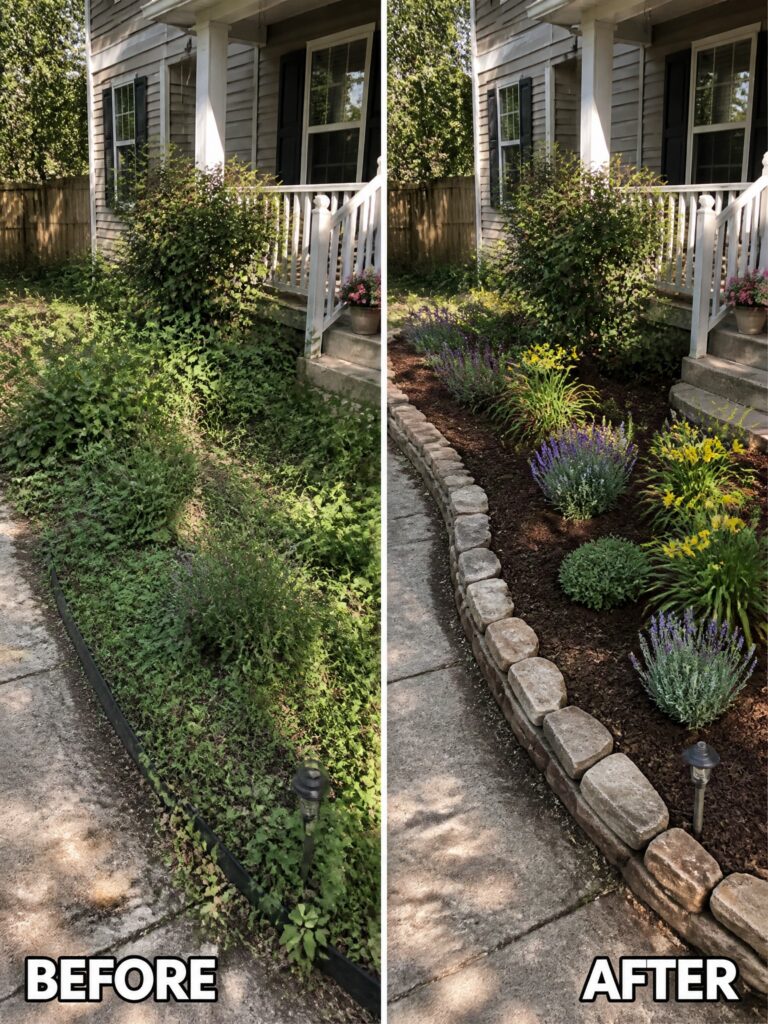
Clearing the weeds first made the biggest difference here. Adding a low stone border and fresh mulch then gave the beds a clear shape that keeps grass from creeping in and makes the plants easier to manage.
This idea suits any narrow bed along a house or walkway. Remove the overgrowth, set the border, spread mulch, and plant in groups. The border does most of the work keeping the area looking neat as the plants grow.
Add Structure To An Overgrown Side Yard
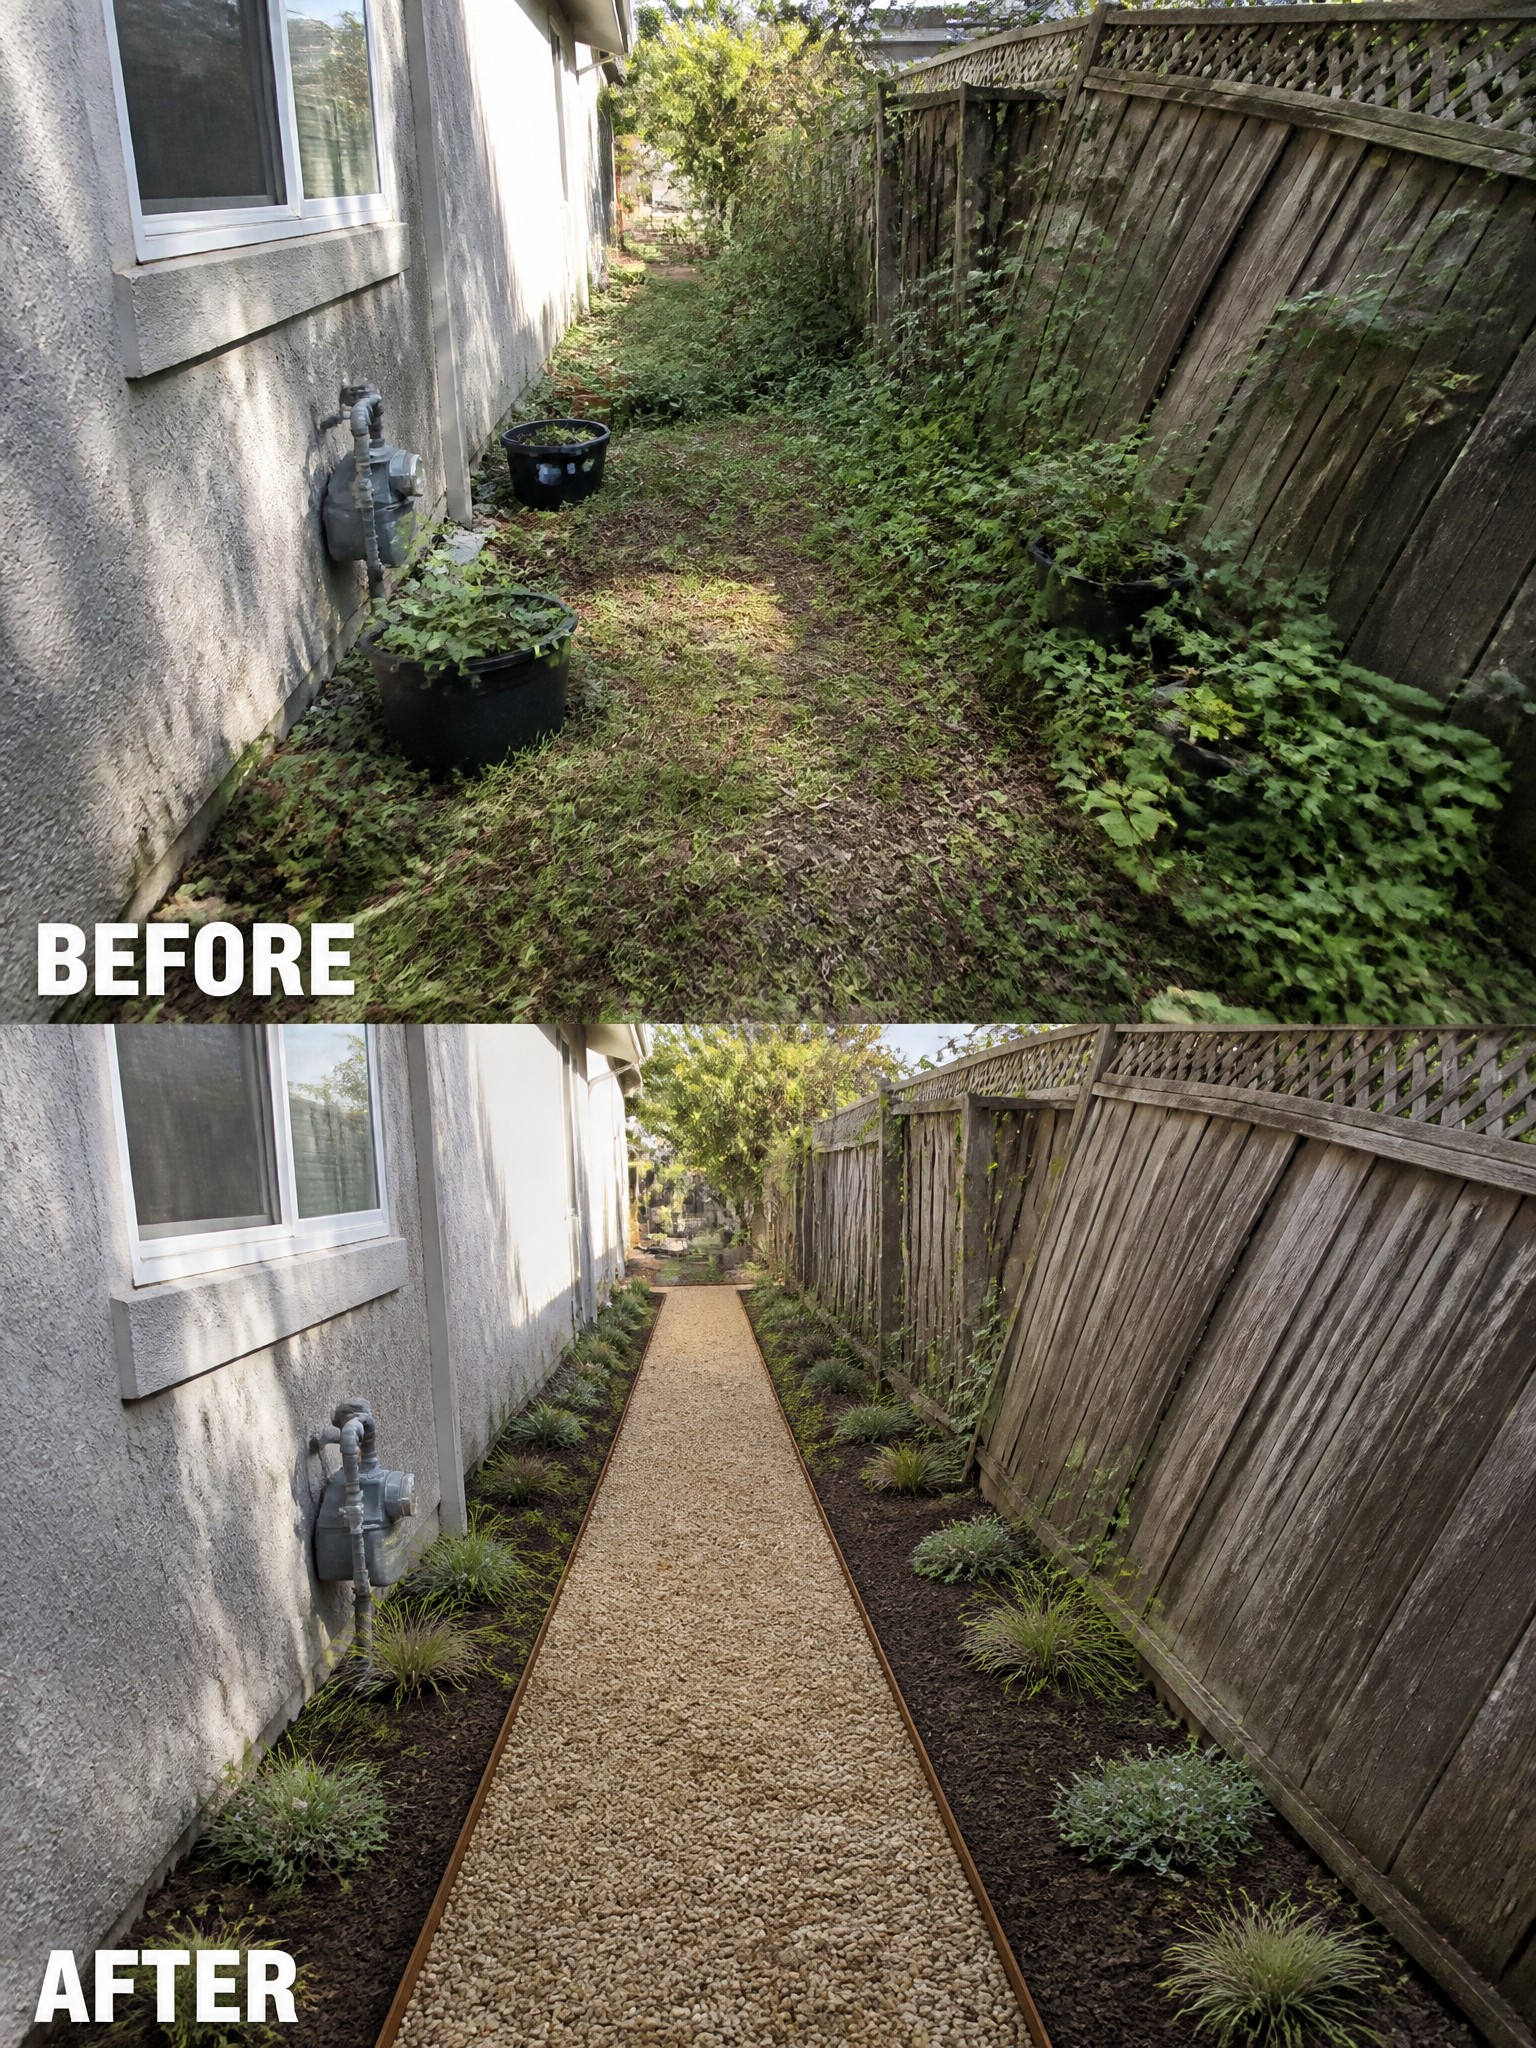
A narrow side yard that has grown wild can quickly become hard to use. Laying a gravel path with simple metal edging gives the space a clear shape, keeps the walkway dry underfoot, and creates room for low plants along both sides instead of letting everything spread into the middle.
This idea works best in tight passages where you still need regular access to the back of the house. Clear the overgrowth first, then add the edging before spreading gravel so the path stays contained and the beds stay easy to maintain.
Add A Simple Border Around Trees
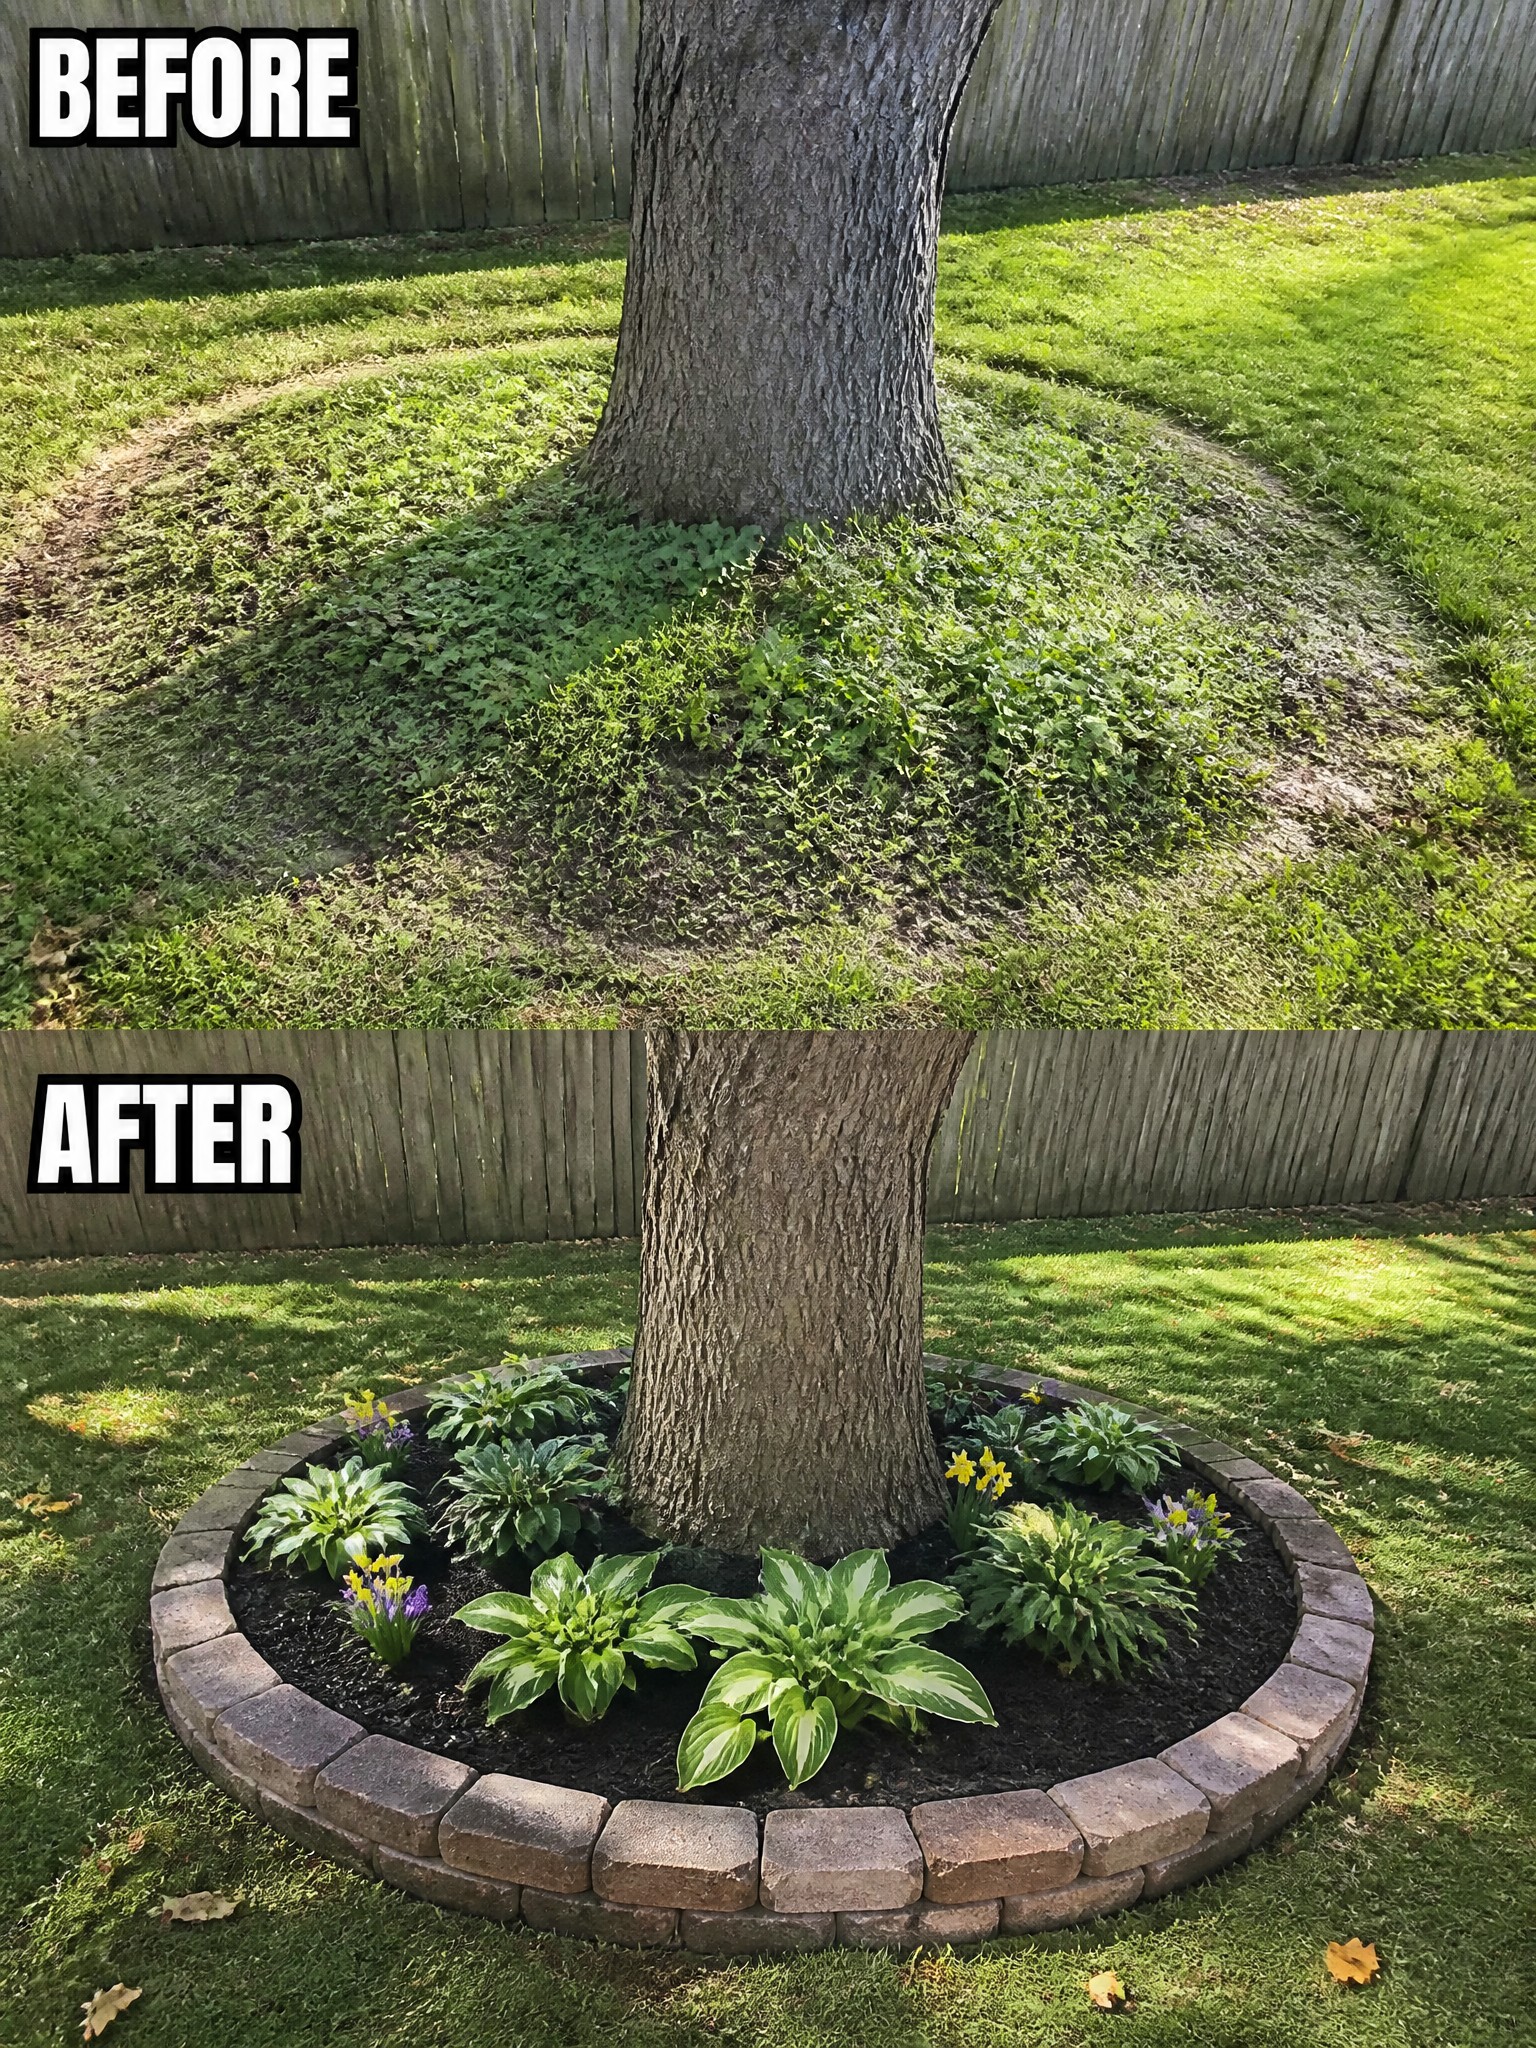
One easy way to fix a messy spot under a tree is to add a clear border and mulch the area inside it. The before photo shows weeds and grass creeping right up to the trunk with no real edge. Once a brick circle goes in and the space gets filled with mulch and a few hostas, the tree base stops looking neglected and starts looking like part of the yard plan.
This idea works in most lawns where trees sit out in the open. Mark a circle big enough for the roots, set the edging, and keep the mulch a few inches away from the trunk. It protects the tree, makes mowing easier, and gives the whole yard a tidier look with very little upkeep.
Add Defined Mulch Beds To Control Overgrown Fence Lines
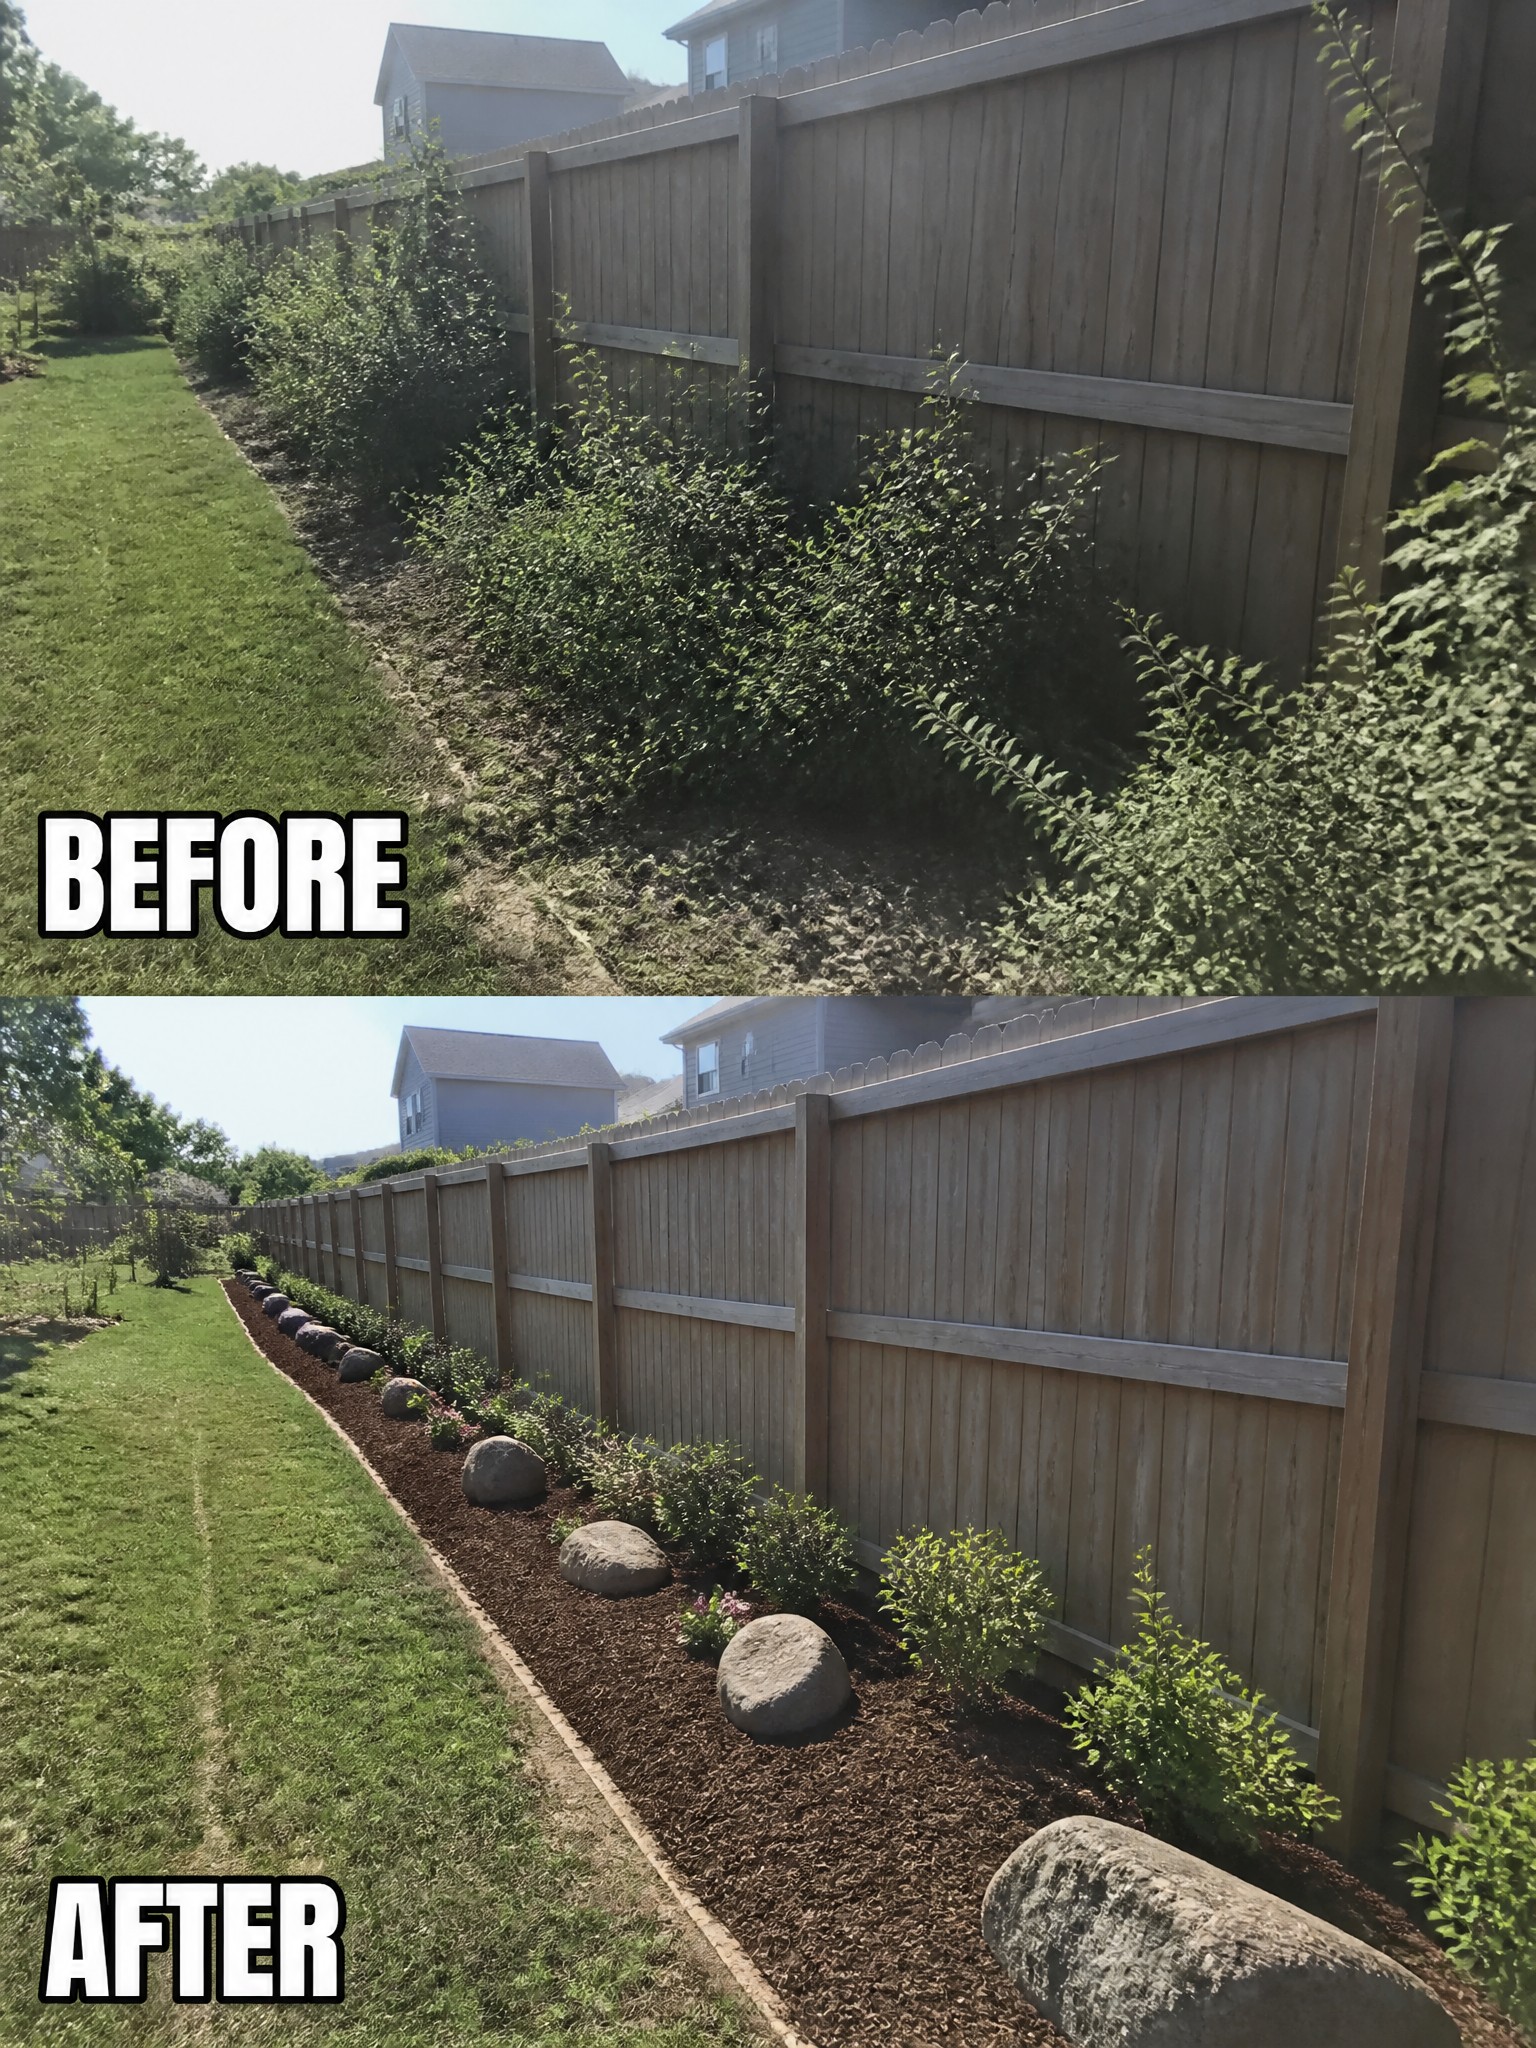
An overgrown strip along a fence often turns into a messy mix of weeds and wild growth that crowds the lawn. The change here comes from clearing that area first, then laying down mulch in a clear strip and adding a few large rocks to hold the shape. This gives the whole side of the yard a settled look without needing a lot of new plants right away.
This approach works well on long, narrow spaces where you want to keep things simple and low maintenance. Start by cutting back the worst of the overgrowth, then decide how wide you want the bed to run so it does not eat into the lawn. Mulch keeps weeds down and gives the rocks something to sit against, so the edge stays neat even after a few seasons.
Add Structure To An Overgrown Backyard
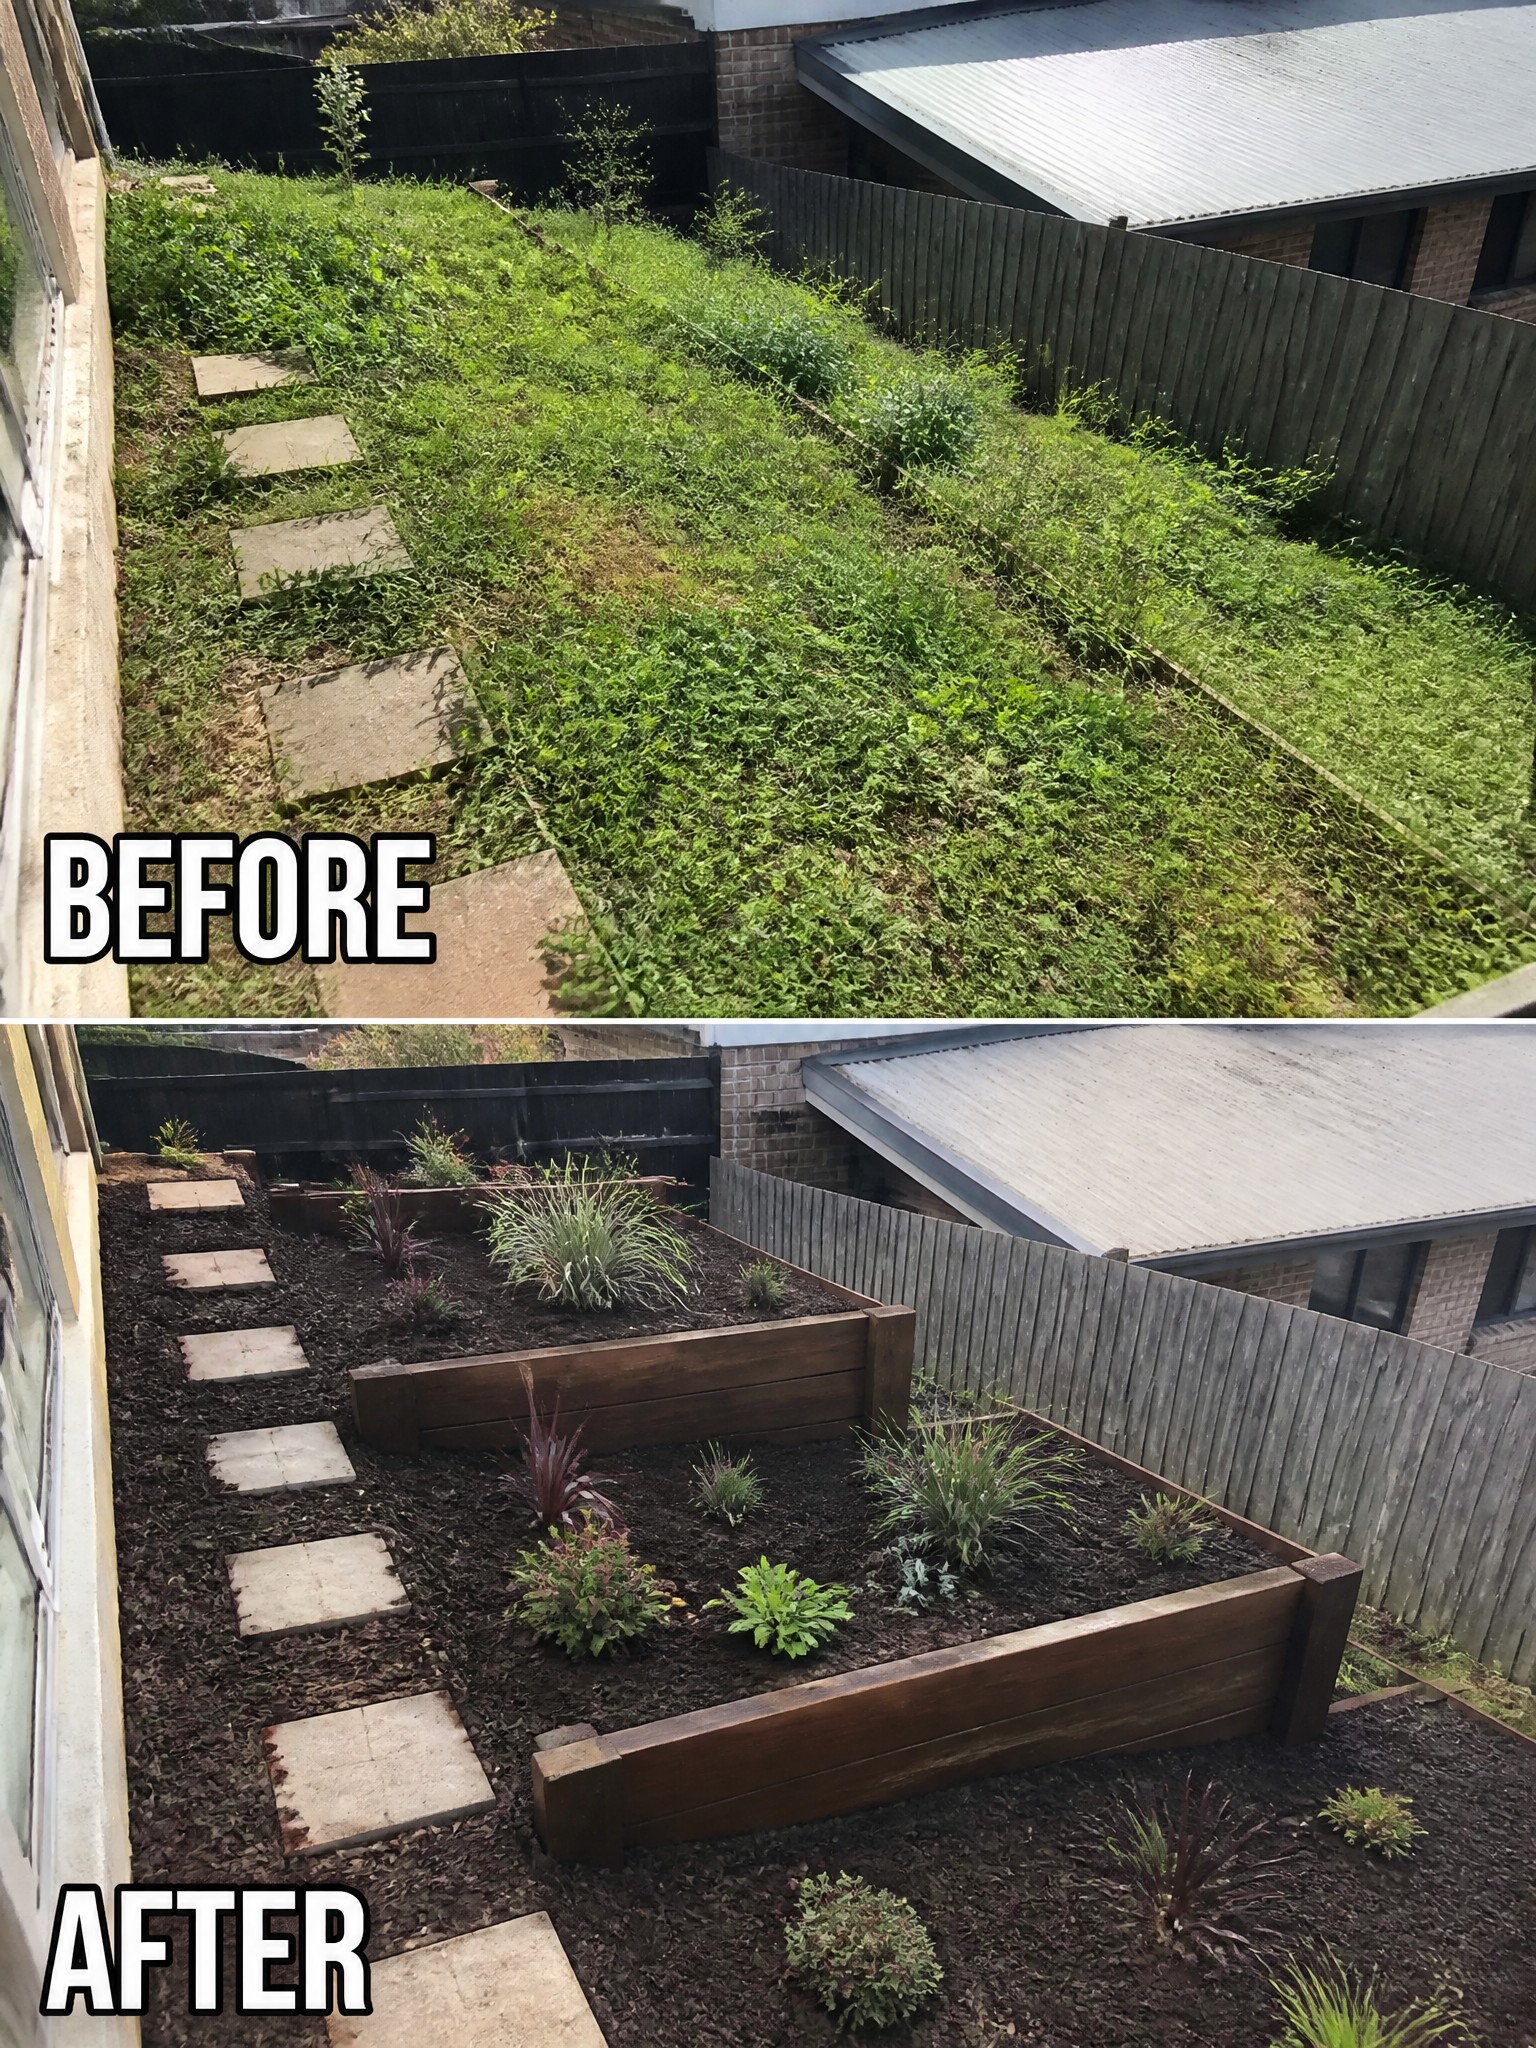
Clearing the thick overgrowth first made room for raised wooden beds and a thick layer of mulch. The new borders keep planting areas contained on the slope while the mulch stops weeds from returning across the rest of the ground.
This idea suits homes with steep or awkward yards where a regular lawn is hard to keep. Build the beds along the grade, fill them with good soil, and use mulch everywhere else to cut down on maintenance. The result feels planned instead of neglected.
Use Borders And Mulch To Give Overgrown Edges A Clean Look

The before photo shows a mailbox sitting in a patch of tall weeds and uneven grass right along the curb. In the after photo the same spot has a simple brick border, fresh mulch, and a few rounded shrubs that keep everything neat without much fuss. The change makes the whole front edge of the yard look intentional instead of neglected.
This approach works well along roadsides or property lines where grass tends to get away from you. Start by clearing the overgrowth, then lay a basic border and mulch to hold the soil in place. It keeps weeds down and gives you a clear line to mow against. The idea suits any home with a visible street edge and does not require a big budget or a lot of new plants.
Clean Up Overgrown Beds With Defined Borders
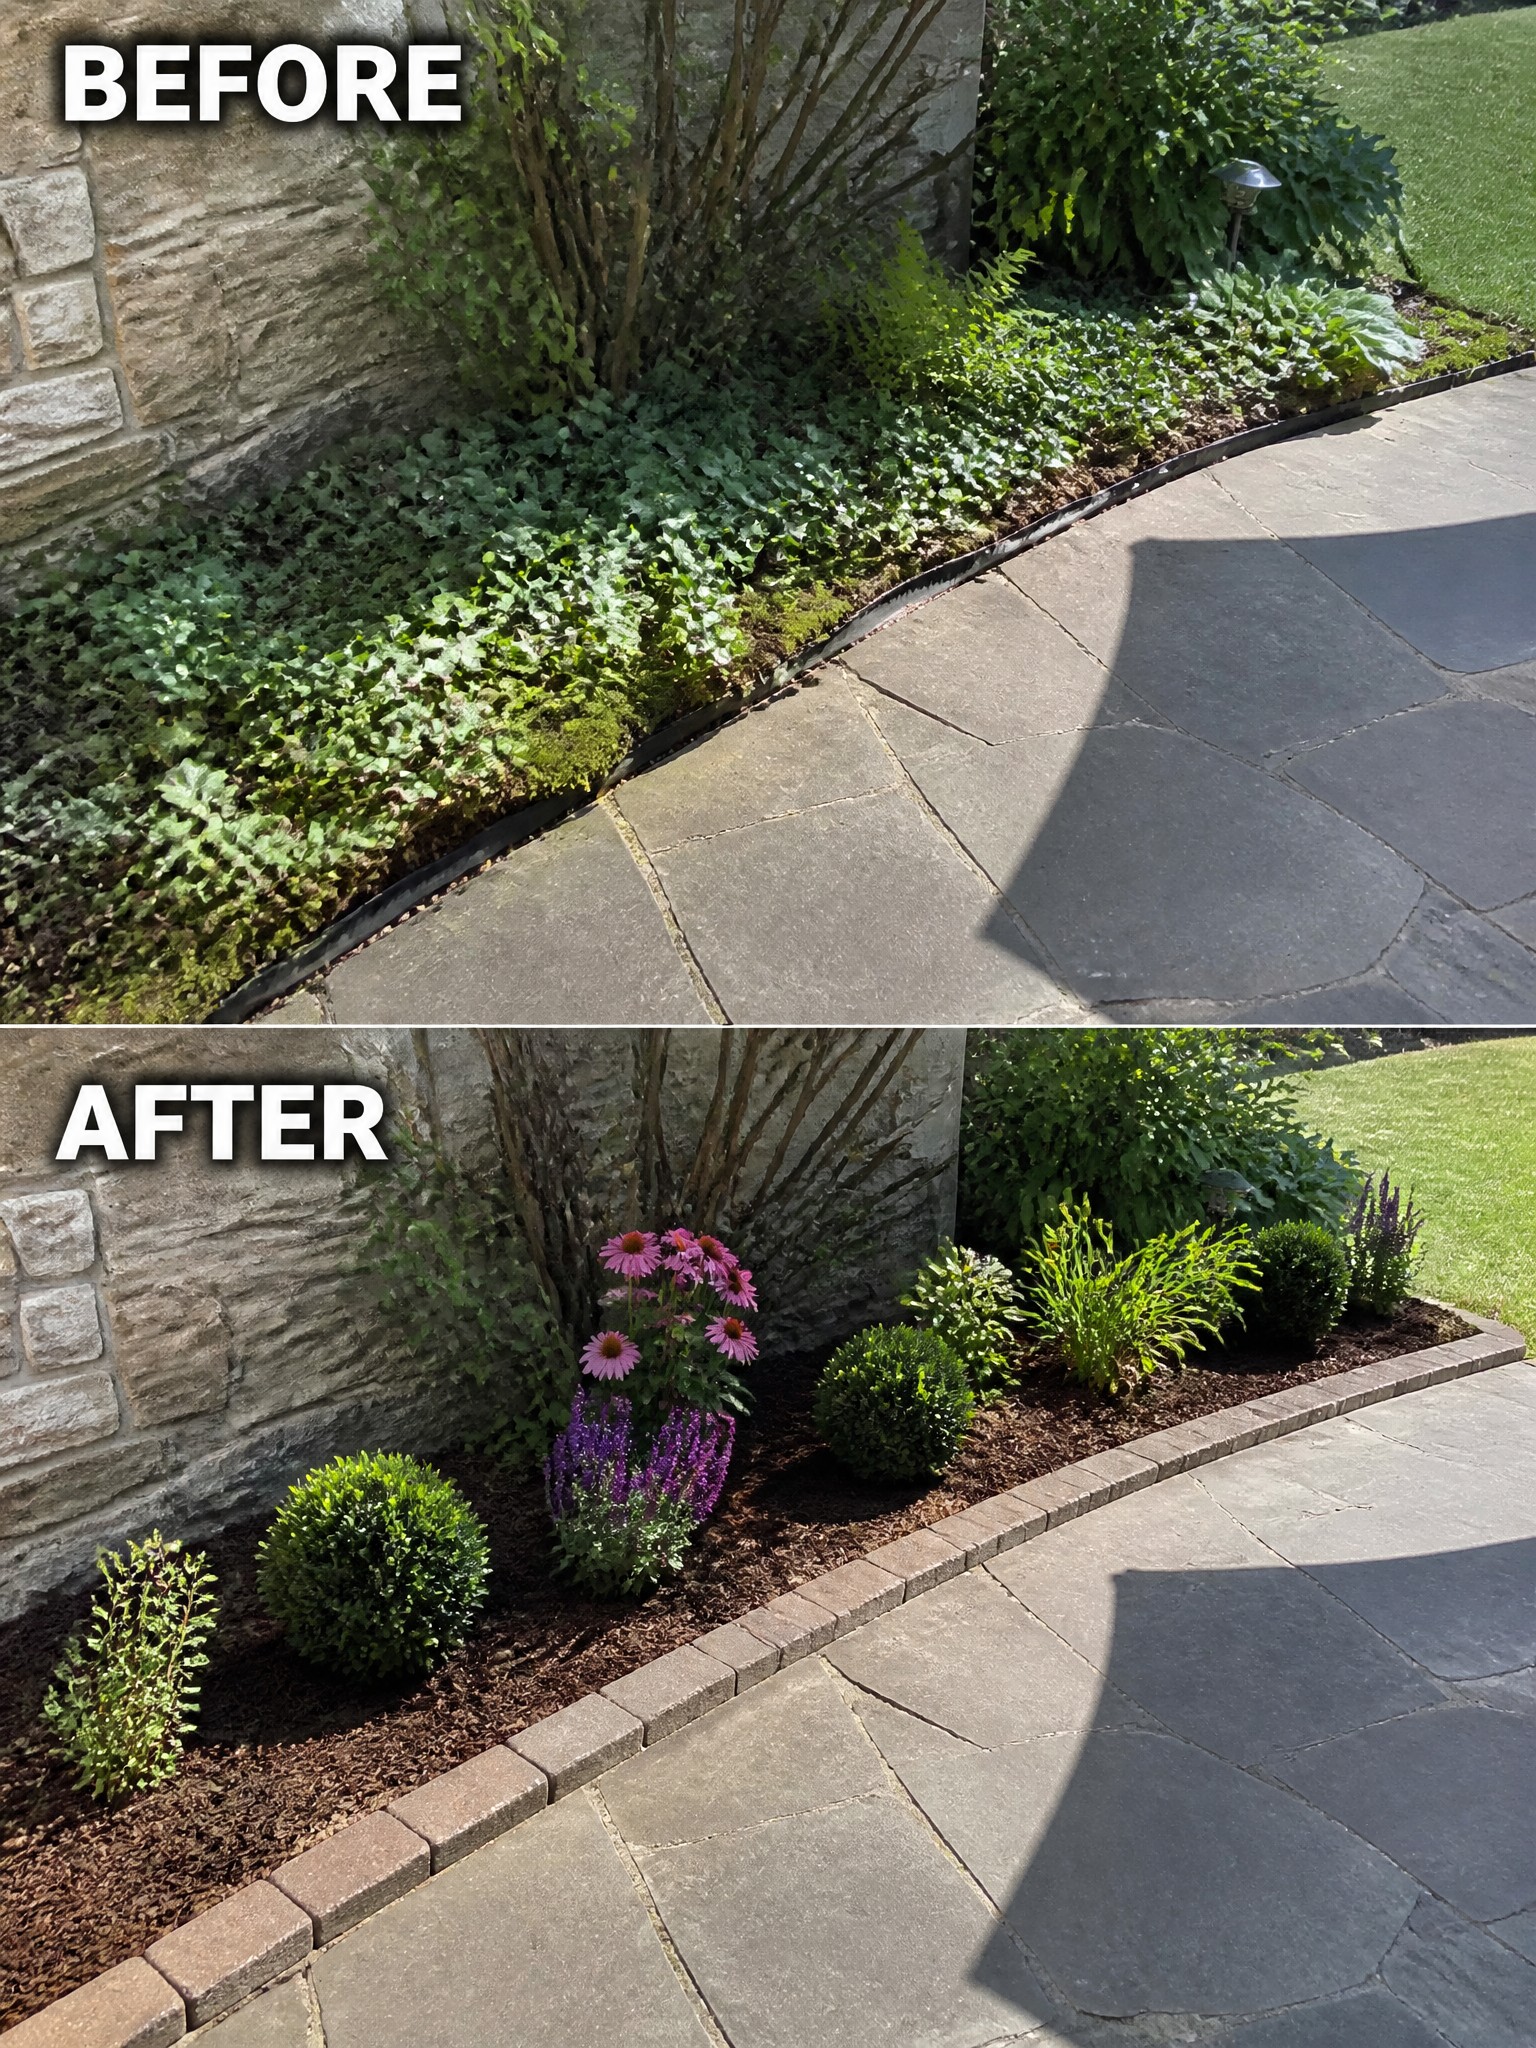
Overgrown ground cover next to a path quickly starts to look messy and spills into areas where it does not belong. Adding a clear brick border and switching to mulch gives the bed a firm edge and keeps the planting contained so the walkway stays open and the area looks intentional.
This idea works best along house foundations or beside paved paths where you want low upkeep. Clear the old growth first, set the edging in a straight line, then spread mulch before adding a few shrubs and flowers in simple groups. The result stays neat with minimal trimming.
Add Structure To An Overgrown Backyard
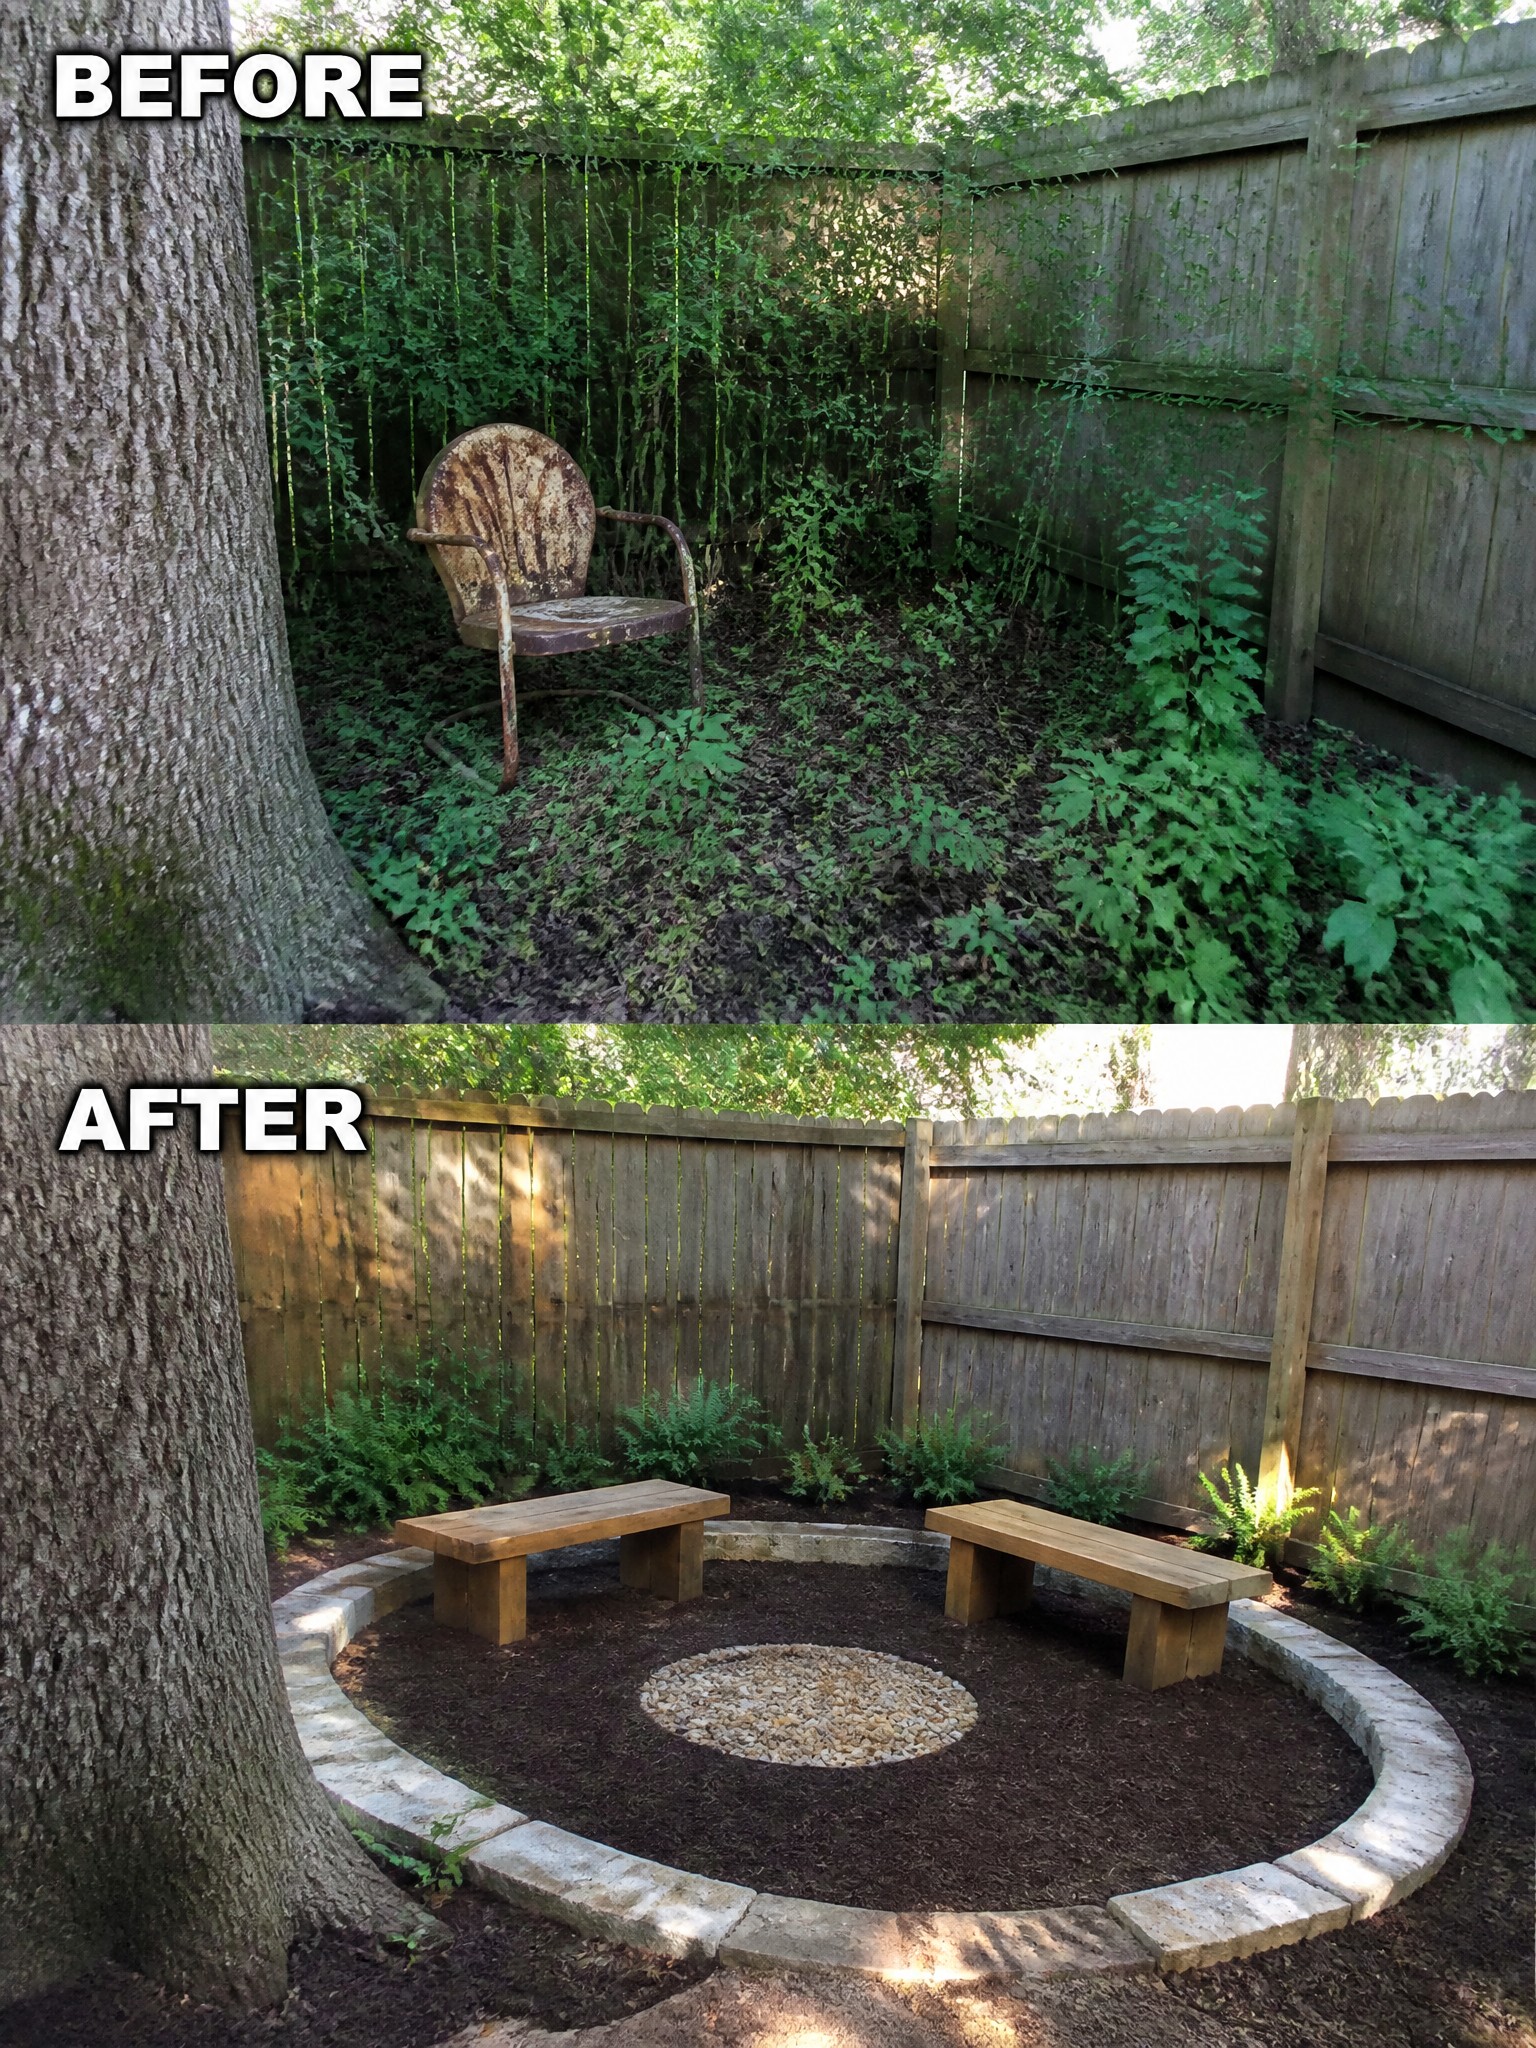
An overgrown yard often stays unused because there is no clear shape to work with. Adding a simple border and fresh mulch turns a weedy patch into a usable space without needing a full redesign.
This idea suits small backyards where the fence already gives you walls. Clear the heavy growth first, then lay a border that matches the size you need for seating or planting. Mulch inside the border keeps the area tidy and makes future upkeep much easier.
Define Foundation Beds With Mulch And Borders
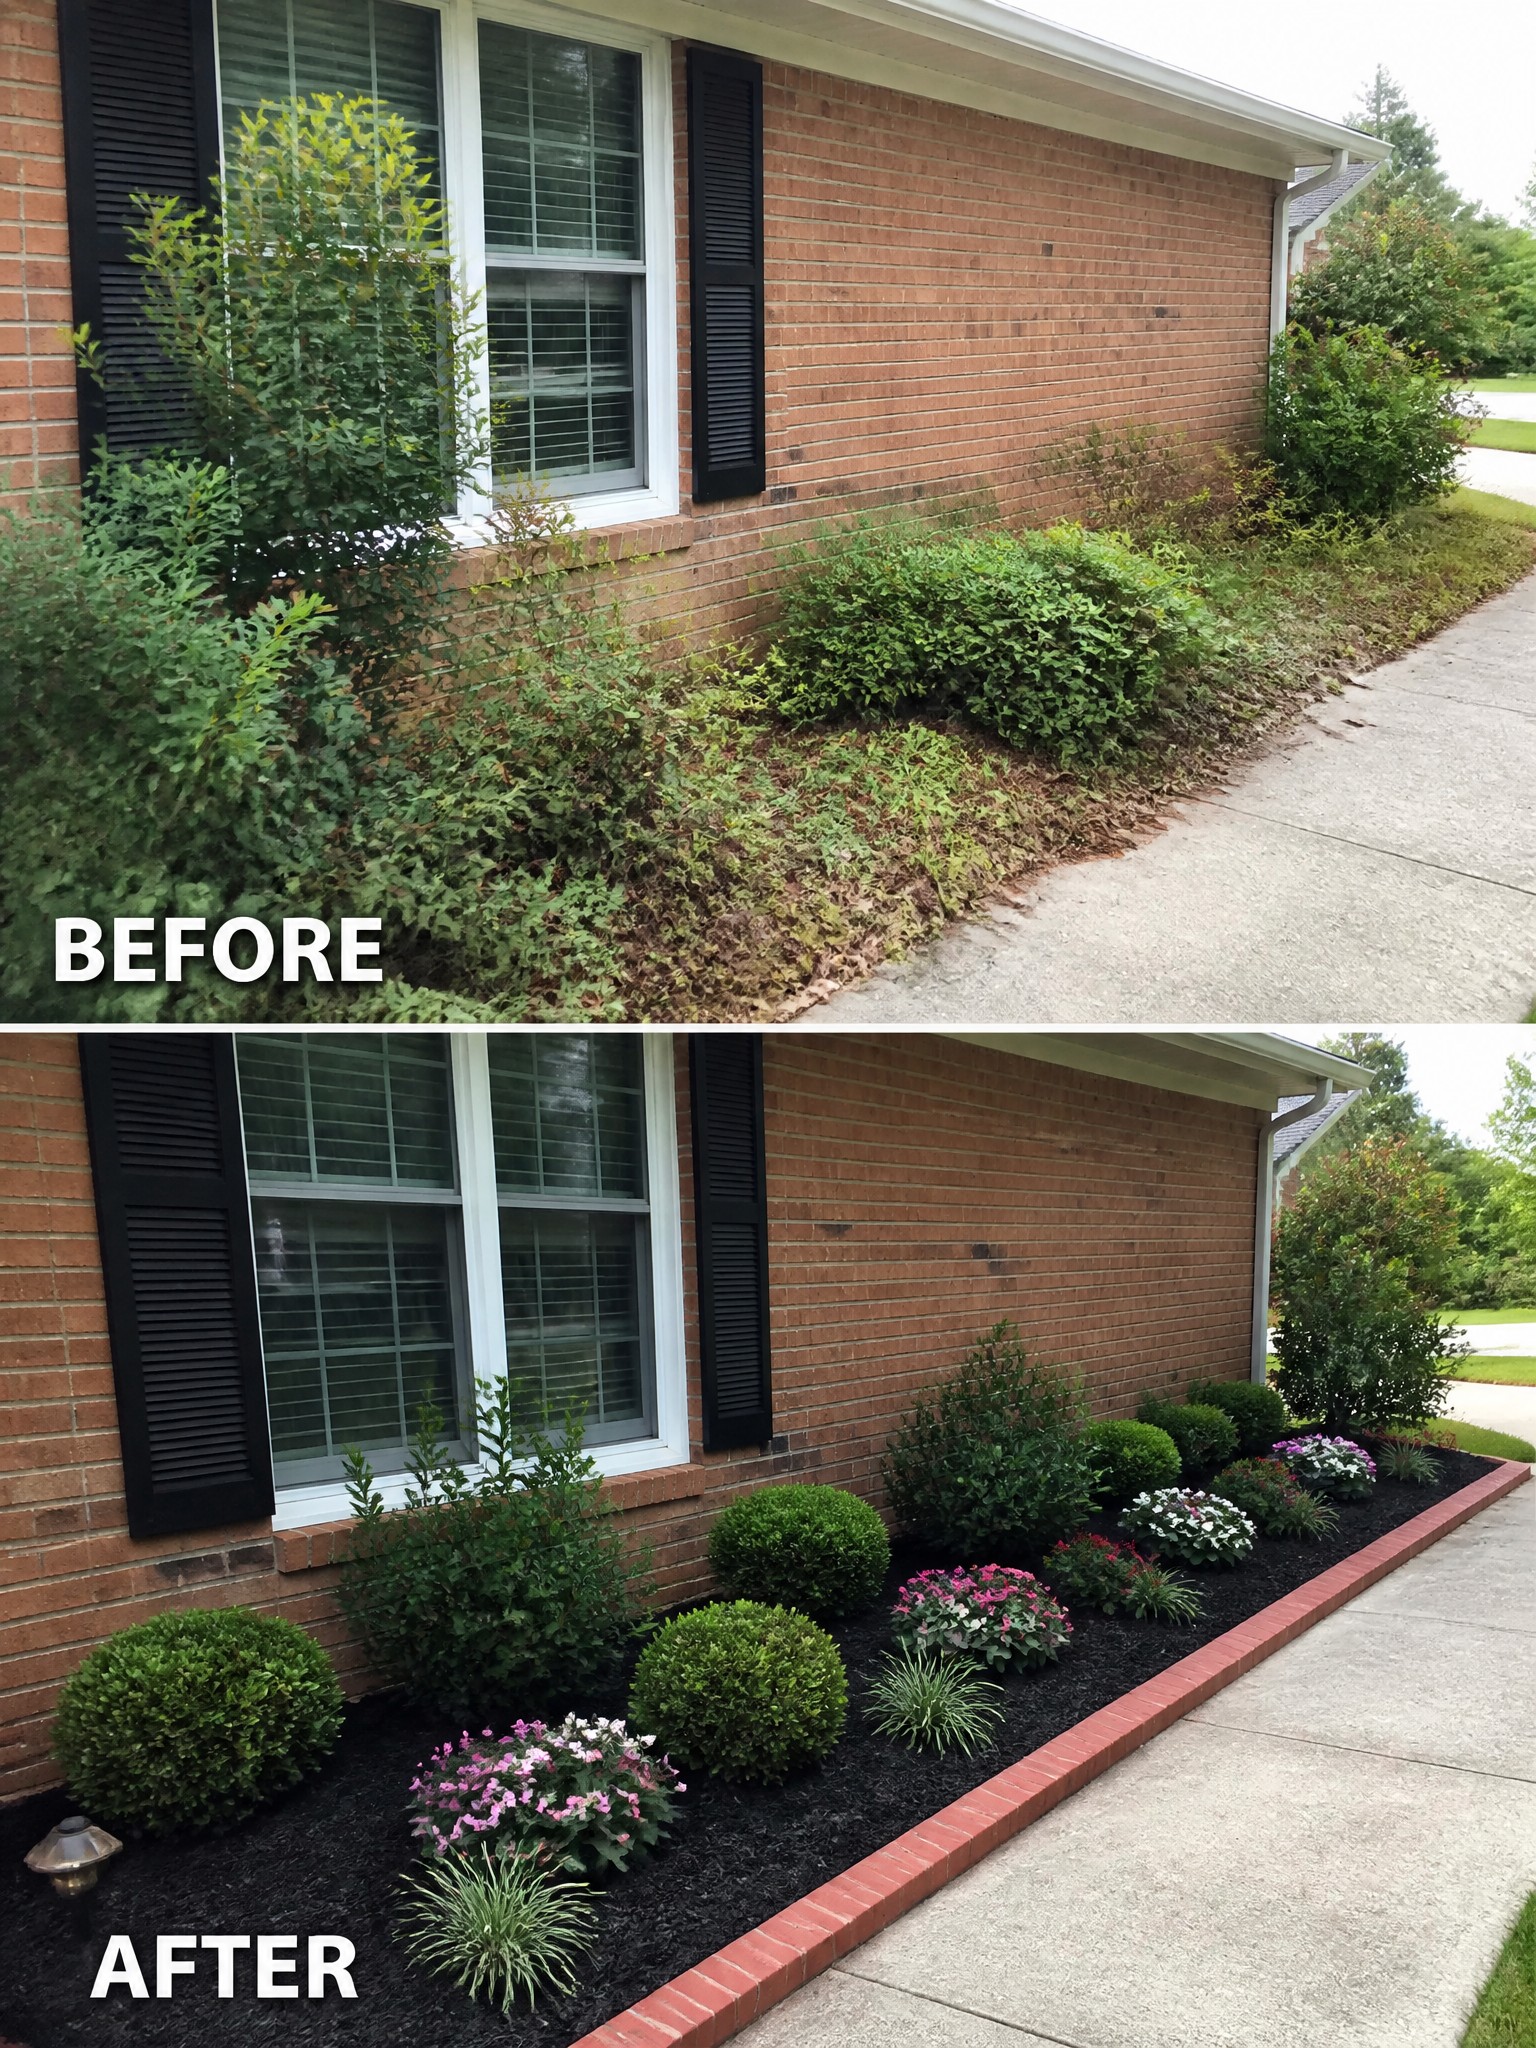
Many homes end up with a messy strip of ground right along the foundation where plants grow wild and leaves collect. Adding a simple border and fresh mulch turns that area into a clean, structured bed that keeps the house looking tended without constant weeding.
This idea works best on long stretches of wall where the lawn meets the brick. Clear the overgrowth first, install a low border to hold everything in place, then spread mulch and add a few rounded shrubs and small flowering plants spaced out along the length.
Use Borders And Mulch To Define A Play Area
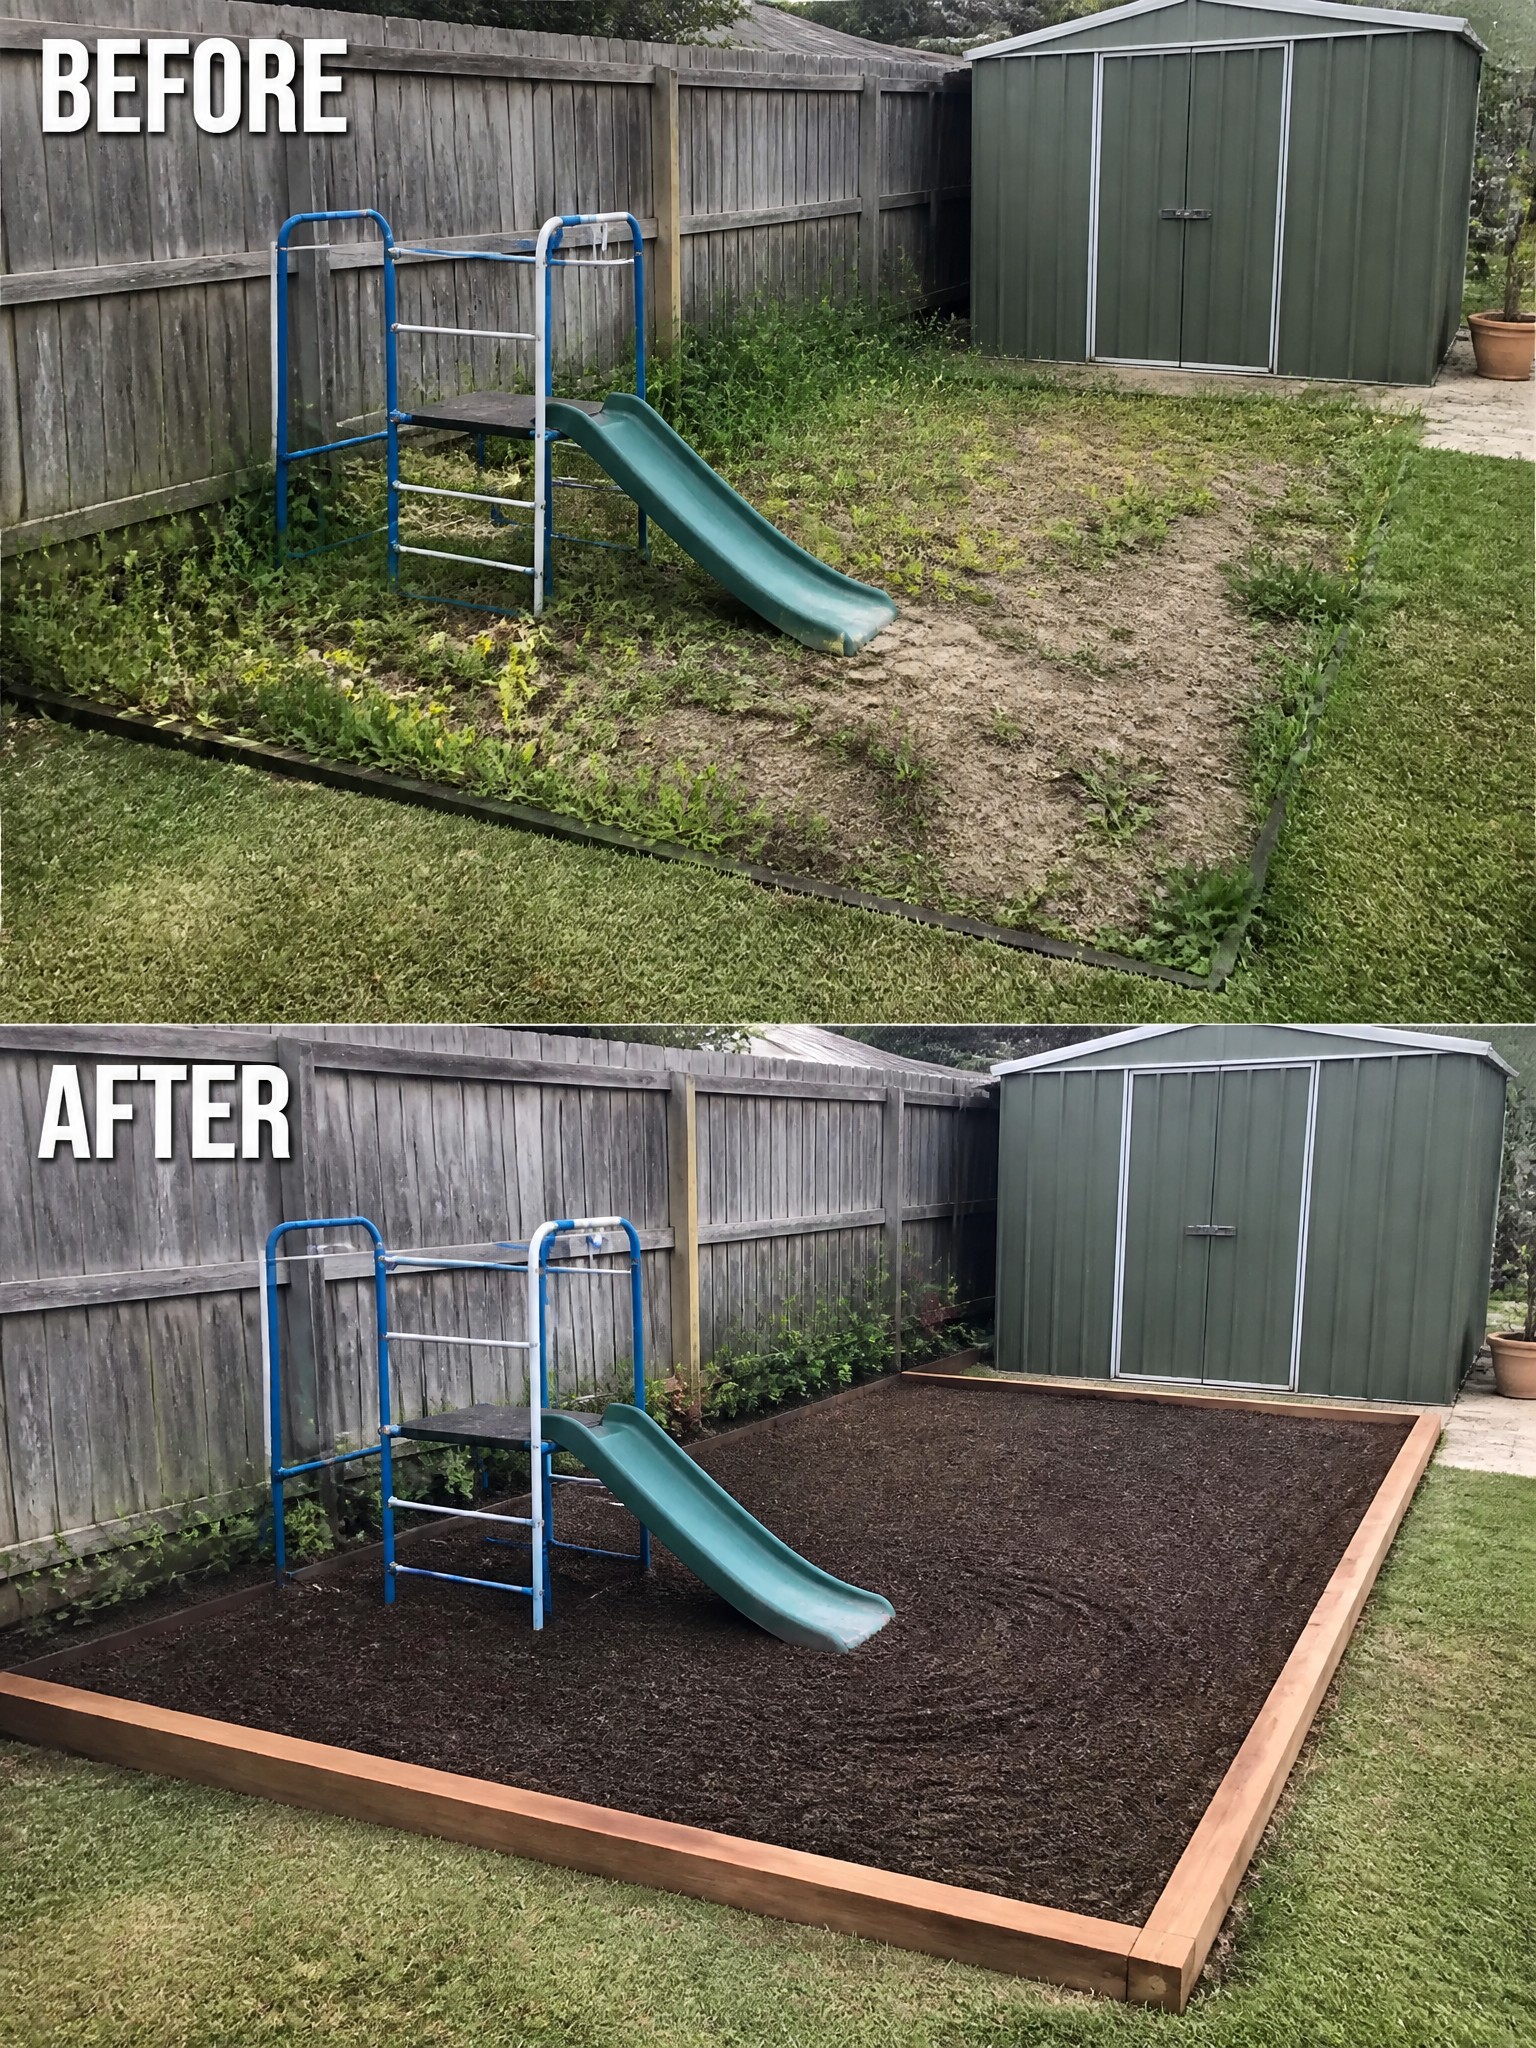
An overgrown patch with play equipment often ends up looking messy because the ground stays bare and weeds take over. Adding a wooden border around the slide and climber and filling it with dark mulch gives the area a clear shape and turns it into a usable spot instead of a weedy corner.
This idea suits smaller backyards where you want the equipment to feel planned rather than scattered. Mark the shape first, put in the edging, then add a thick layer of mulch. It reduces weeds and makes the space easier to keep tidy over time.
Add Defined Borders To Clean Up Overgrown Yard Edges
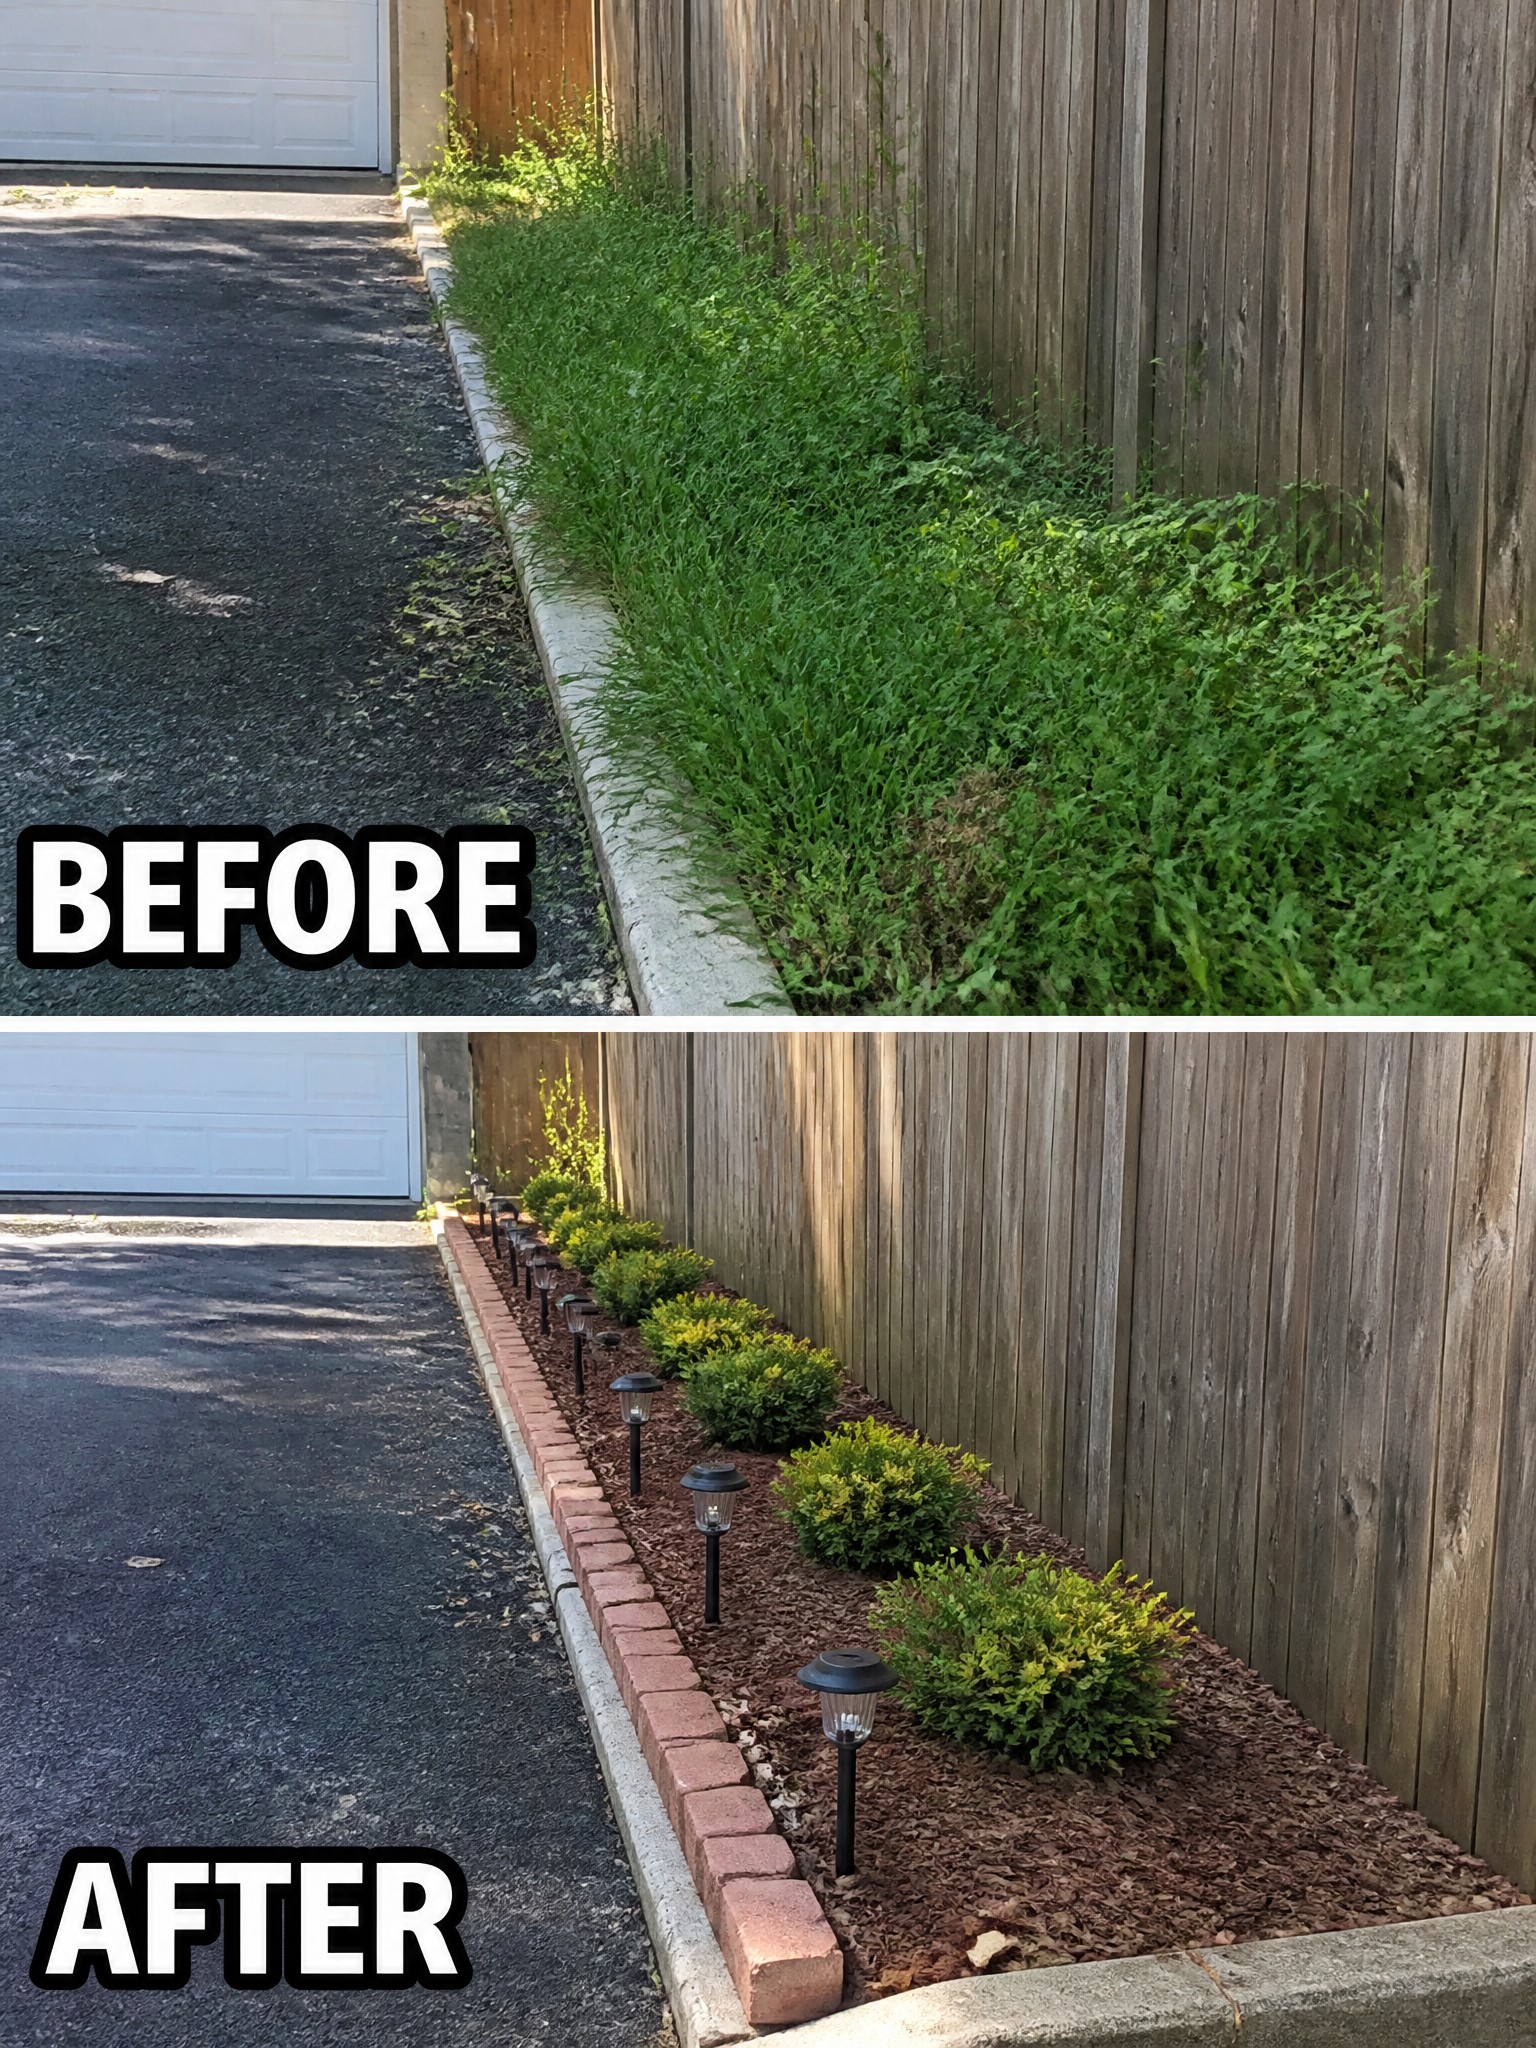
Clearing the weeds first makes the biggest difference when an edge has gone wild. The before image shows grass and weeds spilling over the curb and climbing the fence. Once the overgrowth is removed, a brick border and fresh mulch keep the bed in place and stop the plants from creeping back onto the driveway.
This idea works best on narrow strips next to driveways or fences where regular mowing is difficult. Lay the edging first so the shape stays consistent, then add mulch and a few low shrubs. The solar lights are optional but help mark the bed at night.
Add Structure To An Overgrown Slope
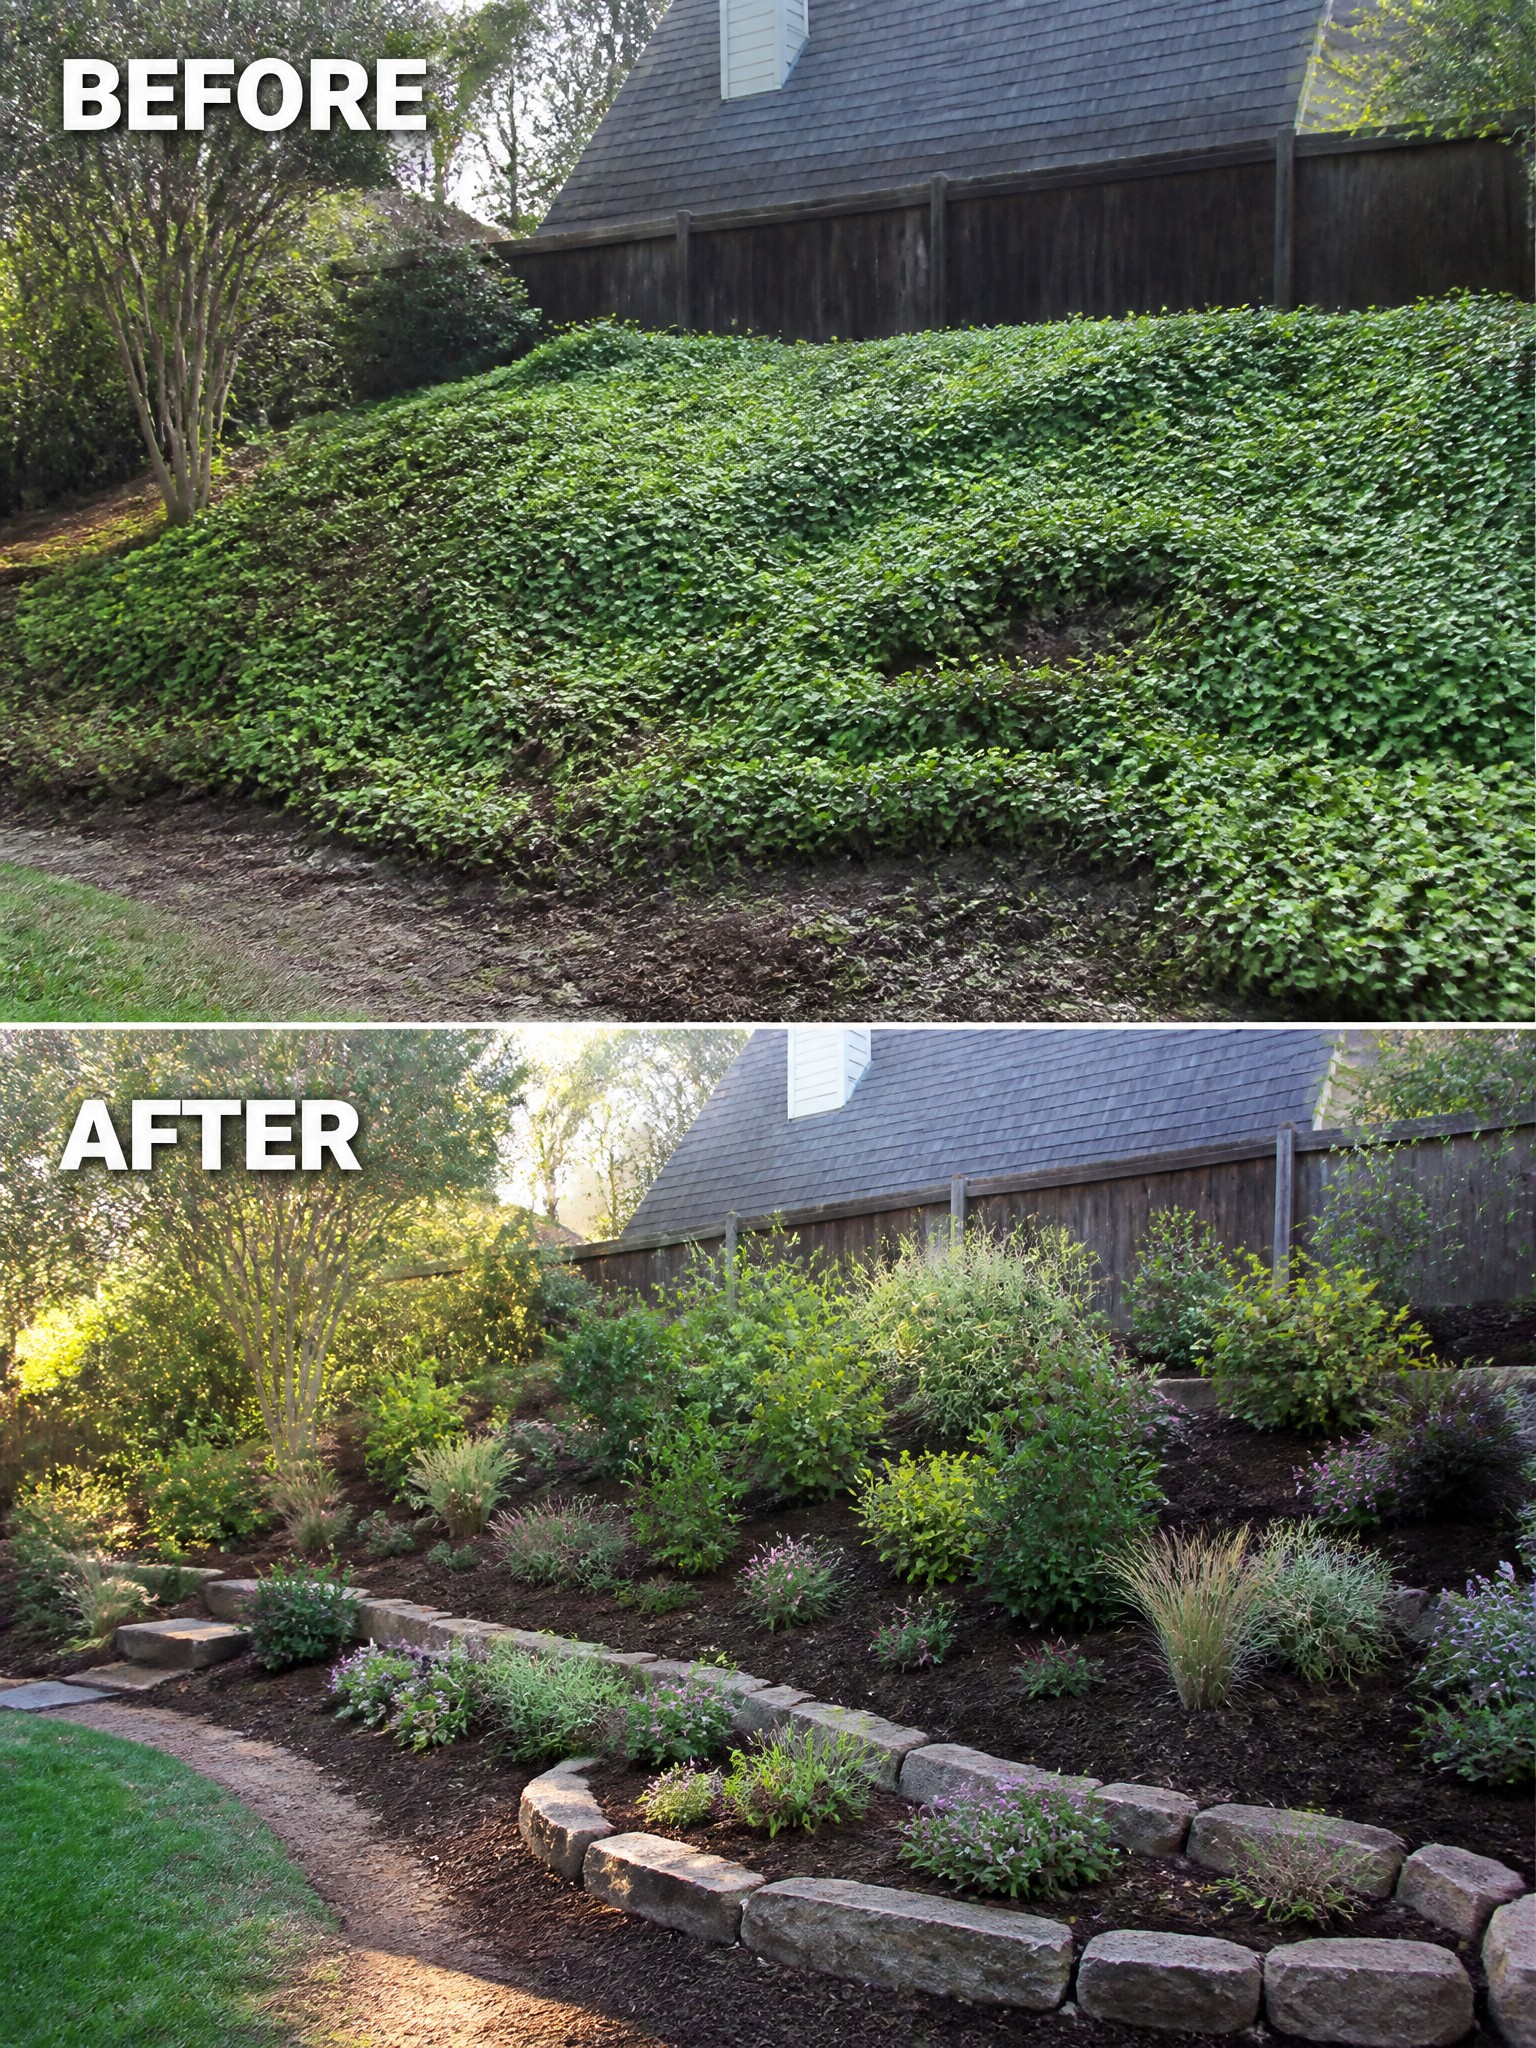
An overgrown slope covered in ivy often turns into a maintenance headache with little control over how it spreads. Switching to terraced beds edged with stone and finished with mulch brings clear lines and stops the plants from taking over everything.
This idea suits any sloped yard where you want better drainage and easier care. Clear the old growth first, set simple borders to hold the soil, then plant in layers so each bed stays manageable without constant trimming.
Use Mulch And Borders To Clean Up Overgrown Beds
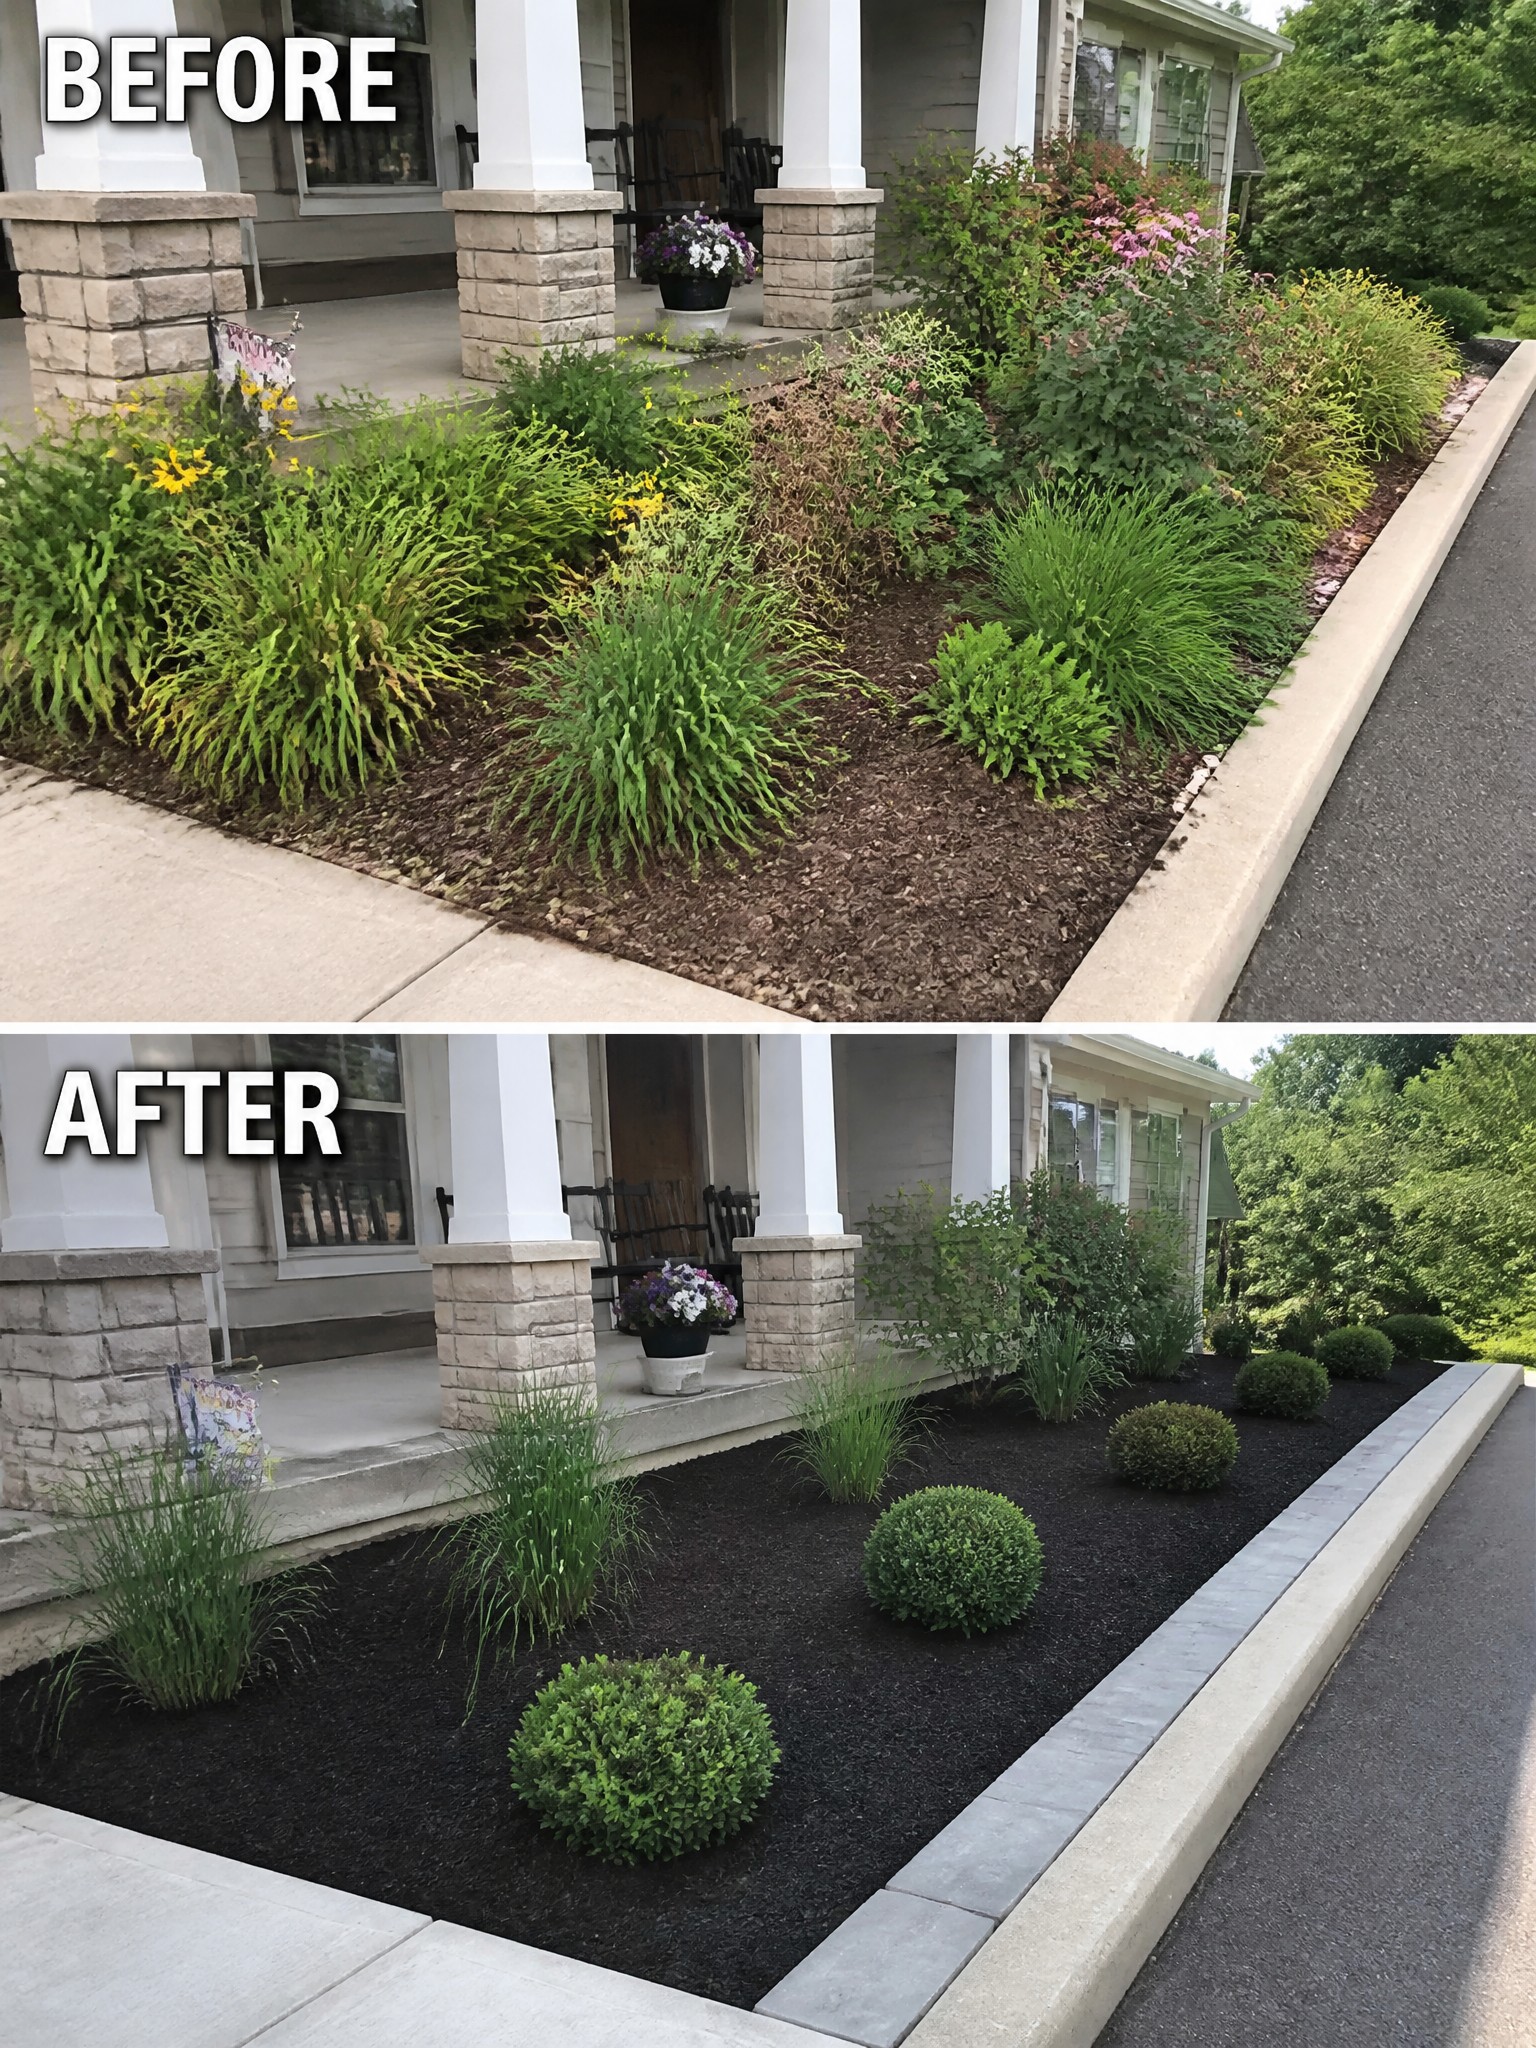
Starting with a full cleanup makes the biggest difference when beds have grown too wild. Removing the uneven mix of plants and laying down fresh dark mulch gave the front a much tidier and more organized look.
This idea works well along any house where the planting area has become hard to manage. Focus on creating clean edges first, then add a consistent layer of mulch before choosing a few simple shrubs to fill the space.
Add Clear Borders To Shape An Overgrown Yard
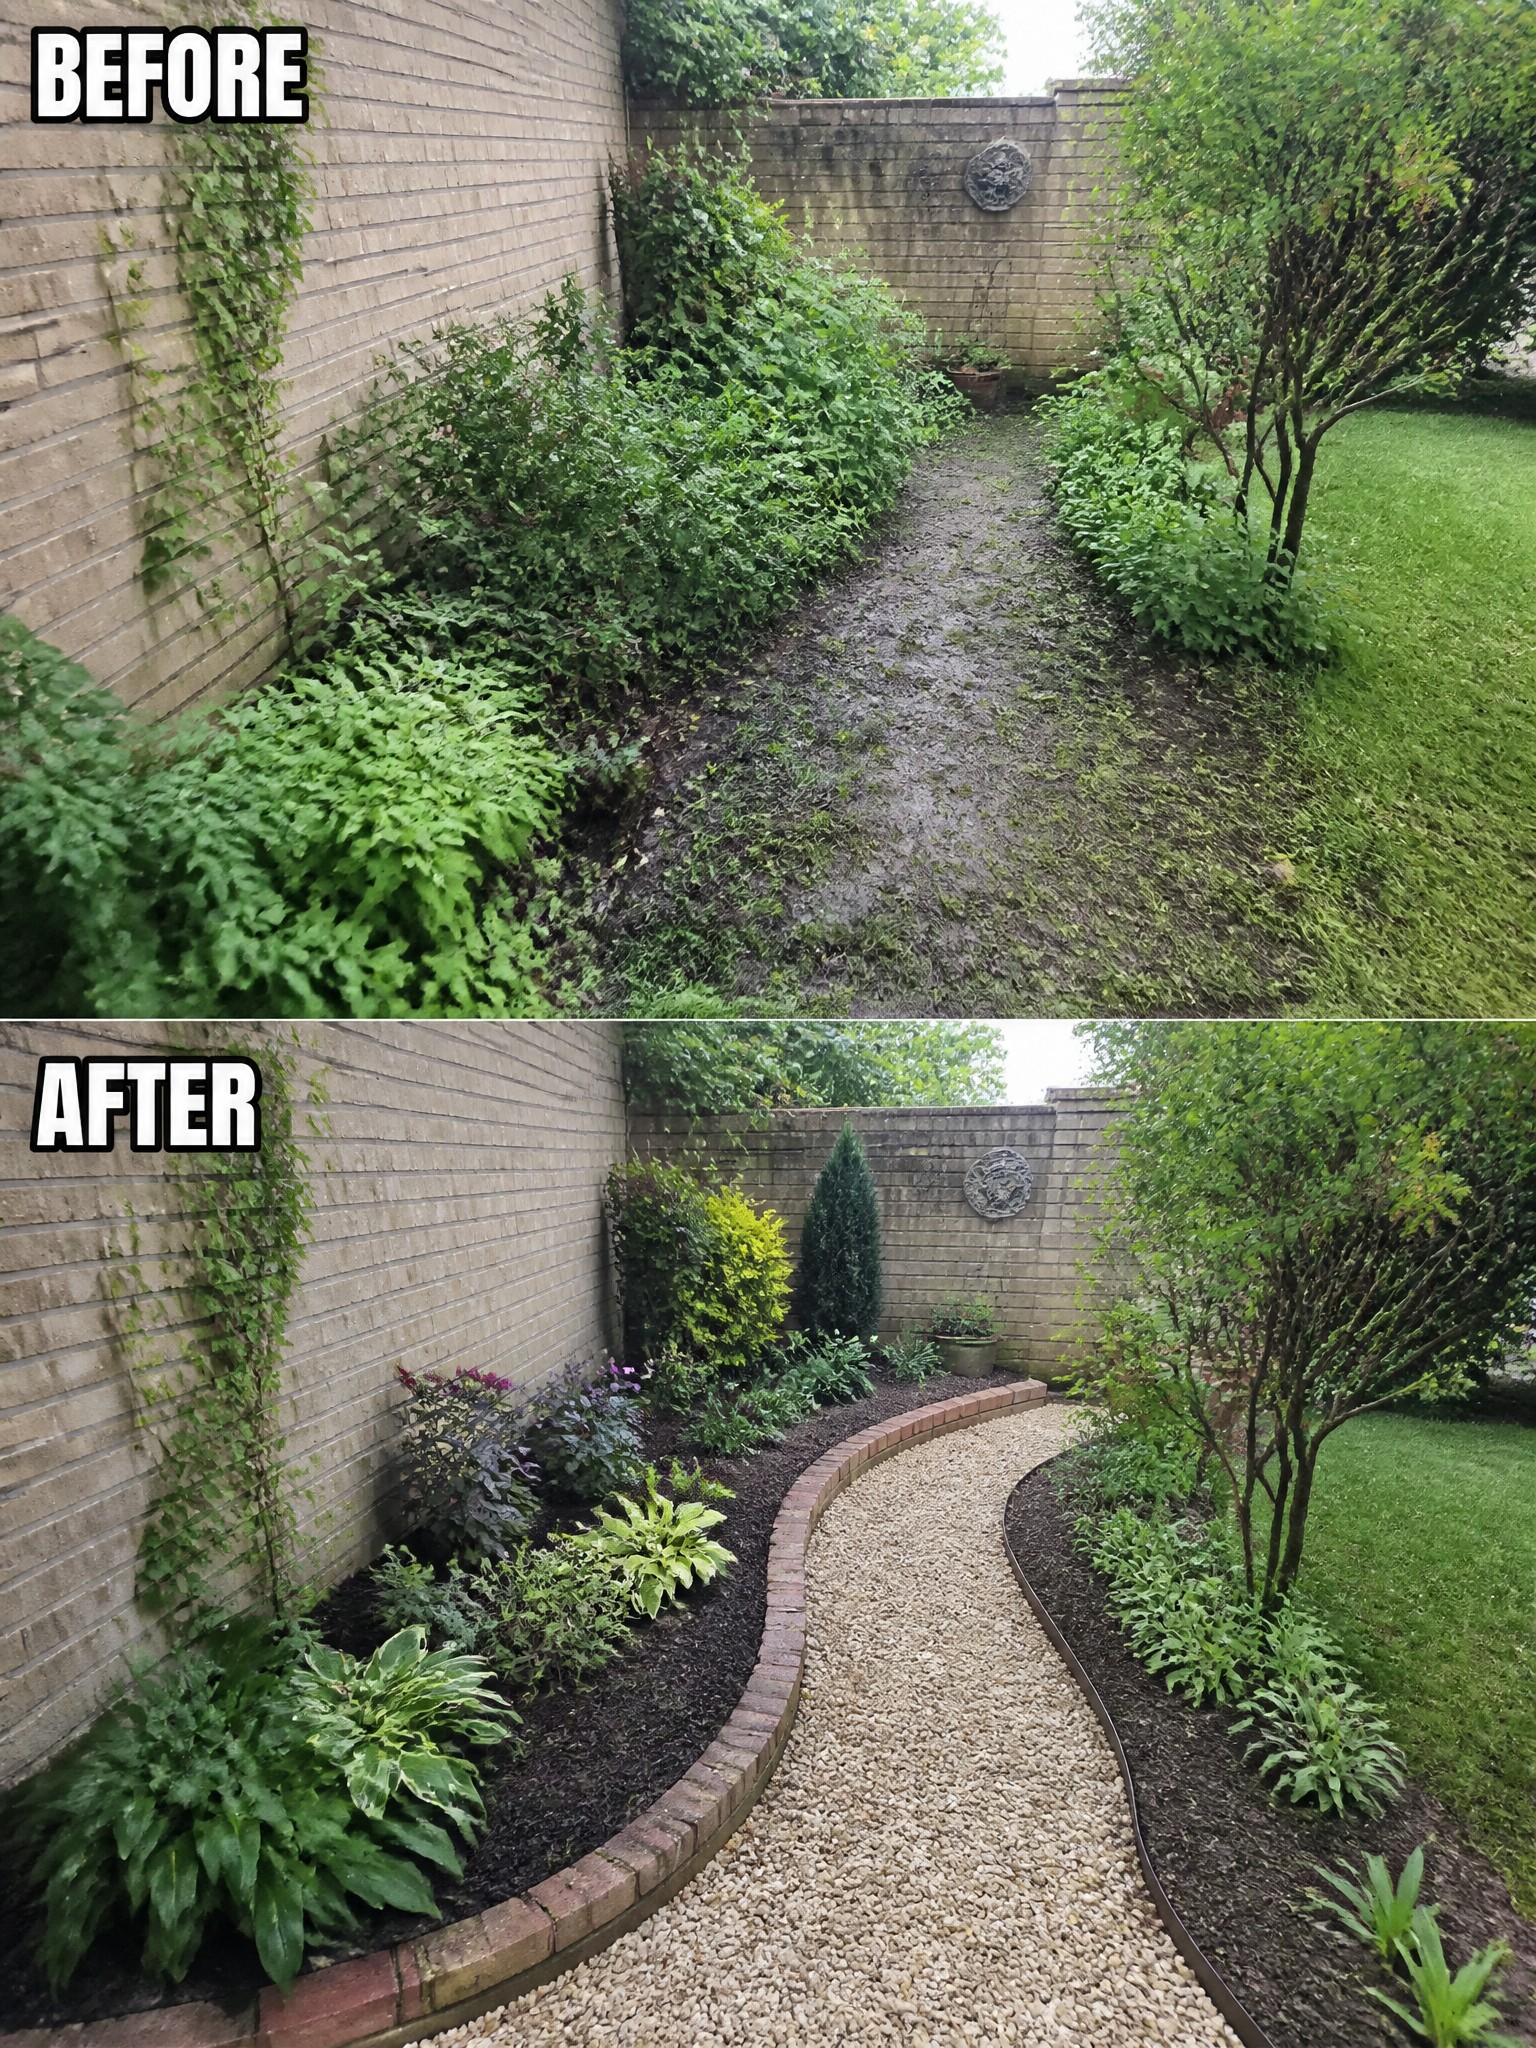
The main improvement came from adding a low brick border and fresh mulch along the edges. This single step turned scattered plants and bare dirt into tidy beds that follow the path instead of spilling into it.
This idea works best in narrow yards or side areas where growth has gotten out of hand. Clear the worst of the overgrowth first, then lay a simple border that matches the shape you want. Mulch fills in the rest and keeps the beds looking neat with very little extra work.
Refresh An Overgrown Bed With Mulch And Borders
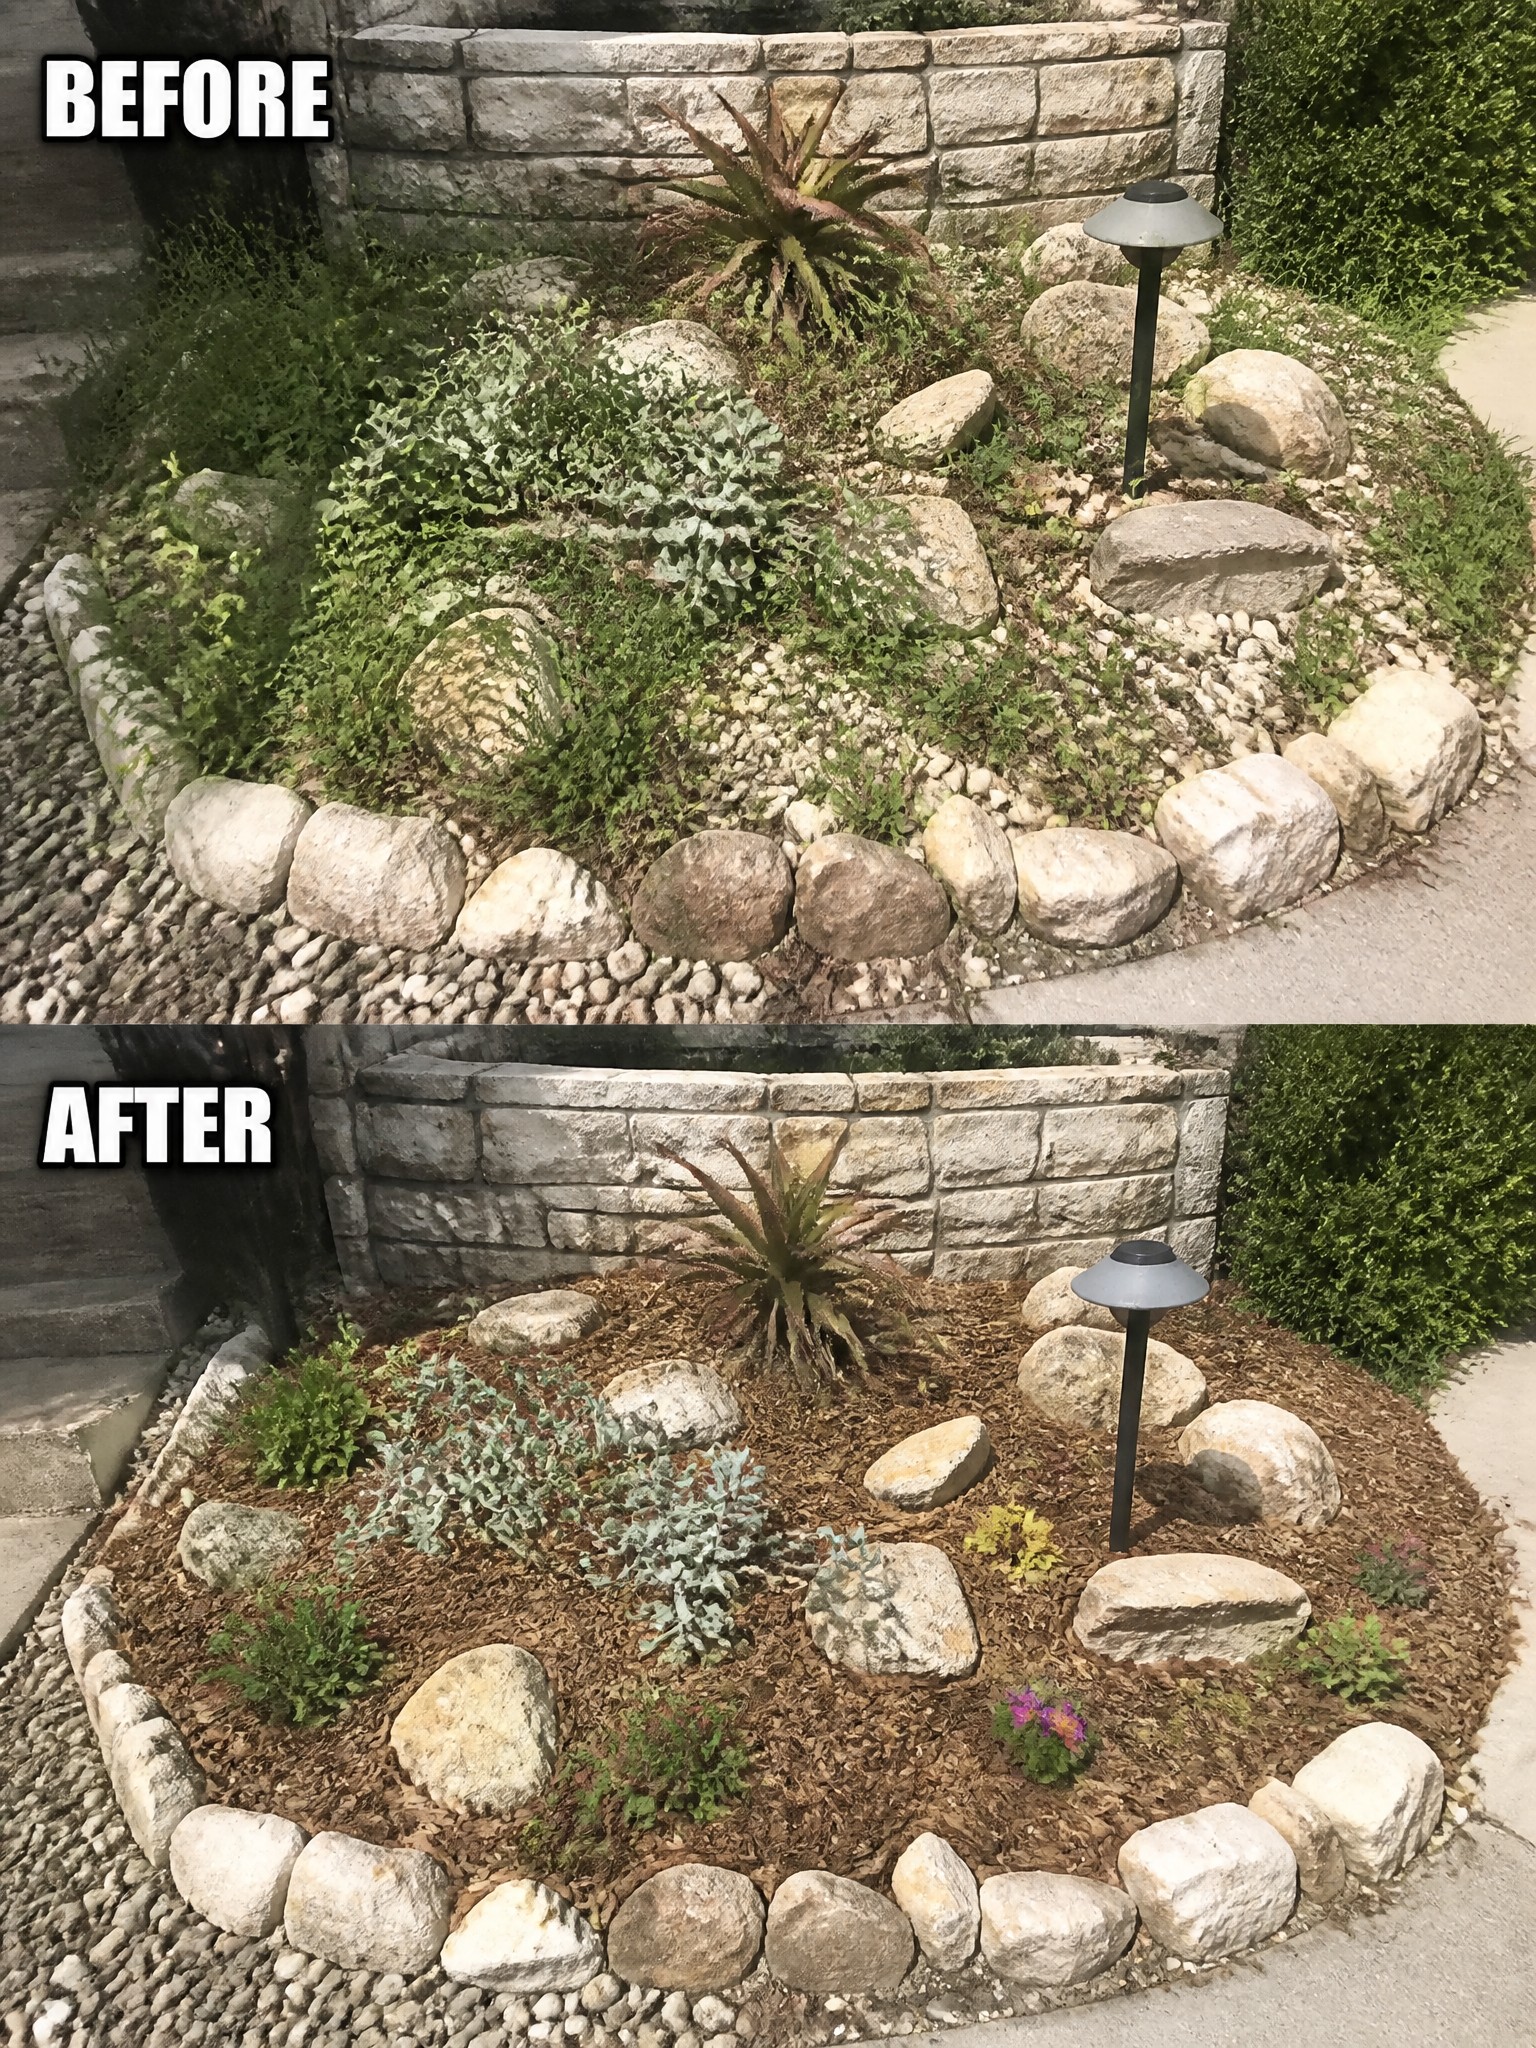
Clearing out the weeds and adding a fresh layer of mulch makes the biggest difference in a small garden bed like this one. The rocks stay in place to hold the shape, but the ground now looks neat instead of patchy and wild.
This idea works best in front beds or narrow side areas where you want low upkeep. Pull the worst growth first, then spread mulch around the plants worth keeping. It cuts down on new weeds and helps the bed look planned without needing a full redesign.
Add Defined Borders And Mulch To Clean Up Overgrown Beds
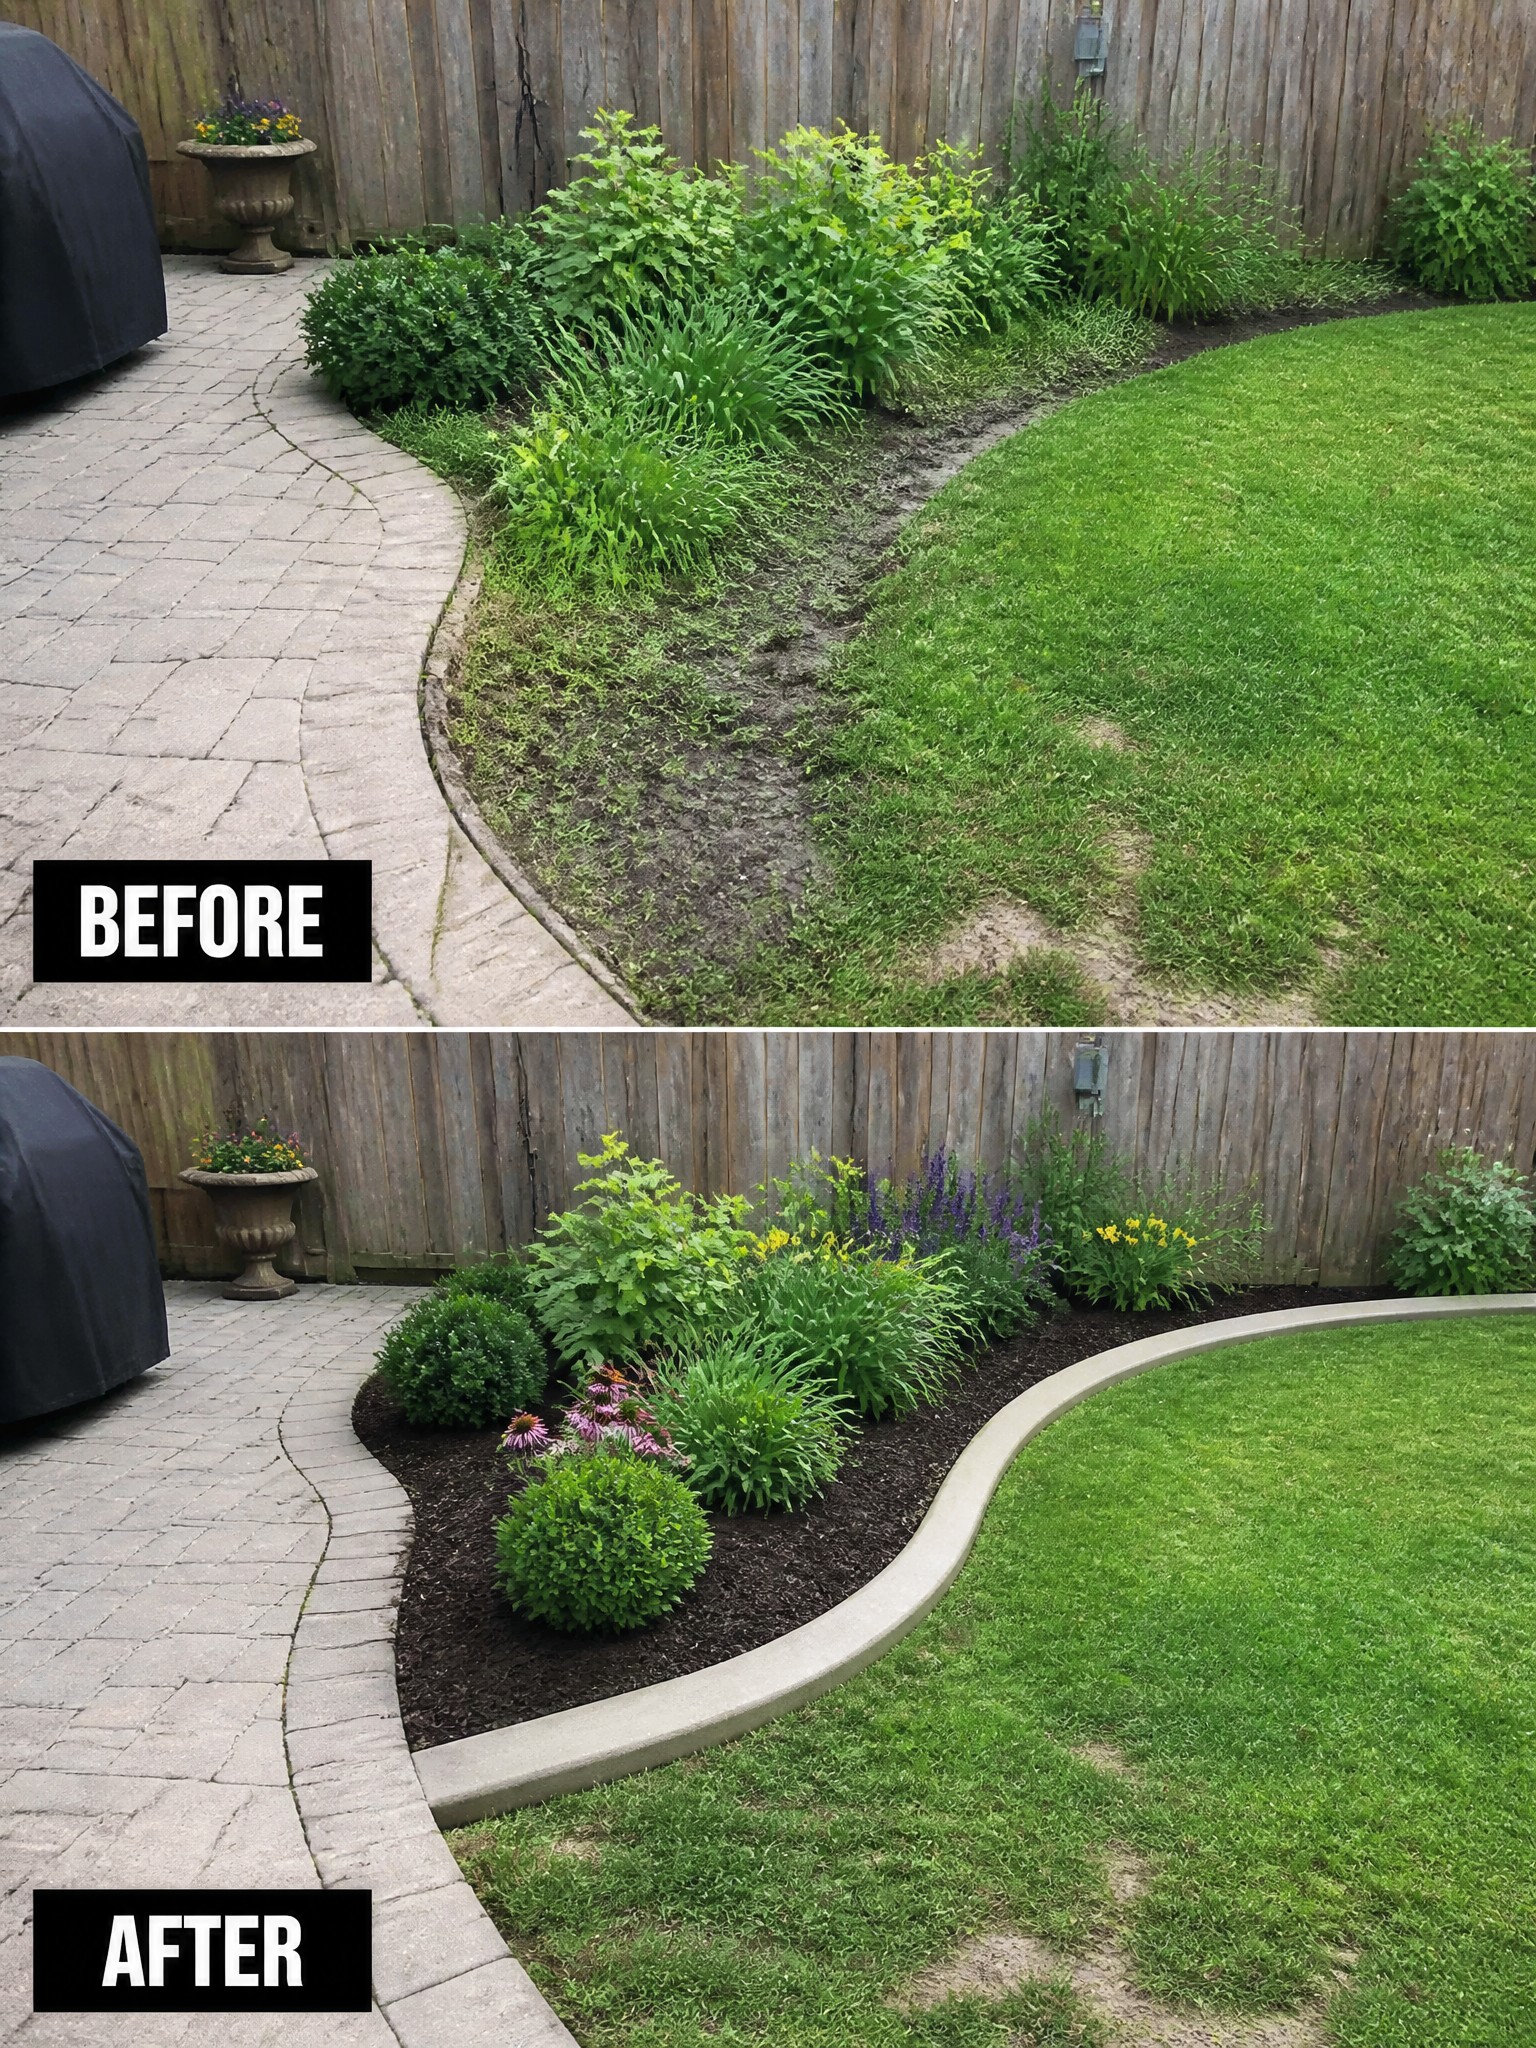
One of the easiest ways to fix an overgrown yard is to add a clear border and cover the beds with mulch. Here the uneven grass and bare soil were replaced by a simple concrete edge that keeps the lawn from creeping in and lets the plants stand out.
This idea works best along the edge of a lawn or next to a patio where things tend to look messy. Cut a clean line first, then add mulch to hold moisture and stop weeds. Most average backyards benefit from this step before adding more plants or furniture.
Add Raised Beds To Organize An Overgrown Backyard Strip
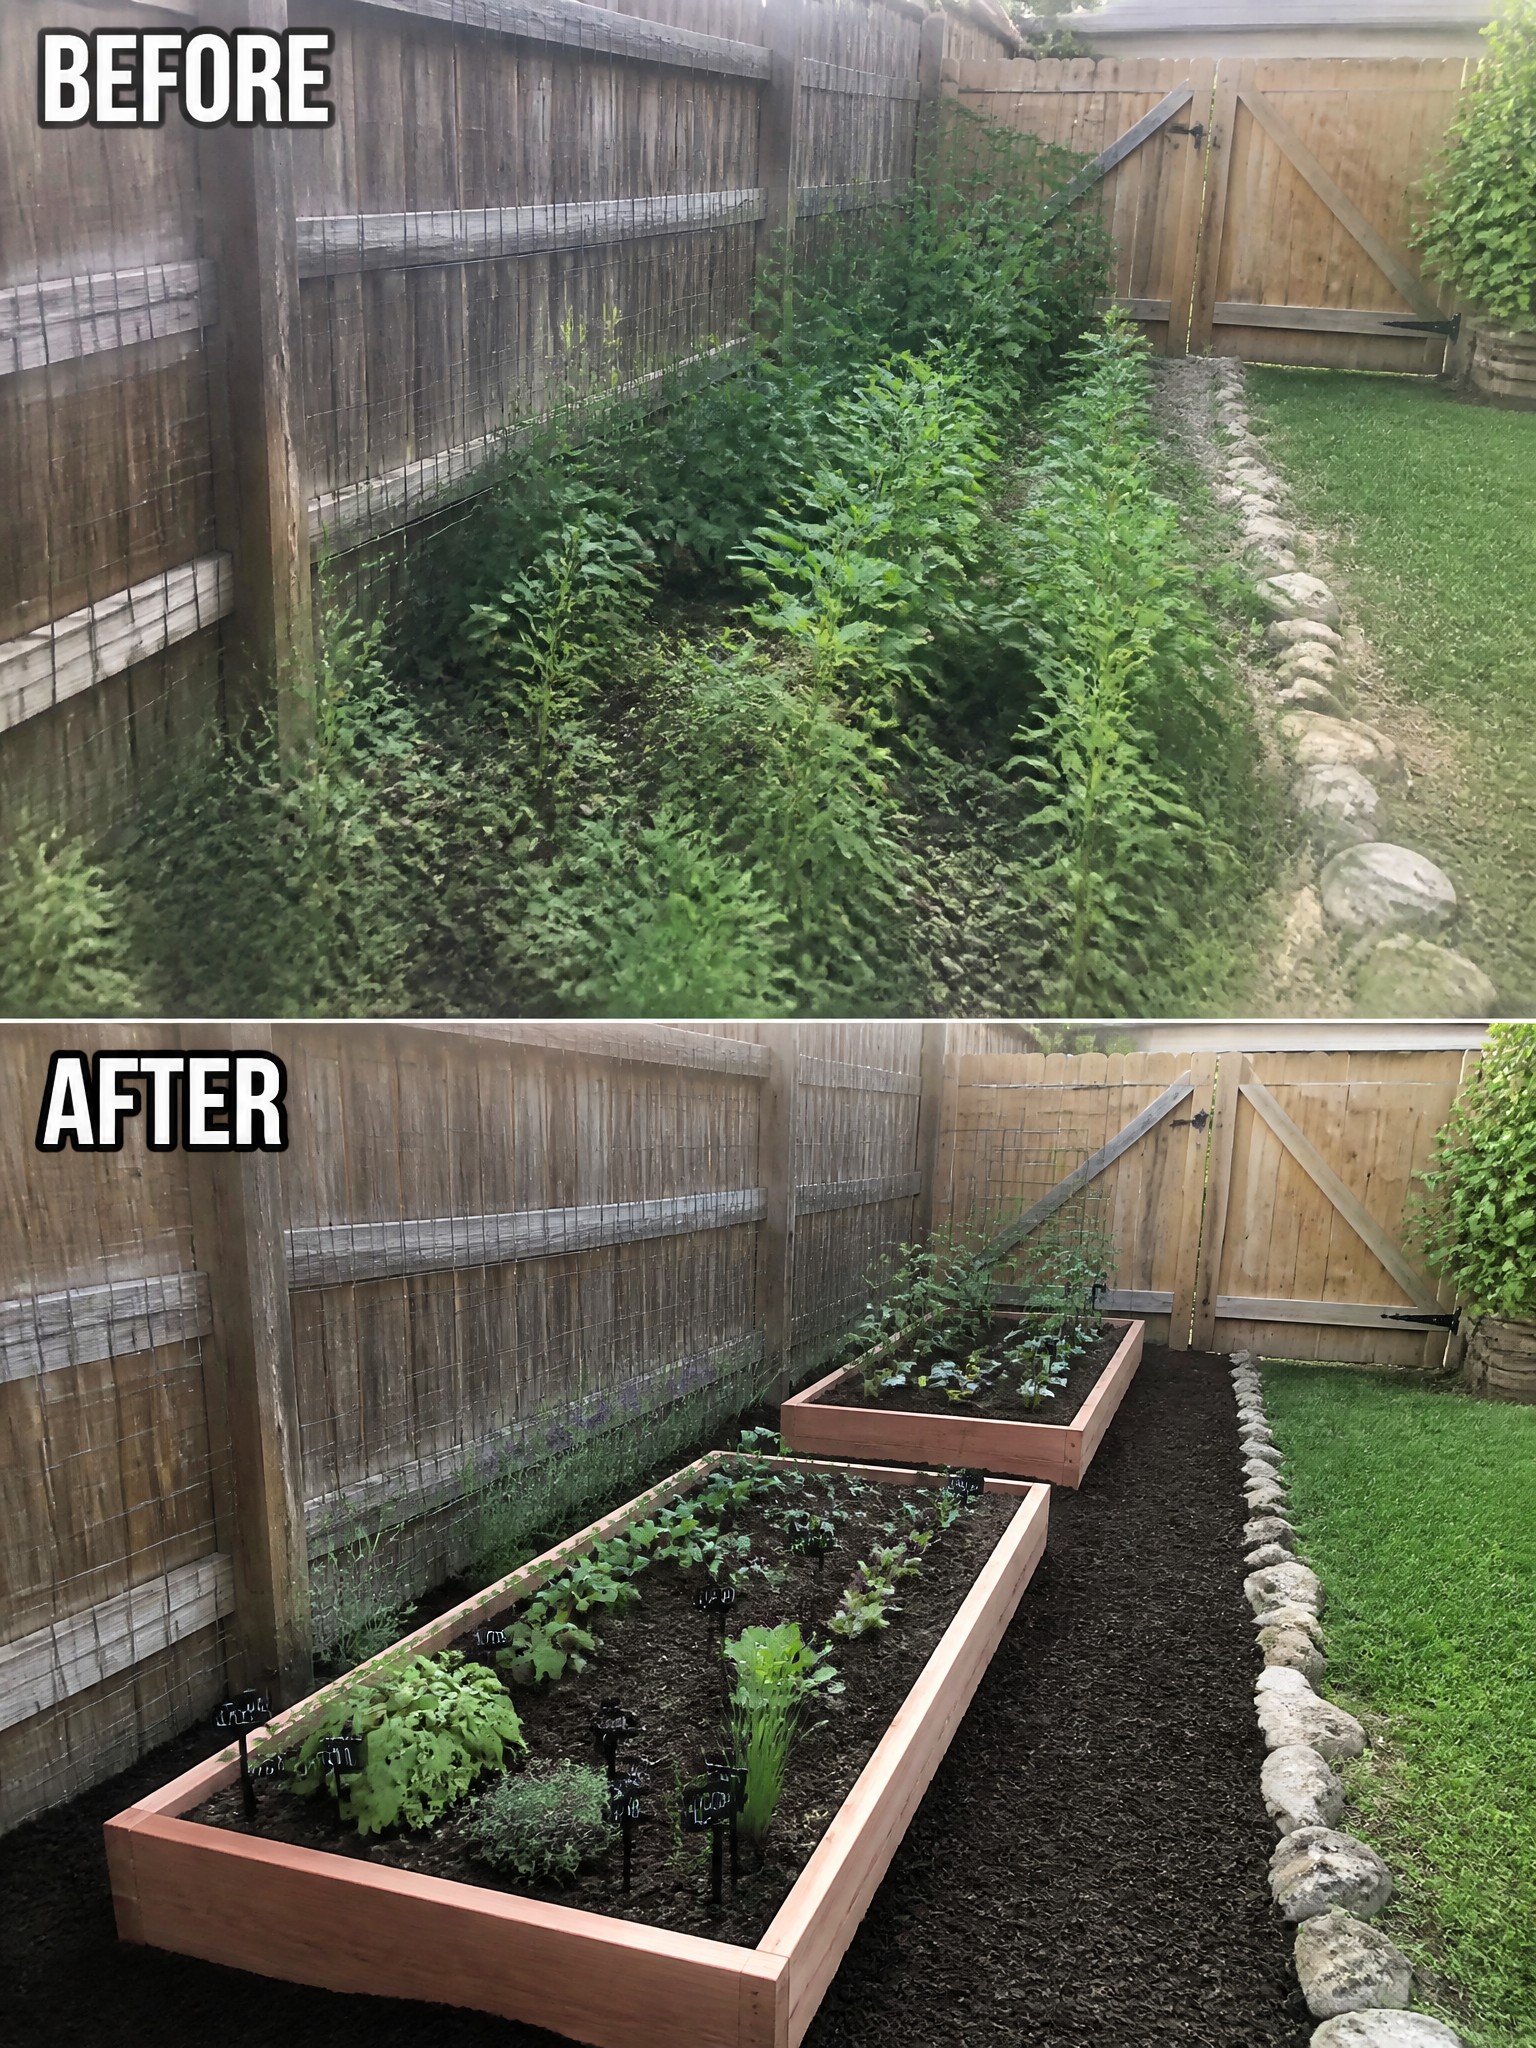
Raised beds give an overgrown fence line a clear purpose. Instead of letting weeds and volunteer plants sprawl, the beds create straight borders and turn the strip into actual growing space that is easier to reach and maintain.
This approach works well along side fences or back property lines where the ground is narrow. Clear the weeds first, set the frames, then spread mulch around the beds so the area stays tidy and the beds stand out as the main feature.
Add Defined Garden Beds To Clean Up An Overgrown Yard

The main change here is replacing a messy stretch of gravel and weeds with neat, curved garden beds filled with mulch. This simple step gives the whole front entry a much more finished look without any big construction. The dark mulch also helps the plants stand out and keeps the area from feeling scattered.
This approach works well along walkways or near the foundation of a house where you want structure without crowding the space. Start by clearing the old growth, then lay down a clean edge and mulch before planting. It keeps the yard looking intentional even when you use just a few types of plants.
Add Structure To An Overgrown Yard With Mulch And Borders
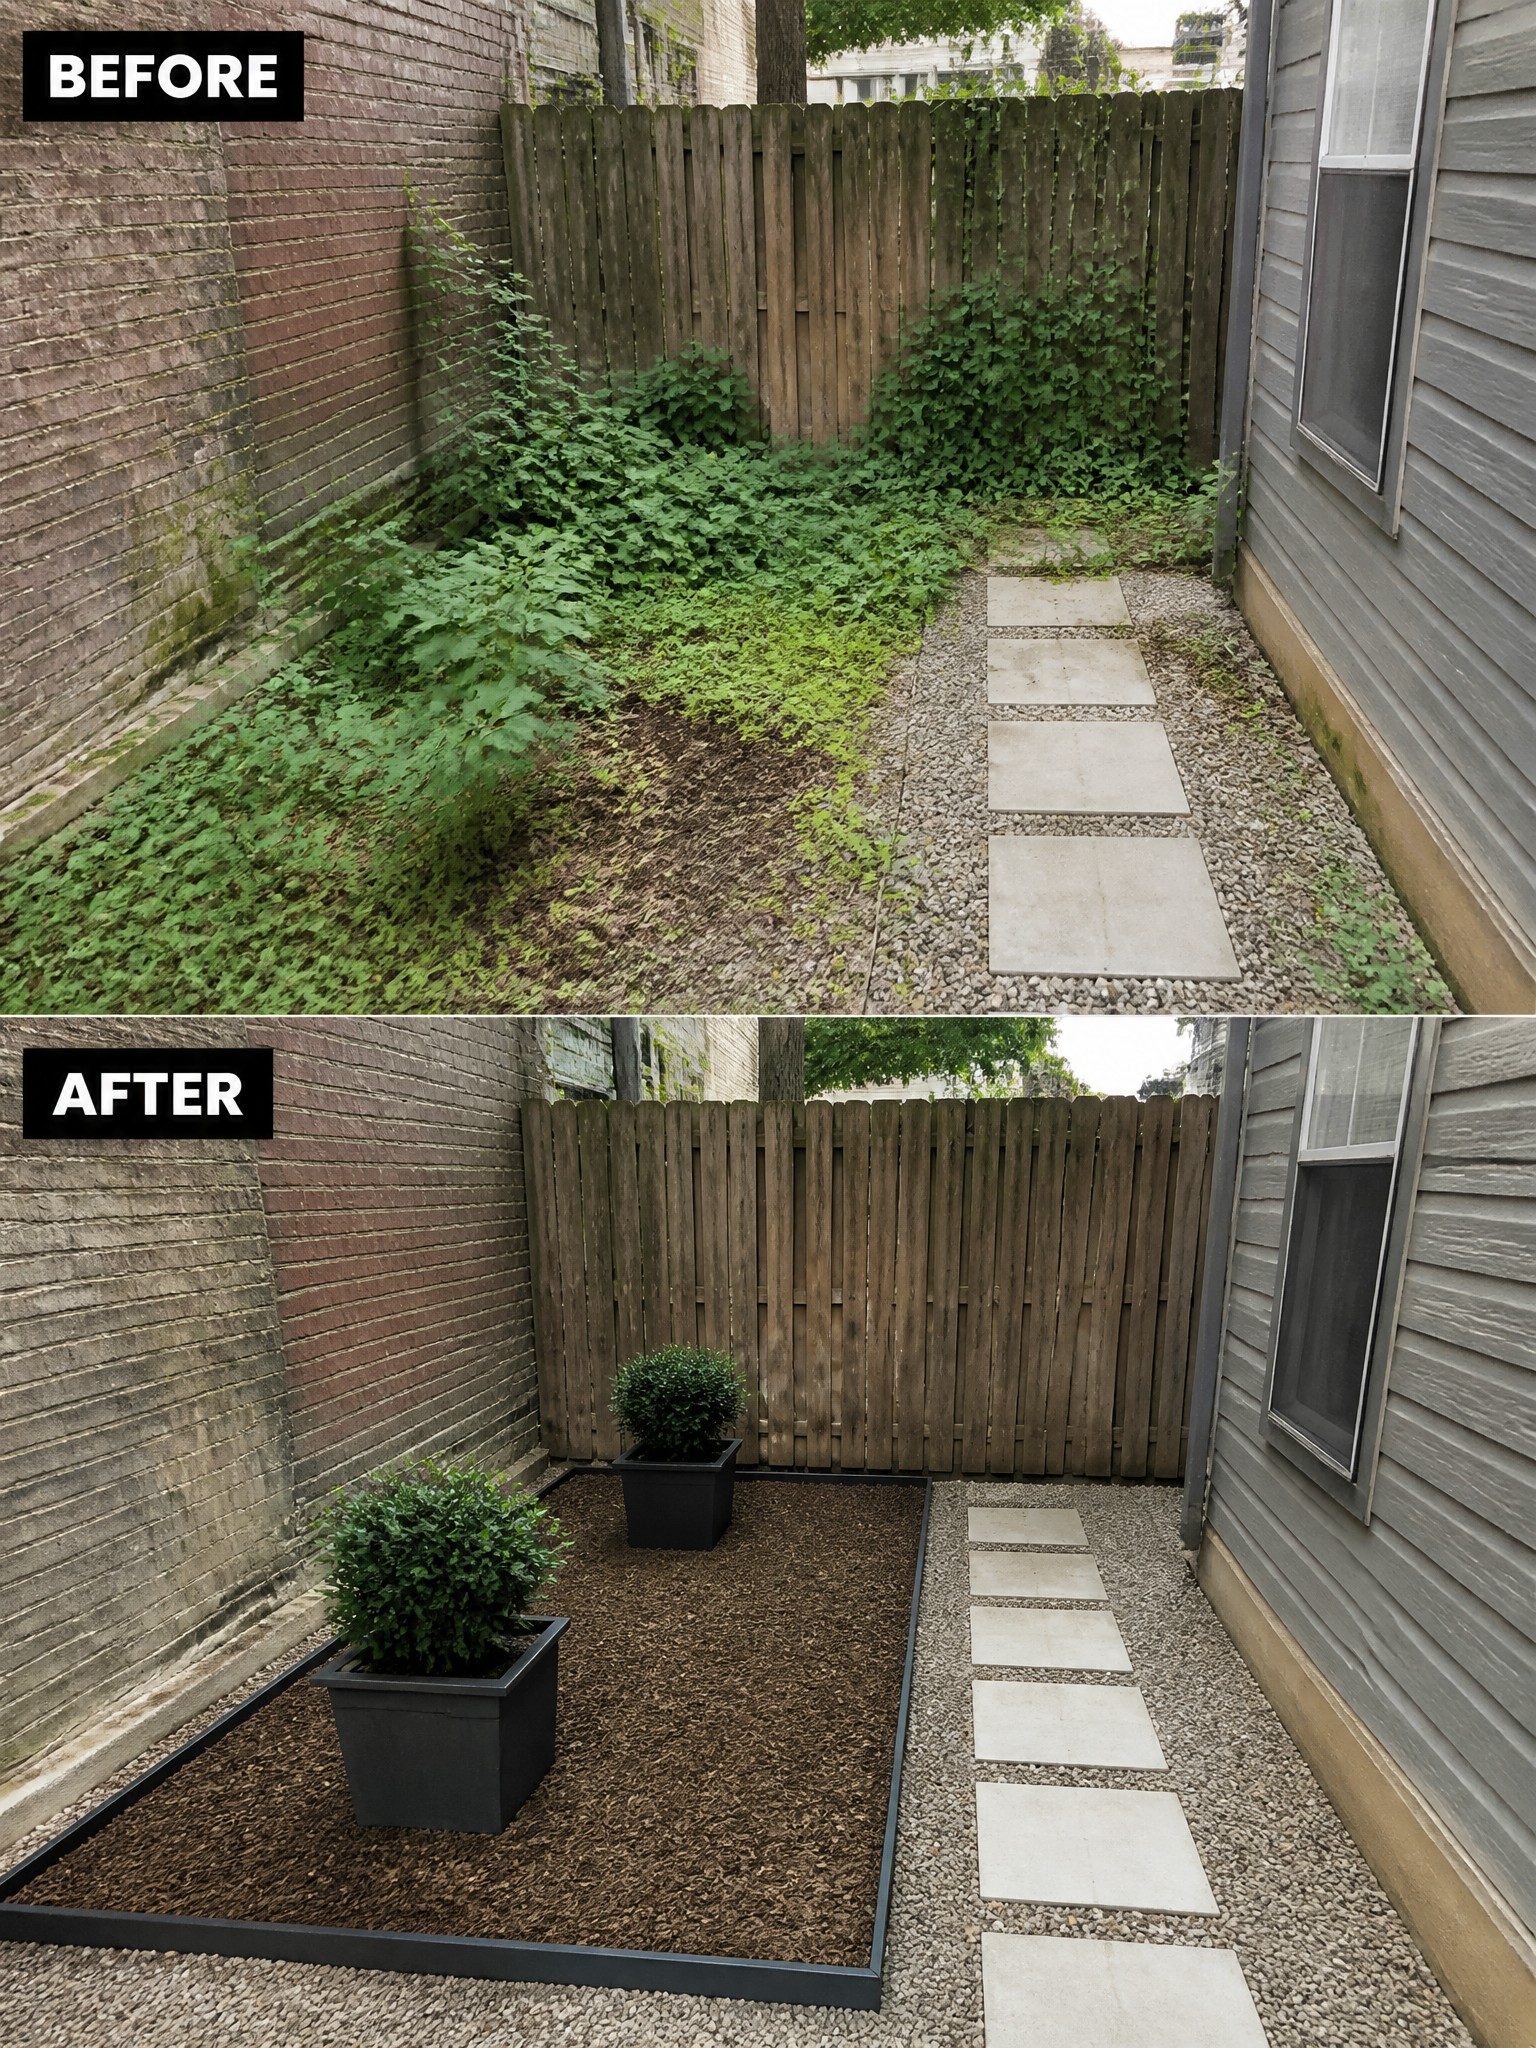
Clearing the wild growth first makes the biggest difference here. Once the weeds were removed, a simple metal border and fresh mulch turned the messy strip into a contained bed that actually looks planned instead of neglected. Two large pots inside the bed give the space height without crowding the narrow walkway.
This approach works well in tight side yards or alleys where you want order without adding lots of plants. Start with a thorough cleanup, then install edging that follows the shape you want. Mulch keeps weeds down and gives the area a finished look even when you keep the planting simple.
Clean Up Overgrown Beds With Mulch And Borders
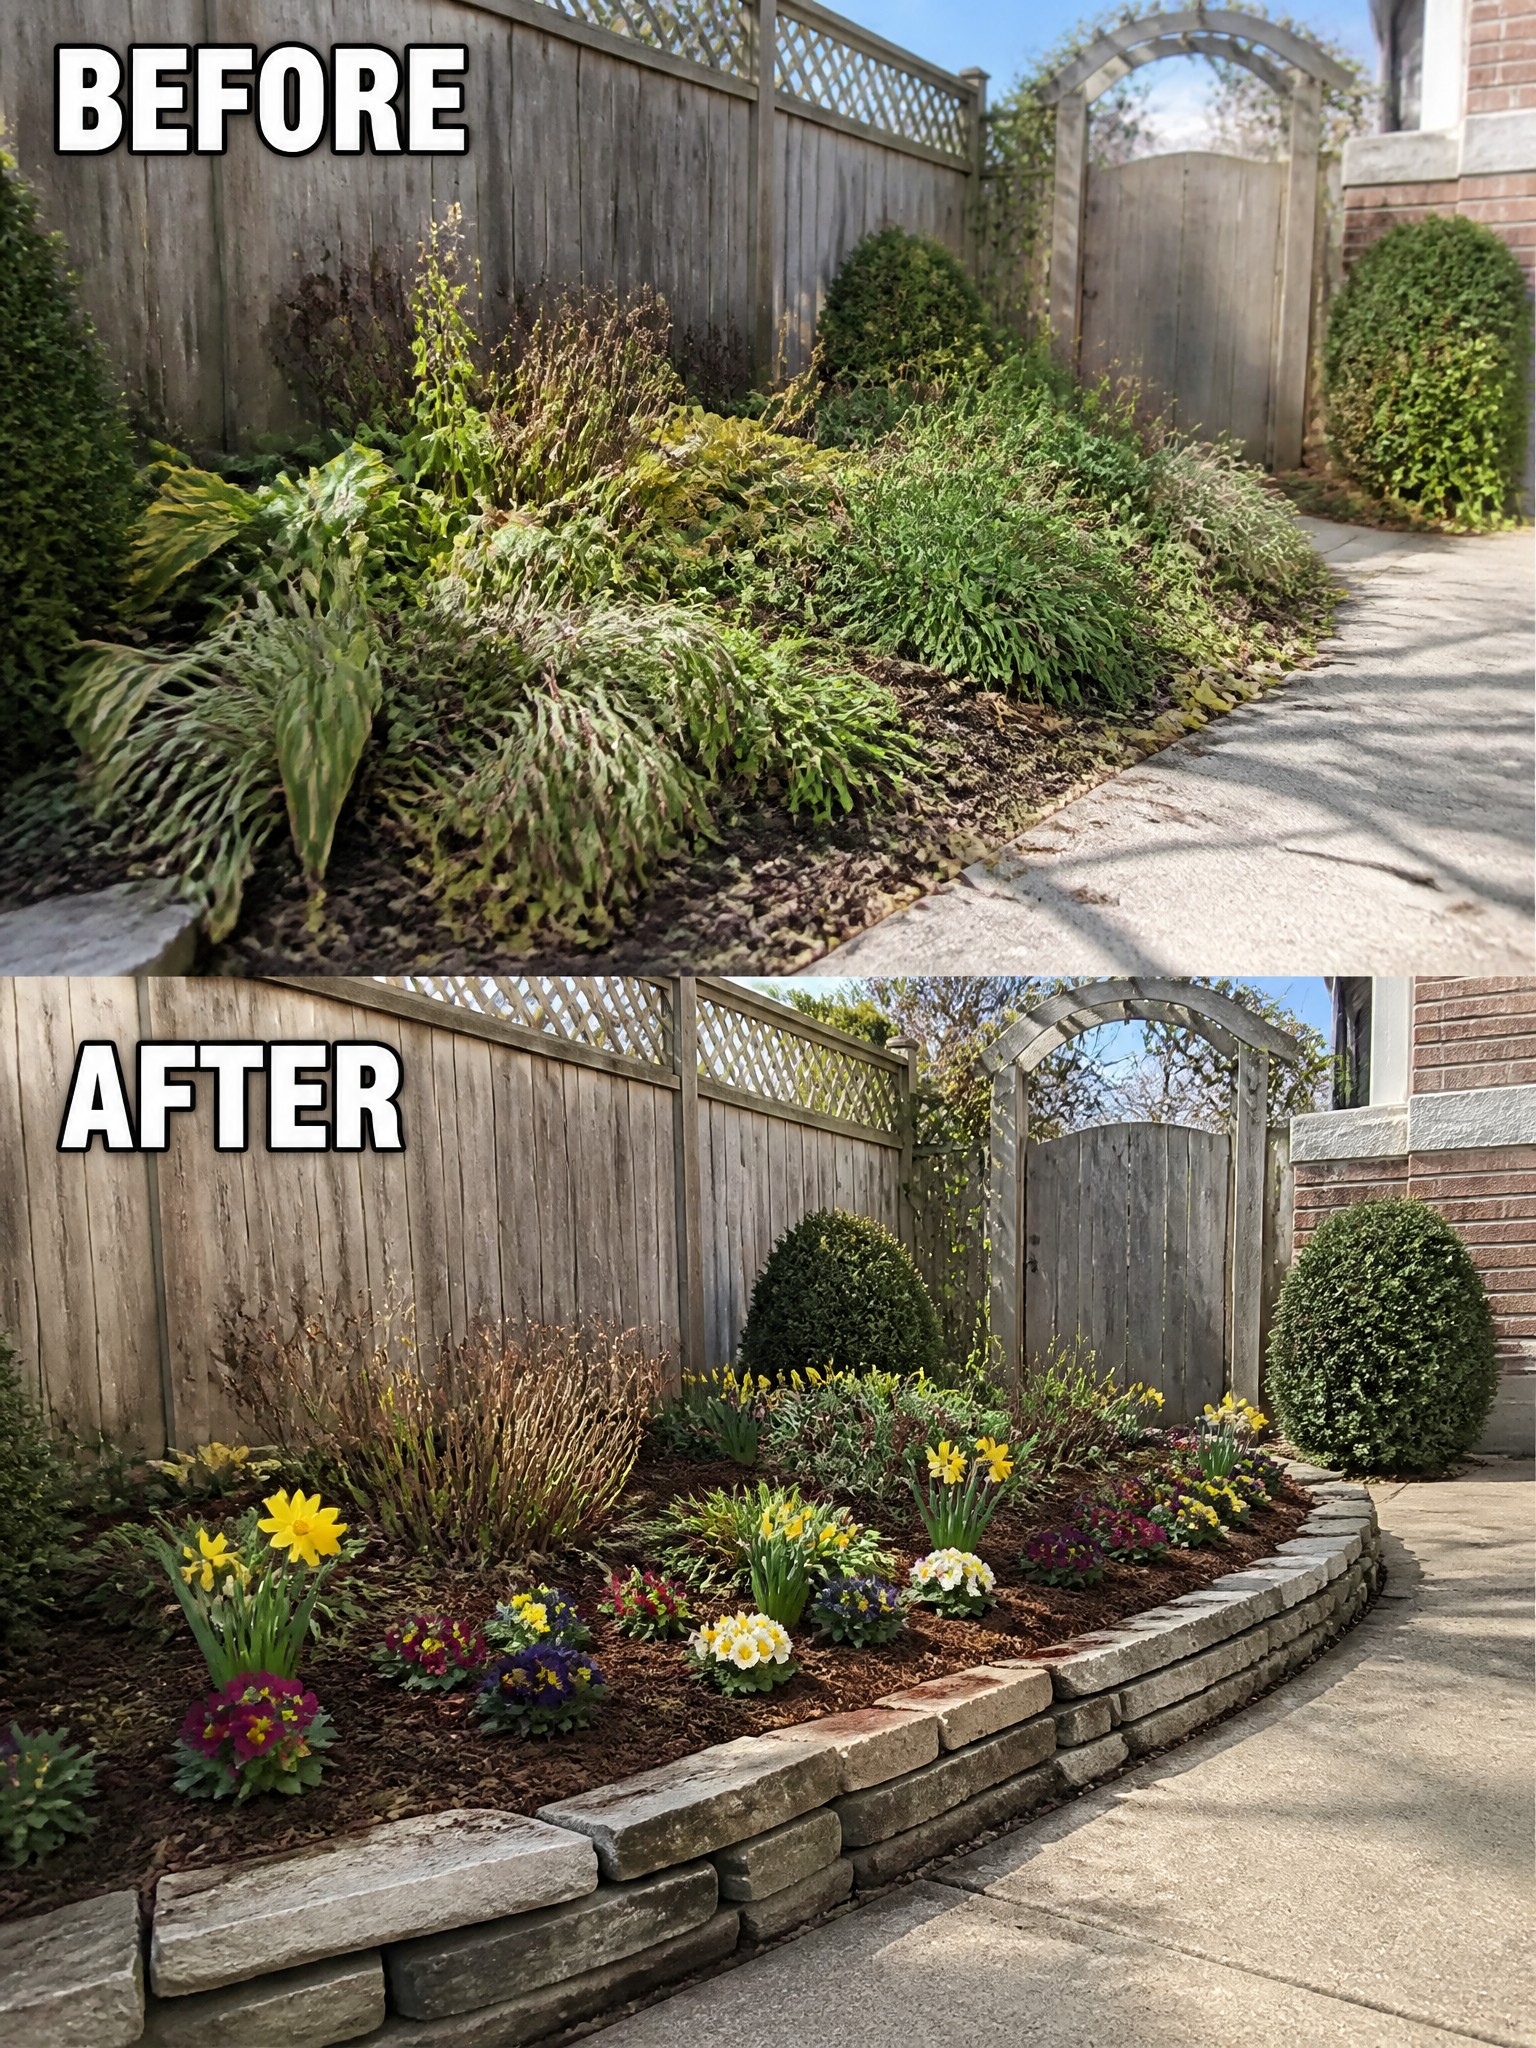
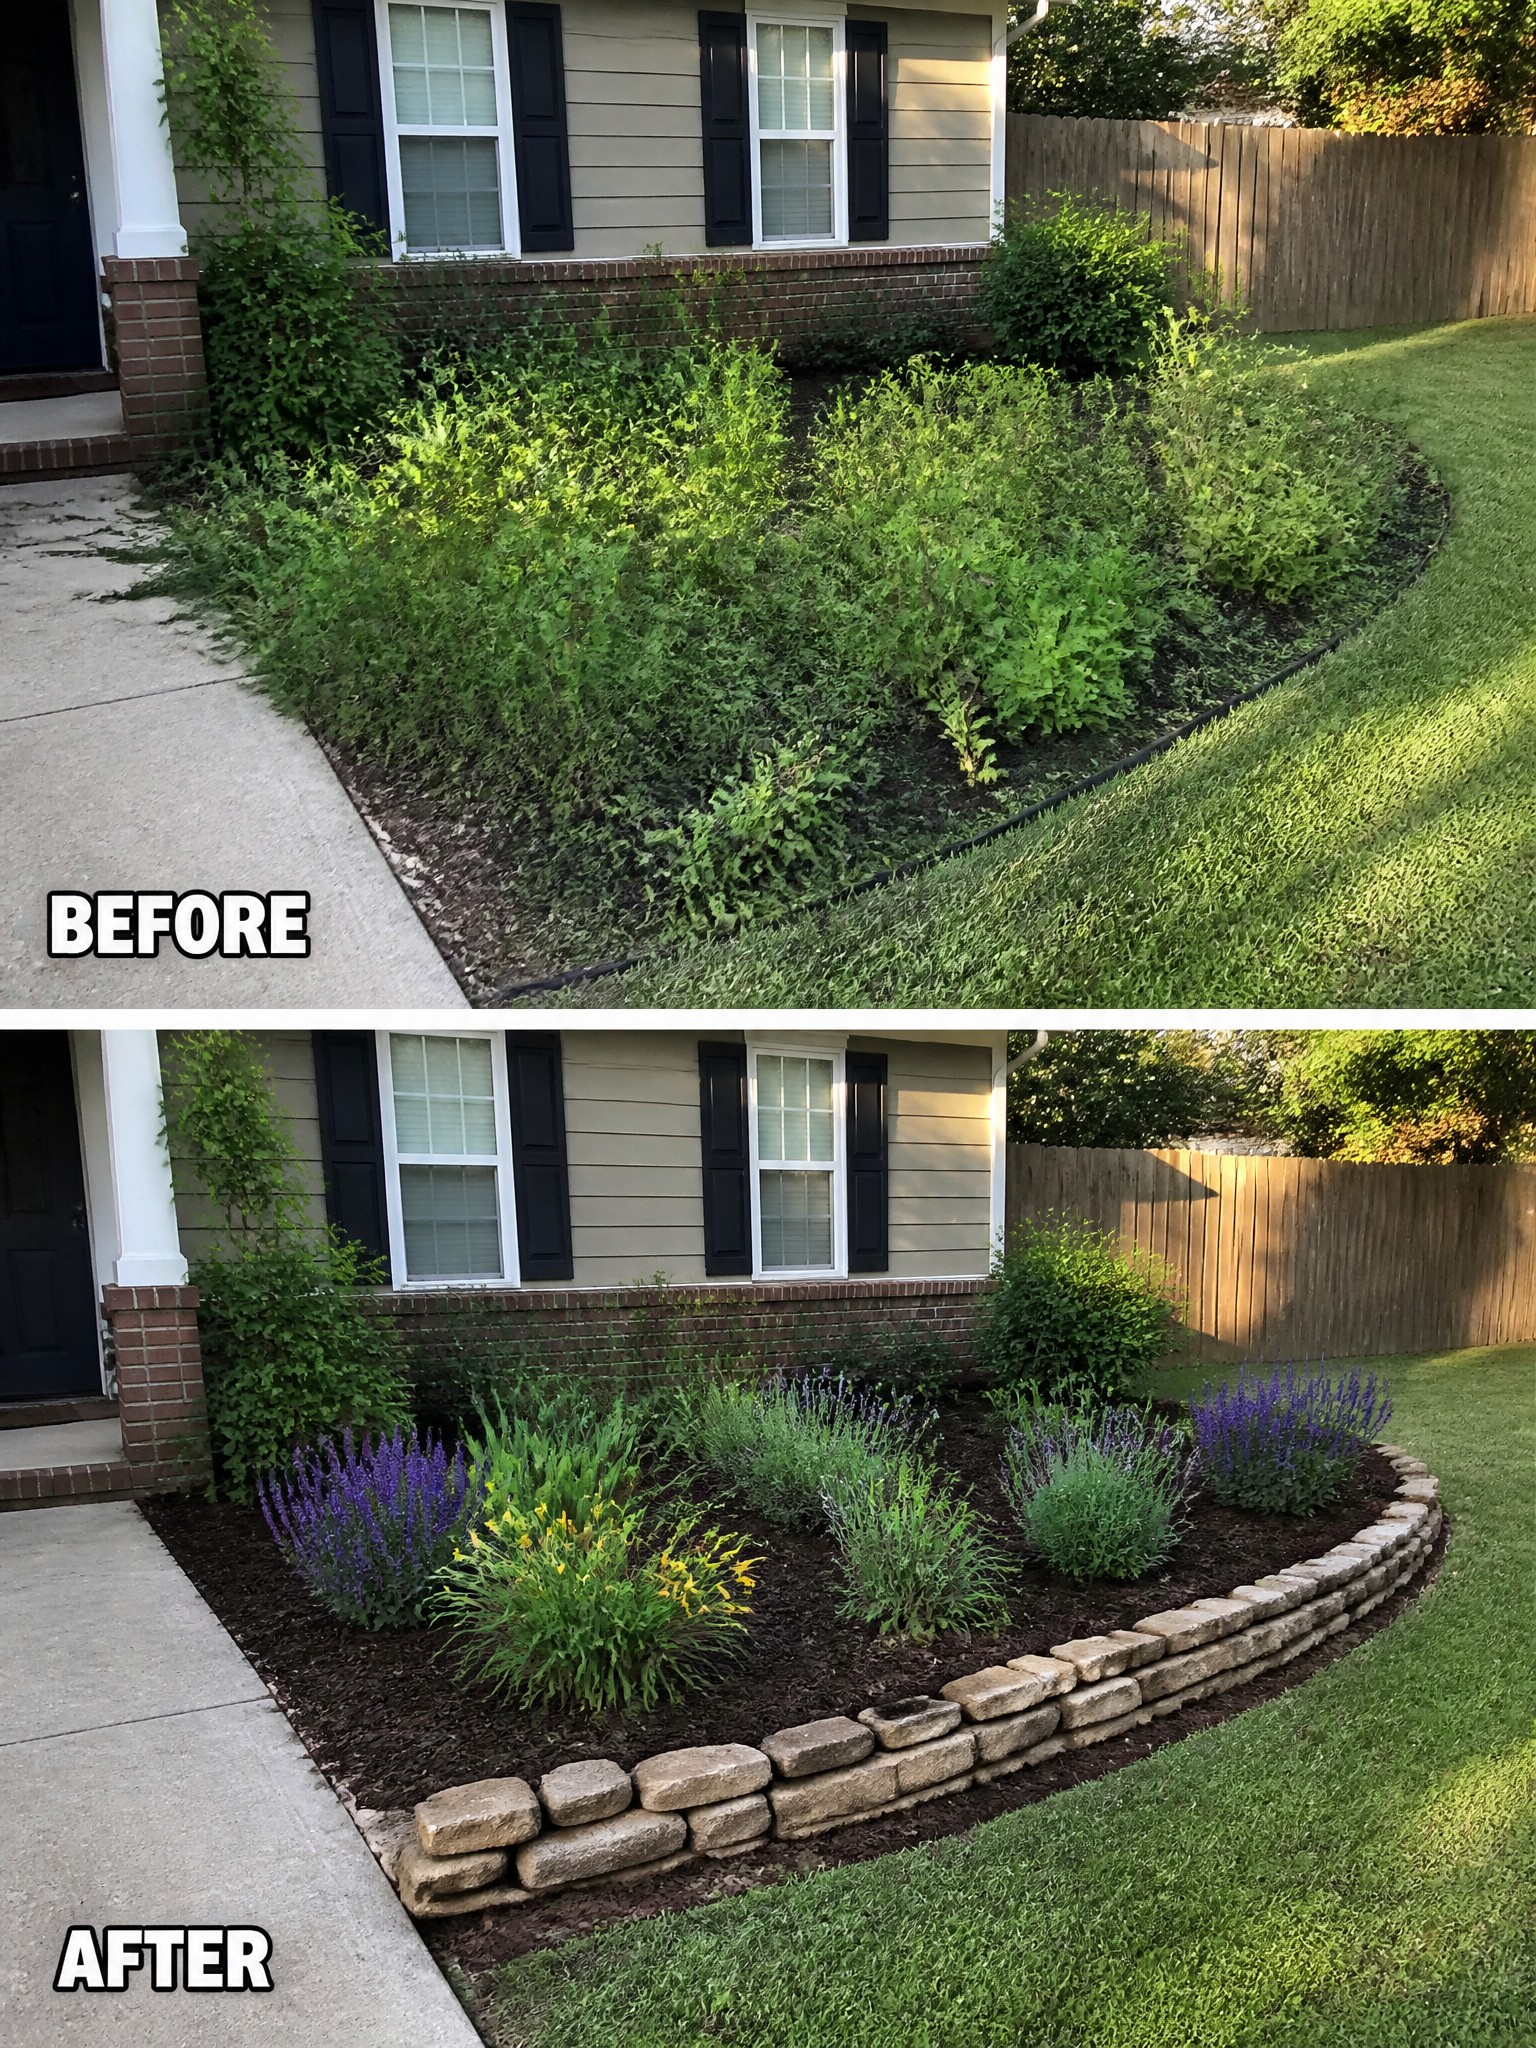
An overgrown strip along a fence quickly makes the rest of the yard look neglected. Clearing the old plants and adding a low stone border with fresh mulch gives the bed a clear shape so new flowers can be planted in simple groups instead of fighting for space.
This works best on narrow beds next to paths or fences. Remove the worst of the growth first, set the edging to hold the line, then mulch and add plants that stay in scale with the space. The result feels planned without needing a full redesign.
Define Garden Beds With Mulch After Clearing Overgrowth
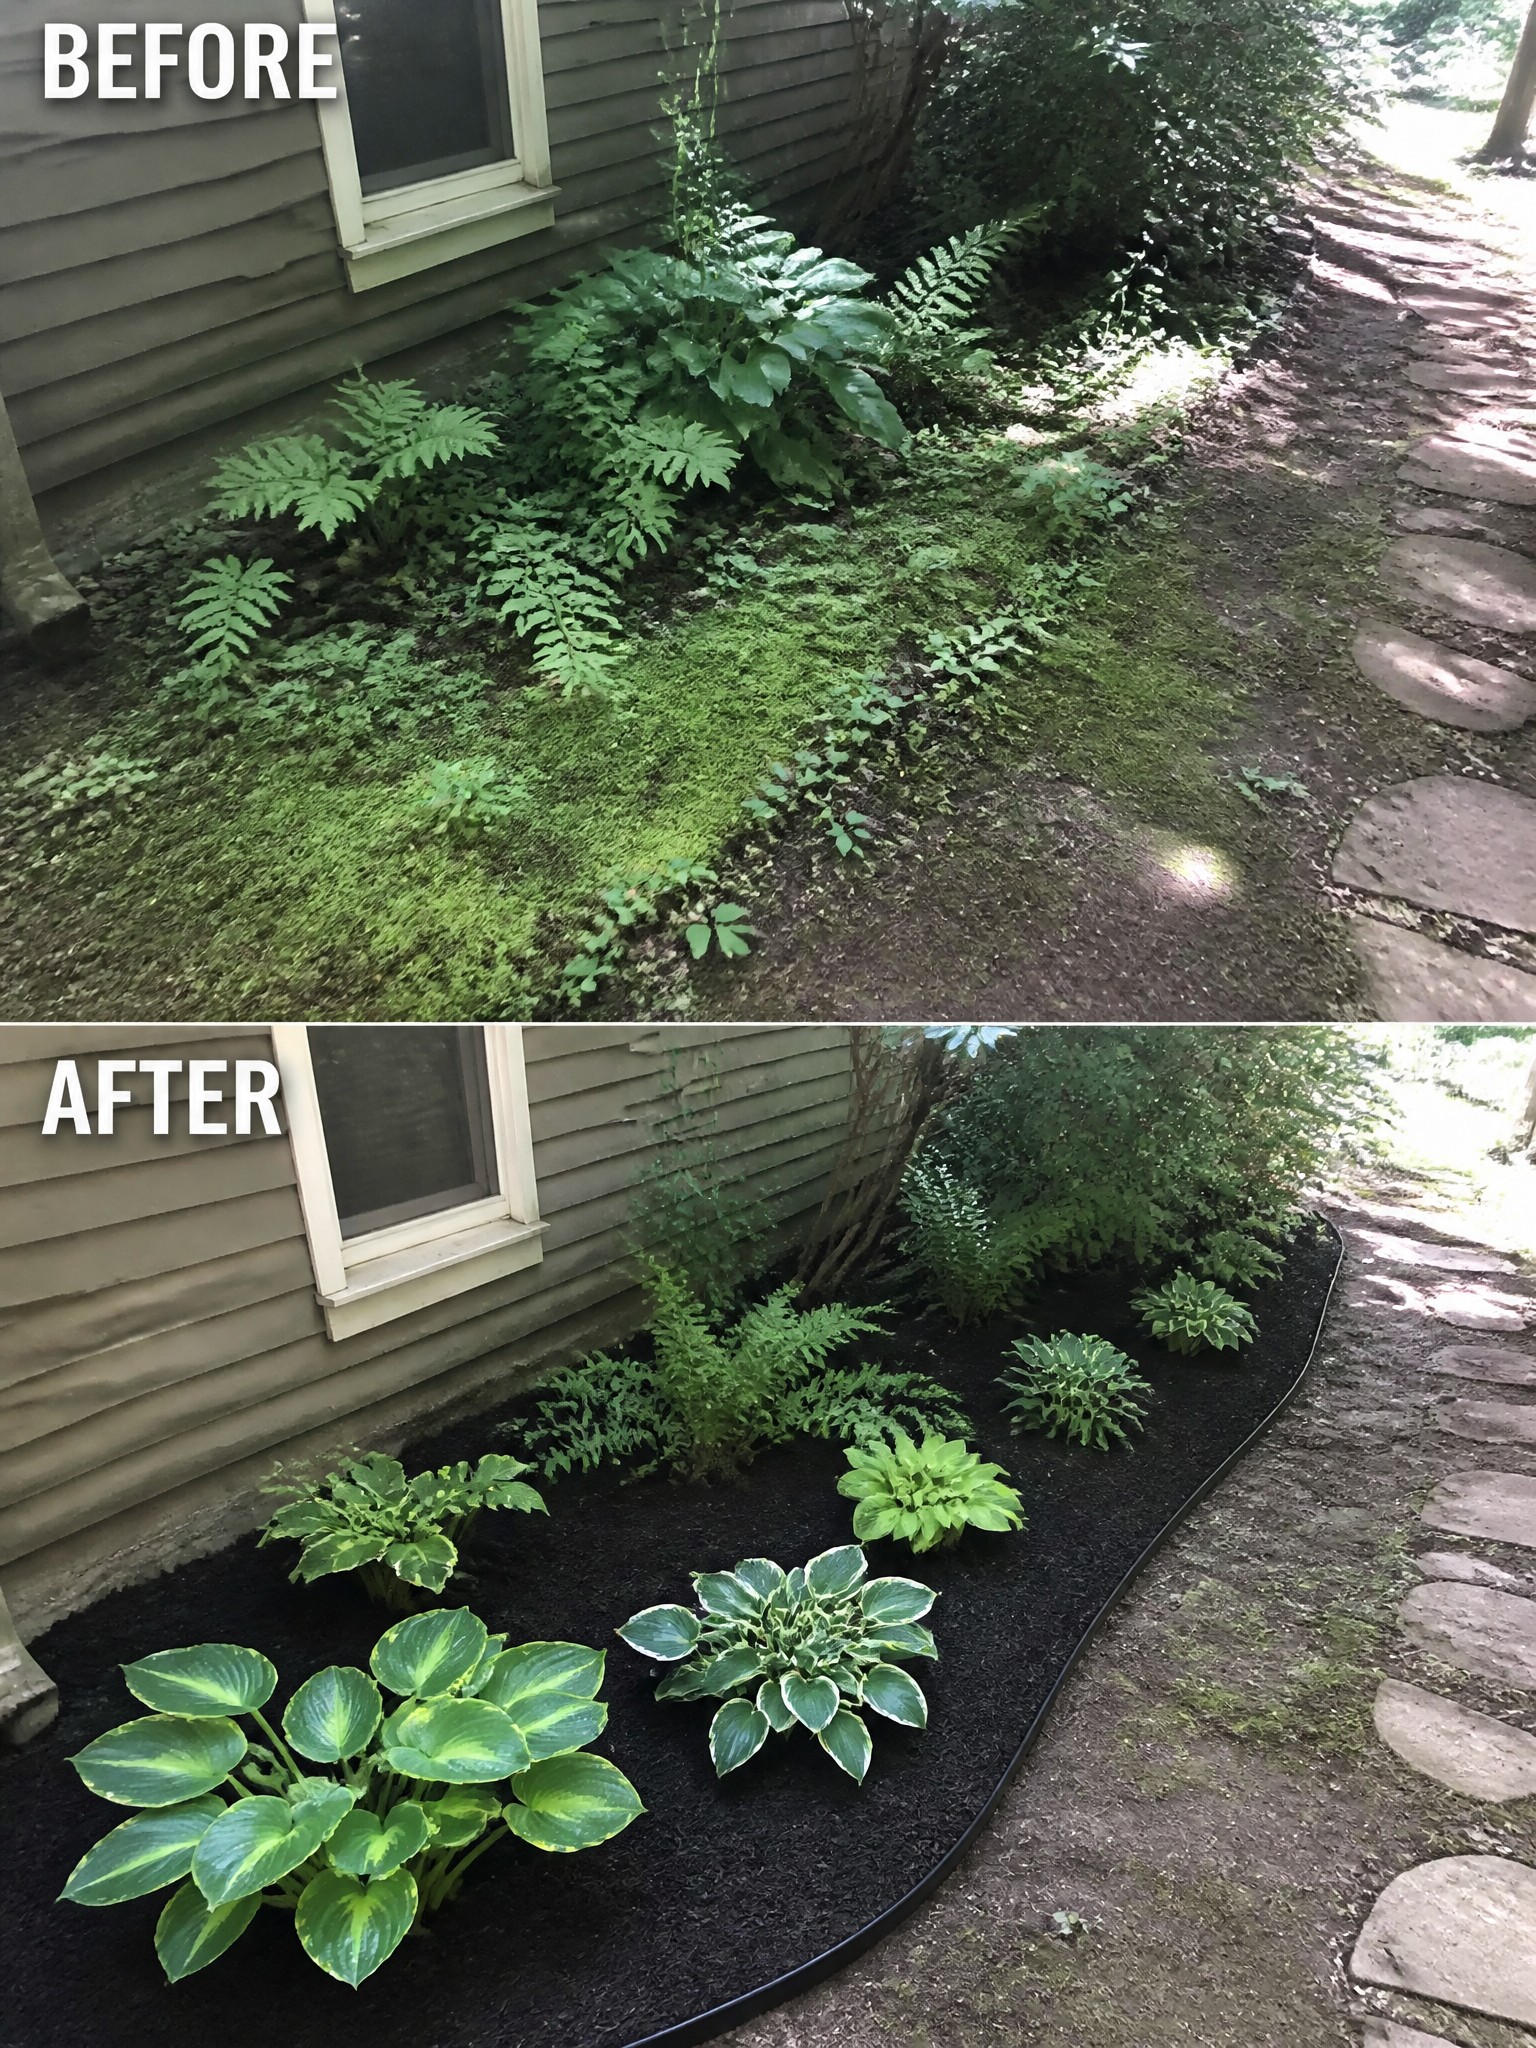
Clearing the thick moss and wild growth first makes the biggest difference. Once the ground is open, a layer of dark mulch with a simple curved border turns the same strip of ground into a tidy bed that looks planned rather than neglected.
This approach works especially well along the side of a house or next to a path where you want low maintenance. Keep the planting light with a few hostas and ferns, and let the mulch and edging carry the clean look. It also helps control weeds and makes future care much easier.
Add Stacked Stone Borders To Shape Sloped Beds
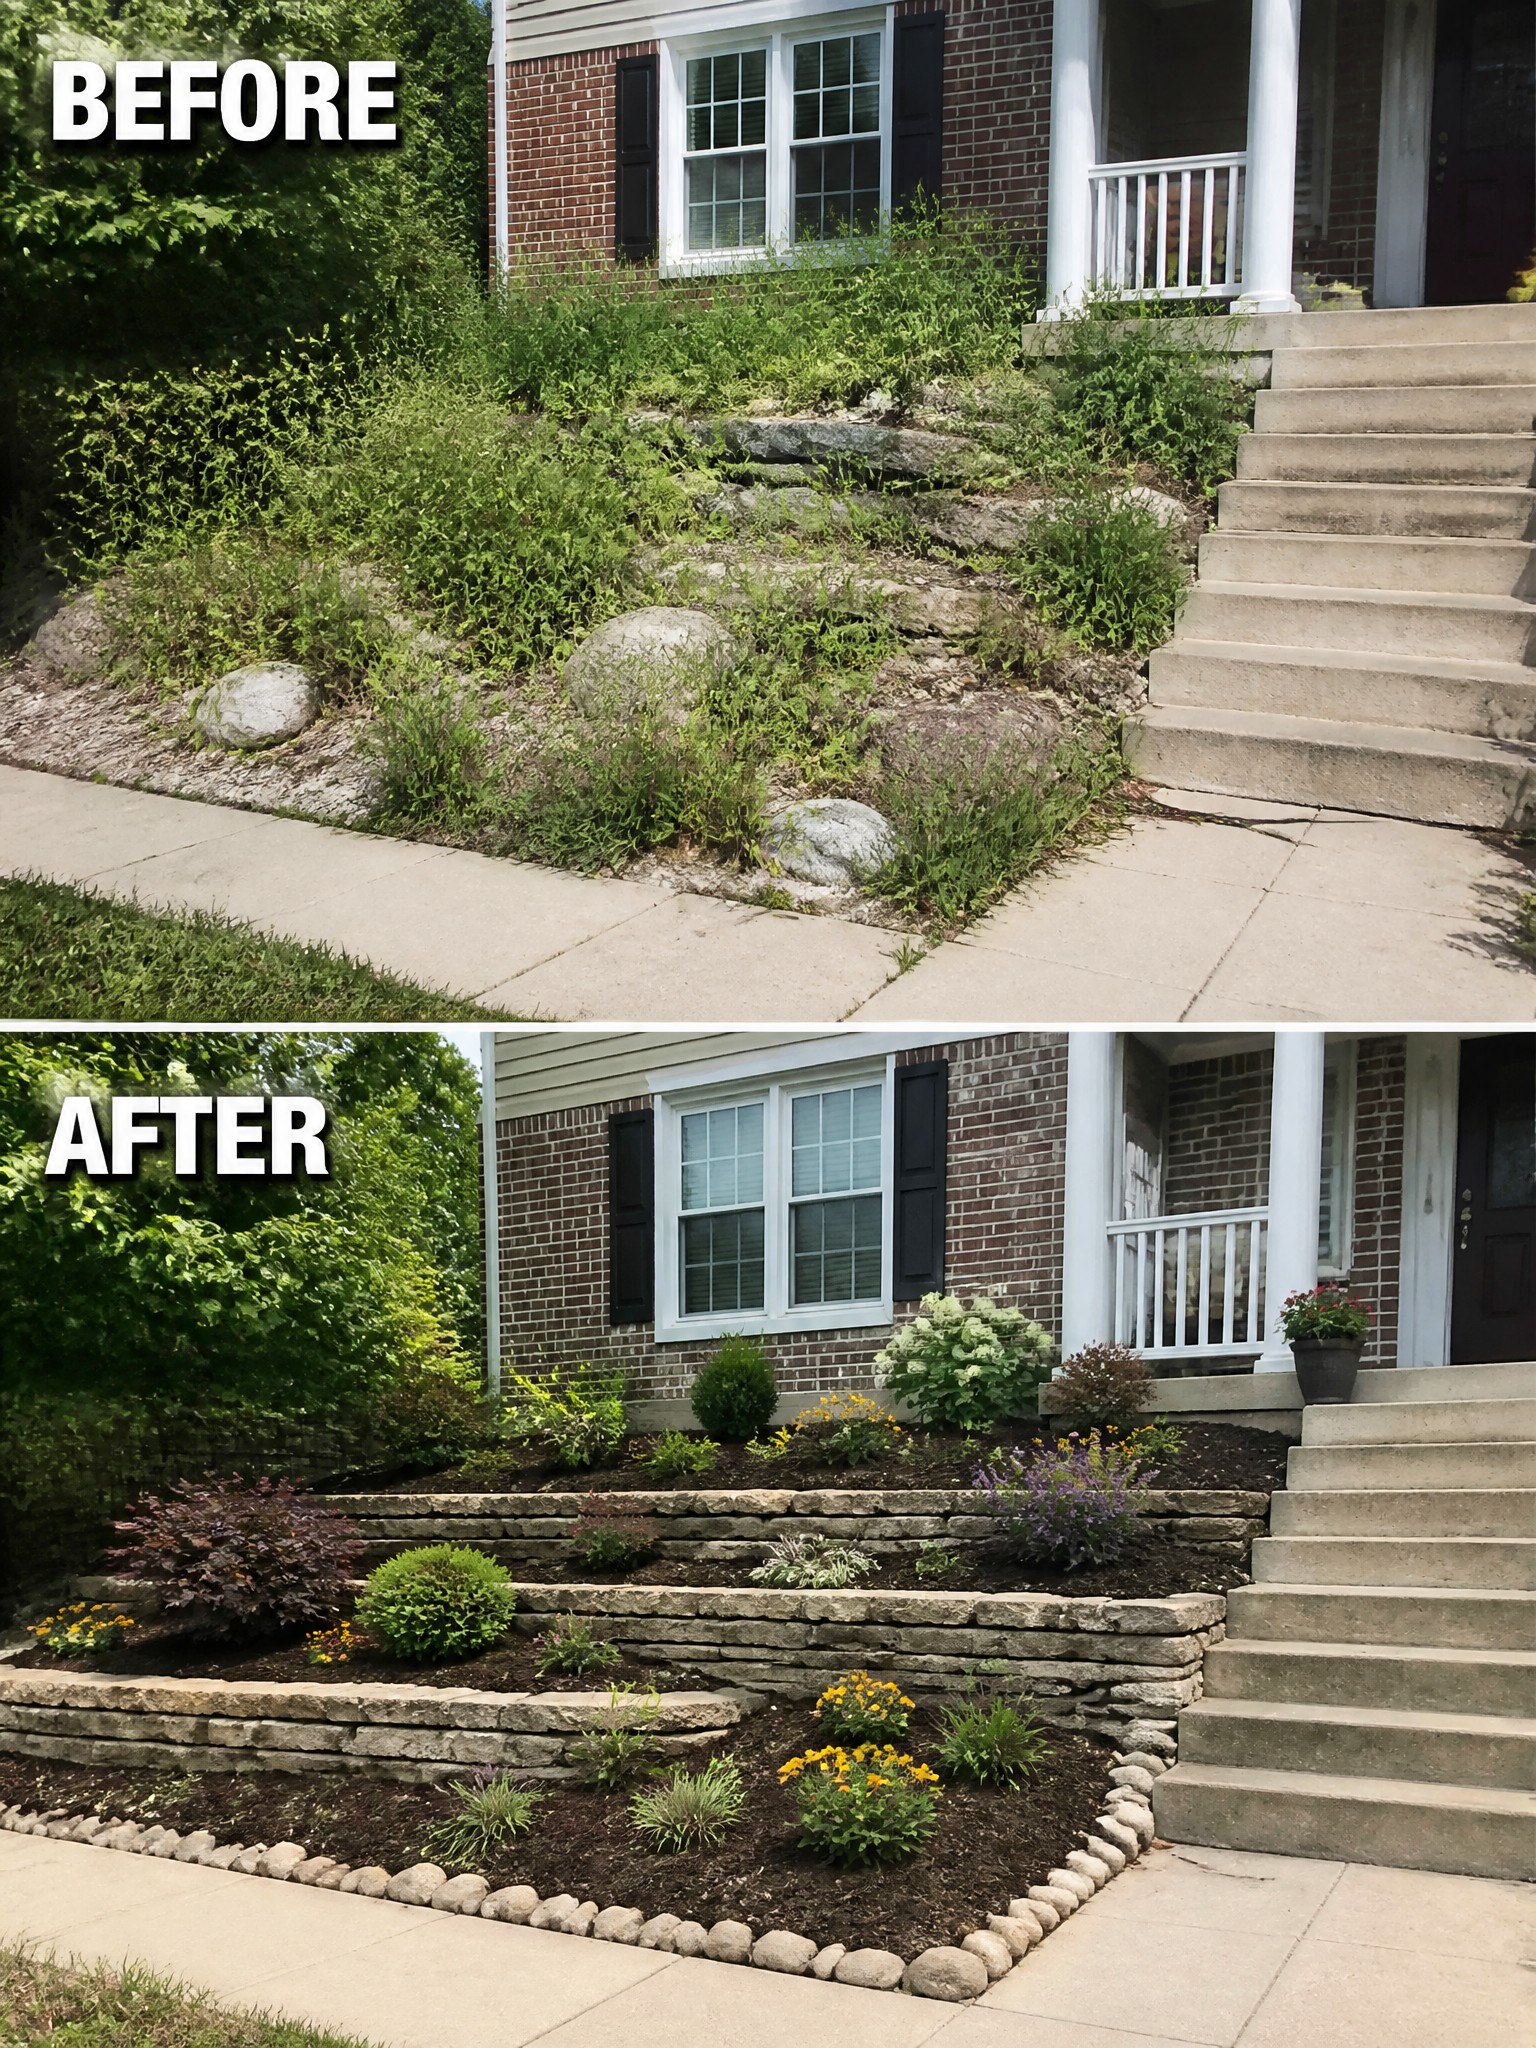
Clearing out thick weeds and rocks first makes room for simple stone retaining walls that turn a messy slope into a series of flat beds. The mulch then keeps the soil in place and gives the whole area a finished look without needing constant weeding.
This approach works well on any front or side yard where the ground drops away from the house. Start with the lowest wall and work upward so each bed stays level, and keep the plantings simple until the structure feels solid.
Frequently Asked Questions
Q: What if weeds keep popping up even after I lay down the mulch? A: Lay down a thick layer of newspaper or cardboard first. It blocks light so weeds can’t grow through easily. Then add your mulch on top.
Q: How do I pick borders that won’t fall apart in a year? A: Go with stones or bricks you can stack yourself. They hold up better than cheap plastic ones. Just make sure they sit level on the ground.
Q: Do I need to edge the borders perfectly straight? A: Not at all. A slight curve gives your yard more character. Follow the natural shape of your overgrown spots instead.
