

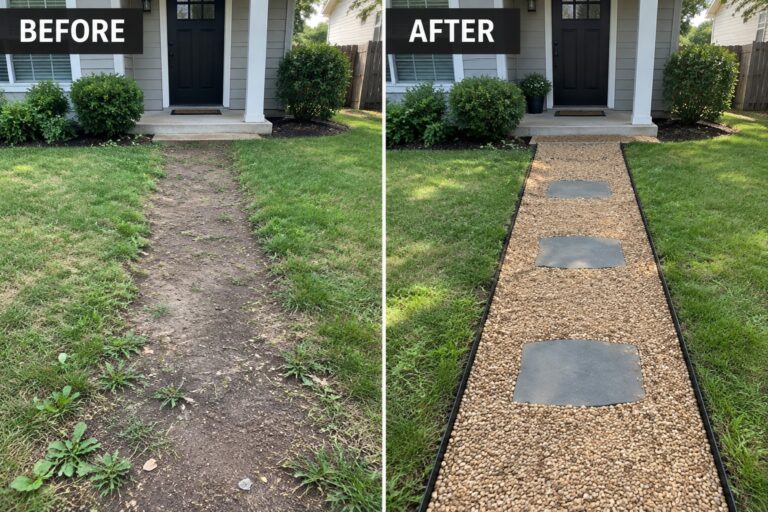
I have walked past plenty of yards where the path just kind of faded into the grass without much thought.
Gravel paired with simple edging can give those routes a clearer shape and keep things from looking scattered over time.
I usually start by checking how the edging will sit against the lawn because that line makes the biggest difference in how neat the area feels overall.
Small updates like these can turn a patchy stretch into something that guides people through the space without needing constant upkeep.
Trying out different gravel sizes or border styles lets you match the look to what already exists around the house.
Define A Worn Path With Gravel And Stepping Stones
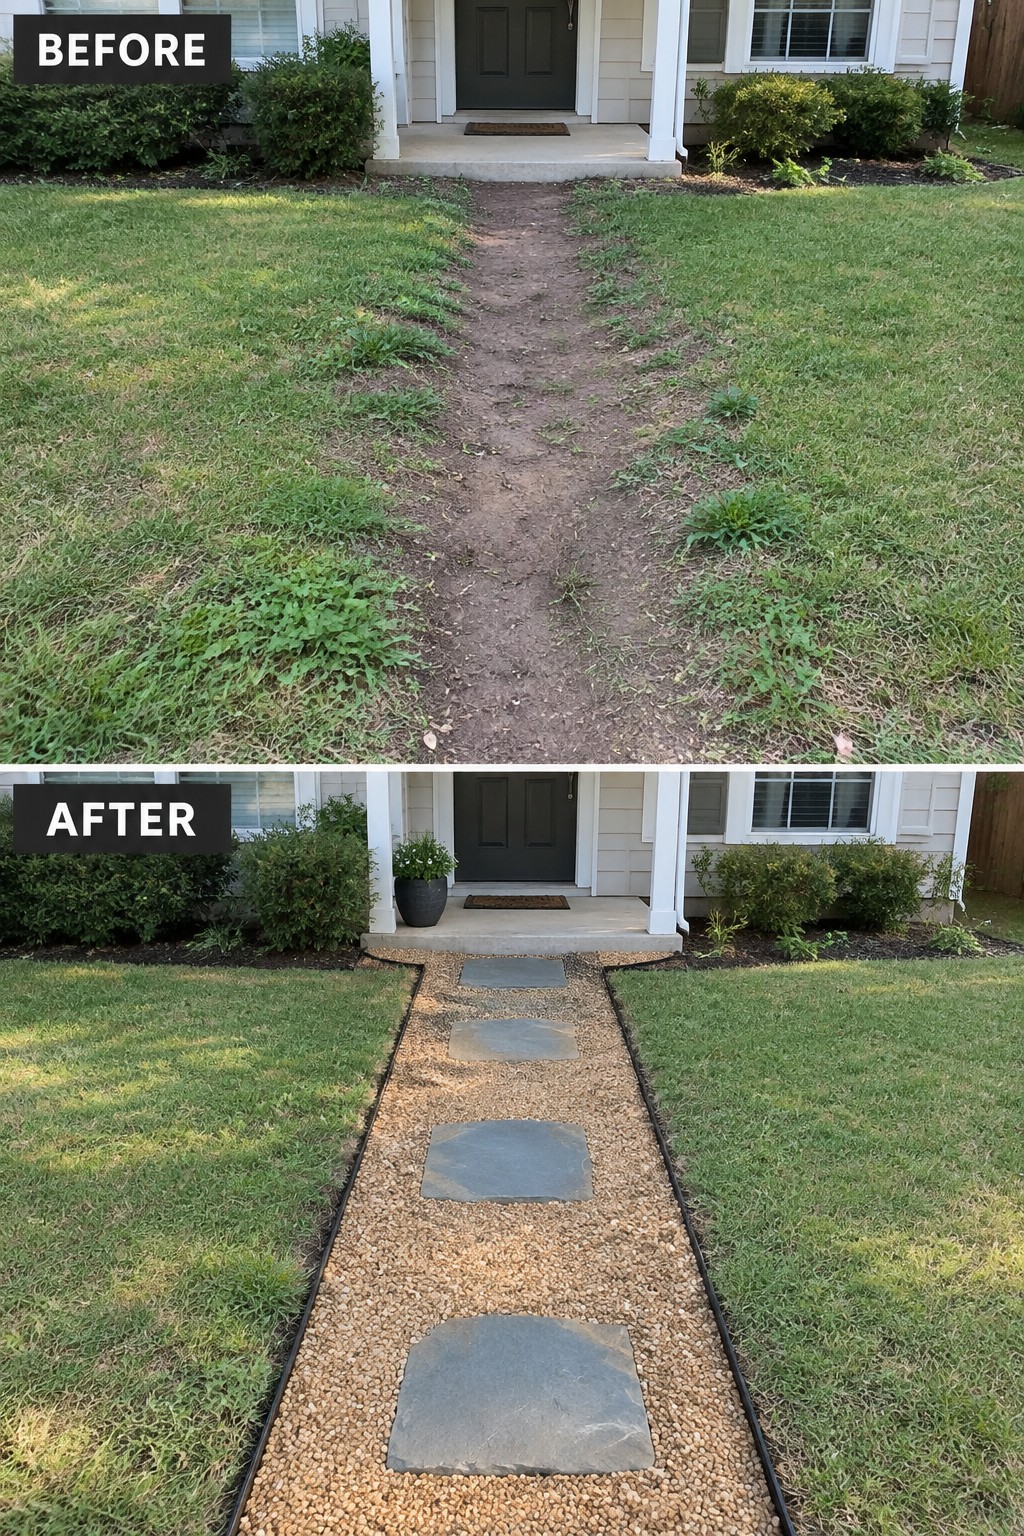
A dirt path that forms from regular foot traffic often ends up looking messy and unfinished. Laying down gravel with a few large stepping stones gives the route a clear shape while keeping the cost low and the work straightforward.
This idea suits homes where the front lawn meets the entry and you want something practical rather than a full concrete or paver install. Use edging to hold the gravel in place, and space the stones so they feel natural to walk on without crowding the lawn on either side.
Replace A Cracked Concrete Path With Gravel And Edging
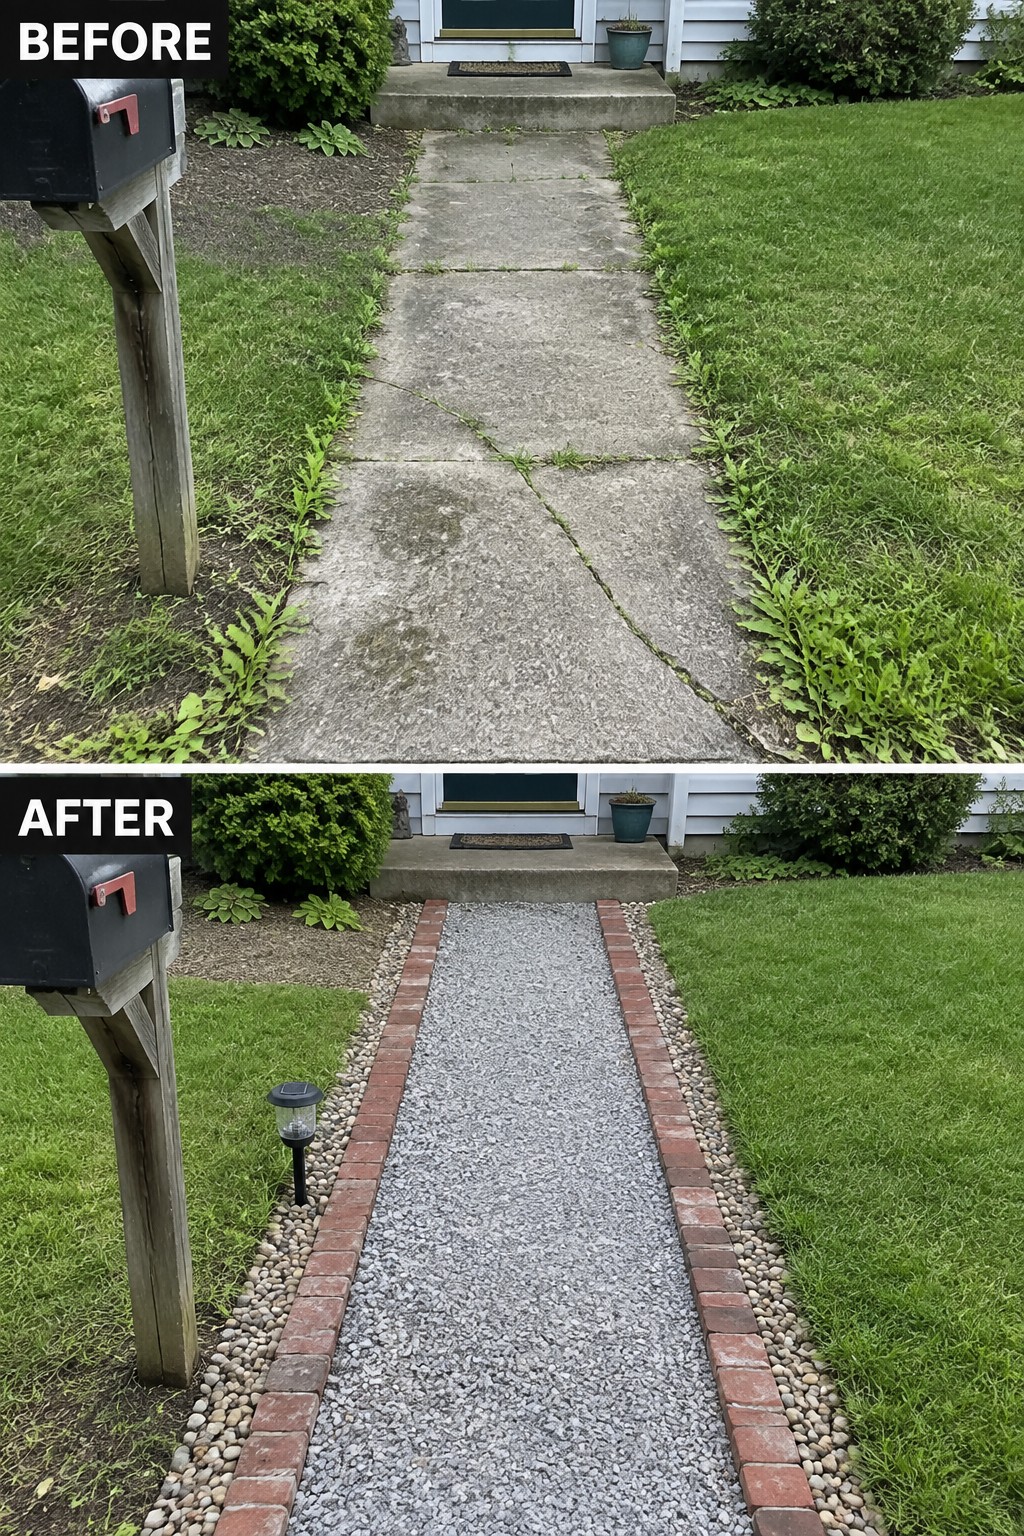
A cracked concrete walkway with weeds pushing through the edges always looks neglected. Switching to gravel with a simple brick border cleans up the line, improves drainage, and gives the path a finished look without tearing out the whole thing.
This idea works best on narrow front walks or side paths where the old surface is still usable as a base. Lay landscape fabric, add gravel, and install the edging first. The materials stay affordable and the result holds up better than trying to patch old concrete.
Define A Garden Path With Gravel And Edging
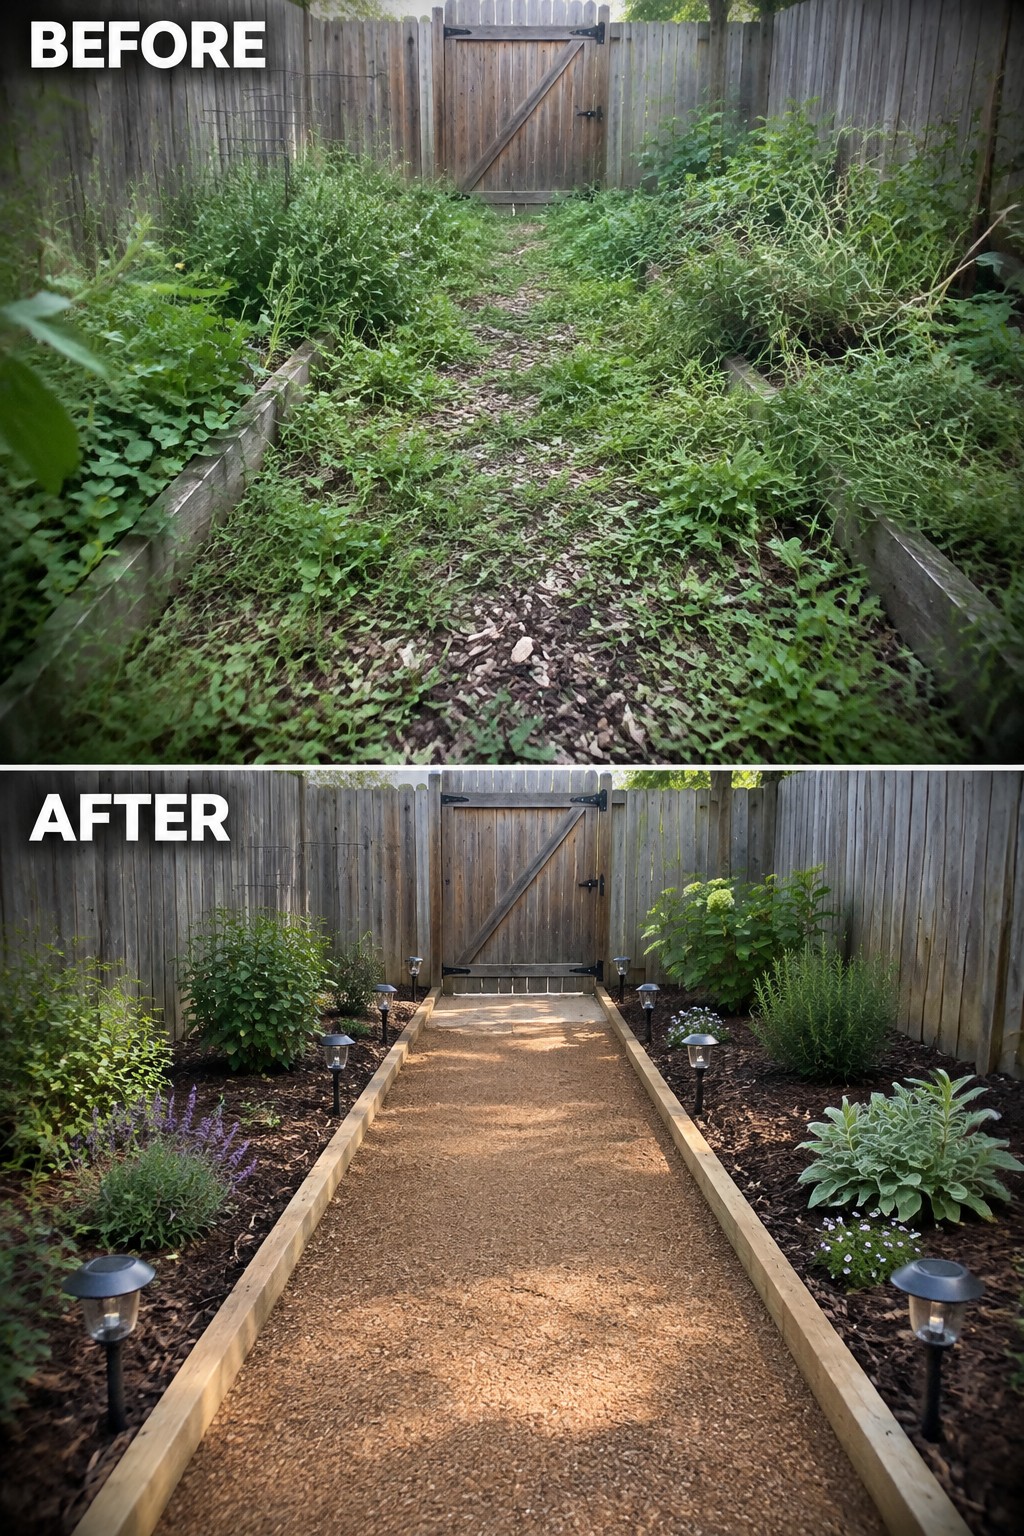
An overgrown path quickly makes a backyard feel neglected and hard to use. Clearing the weeds and adding a gravel walkway with wooden borders brings order to the space and makes it easy to walk through without stepping on plants.
This idea works best in narrow side yards or long garden strips where you need a simple route from one end to the other. Start with cleanup and edging before adding plants so the path stays the main feature and does not get lost among the beds.
Define A Narrow Side Path With Gravel And Stepping Stones
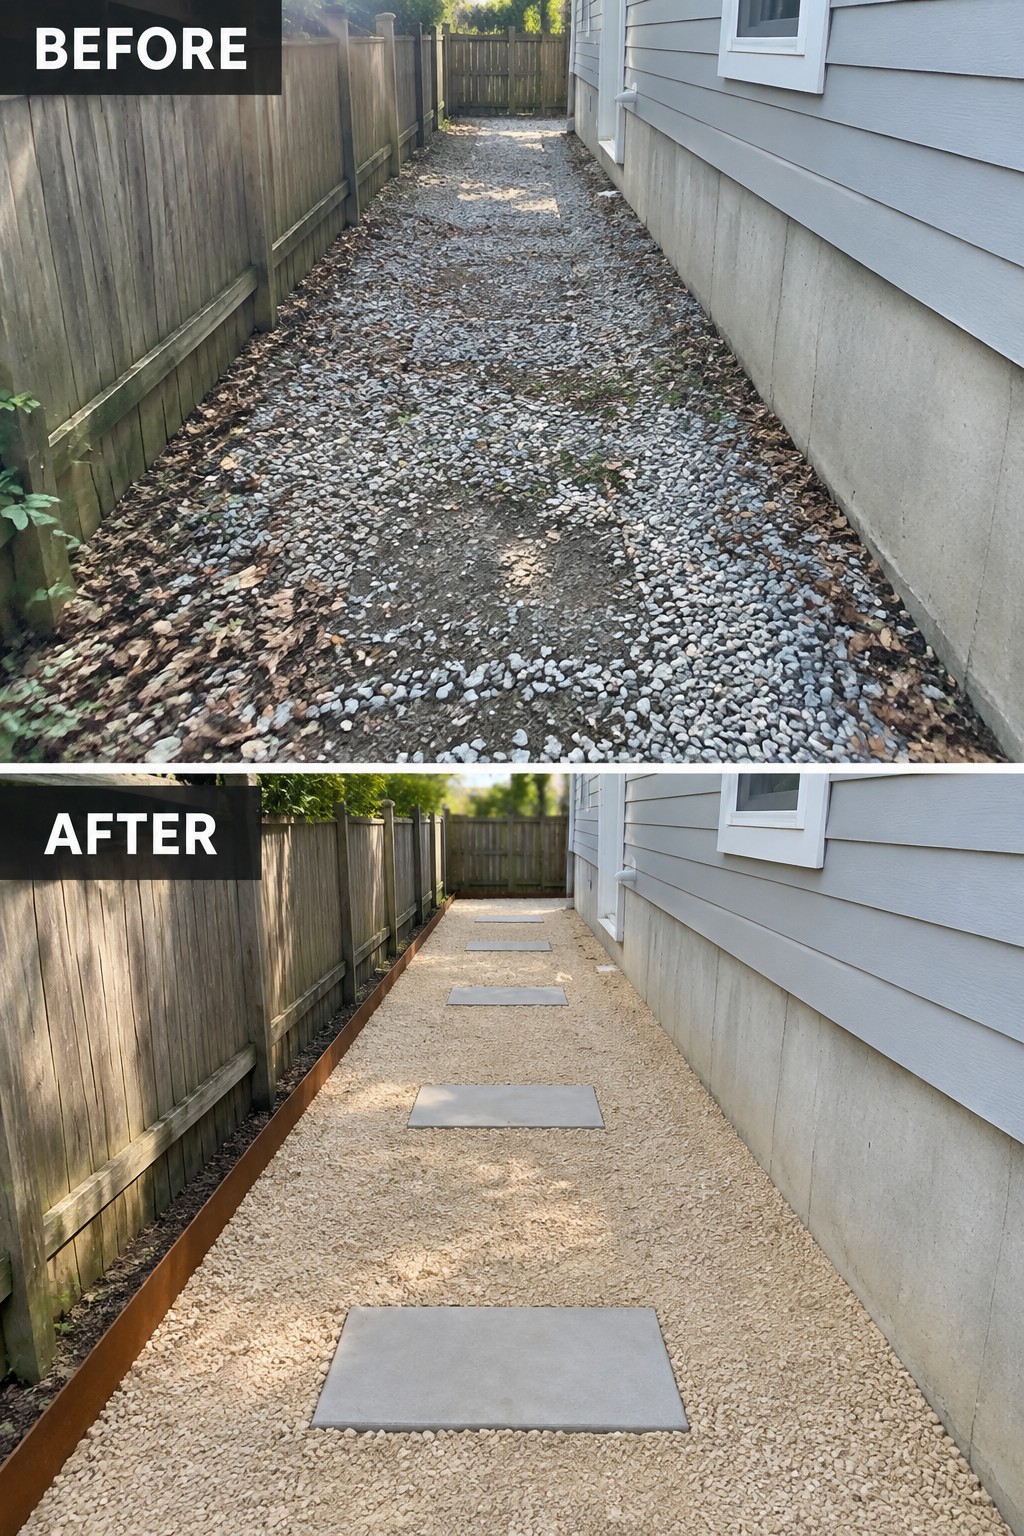
A gravel path along the side of a house often ends up looking messy and uneven after a season or two. Adding a few concrete stepping stones and a simple metal edge gives the path clear direction and makes it much easier to walk on without changing the low-cost gravel surface.
This idea works best in tight side yards where a full patio would not fit. Lay down landscape fabric first, spread fresh gravel, then space the pavers at a natural walking distance and install edging to keep the gravel from spilling into planting areas or against the house.
Replace A Muddy Path With Gravel And Edging
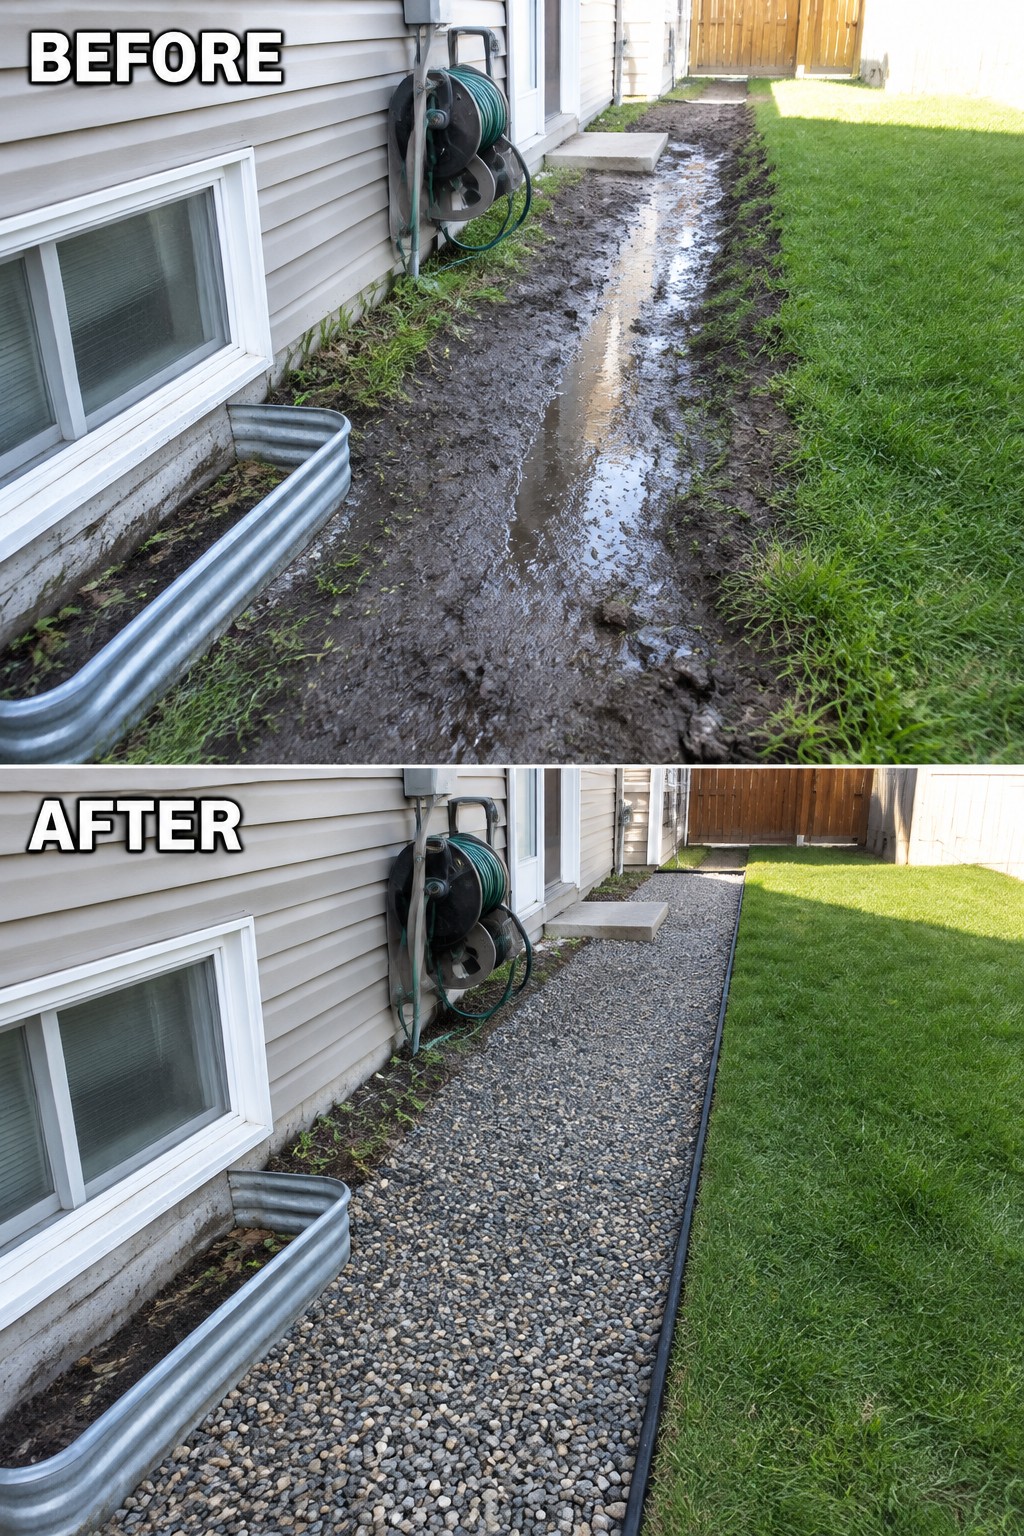
A muddy side path next to the house creates constant problems with water, weeds, and footing. Laying down gravel with a clean border gives the area structure, improves drainage, and turns the space into something you can actually walk on without tracking dirt inside.
This idea works best in narrow side yards or along foundations where a full patio would feel too wide. Keep the path simple by using a solid edging material to hold the gravel in place, and choose a size that packs down without shifting too much. It is an easy first step before adding any plants or lighting.
Use Gravel And Edging To Define A Stepping Stone Walkway
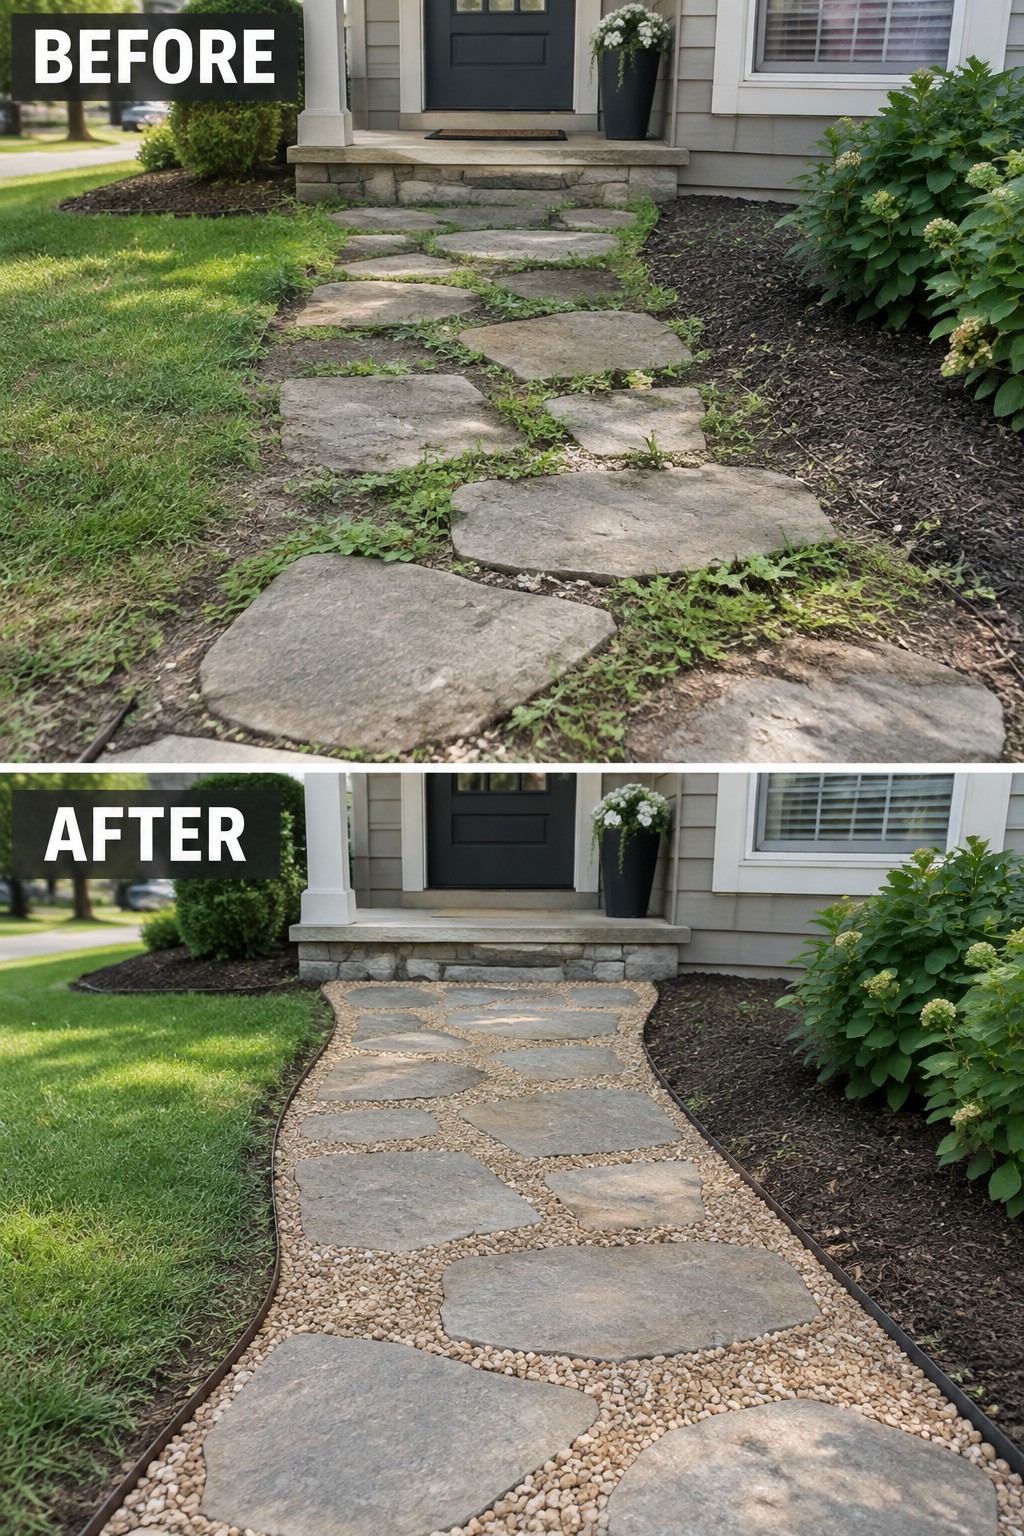
Stepping stone paths often end up looking messy once grass and weeds start filling the gaps. Adding a layer of gravel between the stones and installing simple edging along both sides pulls the whole path together and keeps the lawn from taking over again.
This idea works best on front yard entrances or side paths where you want a tidy look without a full rebuild. Start by clearing out the growth, then choose gravel that sits level with the stones so the surface stays easy to walk on.
Define A Simple Yard Path With Gravel And Edging
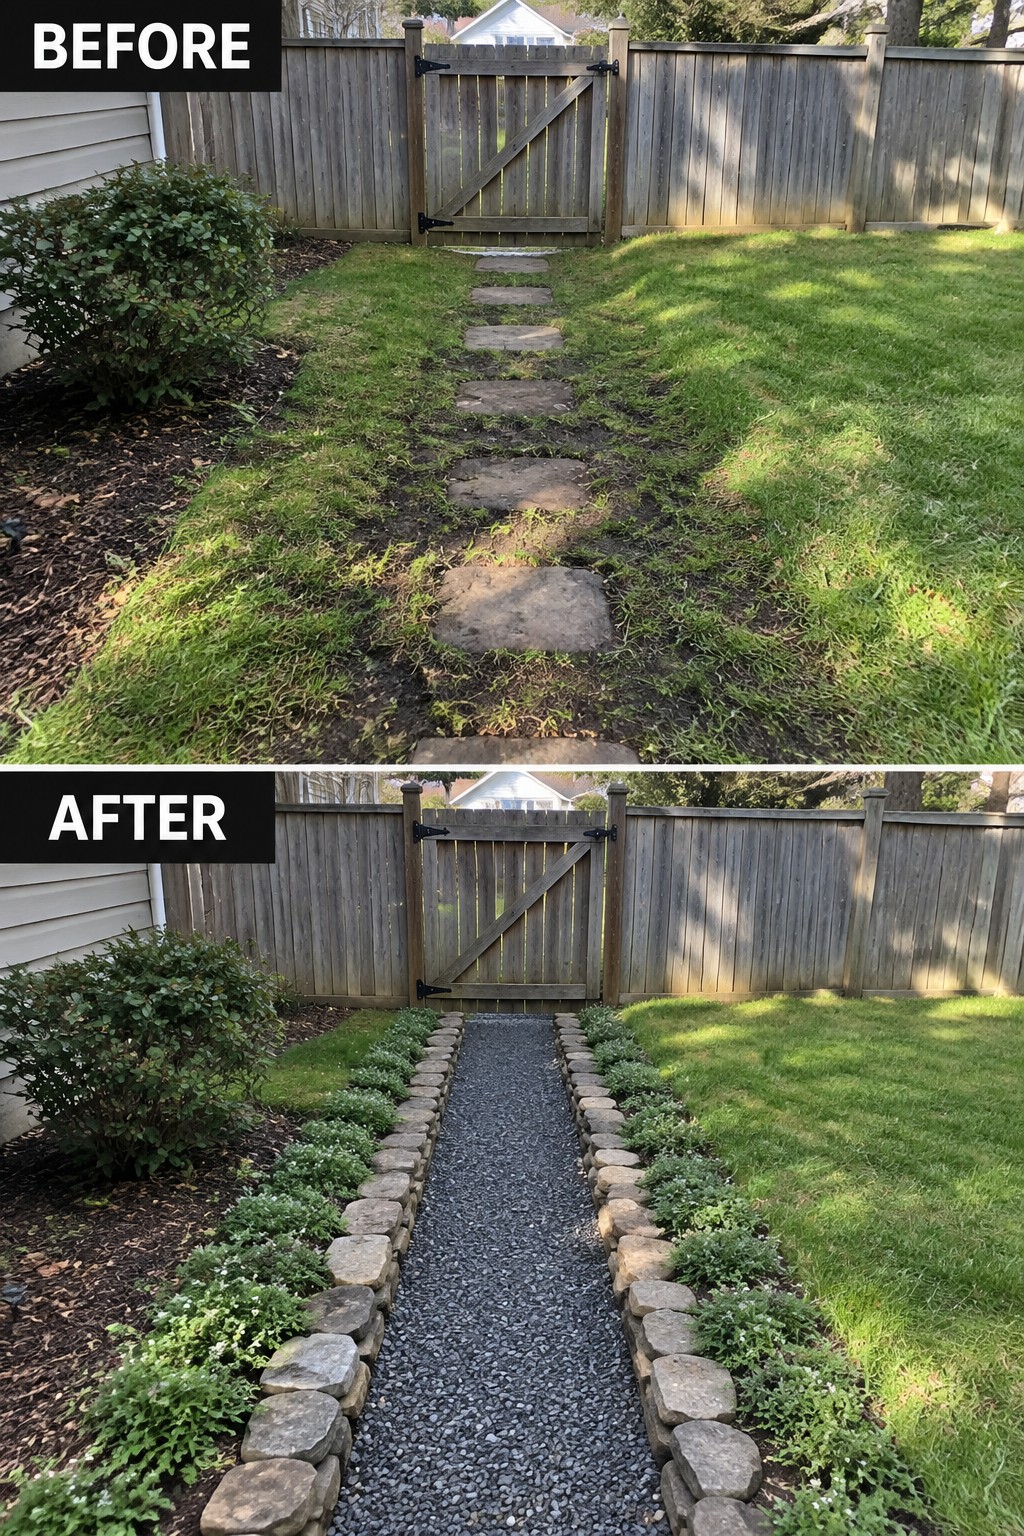
A worn path through the grass often turns muddy and hard to walk on after rain. Adding a gravel walkway with stone edging gives the route a clear shape and keeps the surrounding lawn looking tidy.
This idea works best in smaller yards where you want a low-cost way to connect a gate or back door to the rest of the space. Clear the old grass first, set the edging in a straight line, then fill the center with gravel so water drains properly and the path stays usable year-round.
Define A Plain Walkway With Gravel And Brick Edging
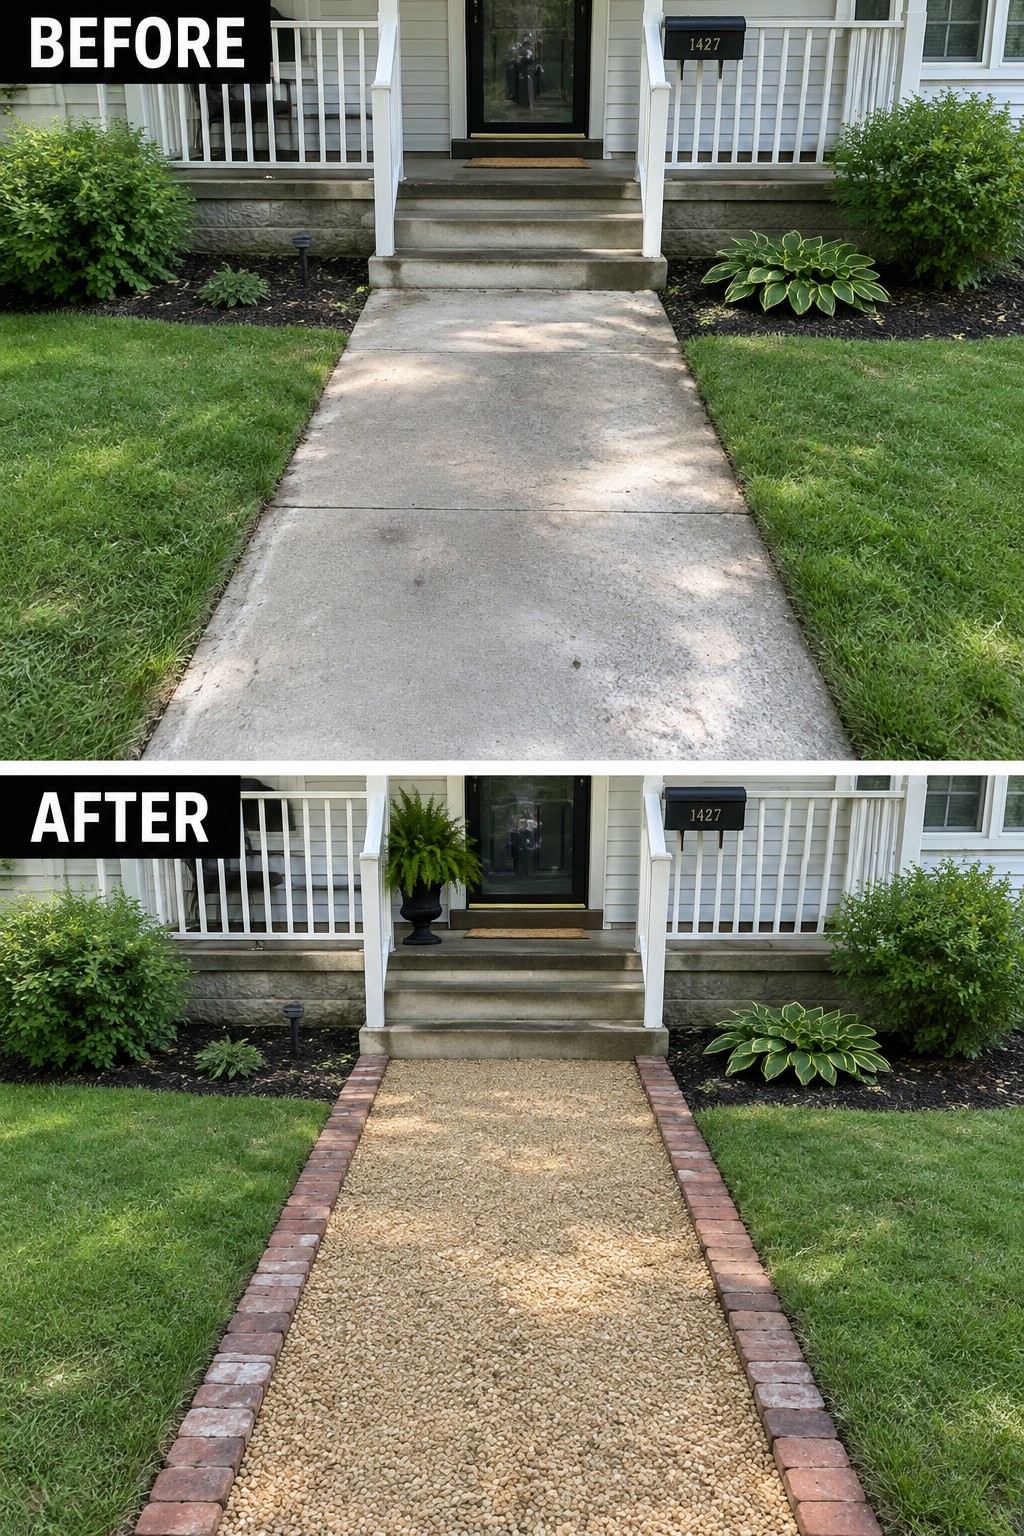
A straight concrete path often blends into the lawn and feels unfinished. Replacing it with gravel and adding a brick border gives the walkway a clear edge and makes the whole front approach look more intentional.
This idea works best on simple, straight paths where you want low-cost structure without a full rebuild. Lay a solid base first, then add the gravel and set the bricks along both sides so the path stays contained and easy to maintain over time.
Define Gravel Paths With Stone Edging
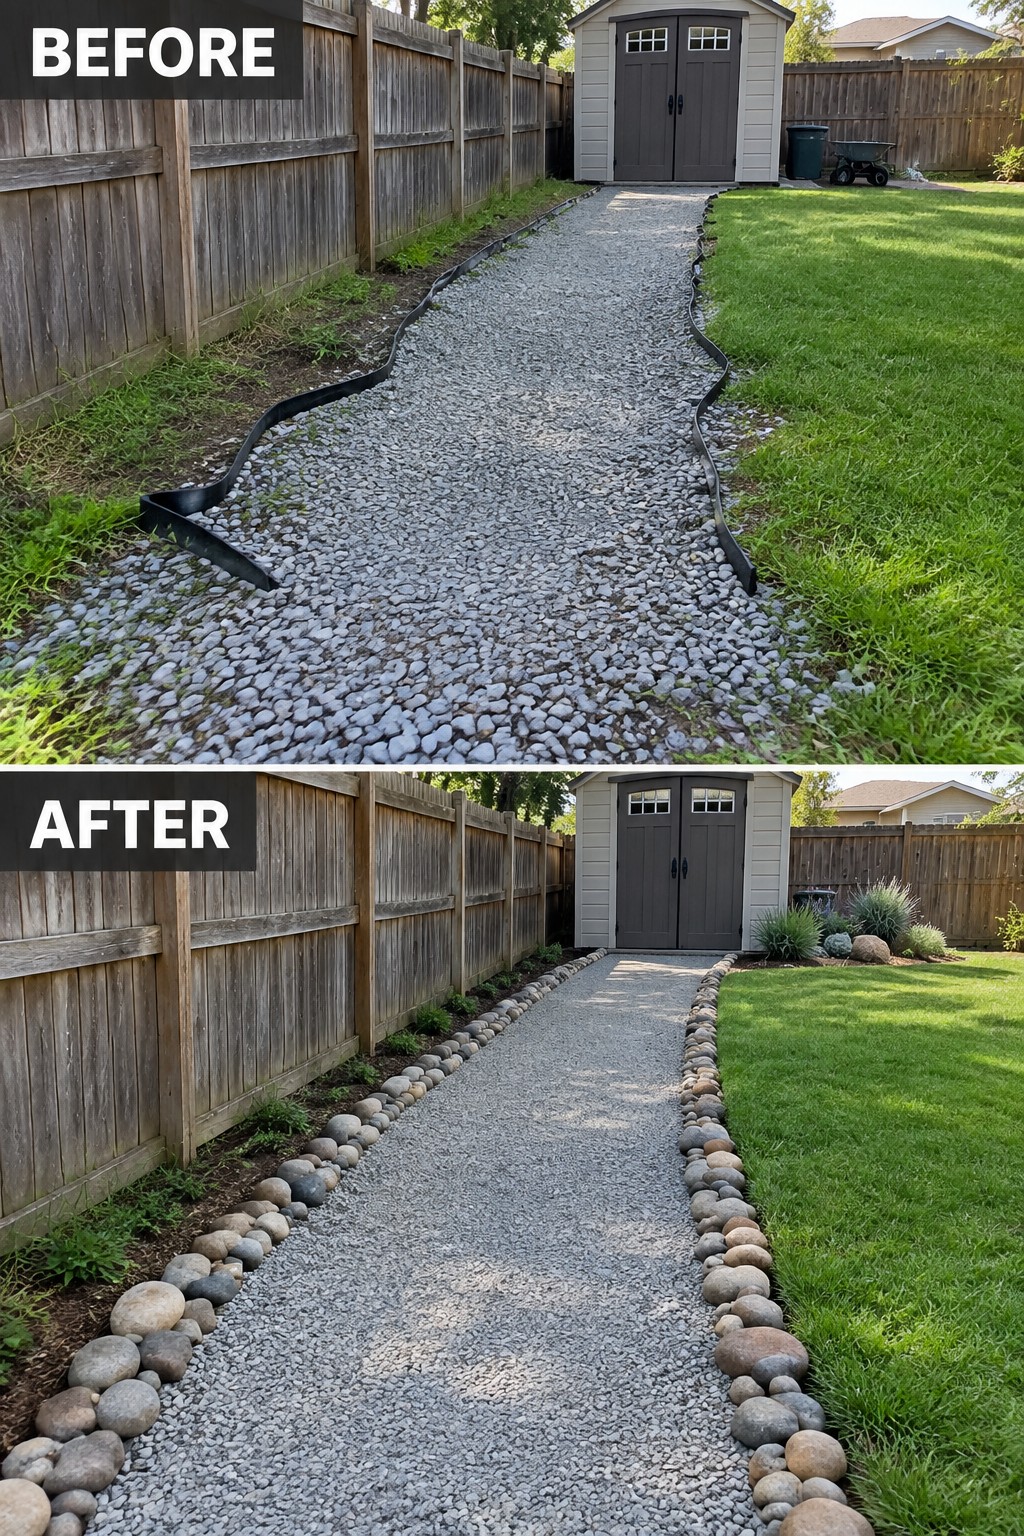
A loose plastic border does little to keep gravel in place or separate it from the lawn. Switching to a row of larger rounded stones creates a solid edge that holds everything where it should be and gives the path a finished look without much cost.
This approach works well in side yards or back gardens where you already have gravel but need better structure. Place the stones end to end along both sides, pressing them slightly into the soil so they stay put. Keep the stones roughly the same size for a neater result, and make sure the path stays wide enough for comfortable walking.
Define A Narrow Side Path With Gravel And Edging
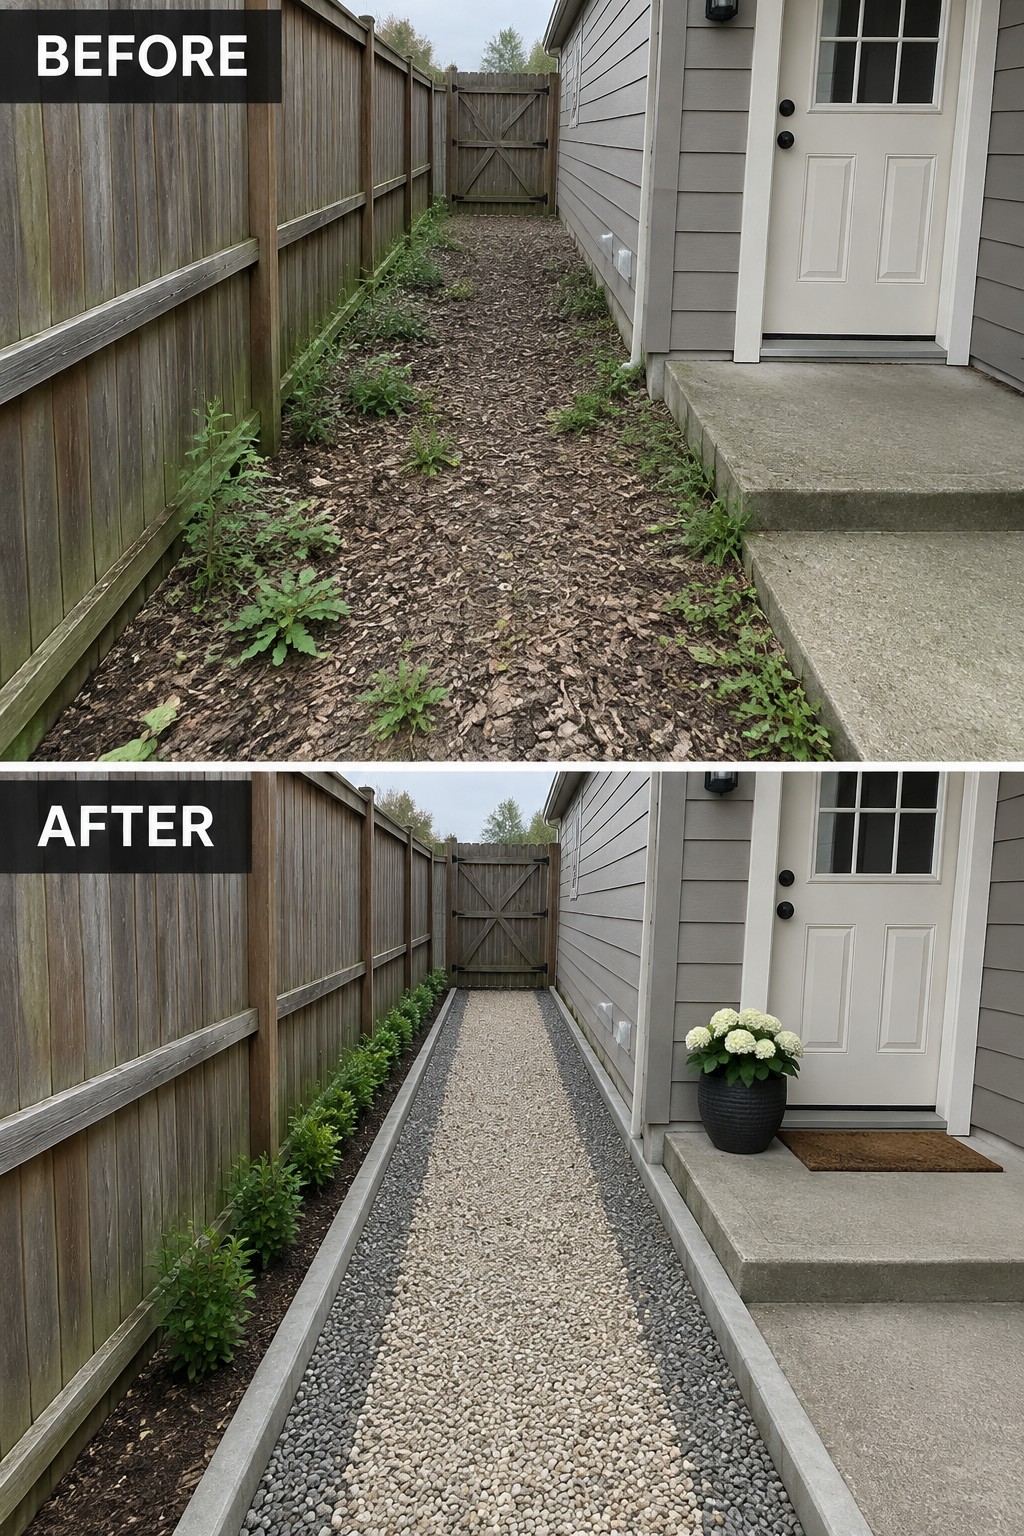
A narrow side path next to the house often ends up as a forgotten strip of weeds and scattered mulch. Adding gravel with a solid concrete border turns the same space into a clear, low-maintenance walkway that stays neat without constant weeding or topping up.
This idea works best on tight side yards where you still need a usable route to the backyard. Lay the edging first so the gravel stays contained, then keep any planting simple and low-growing along the fence. It gives the area purpose without crowding the space or requiring a big budget.
Add Edging To Define A Gravel Path
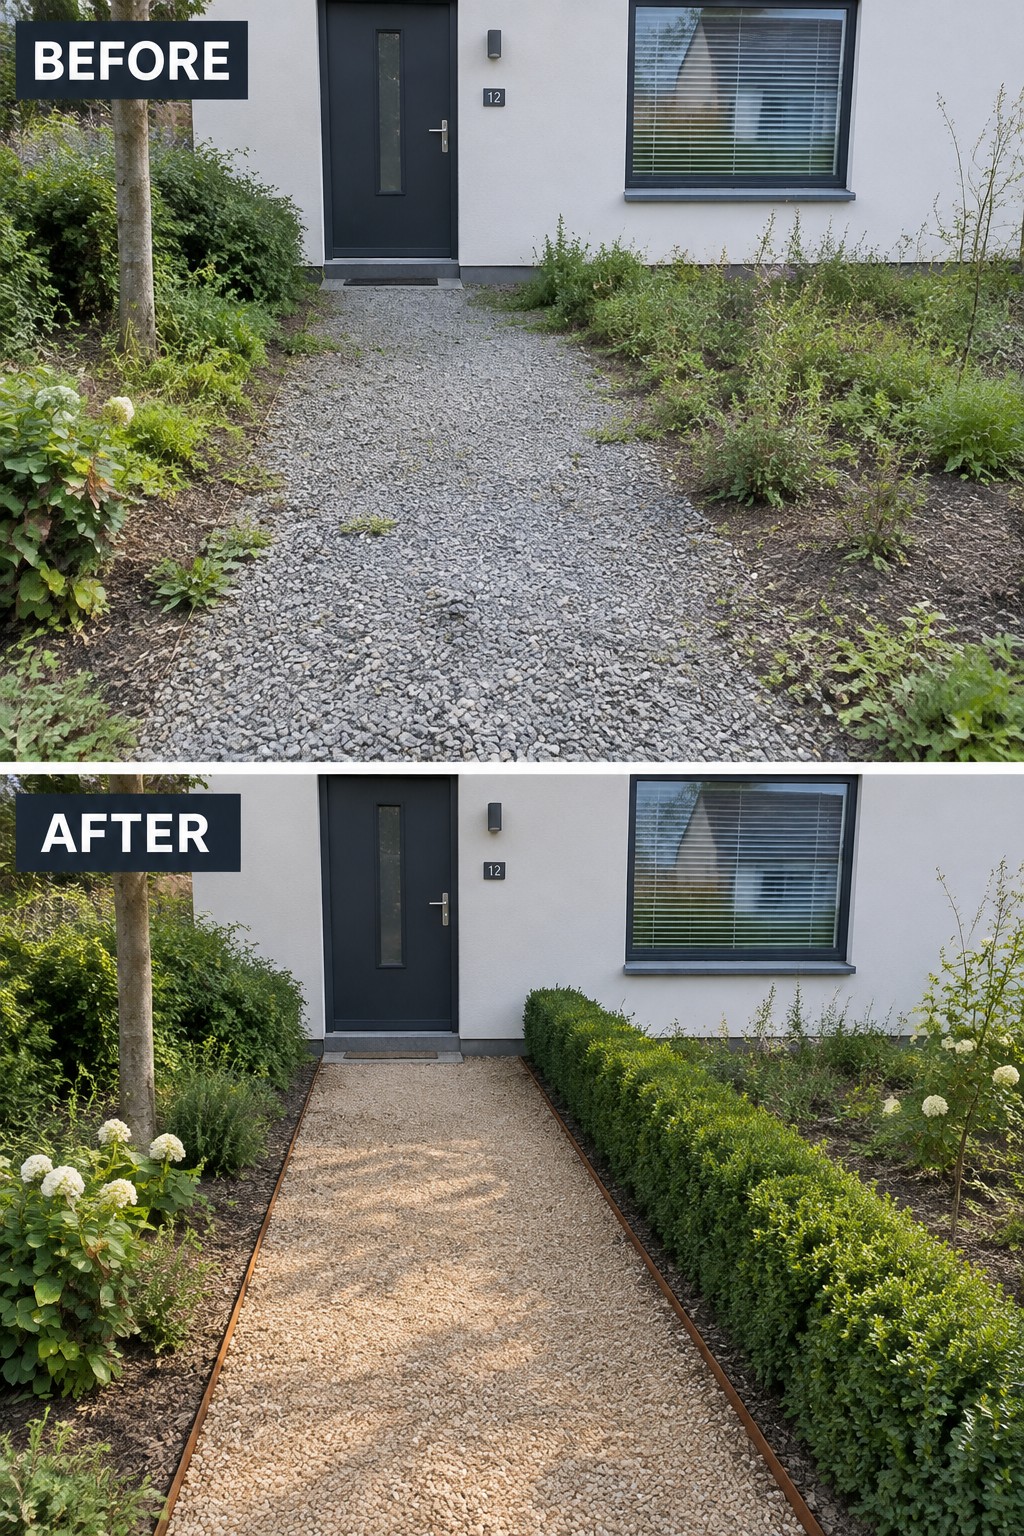
Adding a simple edge turns a loose gravel path into something that looks planned instead of left over. In the before photo the gravel just spread into the weeds, but once the metal border went in and the hedge was planted along one side, the walkway suddenly had clear lines and stayed neat.
This idea works best on front paths or side entrances where you want structure without a big budget. Clean the area first, put down edging to hold the gravel, then add one row of shrubs or a low hedge to keep the borders from creeping back in. It suits small yards especially, since the path stays usable and the planting stays easy to maintain.
Use Gravel To Fix A Muddy Walkway
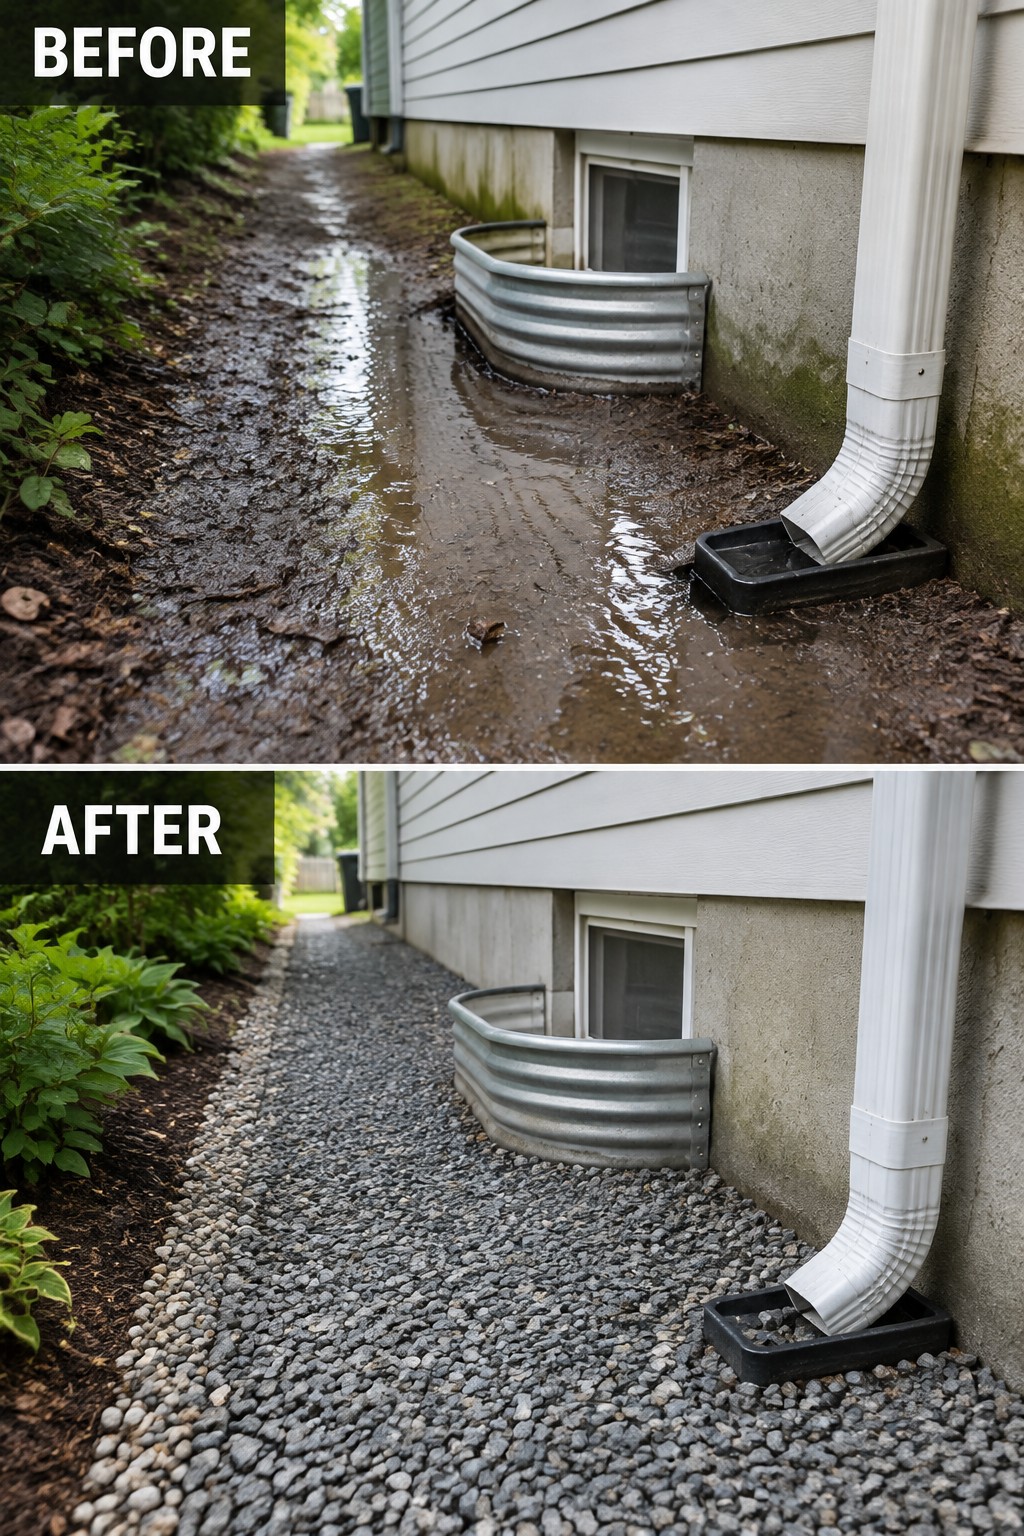
A muddy side path can turn into a real problem after rain, with water pooling right against the house. Laying down gravel over the wet area gives the ground a firm surface that drains better and keeps feet out of the muck.
This fix works especially well along narrow side yards or foundation edges where grass never takes hold. Clear out the worst of the mud first, add a simple border to hold the gravel in place, and spread a thick layer so it stays put through the seasons.
Define A Sandy Path With Gravel And Log Edging
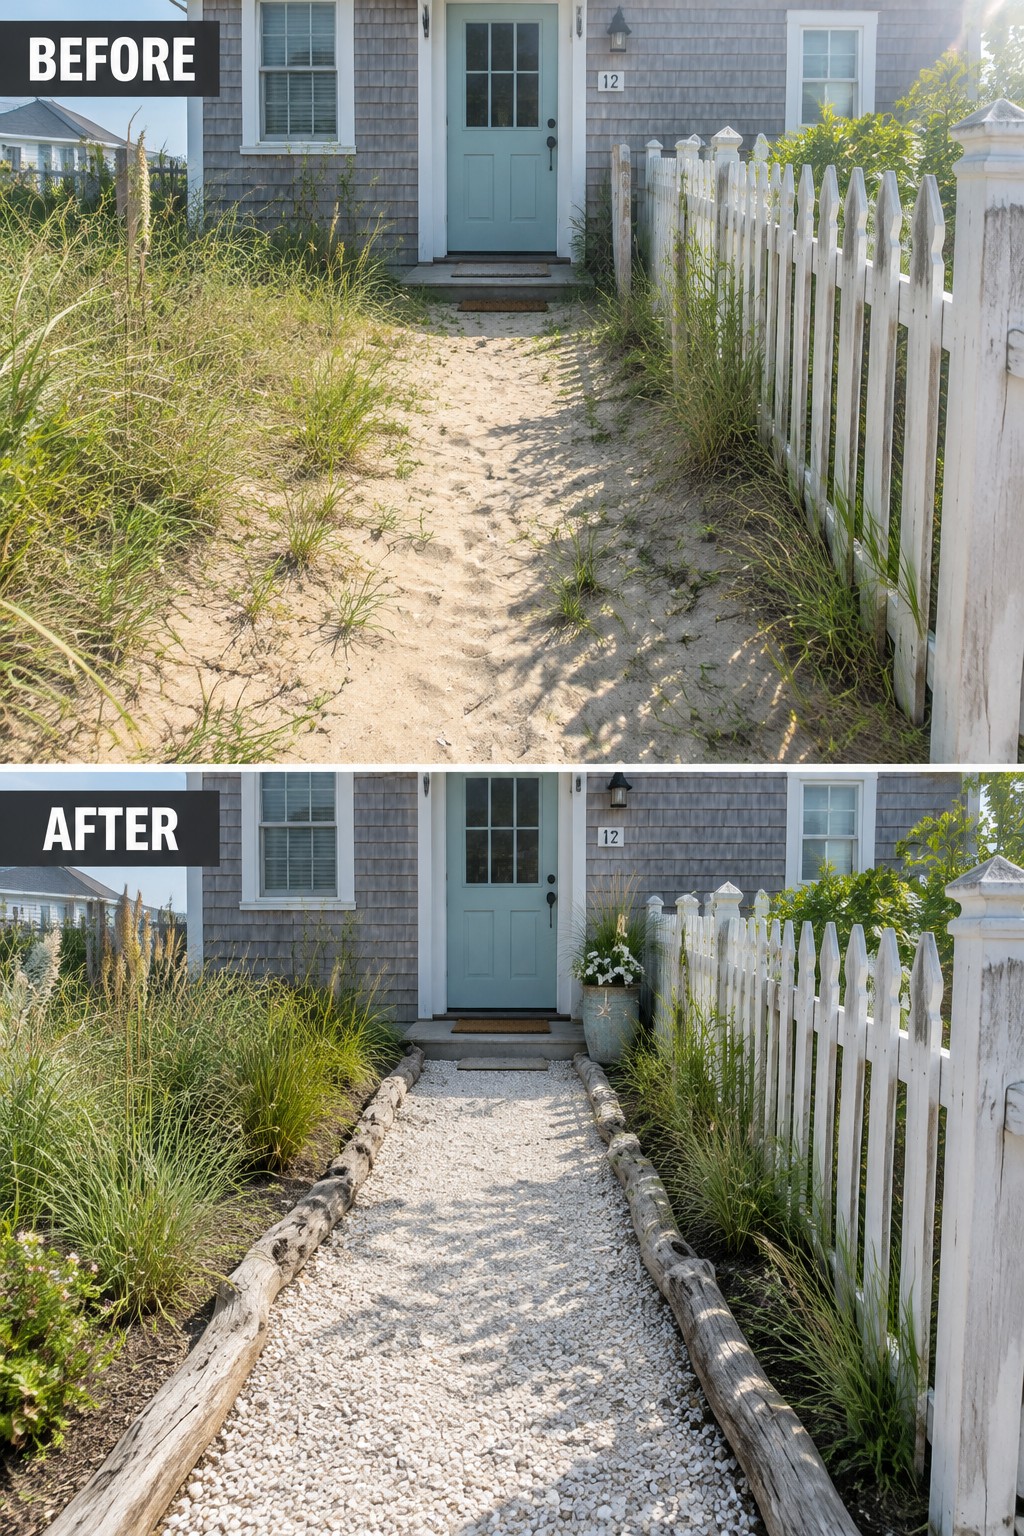
A loose sandy path often ends up looking scattered once grass and weeds start moving in from the sides. Switching to gravel gives the walkway a solid surface that stays put, while the log edging creates clear borders that keep the gravel contained and the planting beds separate.
This idea suits homes with sandy soil or coastal settings where you want something low-cost and natural-looking. Clear the overgrowth first, then add the logs to set the shape before filling the center with gravel. It keeps the path practical without needing fancy materials.
Replace A Concrete Path With Gravel And Clean Edging
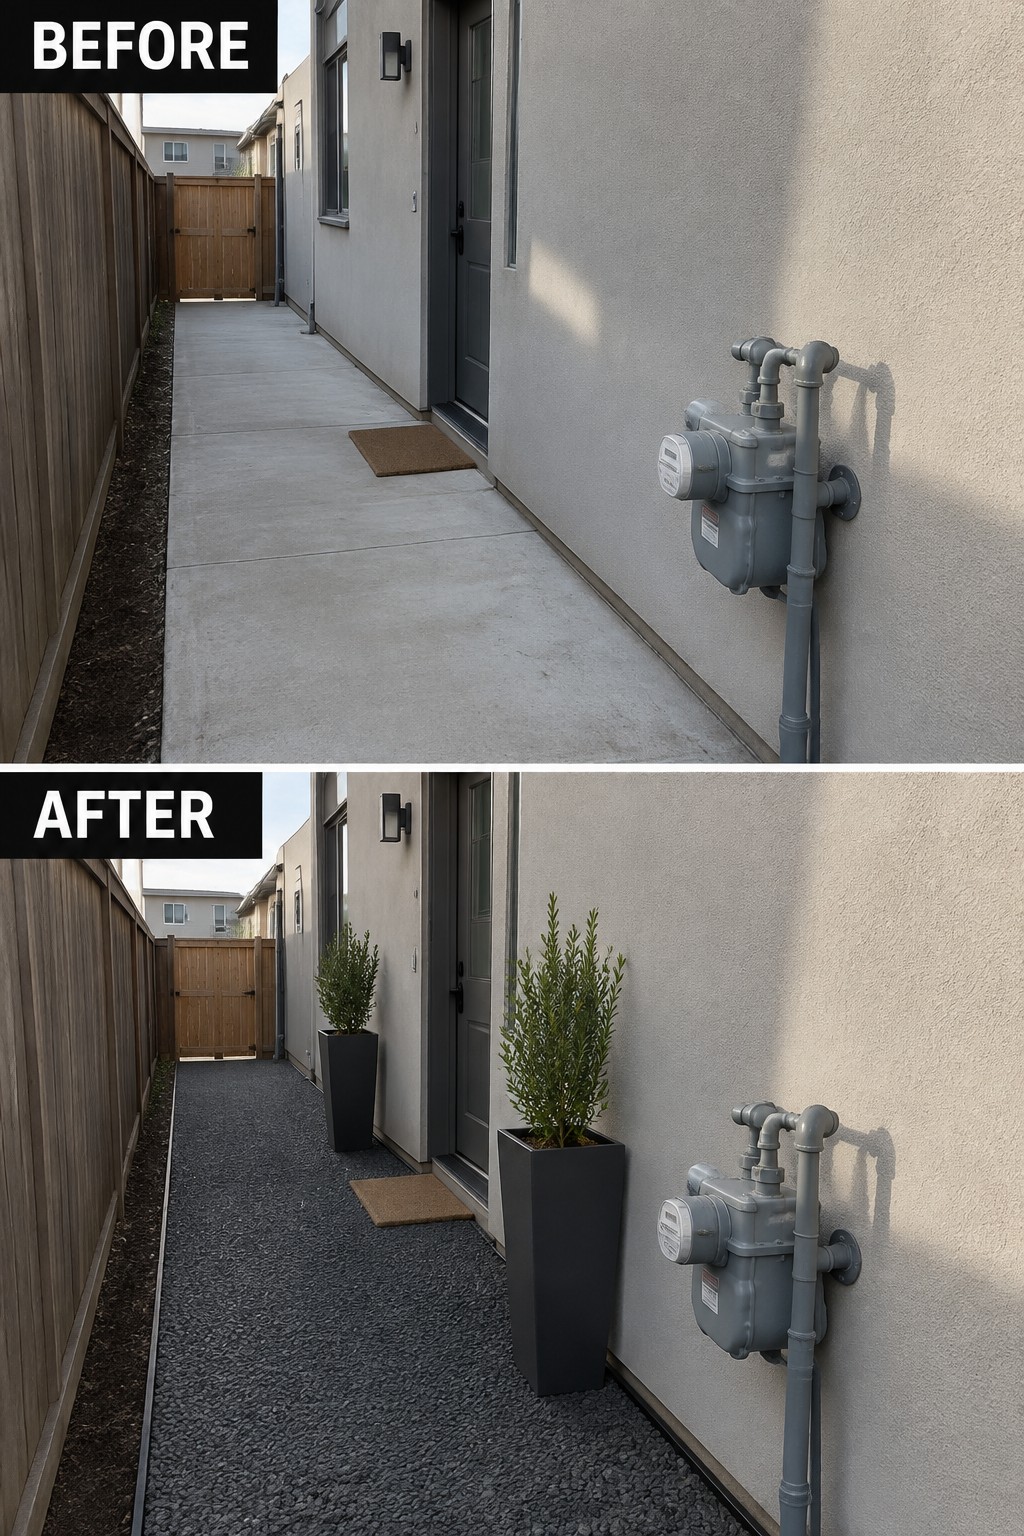
A plain concrete walkway often makes a side yard feel flat and unfinished. Switching to gravel with a simple border gives the space better definition and a softer look. The change also makes the path feel narrower and more purposeful while keeping maintenance low.
This idea works best on narrow side yards or service areas next to the house. Lay landscape fabric first, add the edging to hold everything in place, then spread the gravel evenly. A couple of tall planters near the door can add height without crowding the space.
Define A Path With Gravel And Edging
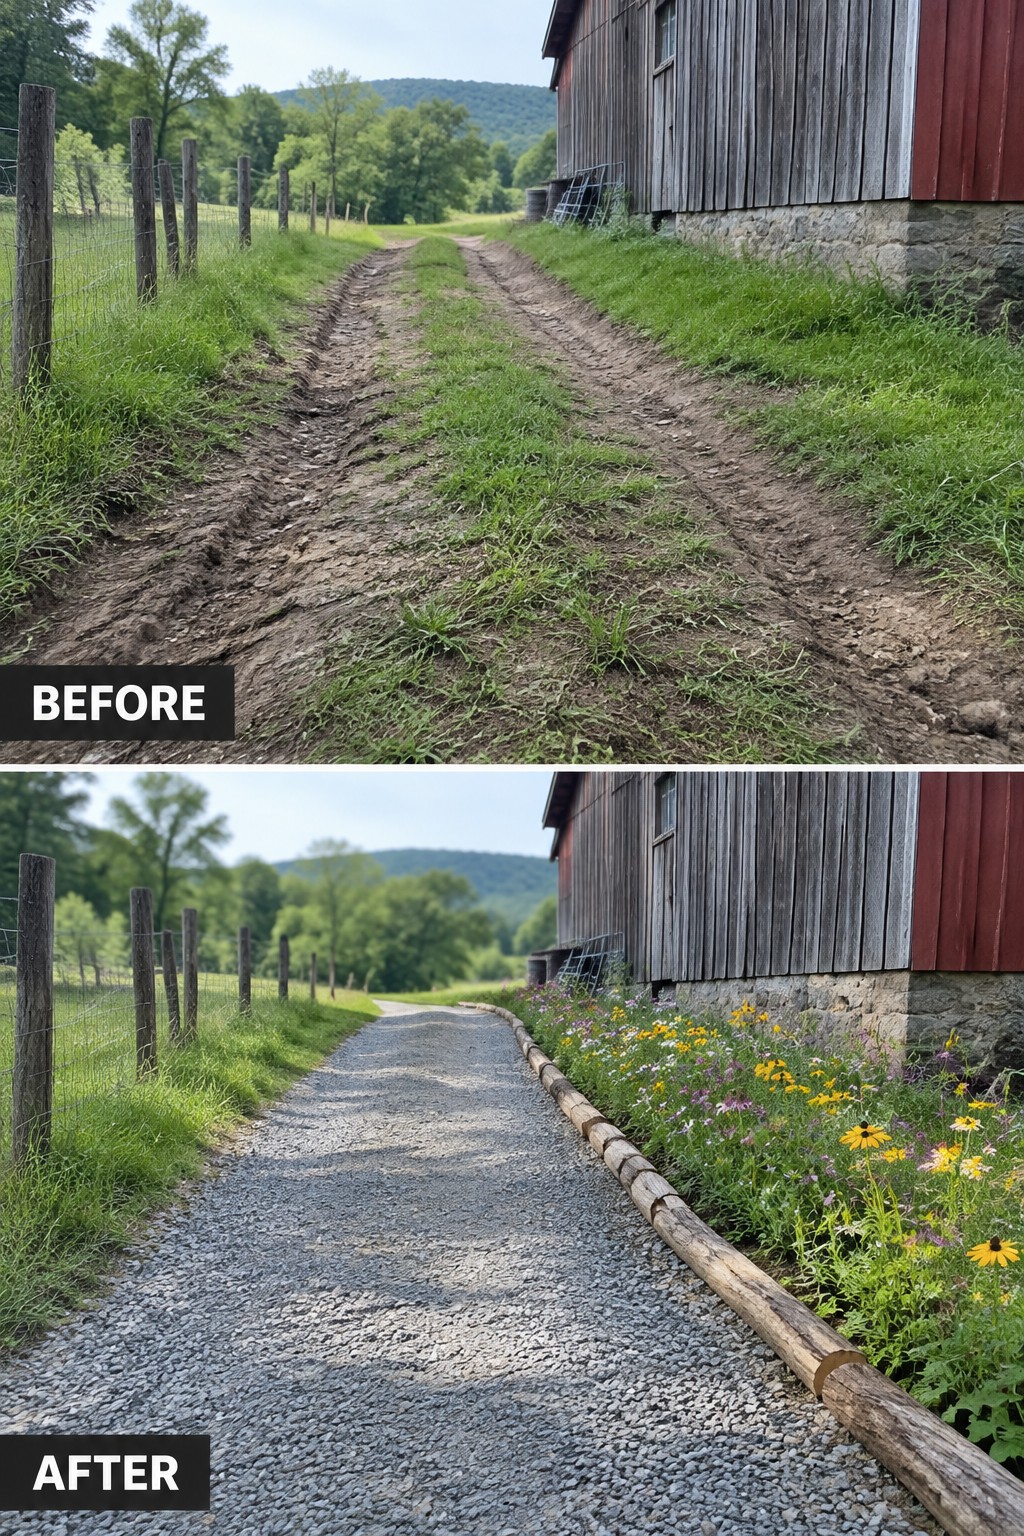
A muddy, rutted track makes any yard feel unfinished and hard to use. Replacing it with gravel and a simple log border gives the path a clear shape, improves drainage, and turns it into something you can walk on comfortably year round.
This idea works especially well on rural properties or along the side of a barn where you need a practical route rather than a fancy patio. Clean out the worst of the mud first, add landscape fabric to hold back weeds, then spread gravel and choose edging that fits the setting. The logs here keep the gravel in place without looking too formal.
Define A Front Walkway With Gravel And Brick Edging
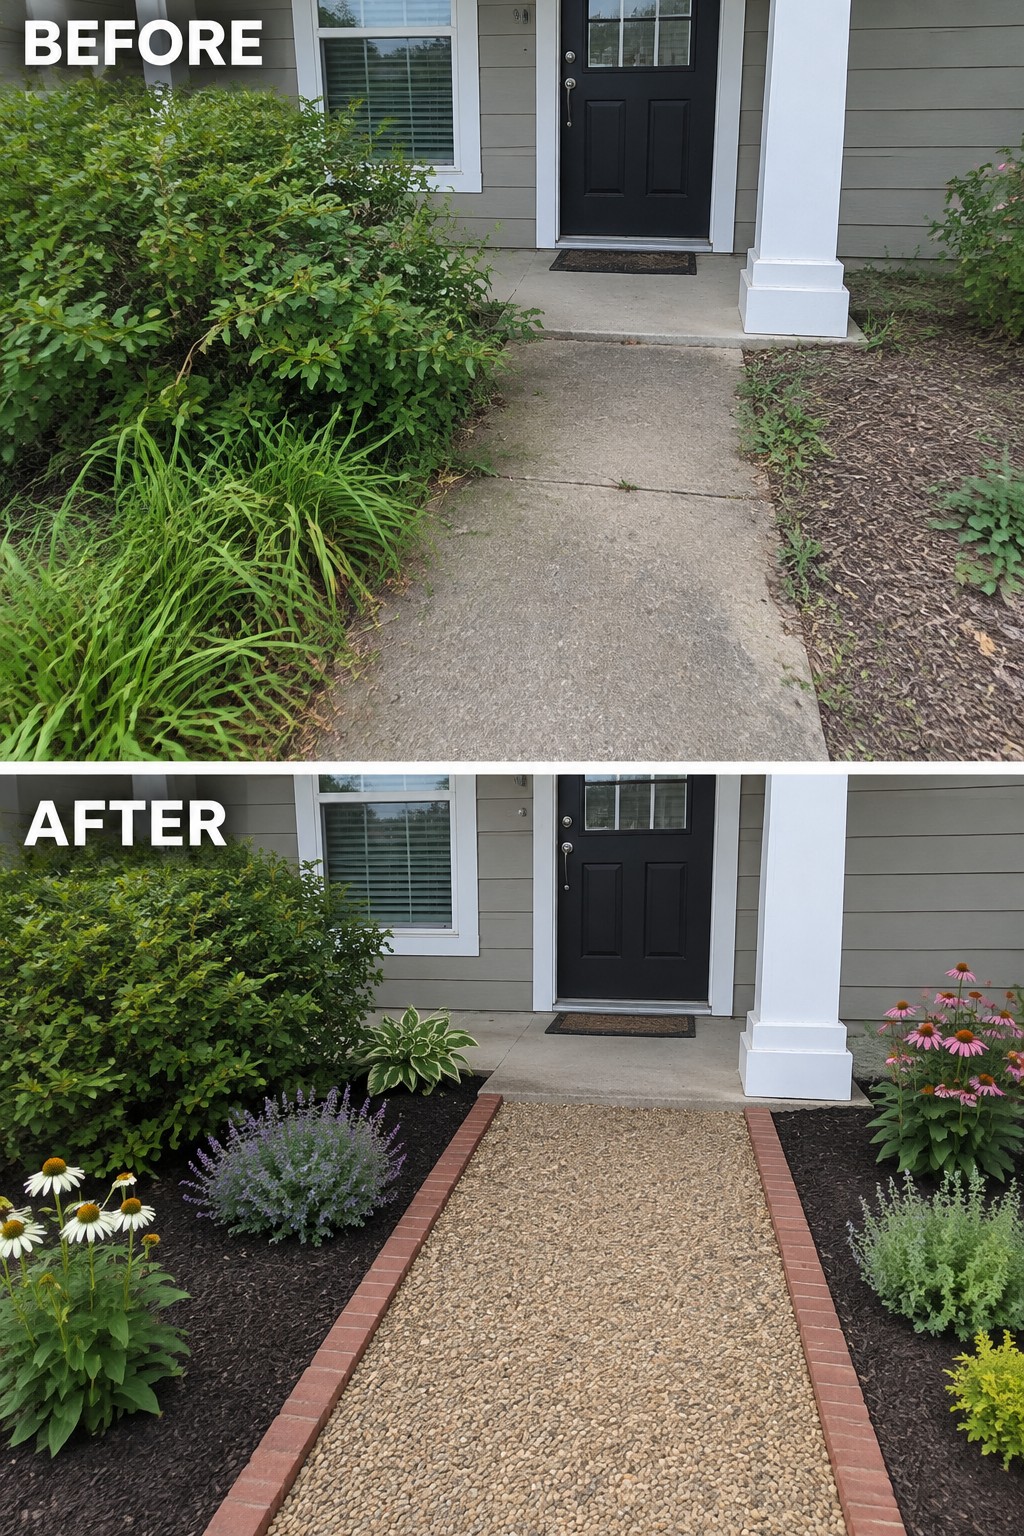
A plain concrete path often looks unfinished when plants grow right up to the edges. Replacing the open sides with gravel and a simple brick border gives the walkway a clear shape and keeps the surrounding beds from spilling over. The change turns a basic slab into something that feels more intentional without tearing out the original concrete.
This idea works best on homes where the existing path is still solid but the front looks a bit neglected. Lay a weed barrier first, add a few inches of gravel, and finish the sides with brick or pavers set in the soil. It keeps the path easy to walk on and gives you clean lines for planting along the edges.
Shape A Gravel Path With Edging And Stepping Stones
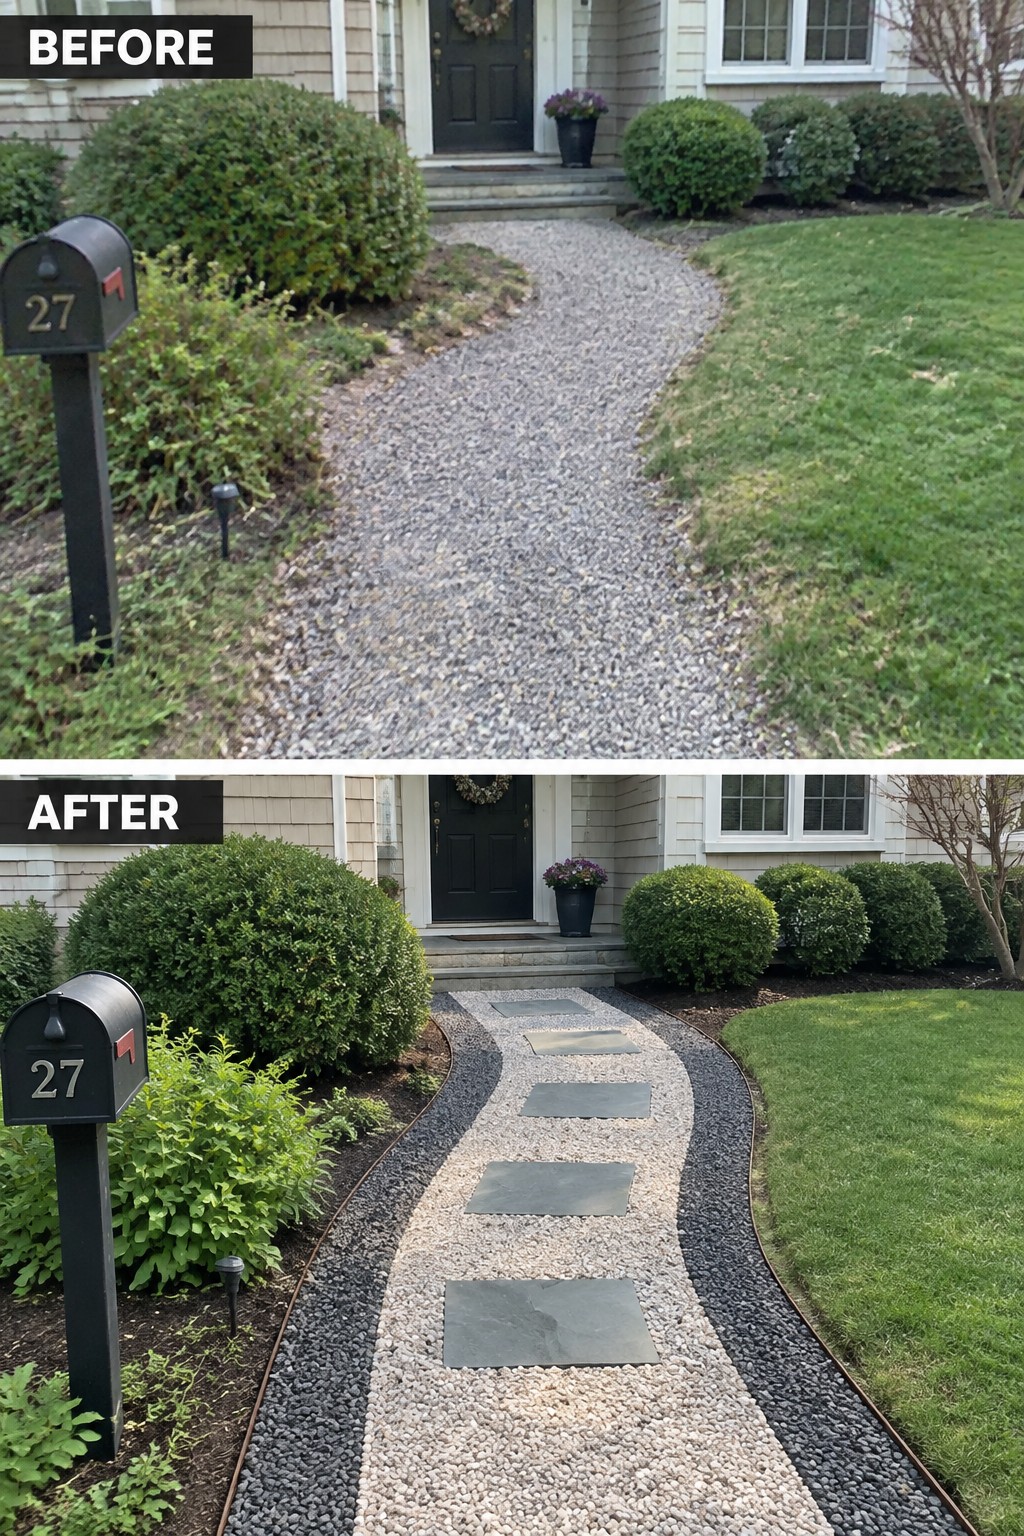
A loose gravel path can start to feel messy once it spreads into the grass and loses any clear direction. Adding a dark border on each side and setting a few flat stepping stones down the middle pulls everything into a tidy line while still keeping the low-cost gravel surface.
This approach works best on front walkways where you want something simple that still looks planned. Lay the edging first to hold the gravel in place, then space the stones so they land naturally underfoot. It keeps the path easy to maintain and stops the gravel from drifting into the lawn over time.
Add Edging And Lighting To A Gravel Path
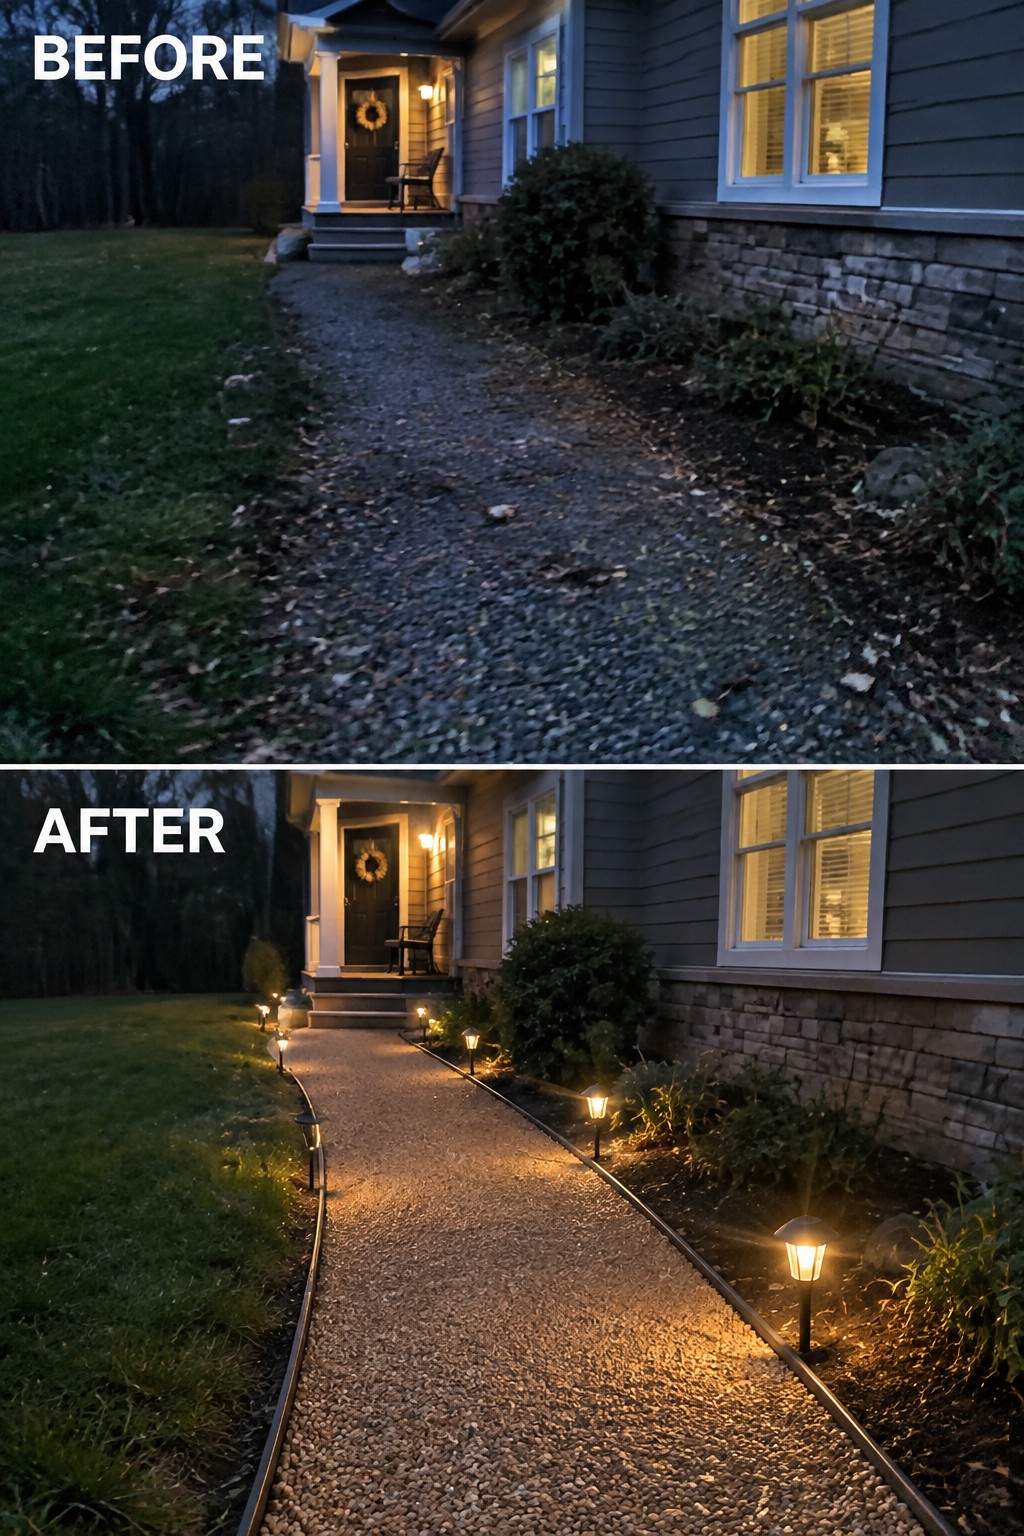
The gravel path looked flat and hard to follow once the sun went down. A simple border on each side kept the stones contained and gave the walkway a clear shape, while the lights made it easy to see where you were stepping.
This idea suits homes with existing gravel paths that just need more definition. Lay the edging first so the surface stays neat, then space the lights evenly along both sides. Solar versions keep the job simple and avoid running wires.
Frequently Asked Questions
Q: How do I stop weeds from popping up through the gravel? A: Lay down landscape fabric before you pour the gravel. It blocks most weeds while still letting water drain through. Rake the surface every few months to keep things tidy.
Q: What edging holds up best on a tight budget? A: Plastic or metal strips work well and cost little. Dig a shallow trench along the path and press the edging in firmly. Check it once a year and tap down any spots that lift.
Q: Can I install this walkway myself in a weekend? A: Yes if the path is short and straight. Clear the area, add the base layer, then spread gravel and set the edging.
