


I often notice how a garden path shapes the way the whole yard gets used day to day.
Without clear routes the beds start to look scattered and the grass wears down in random spots.
Stepping stones change that.
I would probably try laying out a few test stones first before committing to the full route.
Over time those small adjustments add up to a space that feels more put together without needing a complete overhaul.
Define A Garden Path With Gravel And Low Borders
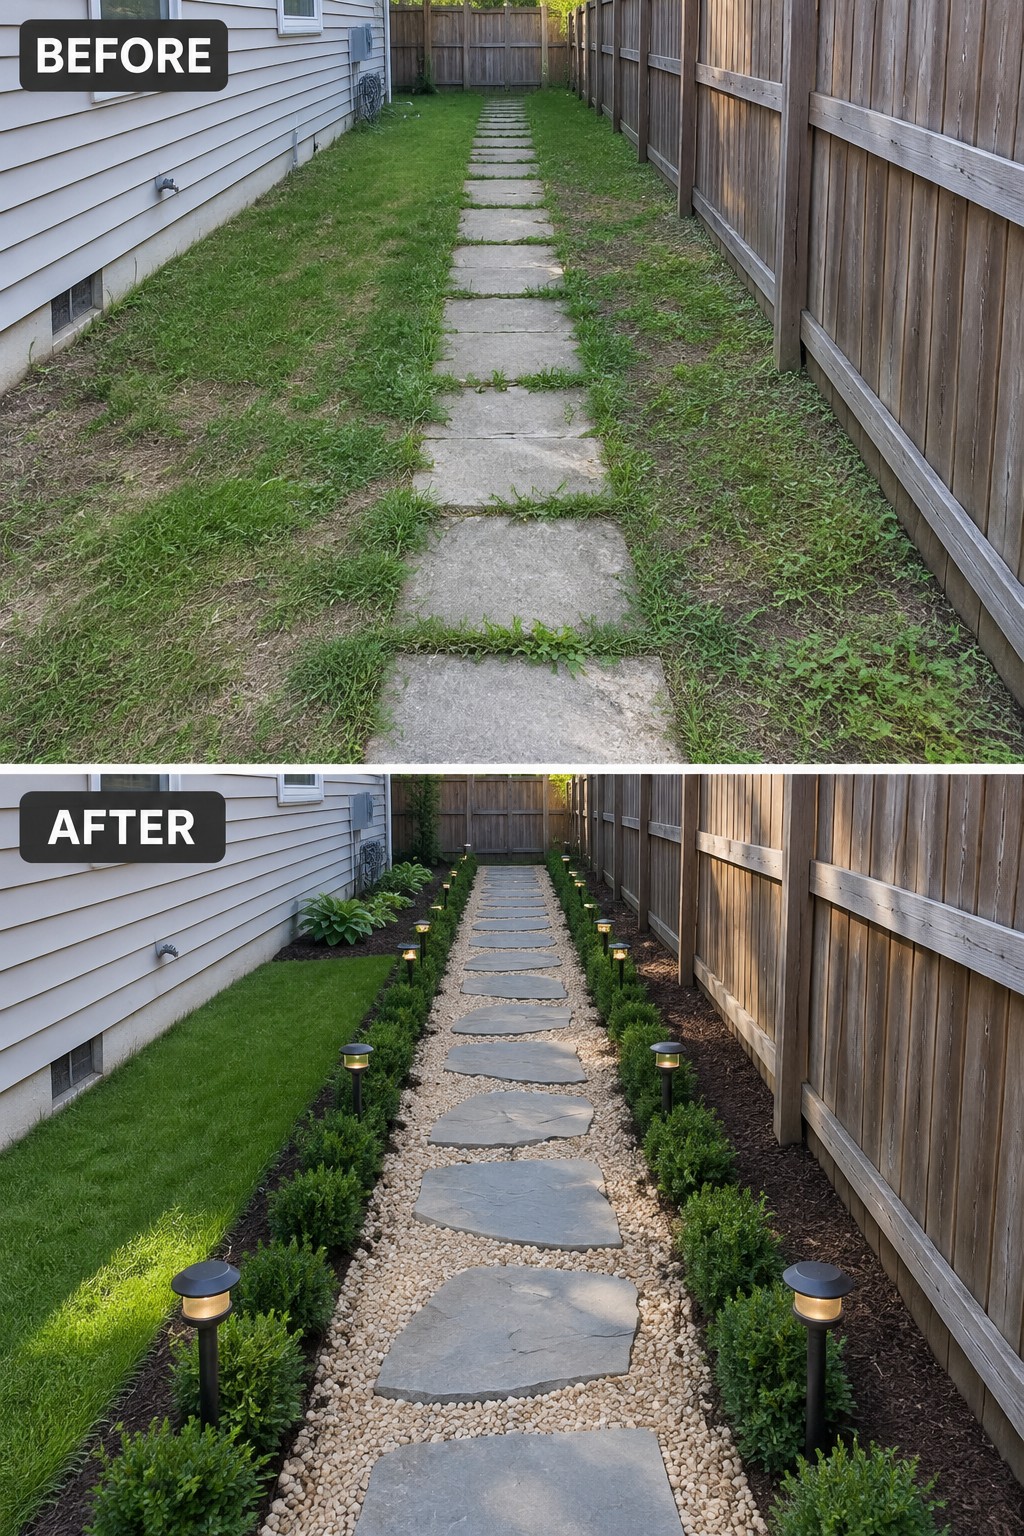
The stepping stone path in the before photo had disappeared into the surrounding grass, with weeds growing right through the joints. Adding a layer of gravel between and around the stones, plus a clean planted edge on both sides, gave the whole walkway a finished look without changing the original stones.
This idea works especially well in narrow side yards where space is tight and you want low maintenance. Clear the grass first, use landscape fabric under the gravel to control weeds, and choose compact shrubs that stay under knee height so the path still feels open. The lights are optional but help mark the route at night.
Clear Overgrowth First When Updating A Garden Path

The main improvement came from removing the heavy weeds and vines that had buried the stepping stones. Once the path was cleared, adding low planting and mulch along both sides gave the walkway a clean edge and made the stones stand out again.
This works best in narrow side yards or between a house and fence where the space already feels cramped. Remove the worst growth first, then add simple borders with a mix of taller flowers at the back and low ground cover near the stones. Keep the mulch even so the path stays practical to walk on.
Turn A Muddy Path Into A Stepping Stone Walkway

A worn dirt track that turns to mud after rain makes a garden feel unfinished and hard to use. Laying concrete stepping stones in a bed of gravel gives the path a firm surface, improves drainage, and keeps the route clear without needing a full paved walkway.
This approach suits backyards that already have a natural route people follow. Clear the soft ground first, add a layer of gravel for stability, then set the stones so they sit slightly above the finished surface. The result stays simple, works in most weather, and leaves room for planting along the edges.
Replace A Solid Concrete Path With Stepping Stones
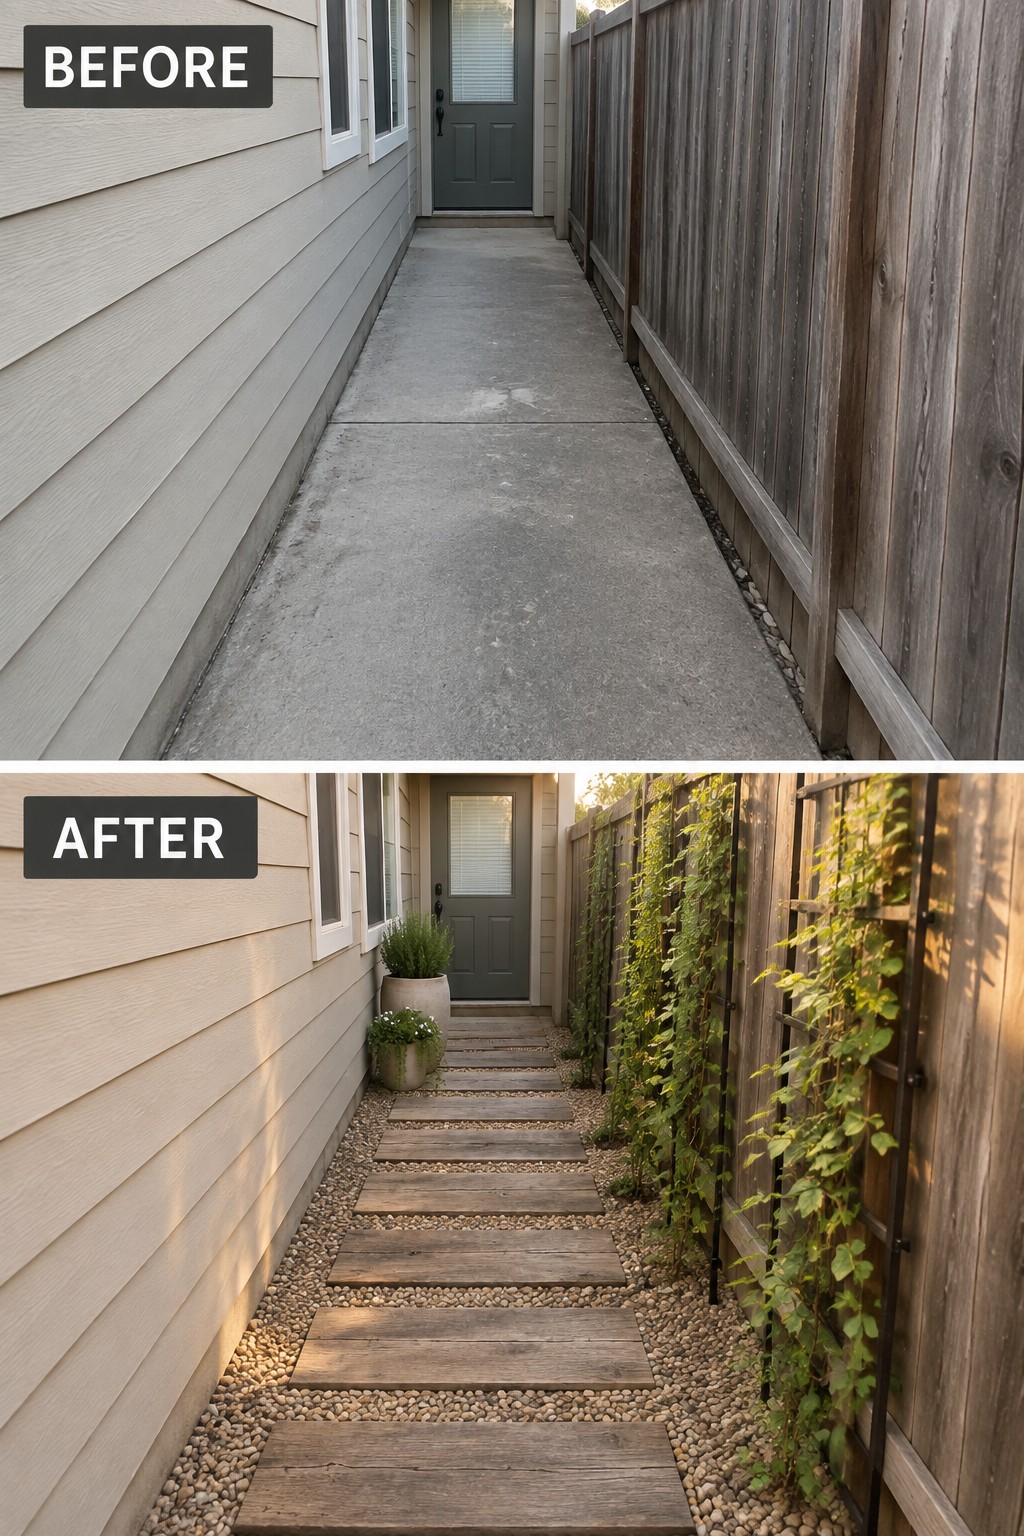
A long run of plain concrete tends to make a narrow side yard feel like leftover space. Laying wooden stepping stones in gravel breaks up the hard surface and gives the path a lighter, more natural feel while still keeping it easy to walk on.
This idea works best in tight areas between a house wall and a fence. Keep the gravel layer thick enough for drainage, space the stones so they feel comfortable to step on, and let a few vines climb the fence to soften the edges. It stays practical in small yards because it avoids crowding the walkway with too many plants.
Create A Checkerboard Path With Pavers And Grass
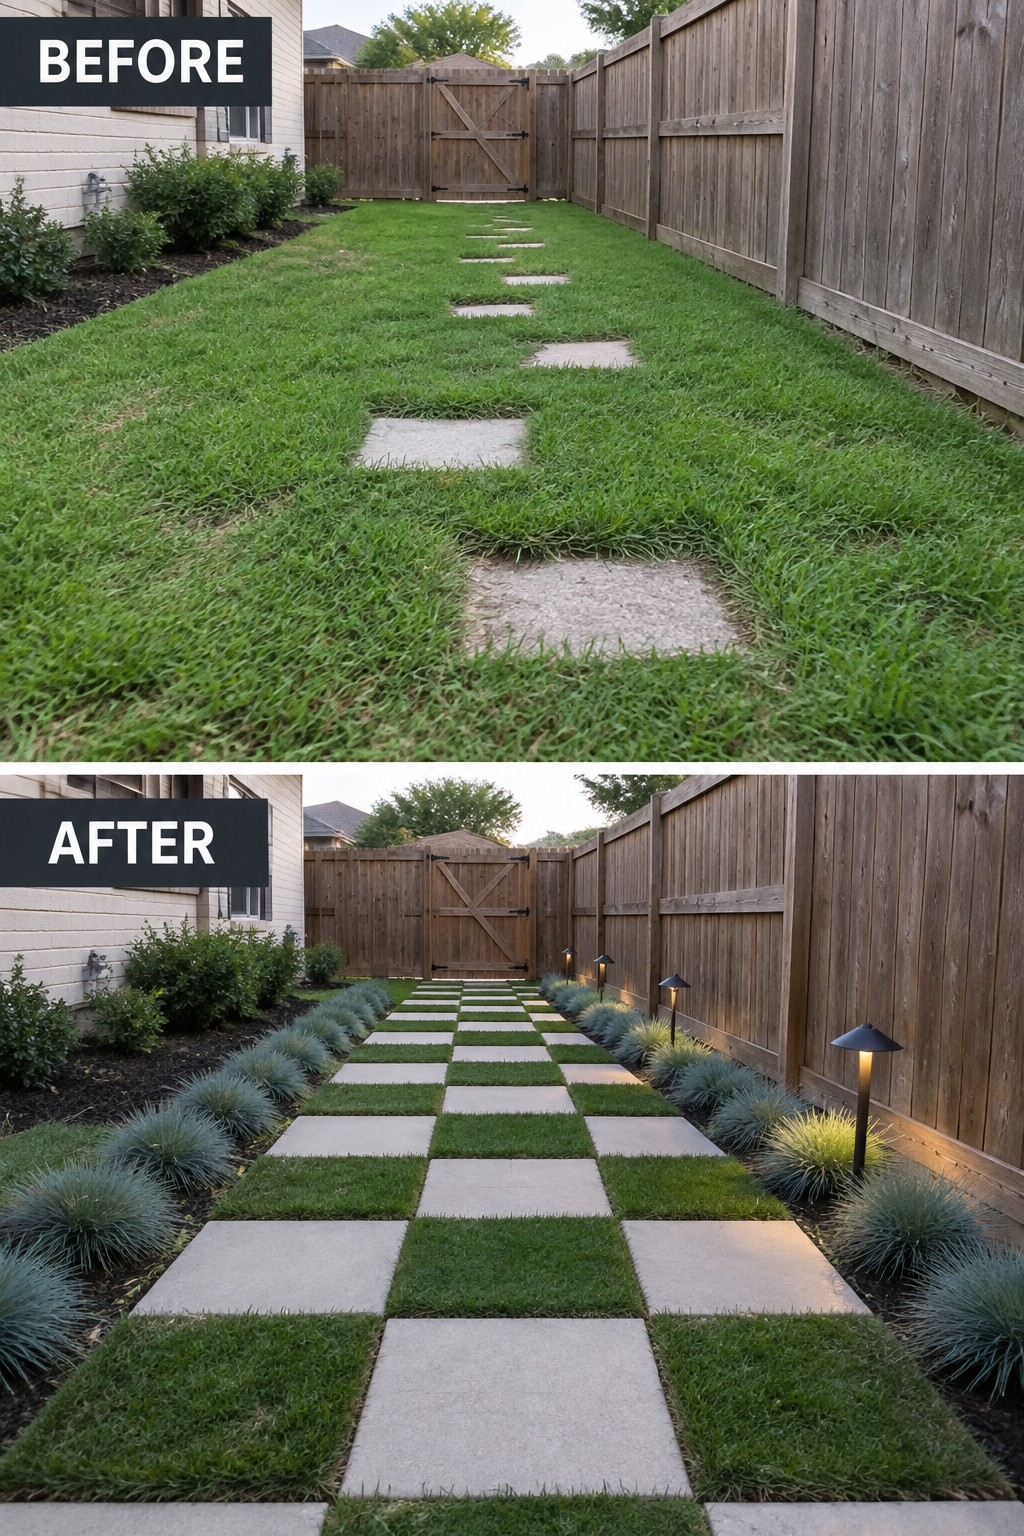
A scattered line of stepping stones often disappears into the lawn over time. Switching to a repeating grid of large pavers and grass squares gives the path clear edges and a steady walking surface while still keeping some green underfoot.
This layout works best in long, narrow side yards or backyards that run along a fence. Measure the width first so the pavers and grass squares stay even, then add low border plants on both sides to keep the edges tidy. The result feels more intentional than a few random stones and still leaves room to mow or trim around the grid.
Replace A Plain Concrete Path With Stepping Stones
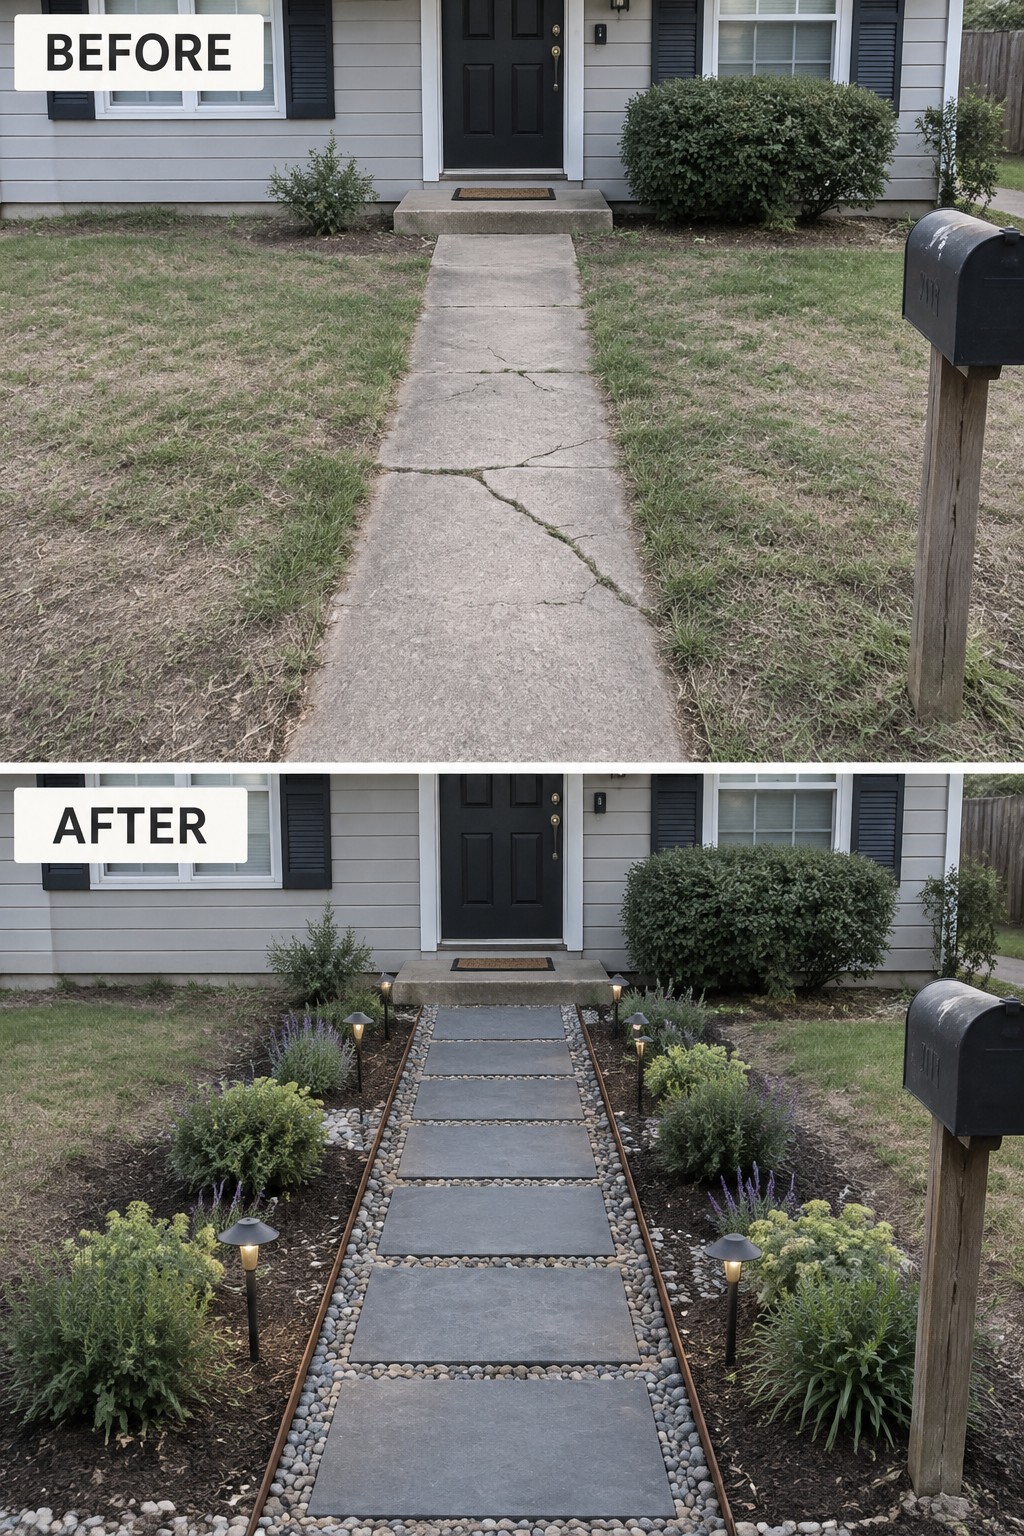
A straight concrete slab often looks dated once it starts cracking, and it does little to connect the house to the rest of the yard. Switching to individual stepping stones set in gravel breaks up the hard line and lets you add planting beds right along the edges. The result feels softer and more intentional without requiring a full hardscape overhaul.
This approach works especially well on narrow front yards or side entries where a wide concrete path dominates the space. Keep the stones roughly the same width as the original walkway, use a gravel base for drainage, and add low lighting so the path stays useful after dark. Start with the path itself before adding too many plants, or the beds can end up fighting for attention.
Soften A Gravel Path With Border Planting
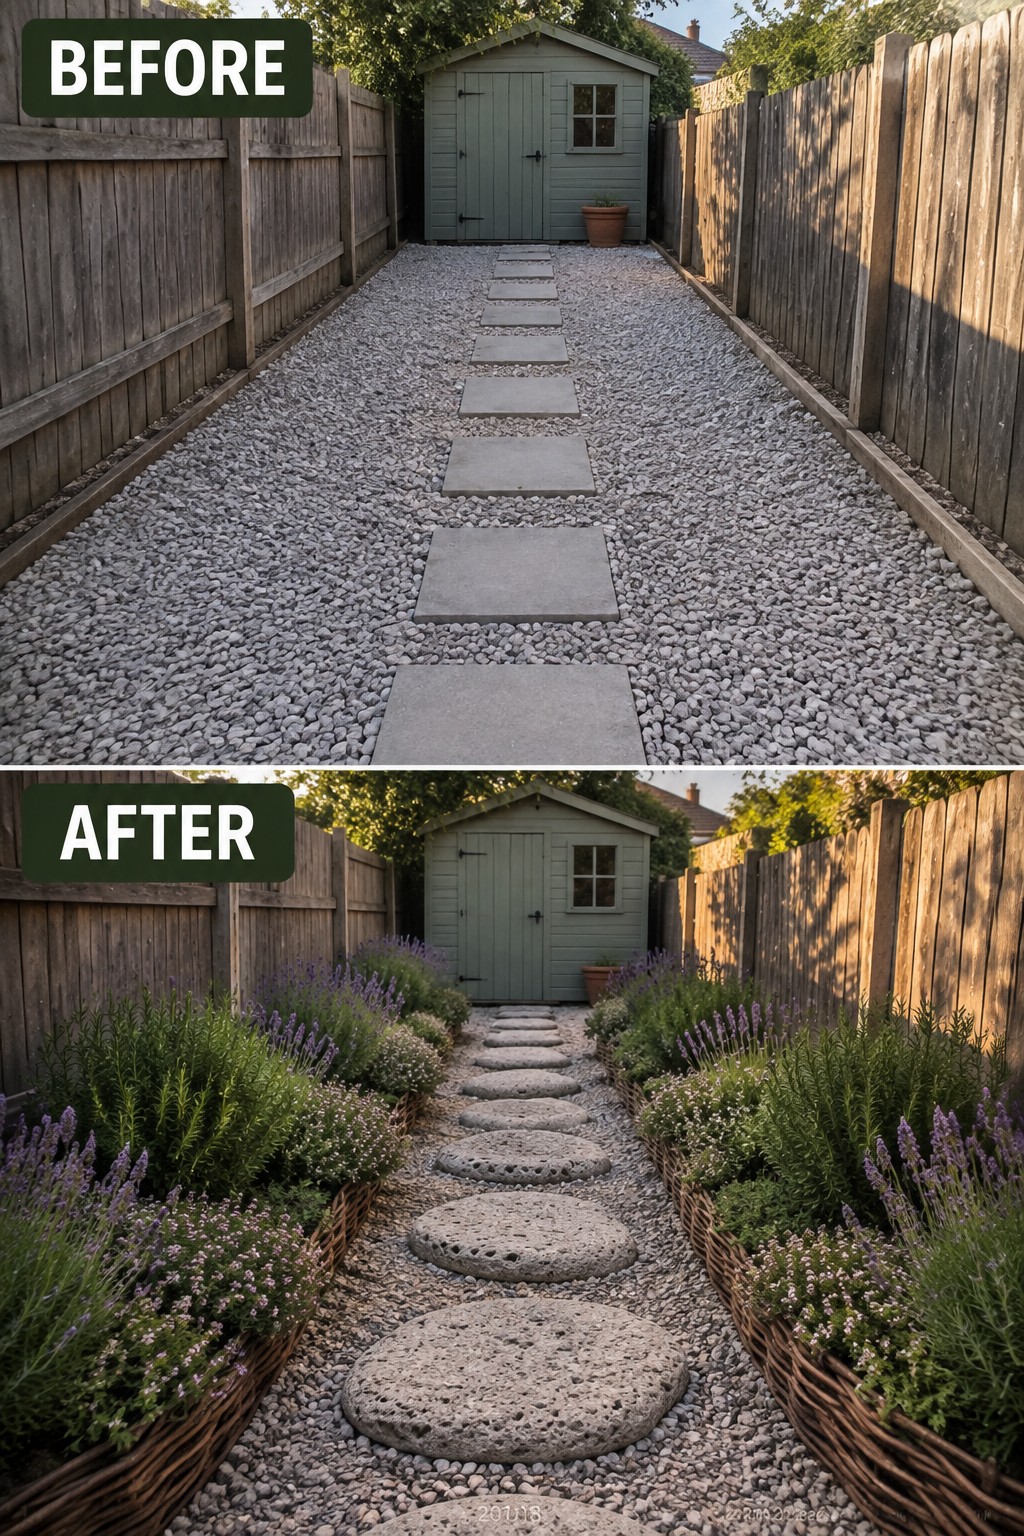
The original gravel path felt functional but empty, with nothing to connect the stepping stones to the surrounding space. Adding simple woven edging and filling both sides with lavender and compact perennials turned the same path into a clear garden route that feels intentional rather than leftover.
This idea suits narrow side yards or back garden access paths where you want to keep the surface practical for walking. Use low edging that follows the path shape, then pick plants that stay tidy and suit your light conditions. Leave enough room between the stones and the planting so the path stays easy to walk.
Use Gravel To Give A Narrow Side Path Clear Structure

The main improvement here comes from replacing scattered, uneven stepping stones and weedy ground with a straight row of uniform dark pavers set into black gravel. The gravel creates a firm, low-maintenance surface that keeps the path looking tidy while stopping weeds from taking over again. It also gives the narrow space a clear edge against both the house and the fence.
This approach works especially well in tight side yards where planting space is limited. Clear the overgrowth first, then use landscape fabric under the gravel so it stays in place. Adding a few vertical vines along the fence softens the look without narrowing the walkway further.
Frame Stepping Stones With Mulch And Planting
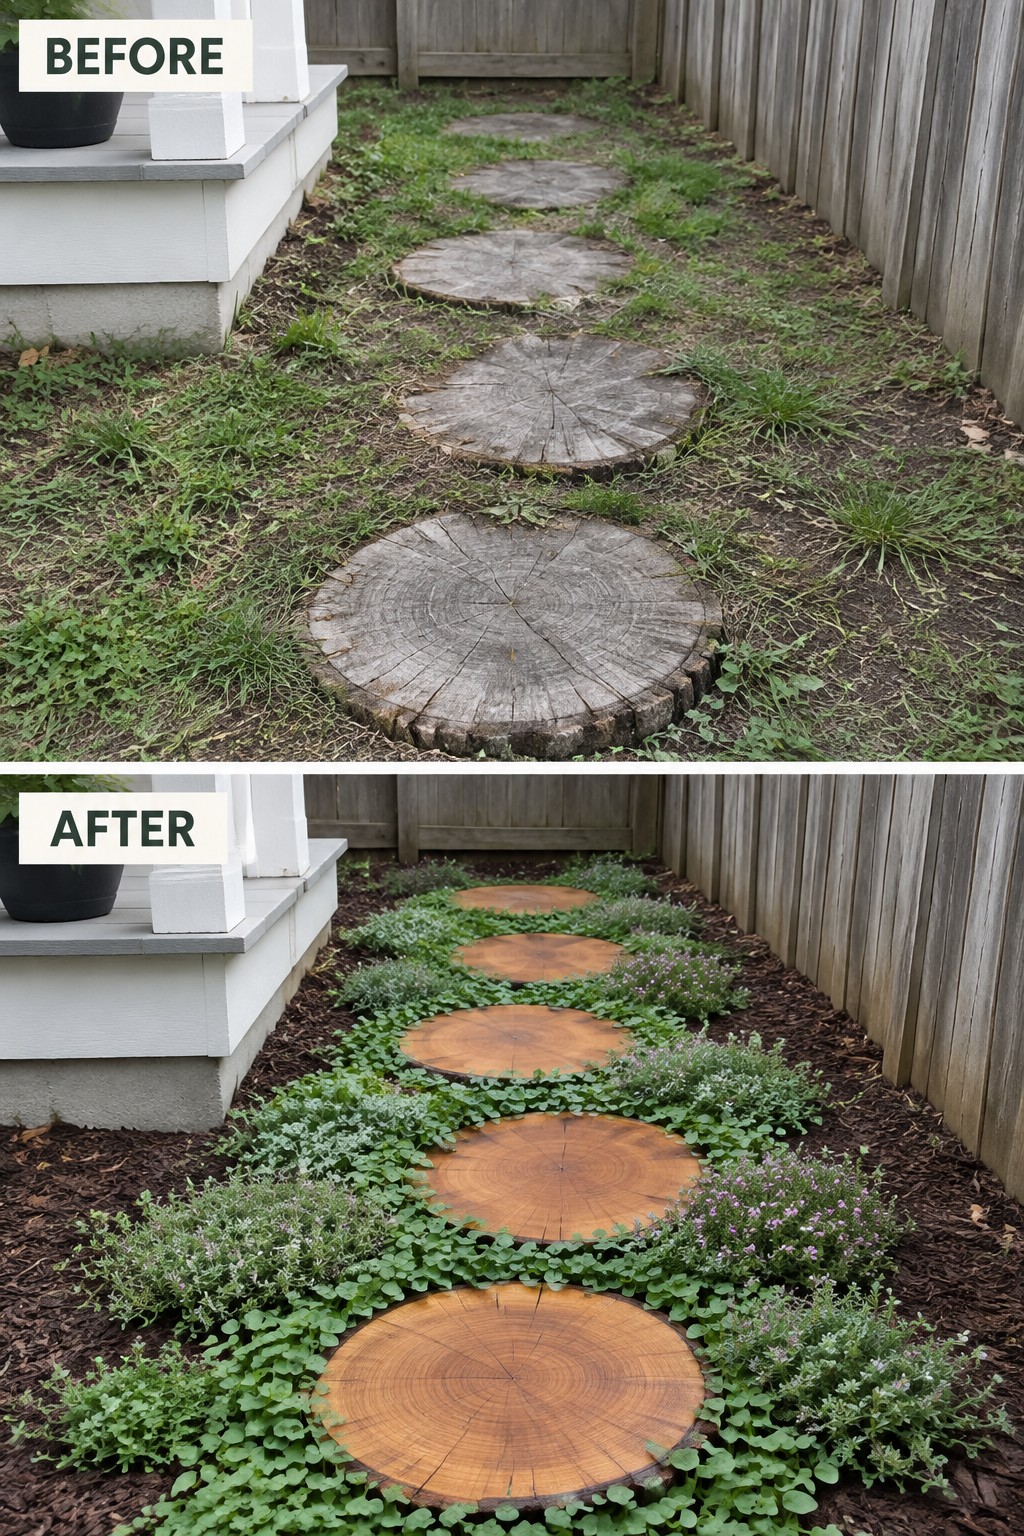
The main change here is clearing out the weeds and grass that had taken over between the stepping stones, then adding mulch and low plants to create clear edges. This simple step turns a scattered line of wood slices into something that reads as a real path instead of just a few rounds left in the yard.
This idea works best in narrow side yards or along fences where you need the path to feel purposeful but still leave room to walk. Start by removing the overgrowth, lay down a good layer of mulch to keep weeds down, and choose low ground covers that spread without getting tall. The plants soften the look while the mulch keeps everything looking neat between rains.
Define A Garden Path With Stepping Stones And Edging

The dense shrubs made the old gravel path feel tight and closed in. Switching to tall grasses planted in curved beds with simple metal edging opened everything up while still keeping the walkway clearly marked. Laying stepping stones down the center gave the gravel a more finished shape without needing to pour new concrete or install pavers.
This approach works best in narrow side yards or back garden passages where you want a softer look but still need a practical route. Clear the old growth first, set the edging to hold the beds in place, then choose grasses that stay fairly upright. The stones sit right on the existing gravel, so the change stays simple and reversible if you want to adjust the layout later.
Use Stepping Stones To Create A Defined Garden Path
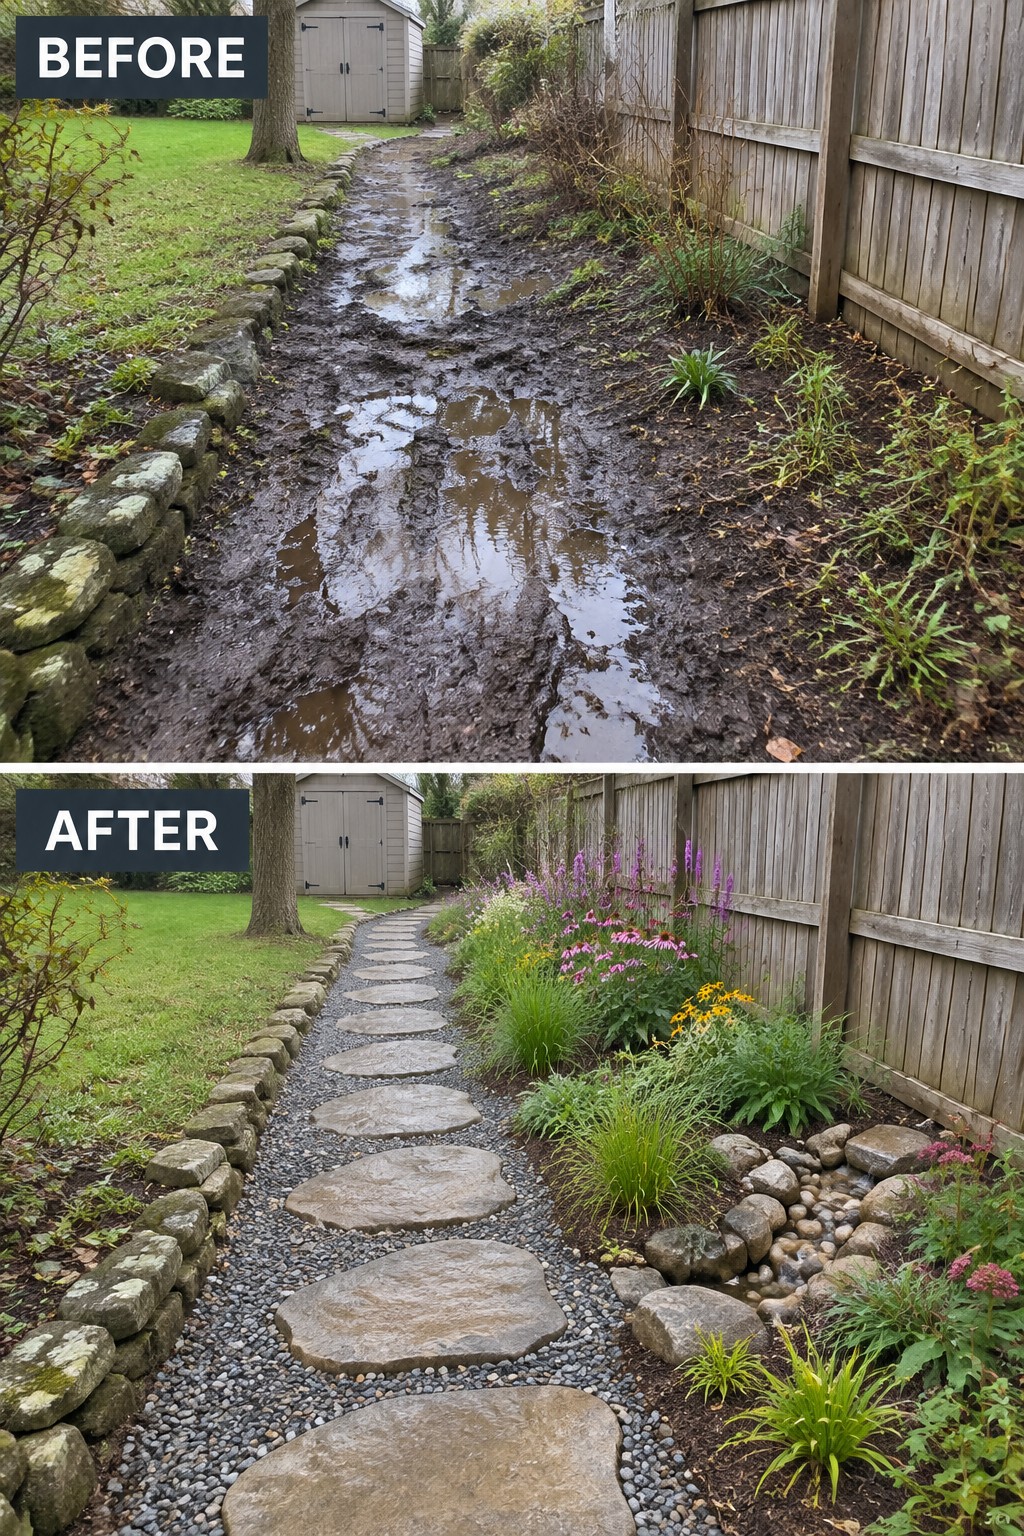
A muddy path quickly makes the side of a garden feel neglected and hard to use. Replacing the wet ground with stepping stones set in gravel gives the space a clear route that stays firm and walkable.
This idea suits narrow side yards or areas beside fences where you need a practical walkway without paving the whole strip. Lay the stones with enough space between them for easy steps, and keep the gravel layer thick enough to help with drainage. It works best when you let the planting grow right up to the edges rather than trying to make the path too wide.
Use Stepping Stones To Shape A Circular Path

A straight line of stones across bare dirt does little to organize a yard. Laying the same stones into a full circle around the fire pit turns the space into a clear loop that guides movement and keeps the seating area from feeling scattered.
Start by marking the path shape first, before adding plants or mulch. Keep the curve simple and wide enough for two people to pass. This approach works best in backyards that already have a main feature like a fire pit or seating zone, since the stones then tie everything together without needing extra structures.
Add Stepping Stones To Create Clear Garden Paths

The biggest change here came from laying down a simple line of stepping stones through the middle of the garden. What used to be a wide strip of trampled grass between messy wire beds turned into a clean, walkable route once the stones were set in mulch. The path gives the whole space structure without needing fancy materials or a big budget.
This idea works well in any backyard vegetable garden or allotment where you need easy access to beds without compacting the soil. Start by clearing the route, then space the stones so you can walk comfortably from one end to the other. Keep the beds on either side narrow enough to reach across, and use mulch to finish the edges.
Define The Front Path With Stepping Stones
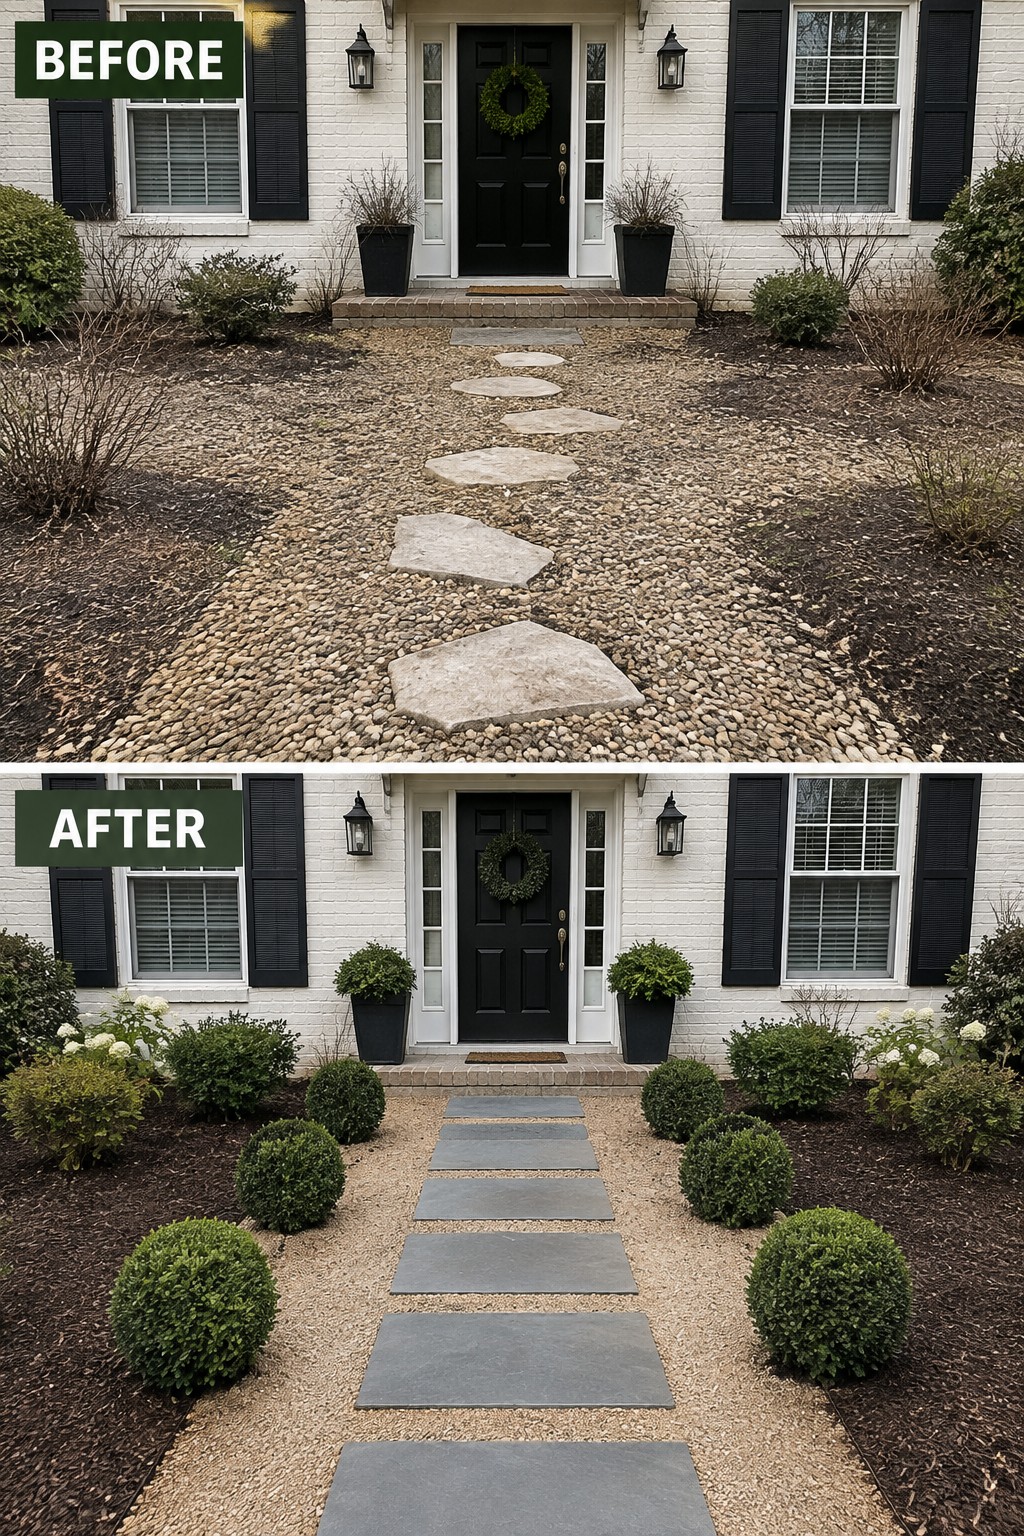
A scattered mix of uneven stones on loose gravel makes the front yard feel unplanned. Switching to a straight line of uniform rectangular stepping stones set in clean gravel gives the whole entry a clear sense of direction and order. The change also makes the space easier to walk and keeps the gravel from spreading into the beds.
This idea works best on small front yards where the path is the main feature. Start by clearing the old surface completely, then set the stones on a stable base so they stay level. Keep the planting simple and repeat the same rounded shrubs on both sides so the path remains the focus.
Define A Narrow Side Path With Gravel And Stepping Stones

A narrow side yard often stays messy because the ground never gets a clear finish. Laying down gravel and setting uniform stepping stones in place of loose mulch and scattered pavers turns the space into a simple, usable walkway that stays dry and easy to keep clean.
This works best in tight passages where you need a straight route but do not want to crowd the ground with wide paving. Level the soil first, spread several inches of gravel for drainage, then space the stones evenly so feet land comfortably. A few wall planters can add height without taking up walking room.
Turn Simple Stepping Stones Into A Patterned Path
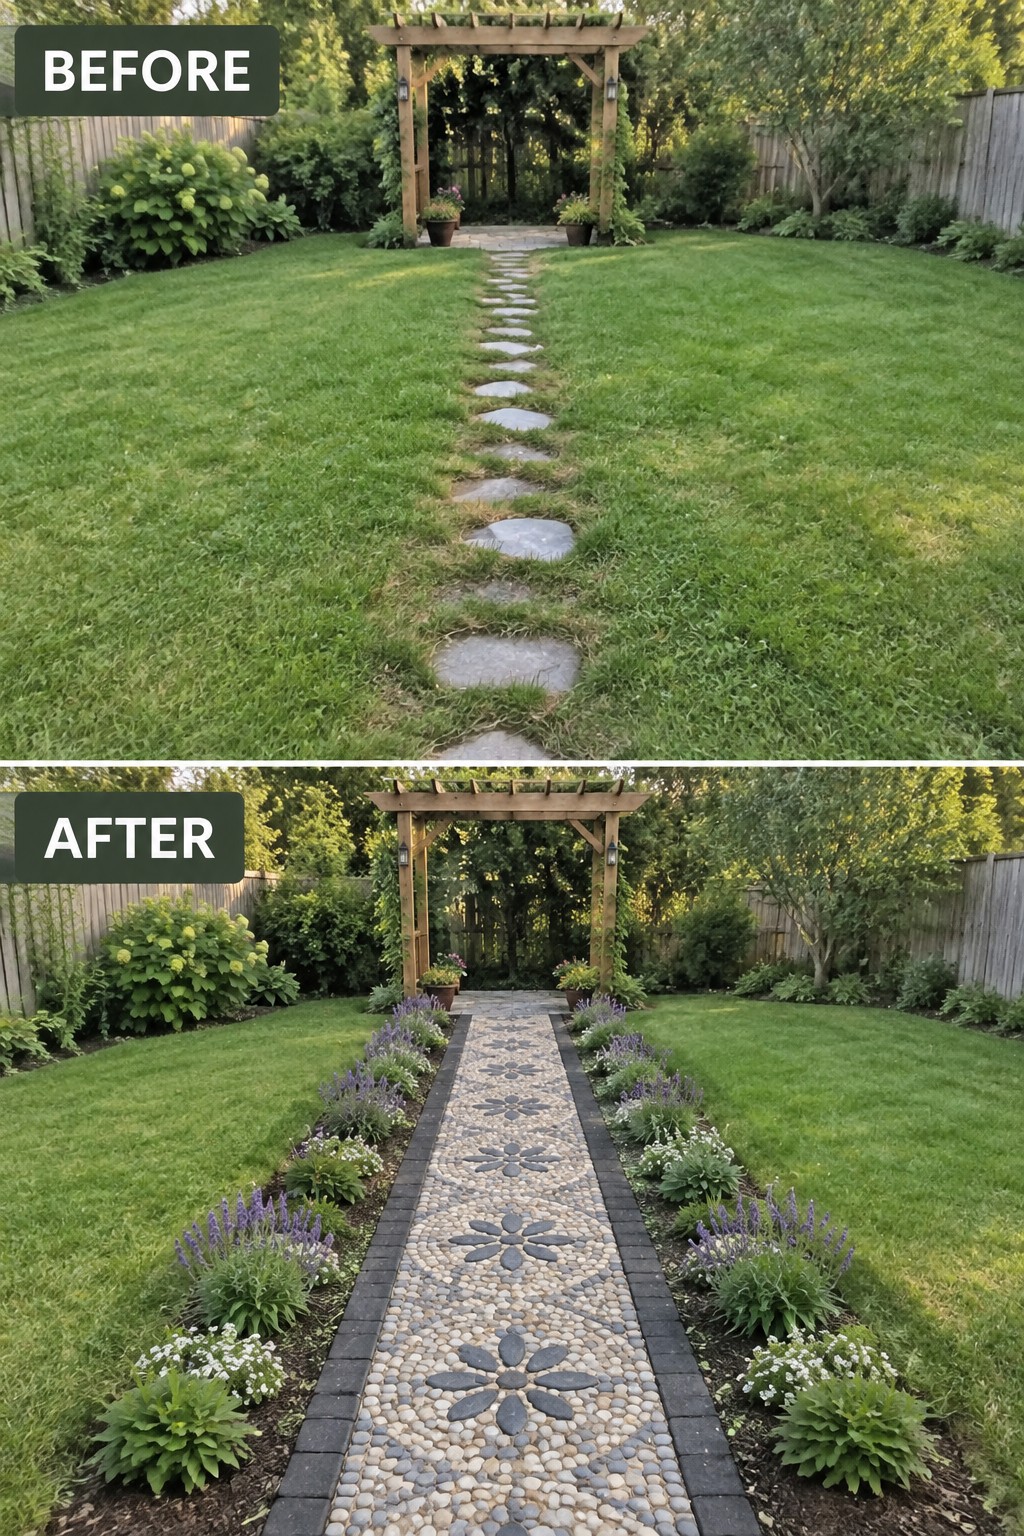
A basic line of stepping stones through the lawn often feels unfinished because it lacks any real structure. Replacing them with a continuous pebble mosaic and a dark brick border gives the path a clear shape and turns it into something you actually notice as you walk through the yard.
This idea works best in gardens that already have decent lawn space on either side. Keep the pattern simple, use two or three pebble colors at most, and plant low borders along the edges so the path stays the main focus instead of getting lost in tall planting.
Replace A Plain Concrete Path With Stepping Stones And Gravel

A wide concrete slab often feels like the quickest solution for a side yard, but it can leave the space looking flat and unfinished. Covering the concrete with gravel and setting stepping stones through it changes the feel right away. The stones give you a clear walking route while the gravel adds texture and helps with drainage.
This idea works best in narrow passages or small yards where you want the path to look intentional without crowding the space. Keep the stones large enough to walk on comfortably and space them evenly. Add simple planting along the edges so the path stays the main feature instead of competing with too many plants.
Define A Narrow Side Path With Stepping Stones And Gravel
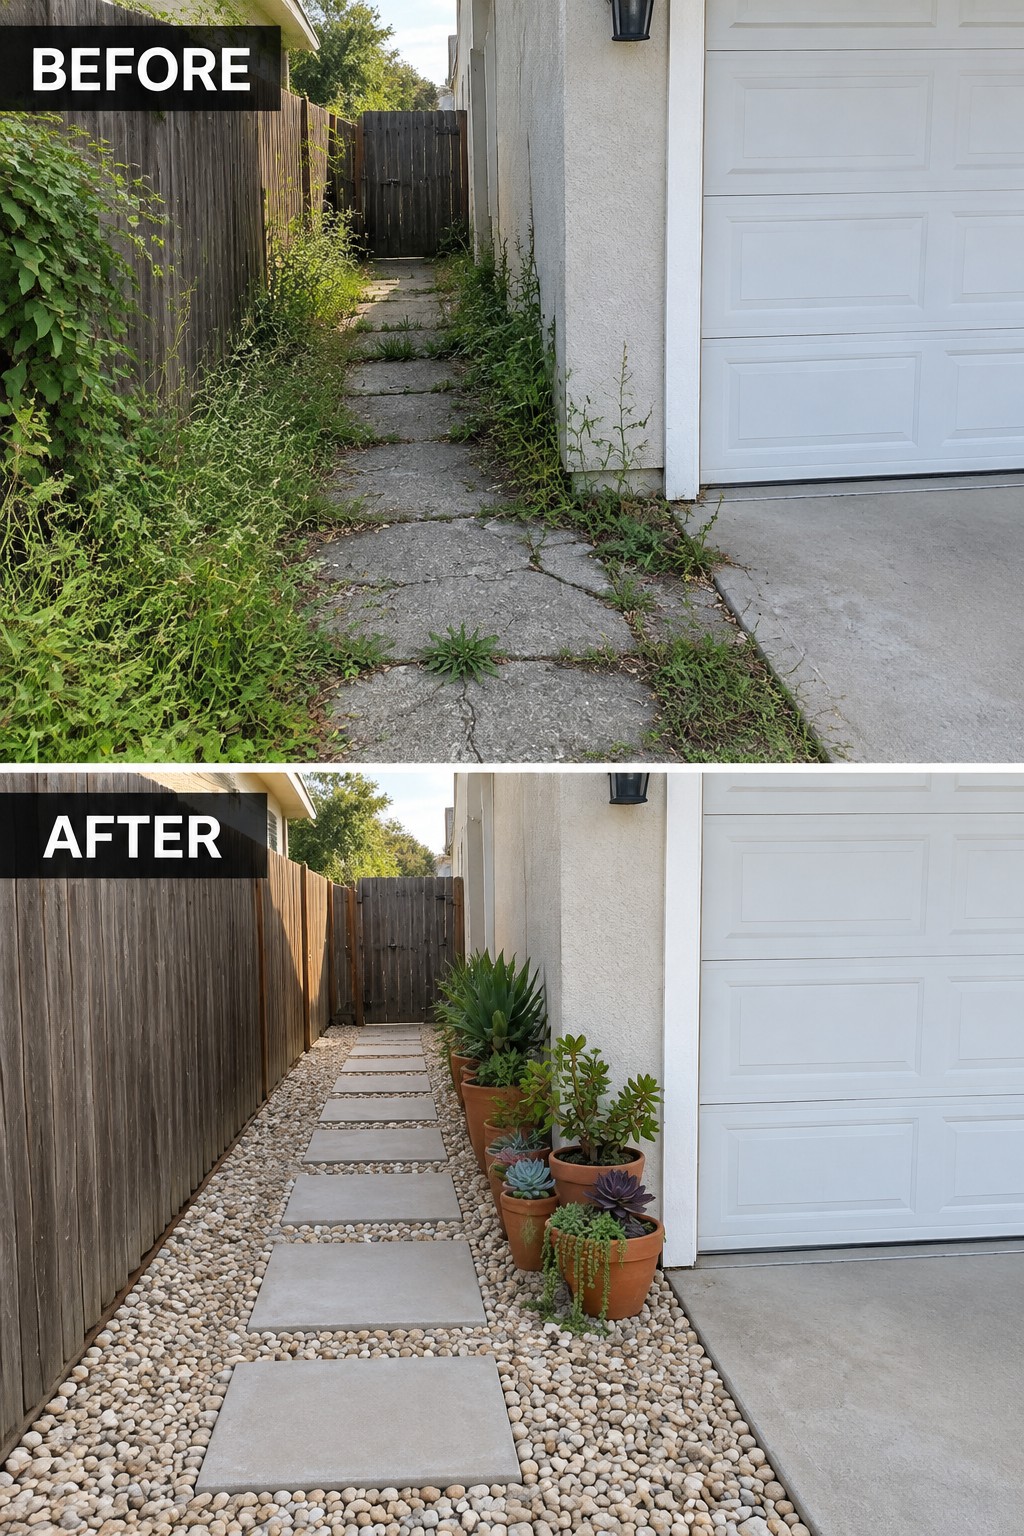
Clearing the overgrowth first makes the biggest difference here. Once the weeds are gone, a layer of gravel gives the stepping stones a clean border and stops new growth from creeping back in. The path feels wider and easier to walk even though nothing major was rebuilt.
This idea works well on side yards or service paths where you need access but do not want high maintenance. Use landscape fabric under the gravel, keep the stones evenly spaced for comfortable steps, and add a few larger pots along one edge if you want some greenery without blocking the way.
Add Structure To An Overgrown Garden Path

Clearing the weeds and replacing scattered stepping stones with larger pavers set in gravel turns a narrow, messy side path into something that actually feels usable. The gravel keeps the surface level and makes walking easier while the bigger slabs give the eye a clear route to follow.
This idea works best in tight side yards where you need a path but do not want to pour concrete. Remove the old stones and overgrowth first, then lay a simple gravel bed with pavers spaced for normal steps. Keep the planting low and repeated on both sides so the path stays the main feature instead of competing with the garden.
Frequently Asked Questions
Q: How far apart should I place the stepping stones? A: Set them roughly 18 inches from center to center so your normal step lands right on each one. Walk the route a few times on the bare ground first and shift any that feel off before you dig.
Q: Do the stones need anything under them to stay put? A: Dig out a shallow spot and pack in a few inches of gravel first. This gives each stone a firm base that drains well and keeps it from shifting after heavy rain.
Q: What if my yard has a gentle slope? A: Follow the natural tilt and set the stones to match the ground level as you go. The path gains character from the small rises and you avoid extra grading work.
Q: How do I stop grass from creeping between the stones over time? A: Fill the spaces with decomposed granite and tamp it down. Pull stray shoots by hand every few weeks and the gaps stay clear without much effort.
