

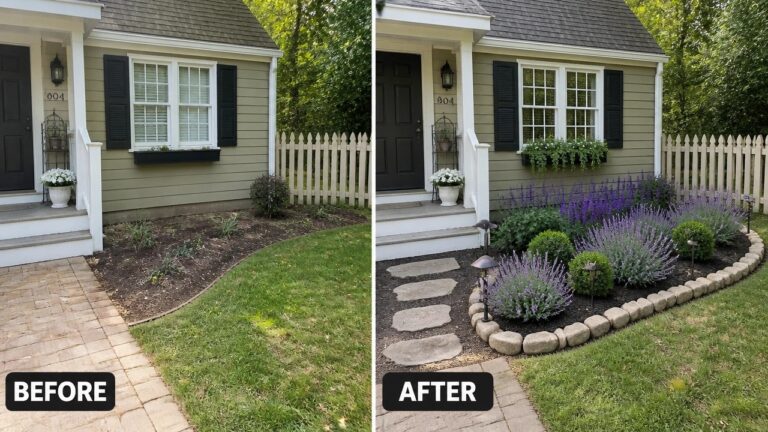
Gardens often feel scattered when there is no clear line separating the lawn from the beds or paths.
I find that simple edging materials like stone can bring order without requiring a complete redesign of the space.
The key is choosing stones that match the existing style of the yard so the whole area feels connected.
I would test one section first.
Seeing the lines settle into place shows how much structure matters more than filling every corner with new plants.
Use Stone Edging To Shape Front Garden Beds
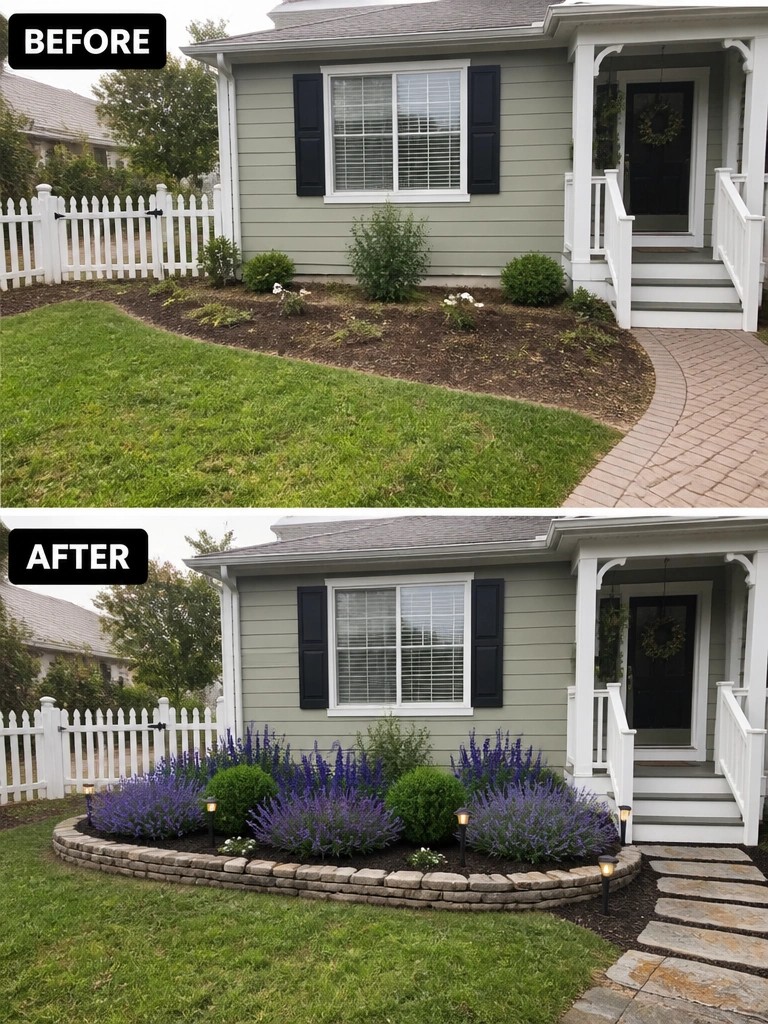
A clear stone border turns a loose planting strip into something that looks finished. The before photo shows mulch spilling into the lawn with no real edge, while the after shows low stones holding the bed in place so the plants stay contained and the grass stays neat.
This approach works best along the front of a house where you want structure without adding height or complexity. Mark the curve first, set the stones on a simple base, then fill in with plants. It keeps maintenance low because the edge stops grass from creeping in and makes weeding easier later on.
Add Structure To An Overgrown Side Yard
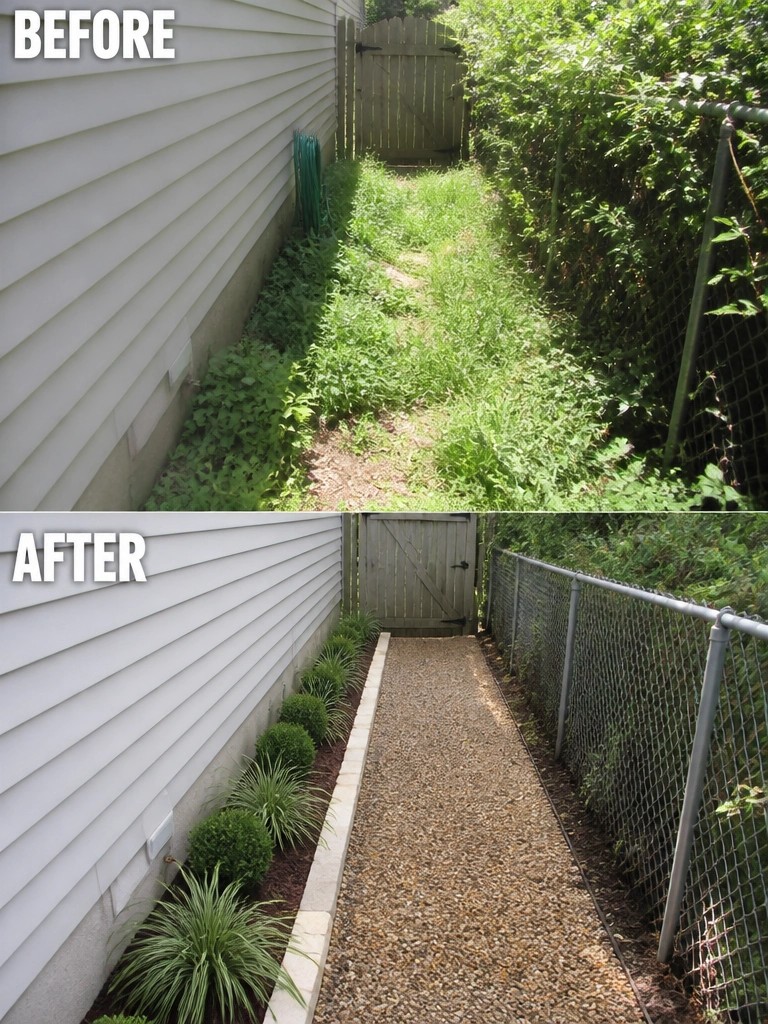
Clearing the weeds first and then laying a gravel path with stone edging turns a narrow, messy strip into a usable walkway. The edging gives the space a clear shape and stops the plants from spilling onto the path.
This approach works best along the side of a house where the area is tight and often ignored. Remove the overgrowth, set the edging straight, and fill with gravel so the path stays low maintenance and easy to walk through.
Add Stone Edging To Define Tree Beds
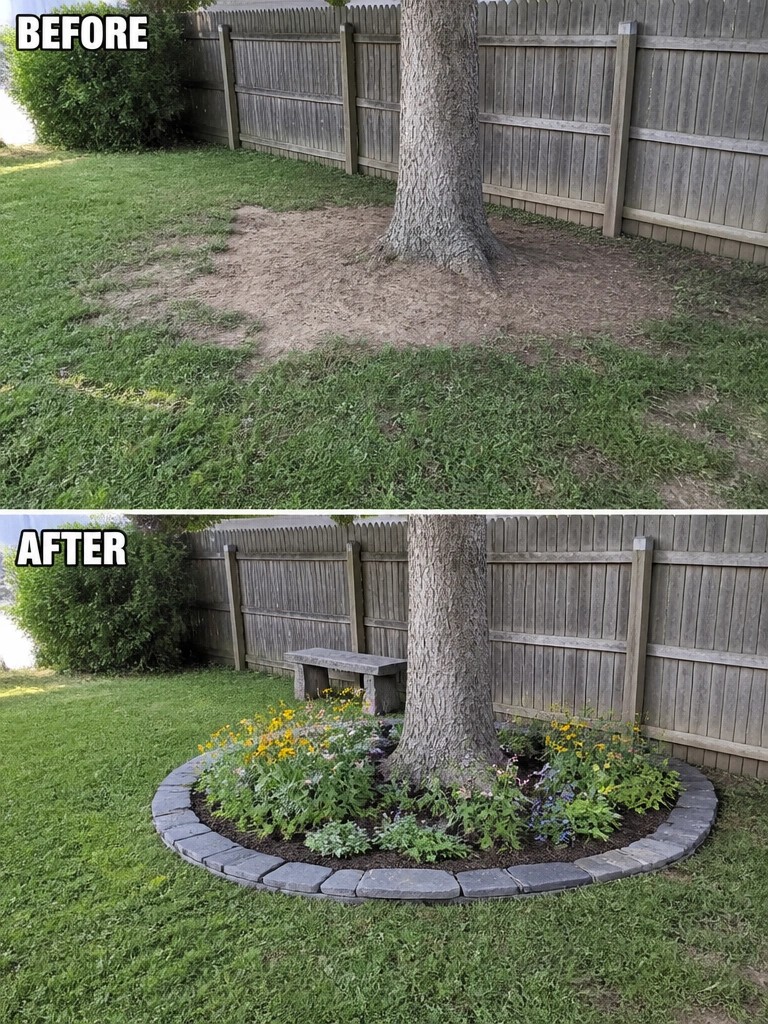
A bare patch of dirt around a tree often looks unfinished and gets messy with weeds or erosion. Adding a simple stone border turns that spot into a clear planting area that keeps mulch in place and gives the tree a more intentional look. The circular edge also makes it easy to care for the bed without fighting grass creeping in.
This approach works well in smaller yards where every area needs a purpose. Start by laying out the stones in a gentle curve around the trunk, then fill with mulch and a few plants suited to the light conditions. Keep the bed a reasonable size so it does not crowd the roots or block mowing paths.
Use Stone Edging To Frame A Patio Area
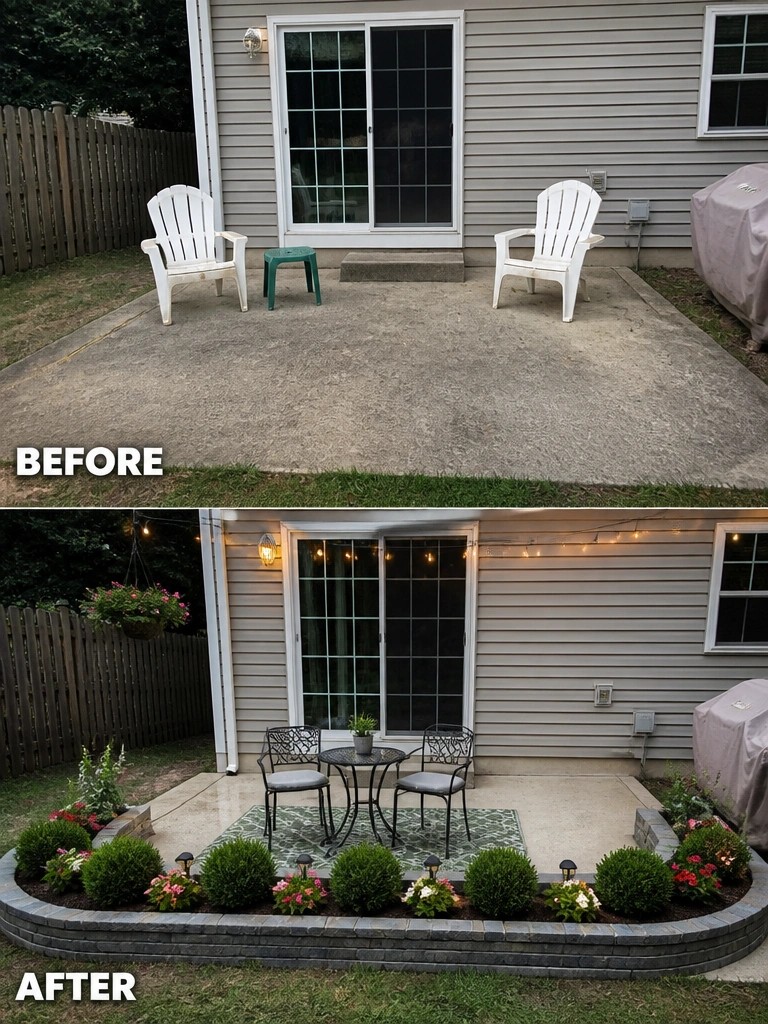
A plain concrete slab can look unfinished when it sits right next to the lawn. Adding a low stone border around the edges gives the patio a clear shape and creates space for planting that keeps the area from feeling open and bare.
This approach works best on small to medium patios where you want structure without losing usable space. Keep the beds fairly narrow, choose plants that match the light conditions, and make sure the edging sits level so it looks intentional rather than added on later.
Add Defined Garden Beds With Stone Edging
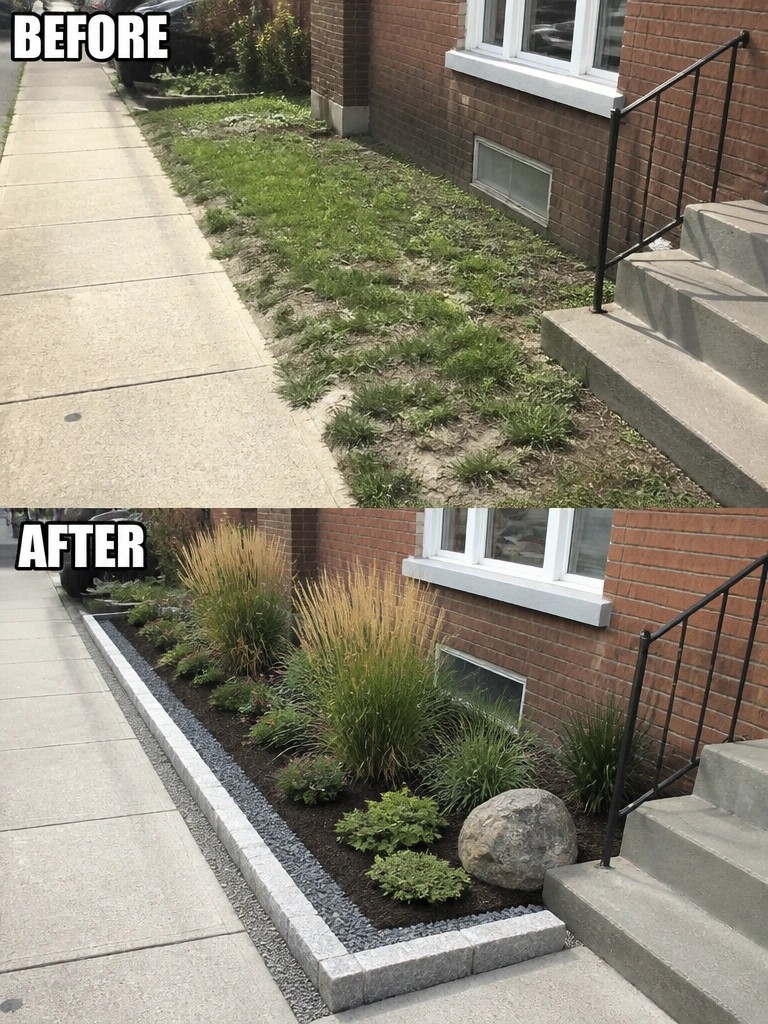
A narrow strip along the side of a house often ends up as patchy grass that is hard to mow and quick to look neglected. Stone edging gives the space a clear shape, turns the soil into a proper bed, and keeps the planting from spilling onto the sidewalk.
This idea works best on tight lots where every foot counts. Put the edging in first so the bed stays neat, then add mulch and a simple mix of low plants that suit the light and soil. The result looks finished without needing a lot of extra space or budget.
Add Stone Edging To Clean Up A Driveway Border

A narrow strip beside a driveway often ends up as a muddy, rutted mess because nothing clearly separates it from the pavement. Laying a simple row of stones creates a firm line, lets you add mulch and a low hedge, and keeps the whole side looking intentional instead of forgotten.
This idea works best on straight driveways where grass never takes hold. Keep the bed narrow so it does not eat into parking space, and choose stones that sit flush with the pavement so snow shovels and tires do not catch on them.
Use Stone Retaining Walls To Shape A Sloped Yard
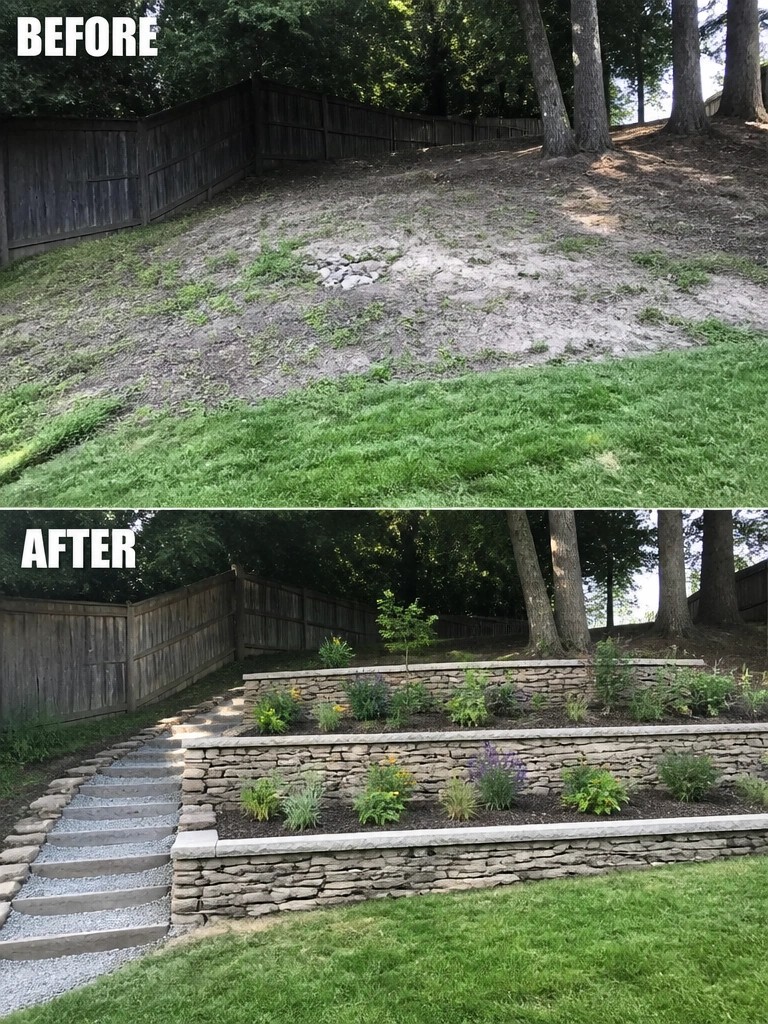
A bare slope is tough to plant and even harder to keep looking tidy. Low stone retaining walls solve this by turning the hill into flat beds that hold soil in place and give plants room to grow. The change from loose dirt to stacked stone creates clear lines and makes the whole area feel finished.
This idea works best on gentle slopes where walls stay under three feet. Keep the beds narrow enough to reach across for maintenance, and add simple steps or gravel paths so people can walk through without compacting the soil. Start with the walls first, then add plants once the structure is set.
Add Stone Edging To Shape Your Garden Beds

The front bed had no clear edge and looked scattered. Laying a simple row of flat stones gave the space a firm border and let the new flowers and shrubs read as one planted area instead of random patches.
This idea works best along the front of a house or beside a walkway. Clear out old growth first, set the stones in a gentle curve that follows the lawn, and keep the planting simple so the edging stays the main feature.
Use Stone Edging To Shape Garden Borders
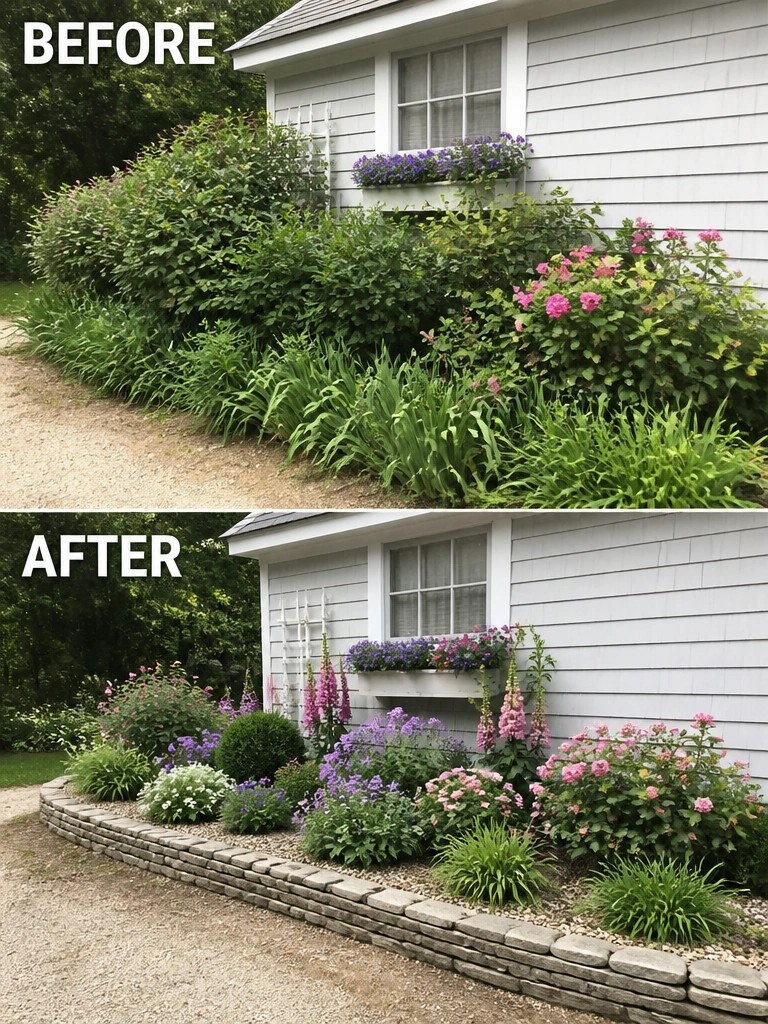
The main change is the addition of a low stone border that runs along the house. This single step turns a loose mix of overgrown plants into clear, separate beds that feel planned rather than scattered.
Stone edging works best on older homes where the garden sits right against the foundation. Clean up the overgrowth first, then set the stones to create a firm line before adding or rearranging plants inside the new shape.
Use Stone Edging To Define A Fire Pit Area
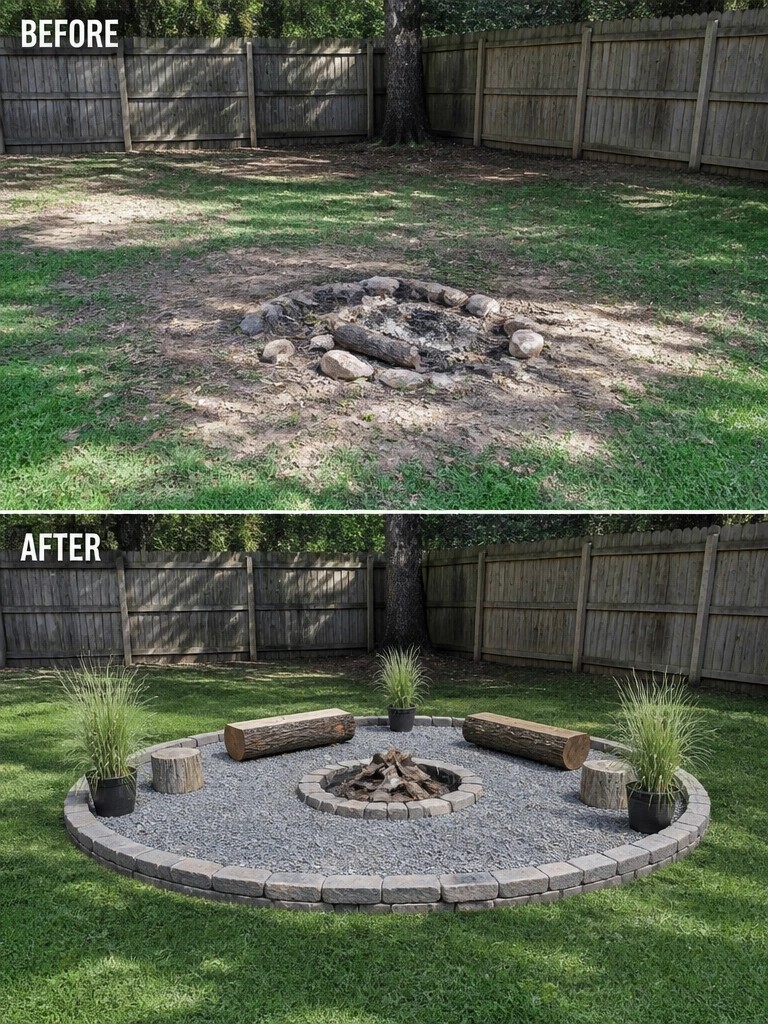
A loose ring of rocks on bare dirt does little to make a fire pit feel like a real spot. Adding a low stone border with gravel inside gives the area clear shape and makes it easier to keep clean.
This approach works well in backyards where the fire pit sits in open grass or dirt. Start with the edging first, then add simple seating like logs and a few plants in pots so the space stays practical without crowding.
Define Garden Borders With Stone Edging
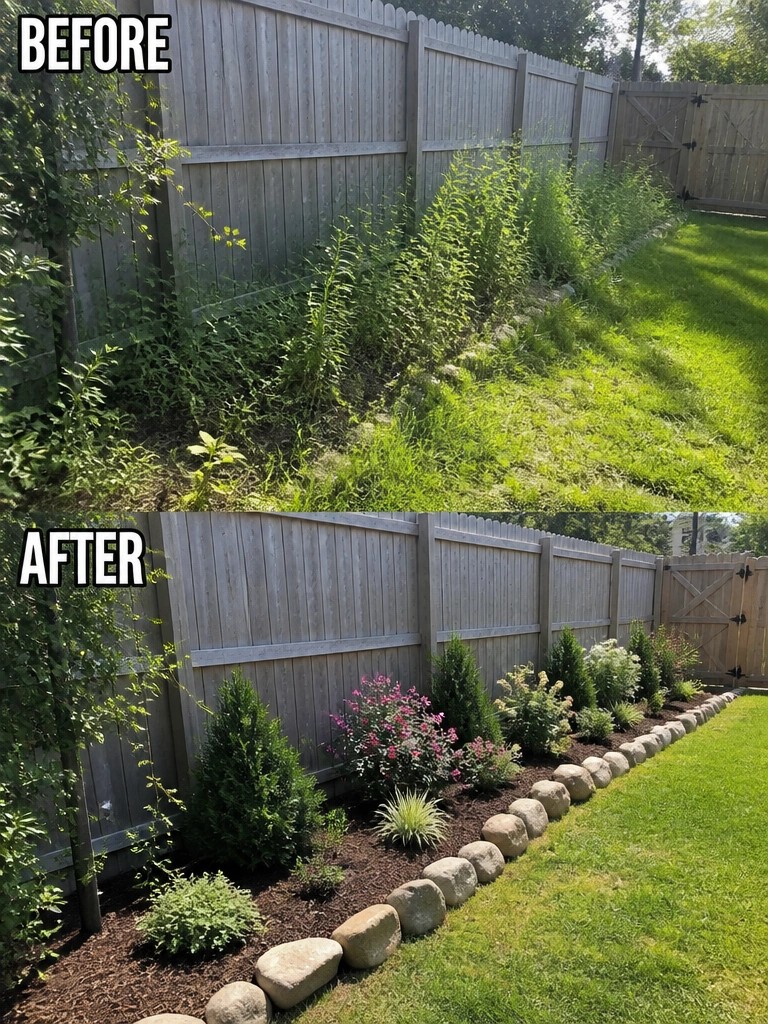
A messy strip of weeds along a fence can make the whole yard feel unfinished. Adding a line of stones creates a clear border that holds mulch in place and gives the area a much cleaner shape.
This idea works best along fences or property lines where grass creeps in from one side. Clear the overgrowth first, set the stones in a gentle curve, then fill the bed with mulch and simple plants. It keeps the space easy to maintain without needing a big redesign.
Use Stone Edging To Shape Planting Beds On A Balcony
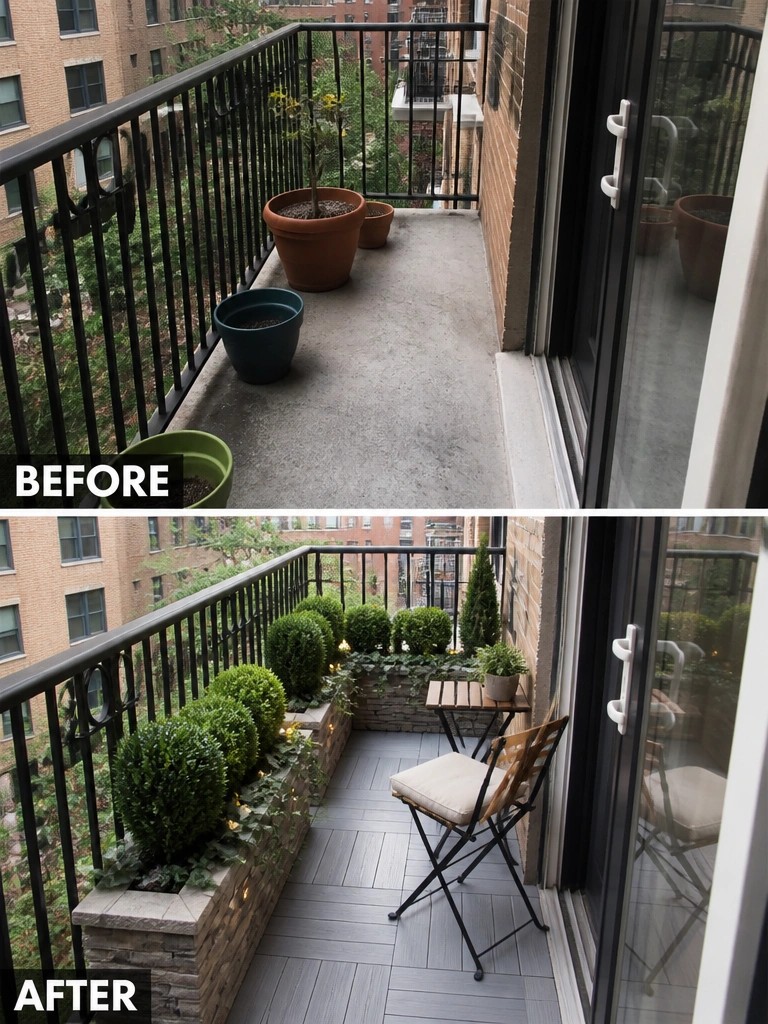
A bare balcony often feels like wasted space when it is just a slab of concrete with a few loose pots. Adding low stone edging creates clear planting beds that turn the area into something more like a small garden. The change gives the space structure right away and makes it easier to add shrubs or greenery without everything looking scattered.
This approach works well on small balconies or patios where you want planting without losing room to move around. Start with simple stone blocks or edging that can handle weather, keep the beds narrow so they do not crowd the floor, and choose compact plants that stay neat. Once the beds are in place you can add a chair and table without the whole area feeling empty or unfinished.
Define Garden Beds With Stone Edging
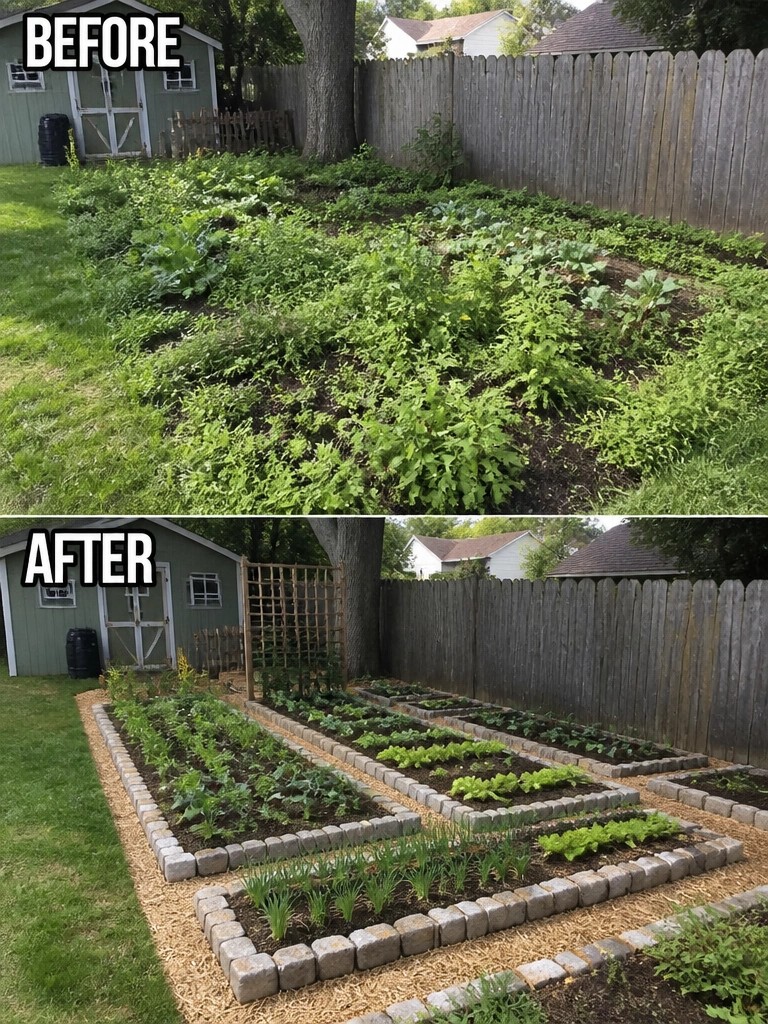
An overgrown garden often looks messy because there are no clear edges. Stone edging changes that by creating firm borders around each bed, which keeps plants contained and gives the whole yard a more organized feel. The mulch between the beds also helps control weeds and makes the space easier to walk through.
This idea works best in smaller backyards where you want a tidy look without spending a lot on big structures. Clear the area first, then set the stones before you plant. It keeps grass from creeping in and makes future maintenance much simpler.
Add Stone Edging To Shape A Sloped Front Yard
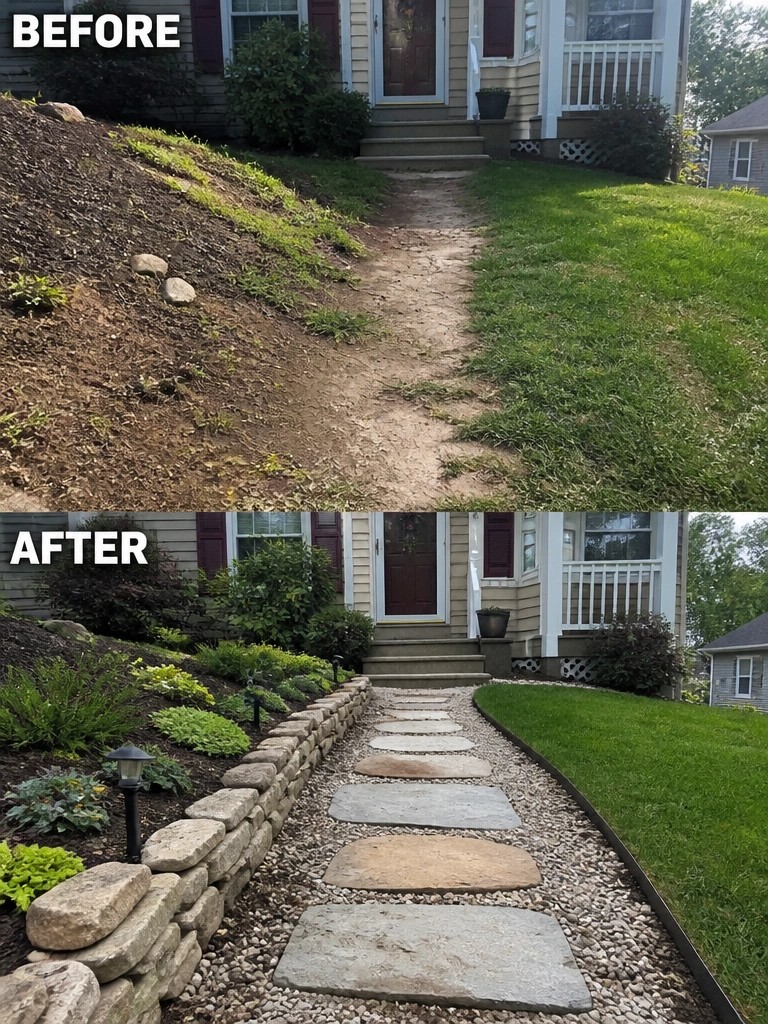
A worn dirt path on a slope can make the whole front look unfinished. Adding a low stone border along the edge and laying flat stones with gravel between them turns the same space into a clear walkway that stays dry and easy to walk on.
This idea works best on small slopes where you want to separate planting from the path without building big walls. Mark your bed line first, then choose stones that sit low enough to mow around. Keep the planting simple so the edging stays the main feature.
Add Structure To A Sloped Yard
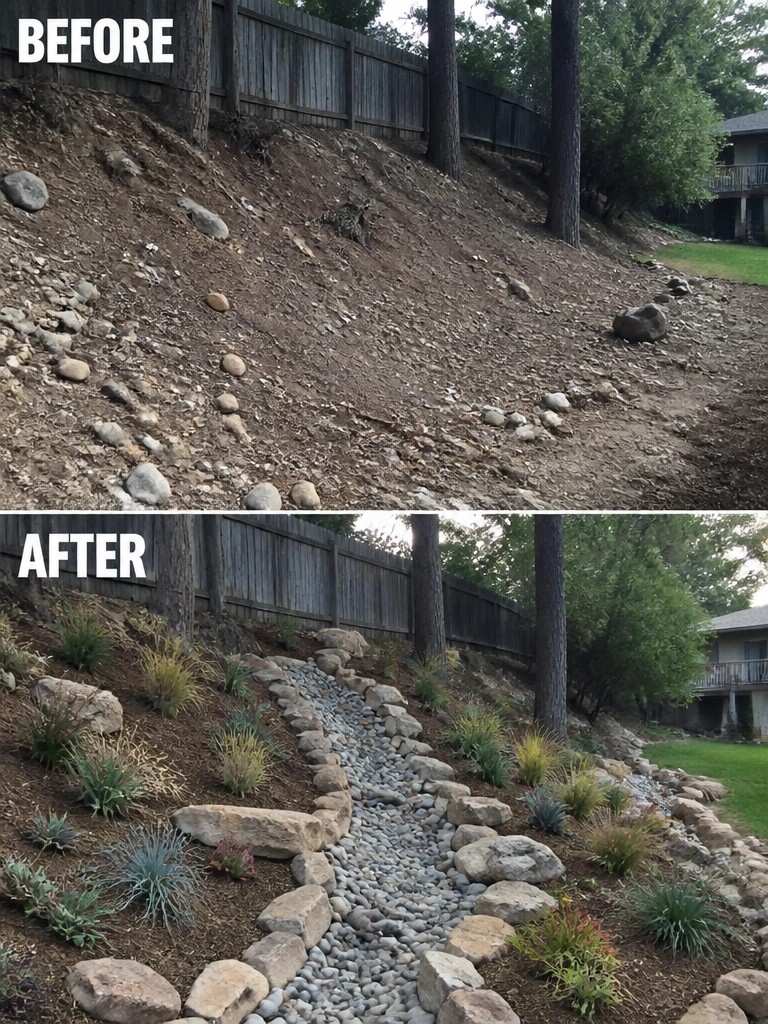
A bare slope tends to look unfinished and can worsen with runoff. Adding a central line of stones with gravel between them creates a clear path that guides water while forming natural planting zones on each side.
This idea suits homes with noticeable grade changes. Follow the natural fall of the land first, then set the stones and fill in with plants suited to the slope so the whole area feels intentional rather than scattered.
Add Stone Edging To Clean Up A Front Yard Edge
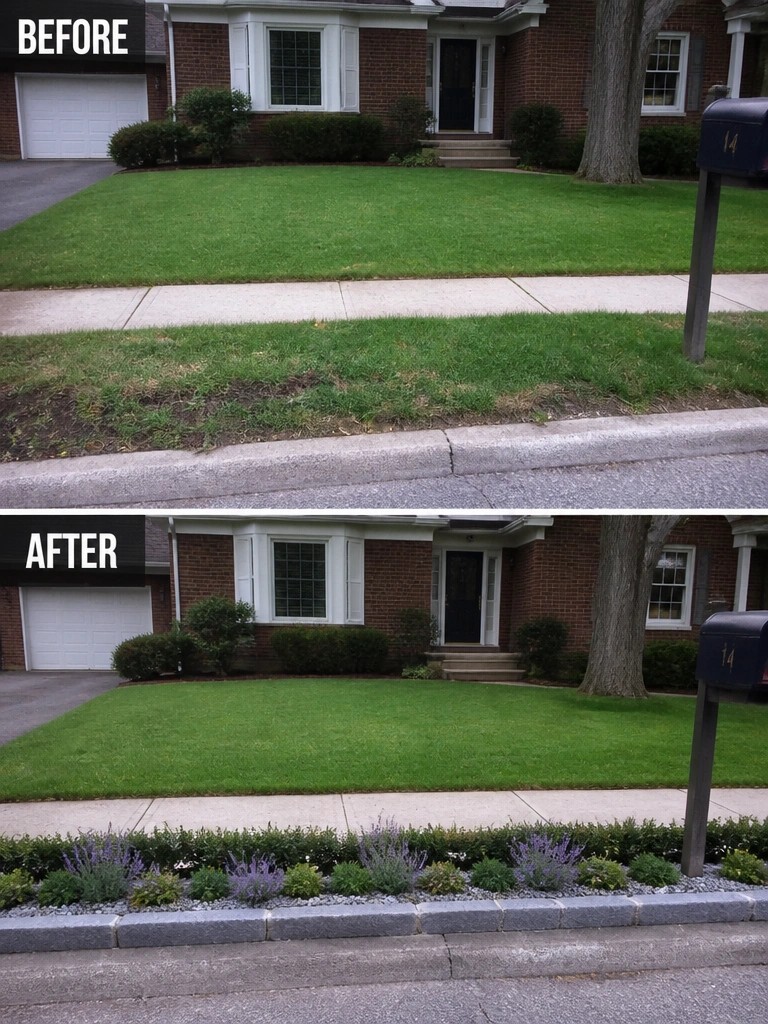
A messy lawn edge along the street makes the whole front yard look neglected. Adding a low stone border with a planted bed creates a clear line that keeps the grass neat and gives the yard more structure without major changes.
This approach works well on older homes where the lawn runs right up to the sidewalk. Start by removing the rough grass strip, then set the edging and fill the bed with low shrubs and perennials that can handle street conditions. Keep the planting simple so it stays easy to maintain.
Define A Bare Spot With Stone Edging
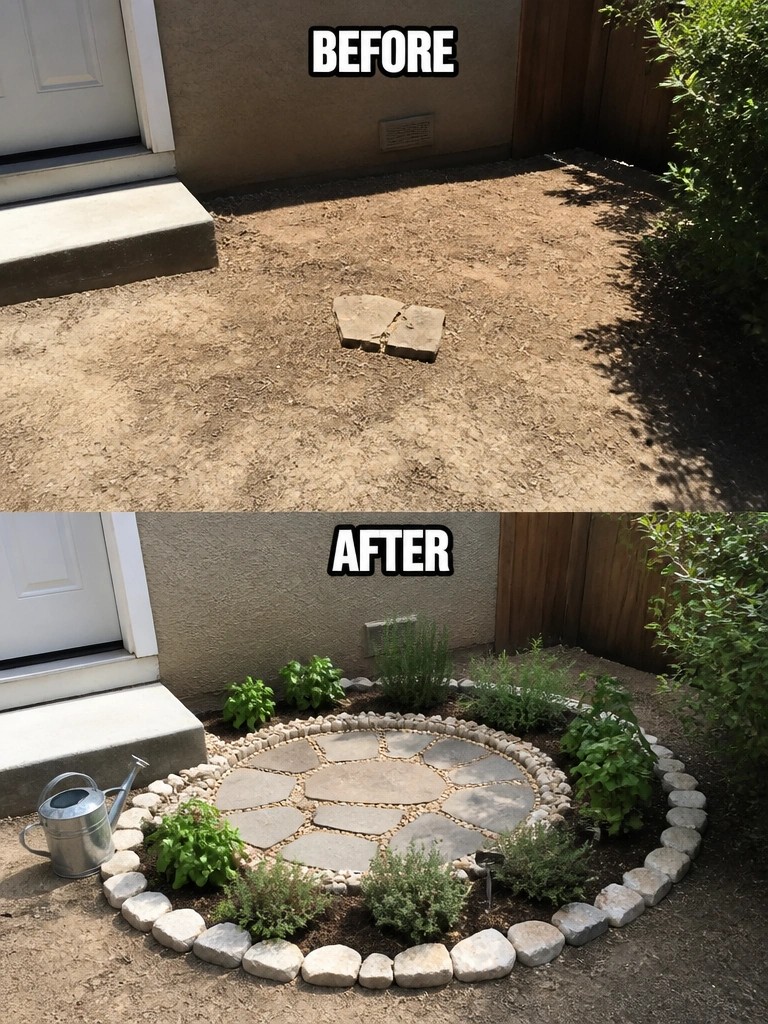
A clear stone edge turns an empty patch of dirt into something that feels planned rather than forgotten. The before photo shows just two loose pavers sitting on bare ground, while the after shows a simple circular bed held in place by a low stone border and filled with a path and plants.
This idea works best in small corners or side yards where you want structure without spending a lot. Lay out the shape first with a hose or rope, set the edging, then add plants and a path inside it. Keep the bed narrow enough to reach across for watering and weeding.
Add Structure To A Pond Edge With Stones
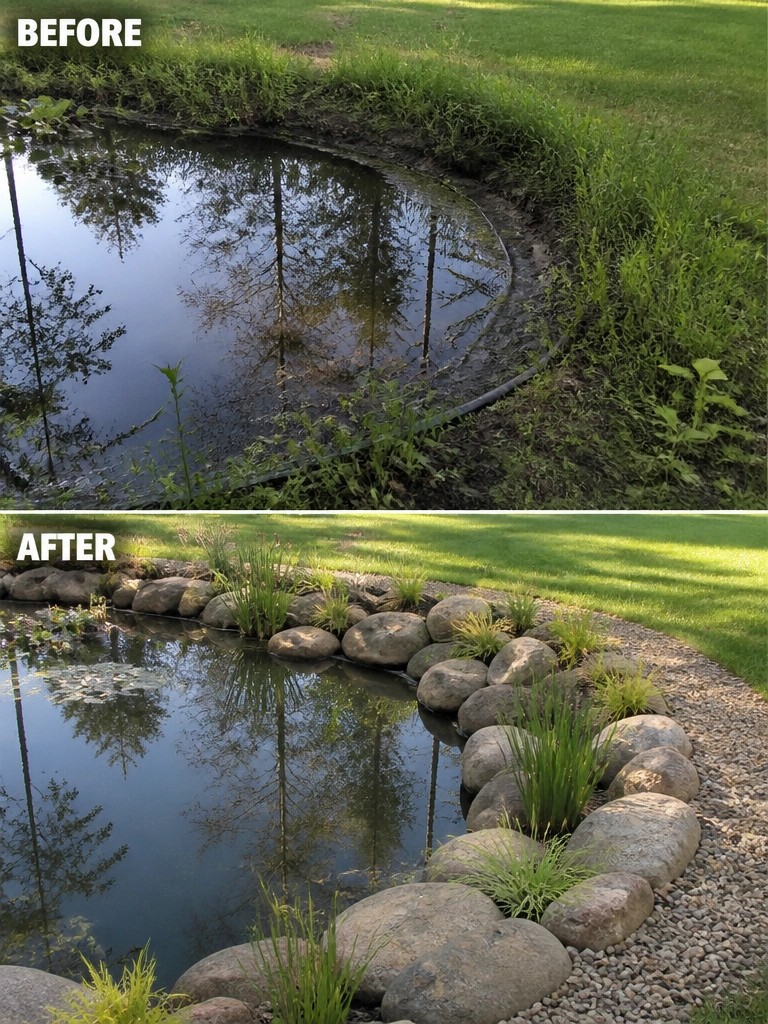
A pond often looks messy when the edges blend into the lawn or weeds. Placing a row of large stones creates a clear border that keeps the water area separate and gives the whole garden a more finished look. The before image shows how overgrown grass and scattered plants made the edge hard to maintain. The after image shows how the same spot now has a solid line of stones that holds everything in place.
This approach works well in any yard with a small water feature or natural-looking pond. Start by cleaning up the edge first, then set the stones so they sit slightly above the waterline. Gravel behind the stones helps with drainage and keeps the border from shifting over time. It is a simple step that makes future planting and mowing much easier.
Define Garden Beds With Stone Edging
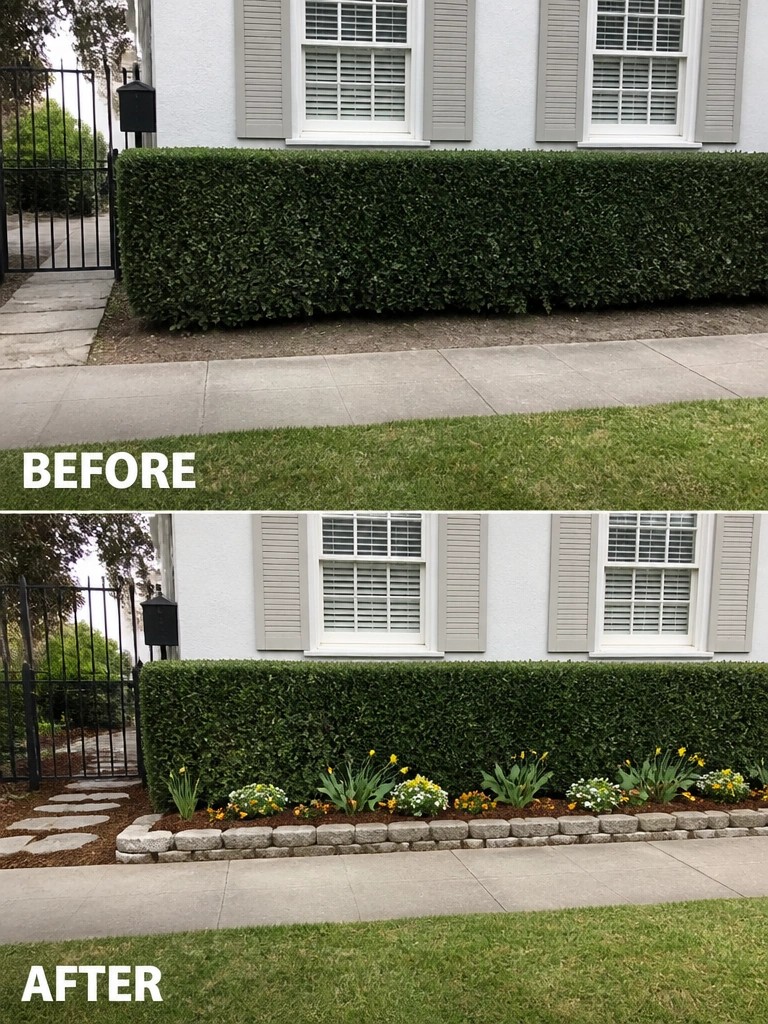
A plain strip of grass or dirt along a hedge often looks unfinished. Adding a low stone border creates a clear edge that turns the space into an actual garden bed. In this case the change is simple. The ground in front of the hedge went from flat and bare to a mulched planting area filled with flowers.
This approach works well along sidewalks or driveways where you want a tidy look without moving large shrubs. Start with the edging first so the shape stays straight, then add mulch and a few plants that suit your light. It keeps the bed from spilling onto the walk and makes routine weeding easier later on.
Define A Walkway With Stone Edging
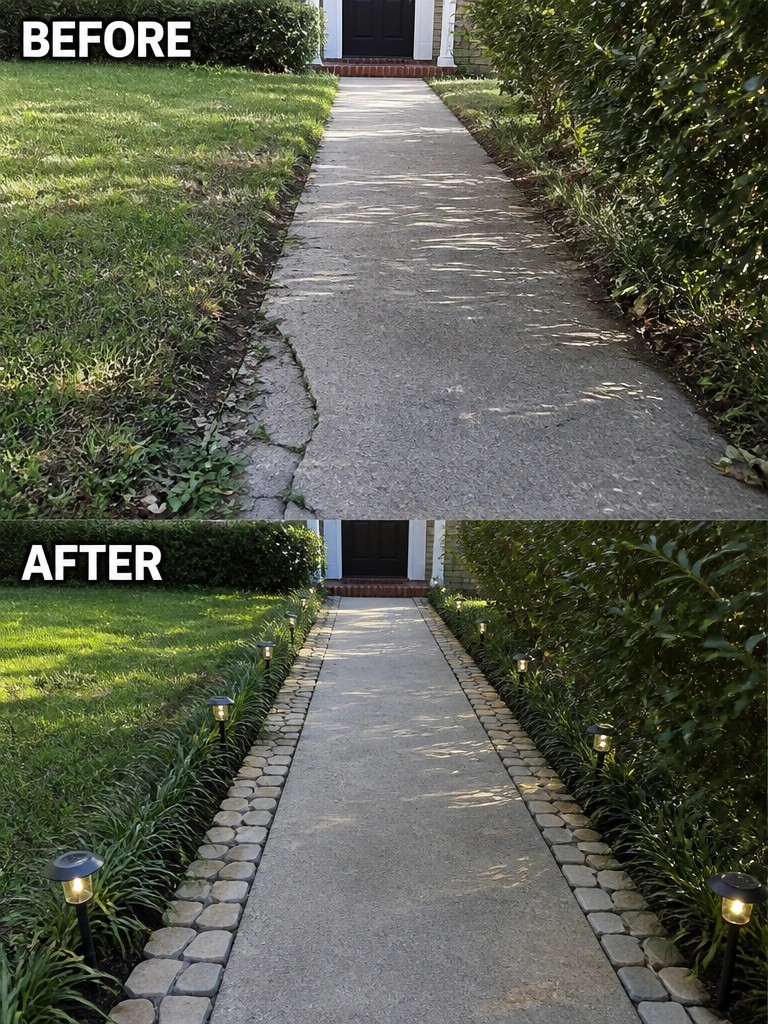
Adding stone edging along a plain concrete path gives the whole front yard a more finished look without any major construction. The before shows grass and weeds spilling over the edges in an uneven line. The after replaces that with a clear border of flat stones on both sides and a few low lights to mark the edge after dark.
This idea works best on straight paths that already have a solid surface. Clean up the grass first, then set the stones level with the ground so they stay in place over time. It suits older homes where the walkway is still usable but the surrounding lawn needs better shape.
Define Garden Beds With Stone Edging
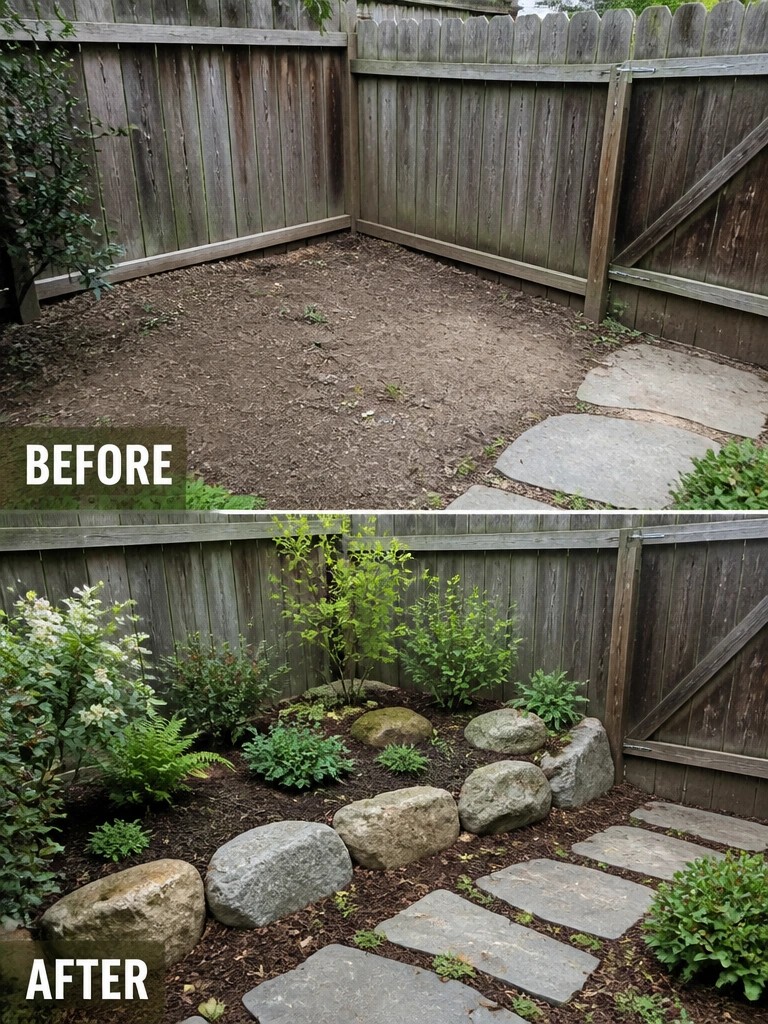
A bare dirt yard often feels unfinished because nothing separates planting areas from open space. Placing stones in a simple line along the fence and around new beds gives the garden clear shape and makes it easier to care for over time.
This idea works best in small backyards or side yards where you want some structure without filling the whole space. Lay the stones first to mark the beds, then add mulch and plants that fit your conditions so the layout stays practical as things grow in.
Add Stone Edging To Create A Formal Garden Bed
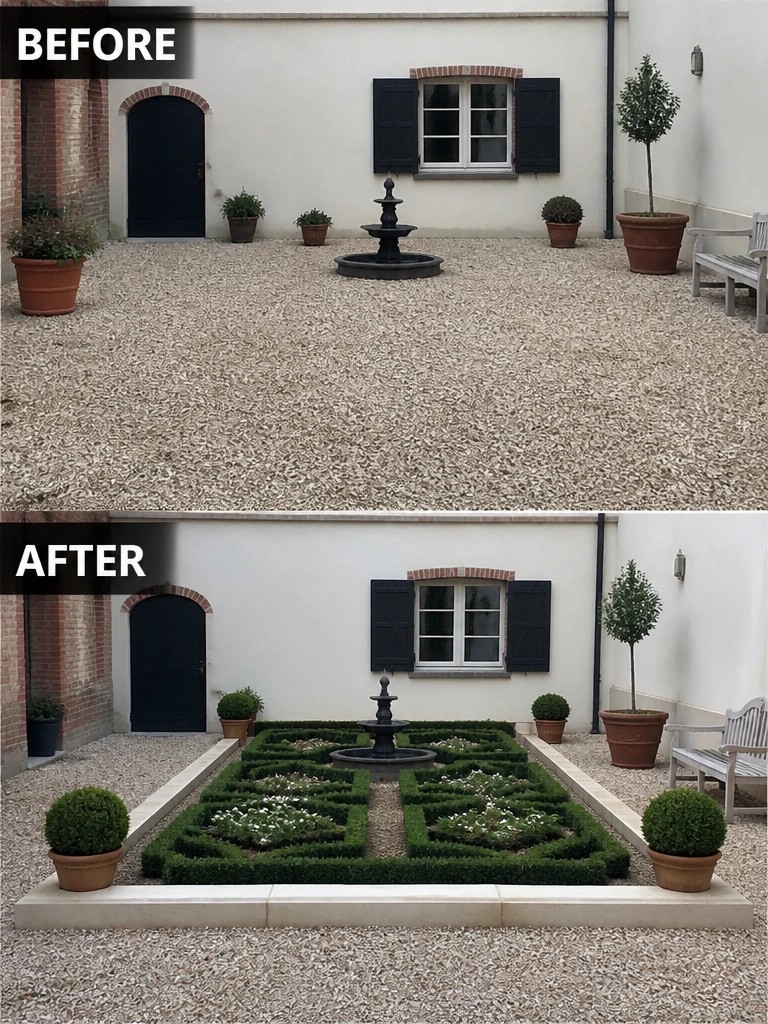
A plain gravel courtyard can look scattered when plants sit in random pots with no clear shape. Adding a low stone border around the central fountain and filling it with a simple hedge layout gives the whole space a planned feel instead of just open gravel.
This approach works well in small courtyards or side gardens where you want order without losing the easy gravel surface. Keep the bed narrow enough to walk around and choose one repeating plant shape so the edging stays the main feature rather than competing with too many different plants.
Define Garden Beds With Stone Edging
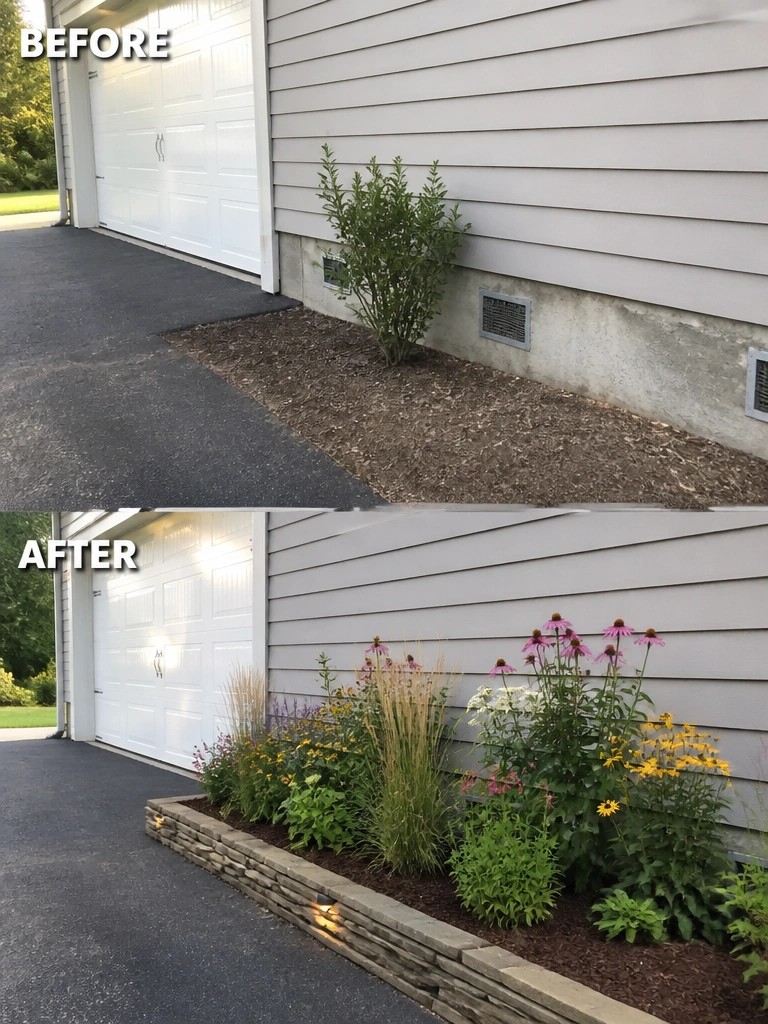
A simple stone border can turn a plain strip of mulch along the house into a real garden bed. The change gives the space a clear edge, keeps the soil in place, and makes room for layered planting that stays neat over time.
This approach works best along foundations or driveways where you want color and interest without letting the bed spread into the lawn. Lay the edging first so the shape stays consistent, then add plants in groups rather than scattering them.
Use Stone Edging To Define A Play Area
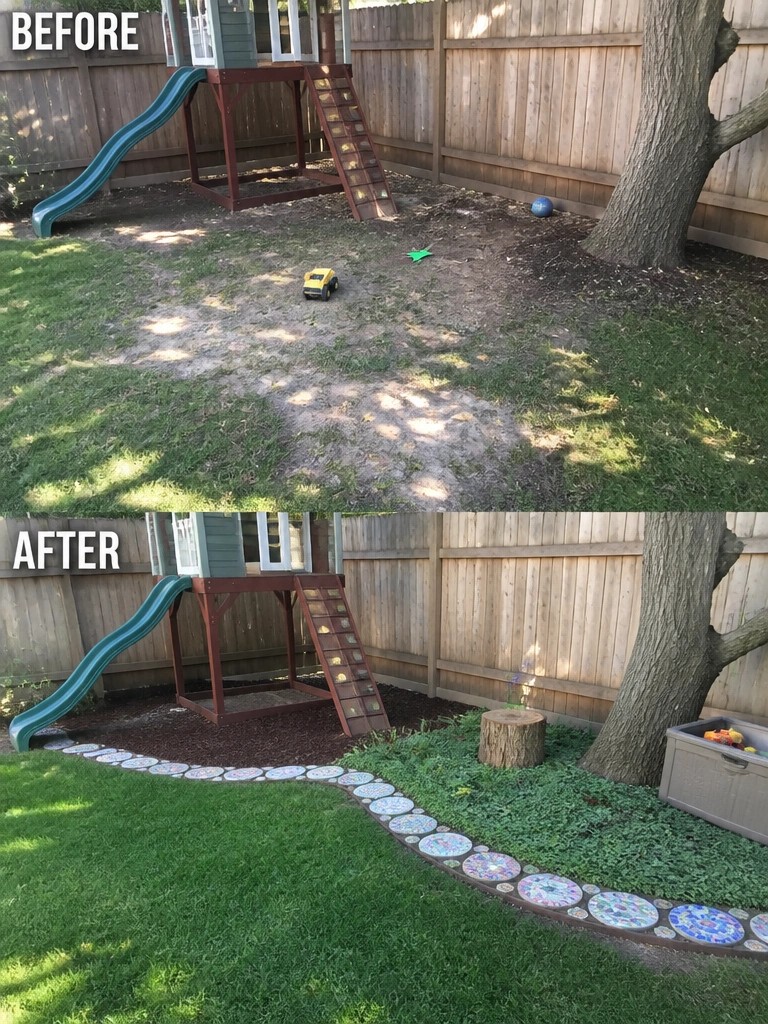
A patchy dirt yard around a playset often feels unfinished and hard to keep clean. Adding a simple stone border with decorative tiles turns the space into a clear zone, with mulch inside the edge to keep things neat and separate from the grass.
This approach works well in small backyards where you want the play area to feel intentional without adding walls or fences. Start by laying out the edging first, then fill inside it, and keep the rest of the lawn open so kids still have room to run.
Frequently Asked Questions
Q: Will stones stay in place if my yard slopes?
A: Set them at a slight angle into the hill for better grip. Pack soil firmly behind each one as you go. This stops them from sliding after rain.
Q: How do I stop grass from growing over the stones?
A: Dig a shallow trench before you lay the edging. Keep the stones a bit higher than the lawn level. Trim along the edge with a string trimmer every few weeks.
Q: Can I reuse old stones from another project?
A: Clean them off first to remove dirt and moss. They add character once you sort similar sizes together.
