

Gardens tend to feel scattered when the beds lack any real structure in how the plants are arranged.
I have found that taking time to plan the layout makes the whole space look more intentional even with the same plants.
Cleanup helps too.
Once the edges are defined it becomes easier to see what needs filling in or moving around.
Some of these approaches seem practical enough to try in my own yard this season.
Define Garden Beds With Simple Edging
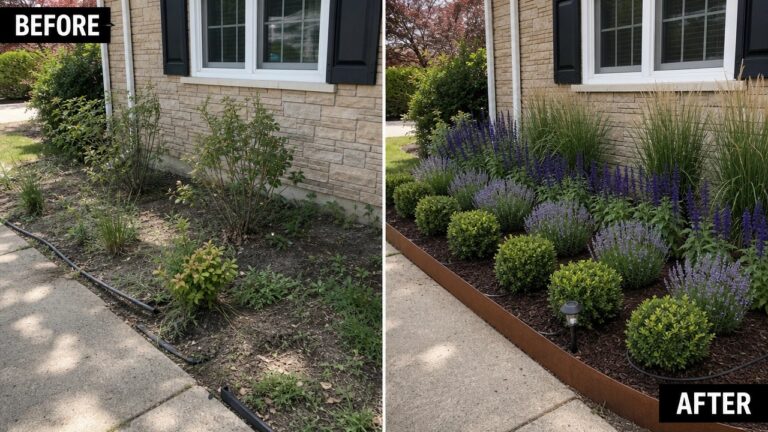
The main change here is the addition of a clean metal edge along the front of the bed. That single line turns a loose, weedy strip of dirt into something that looks intentional. Layering low shrubs in front, lavender in the middle, and taller grasses behind gives the bed height and order without crowding it.
This approach works well along a house foundation or walkway where the space is long and narrow. Start with the edging so the shape stays consistent, then choose plants in three heights rather than filling the bed all at once. The result feels planned even when the planting stays fairly simple.
Add Structure To An Overgrown Border
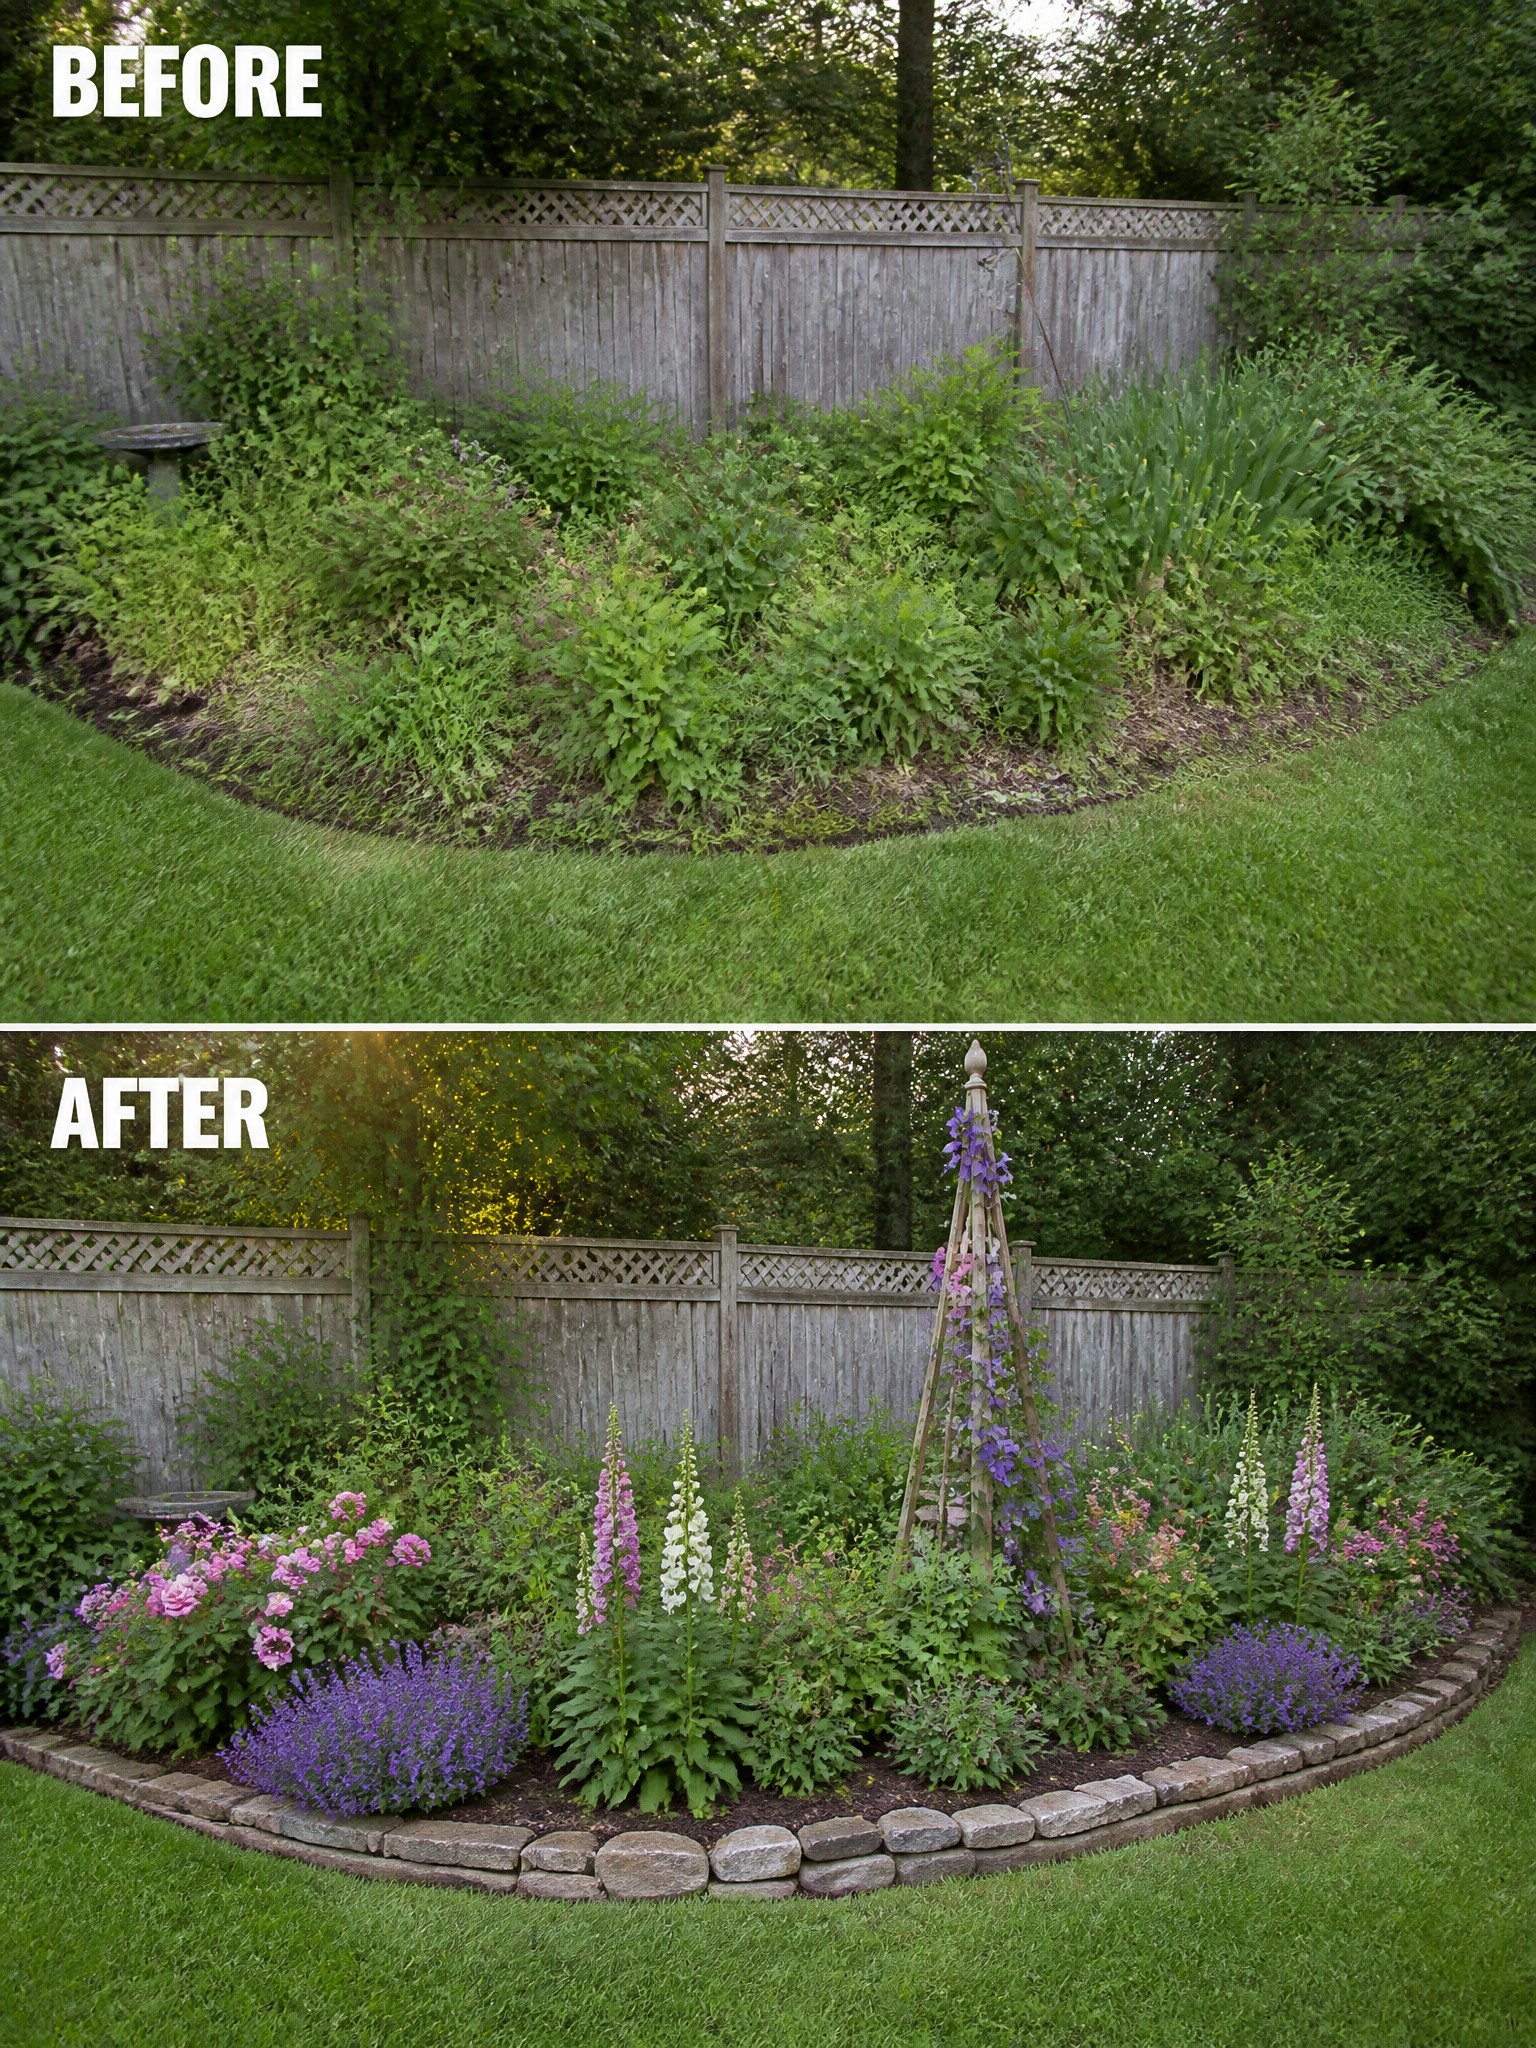
A messy garden bed often looks worse than a bare one because the plants have no clear shape. In this case the before photo shows a jumbled mix of greenery spilling onto the lawn. Adding a simple stone edge and a bit of planting structure turned the same space into something that reads as intentional rather than neglected.
The same approach works along fences or house foundations where beds tend to blur into the grass. Start by cutting a clean line and laying edging before you add new plants. Keep the tallest element toward the back so the border stays easy to mow around and does not feel crowded.
Add Structure To A Narrow Side Yard
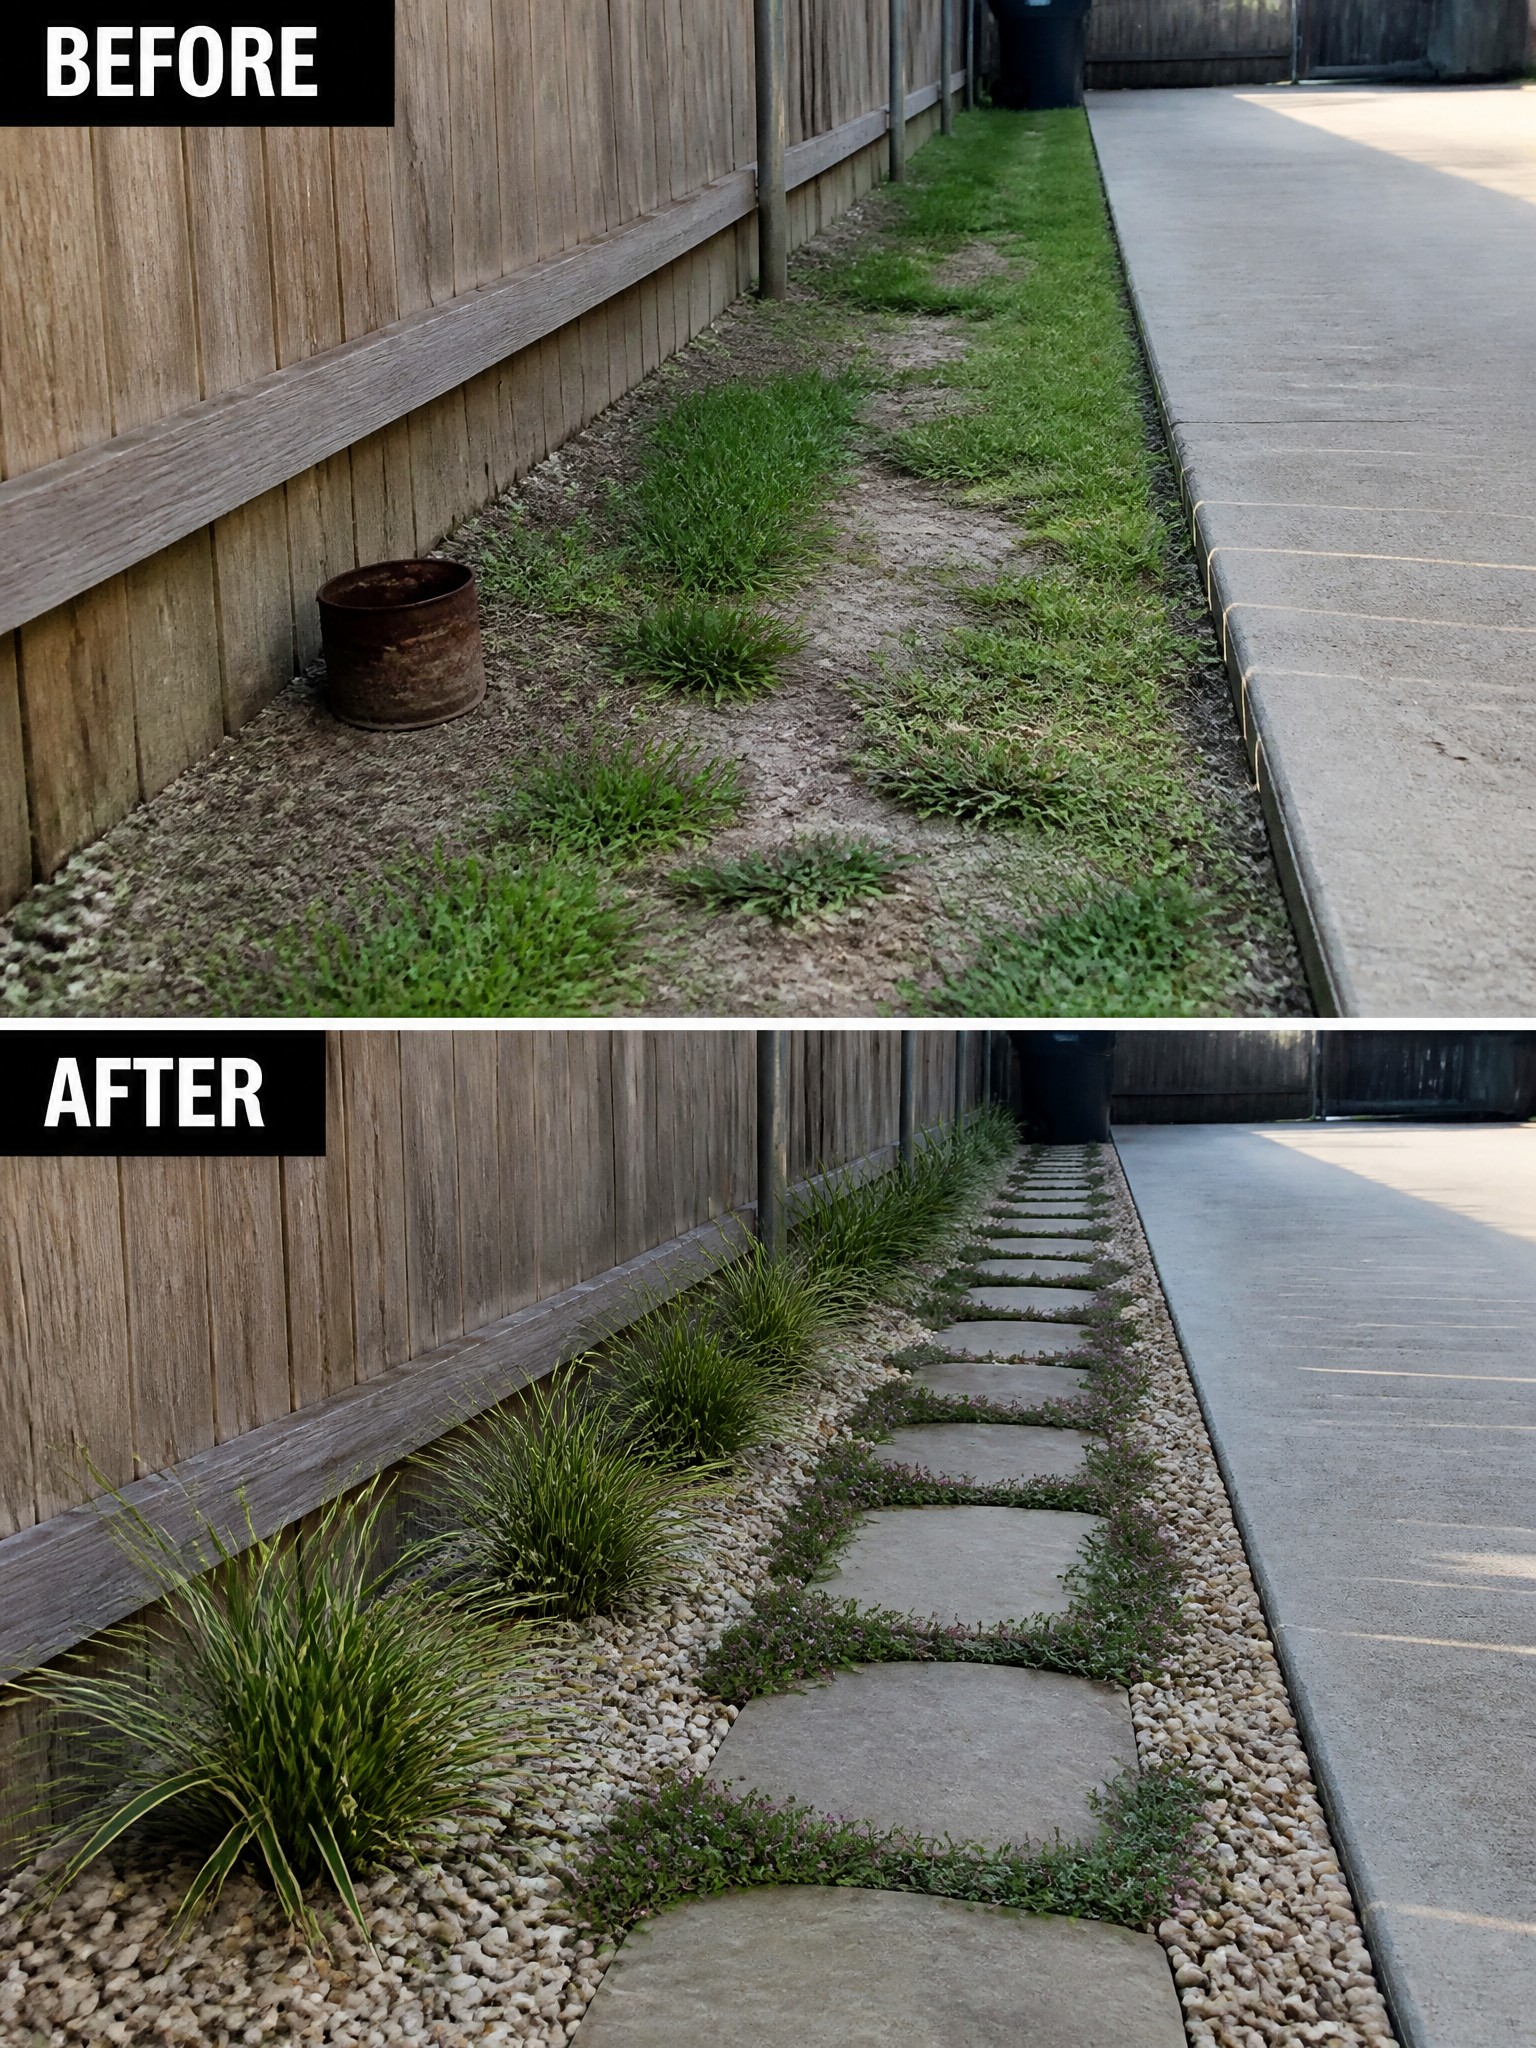
A weedy dirt strip next to a fence often ends up ignored because it feels too narrow to use. Laying down a simple line of pavers and filling the rest with gravel gives the space a clear purpose and makes it much easier to maintain.
This idea works best along long, tight areas where you still need occasional access. Clear everything first, then set the pavers in a gentle curve so the path feels natural. Low ground cover planted between the stones keeps the look soft without taking over the gravel.
Define Garden Beds With Simple Edging
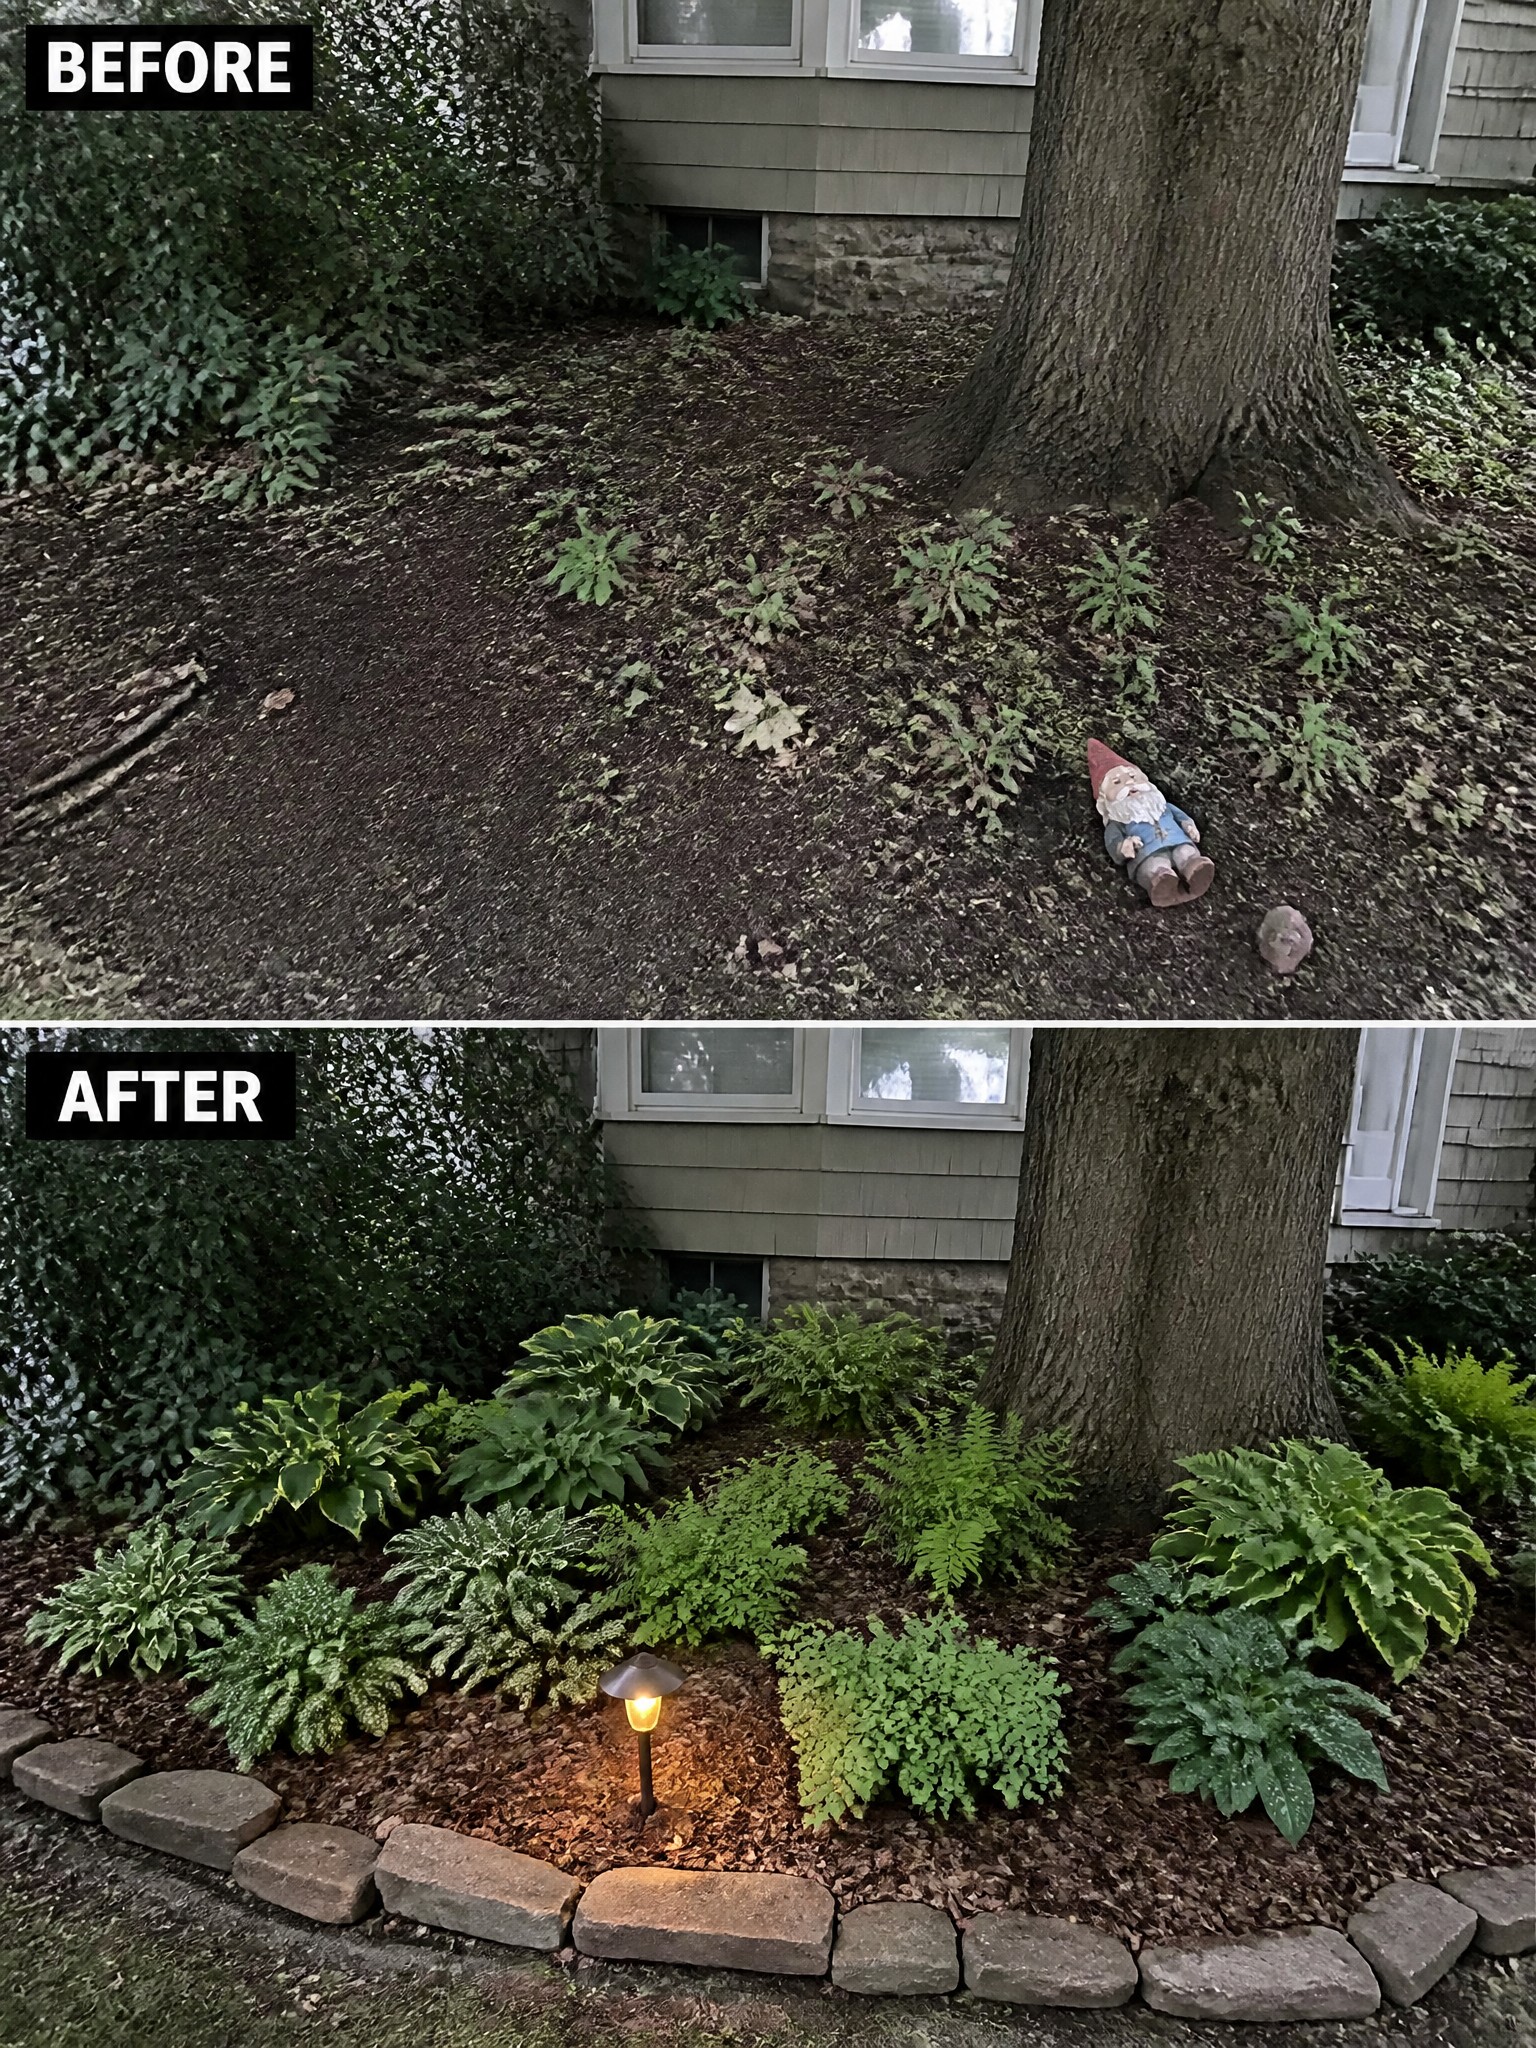
A bare patch of mulch under a tree often looks unfinished because nothing holds the space together. Adding a low stone border and filling the bed with layered plants turns the same spot into a clear garden area. The edging keeps mulch in place and gives the planting a finished shape that feels intentional rather than scattered.
This approach works well around mature trees where roots limit what you can do. Start with the border first so you know the exact size of the bed, then choose shade-tolerant plants that can handle the conditions. Keep the number of varieties modest so the bed stays easy to maintain over time.
Refresh Old Raised Beds For A Cleaner Layout
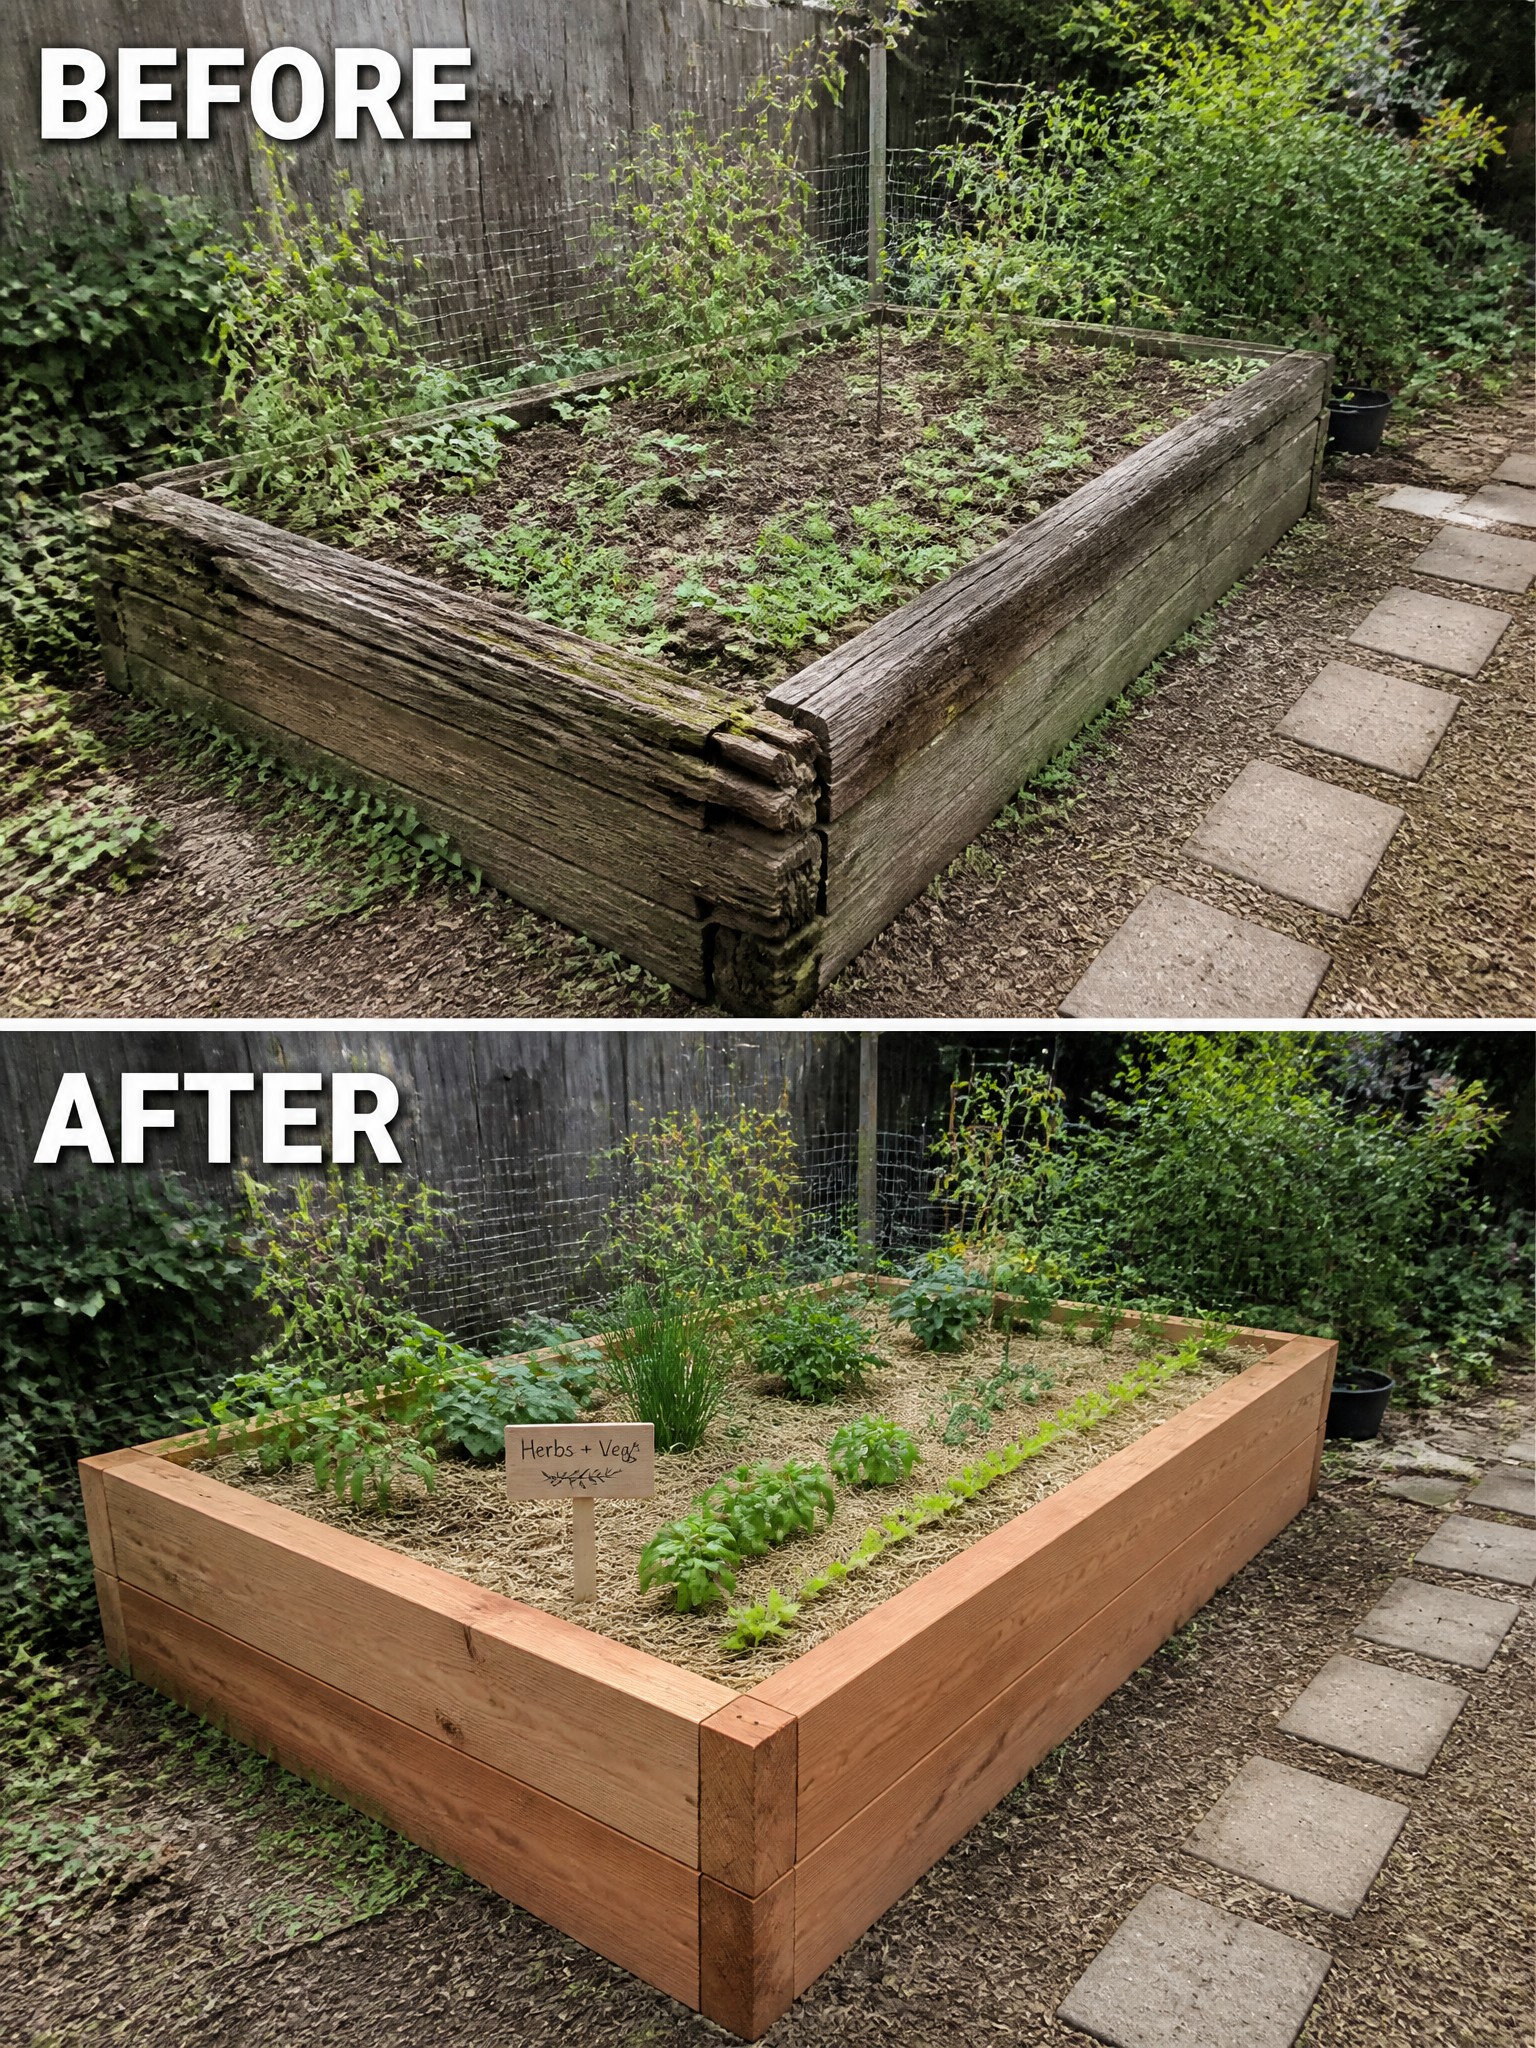
An old raised bed often ends up looking messy once plants spread and weeds take over. Replacing the weathered wood and adding a layer of straw mulch gives the bed clear edges and a tidy surface that makes the whole area feel more intentional.
This approach works well in small backyards where space is limited. Start by checking the condition of the boards, then focus on mulch to keep soil covered and paths looking neat. It keeps the bed easy to maintain without needing a full redesign.
Use Retaining Walls To Turn A Slope Into Garden Beds
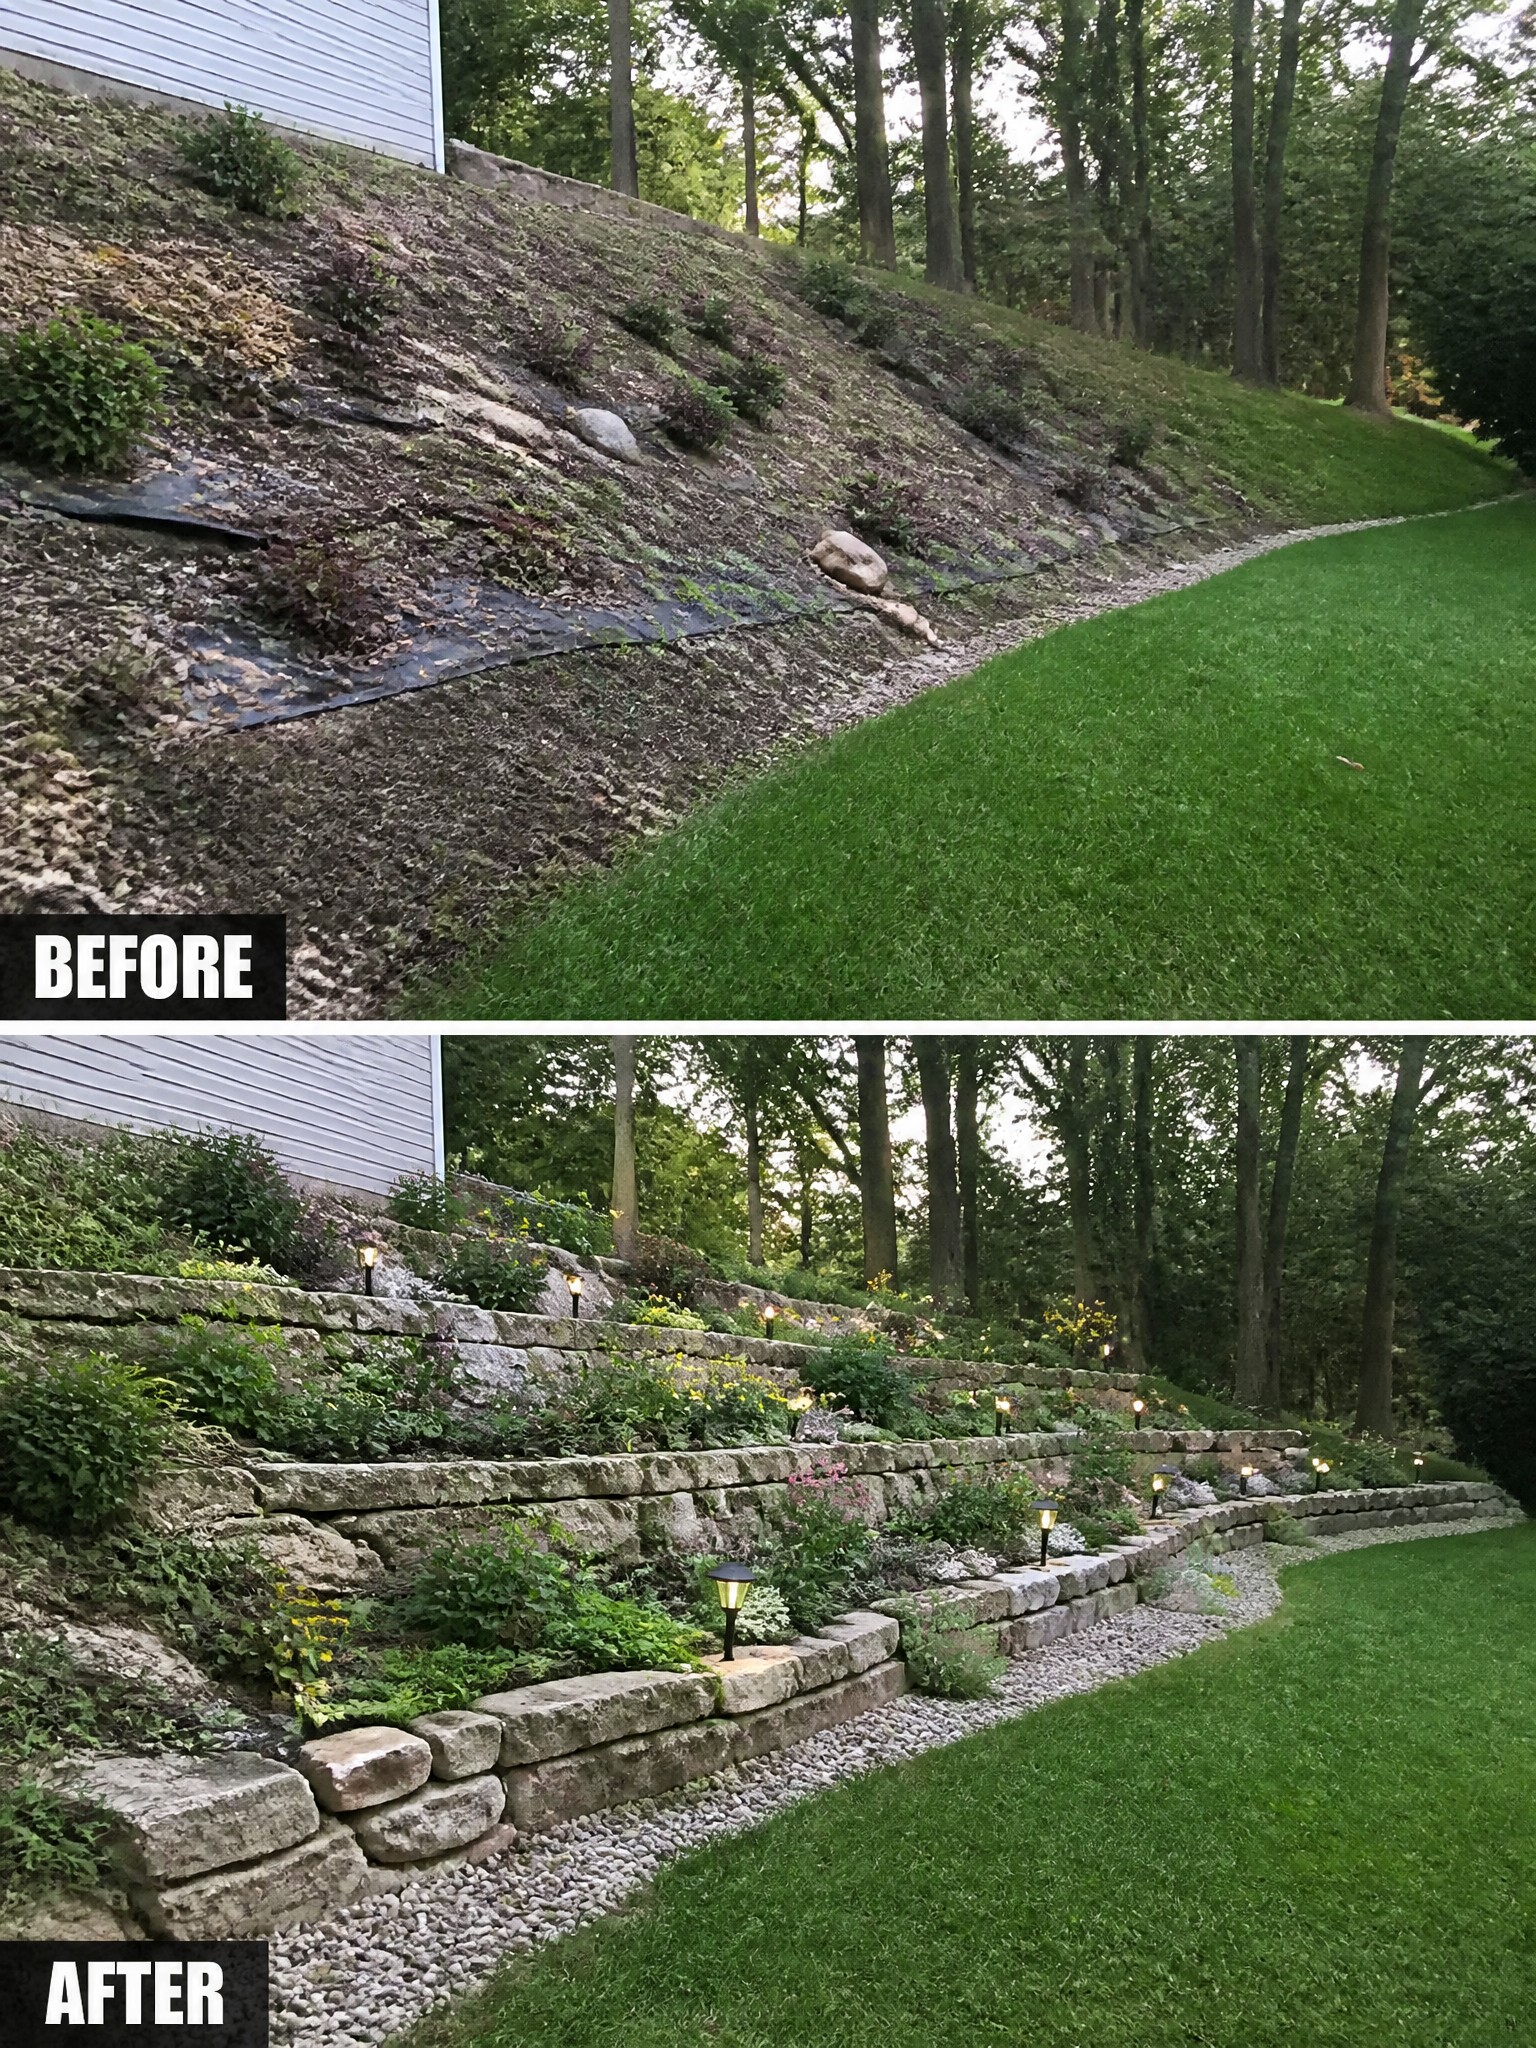
A steep hillside covered in weeds and erosion fabric is hard to plant and harder to maintain. Adding low stone retaining walls turns the slope into a series of flat beds that hold soil and make the space feel intentional instead of neglected.
This idea works best on yards where the grade is too steep for simple planting. Build the lowest wall first, backfill behind it, then repeat the step up the hill. Keep the beds narrow so you can reach the back without climbing, and add gravel at the base for drainage and a clean edge.
Repeat Plants To Give Beds A Planned Look

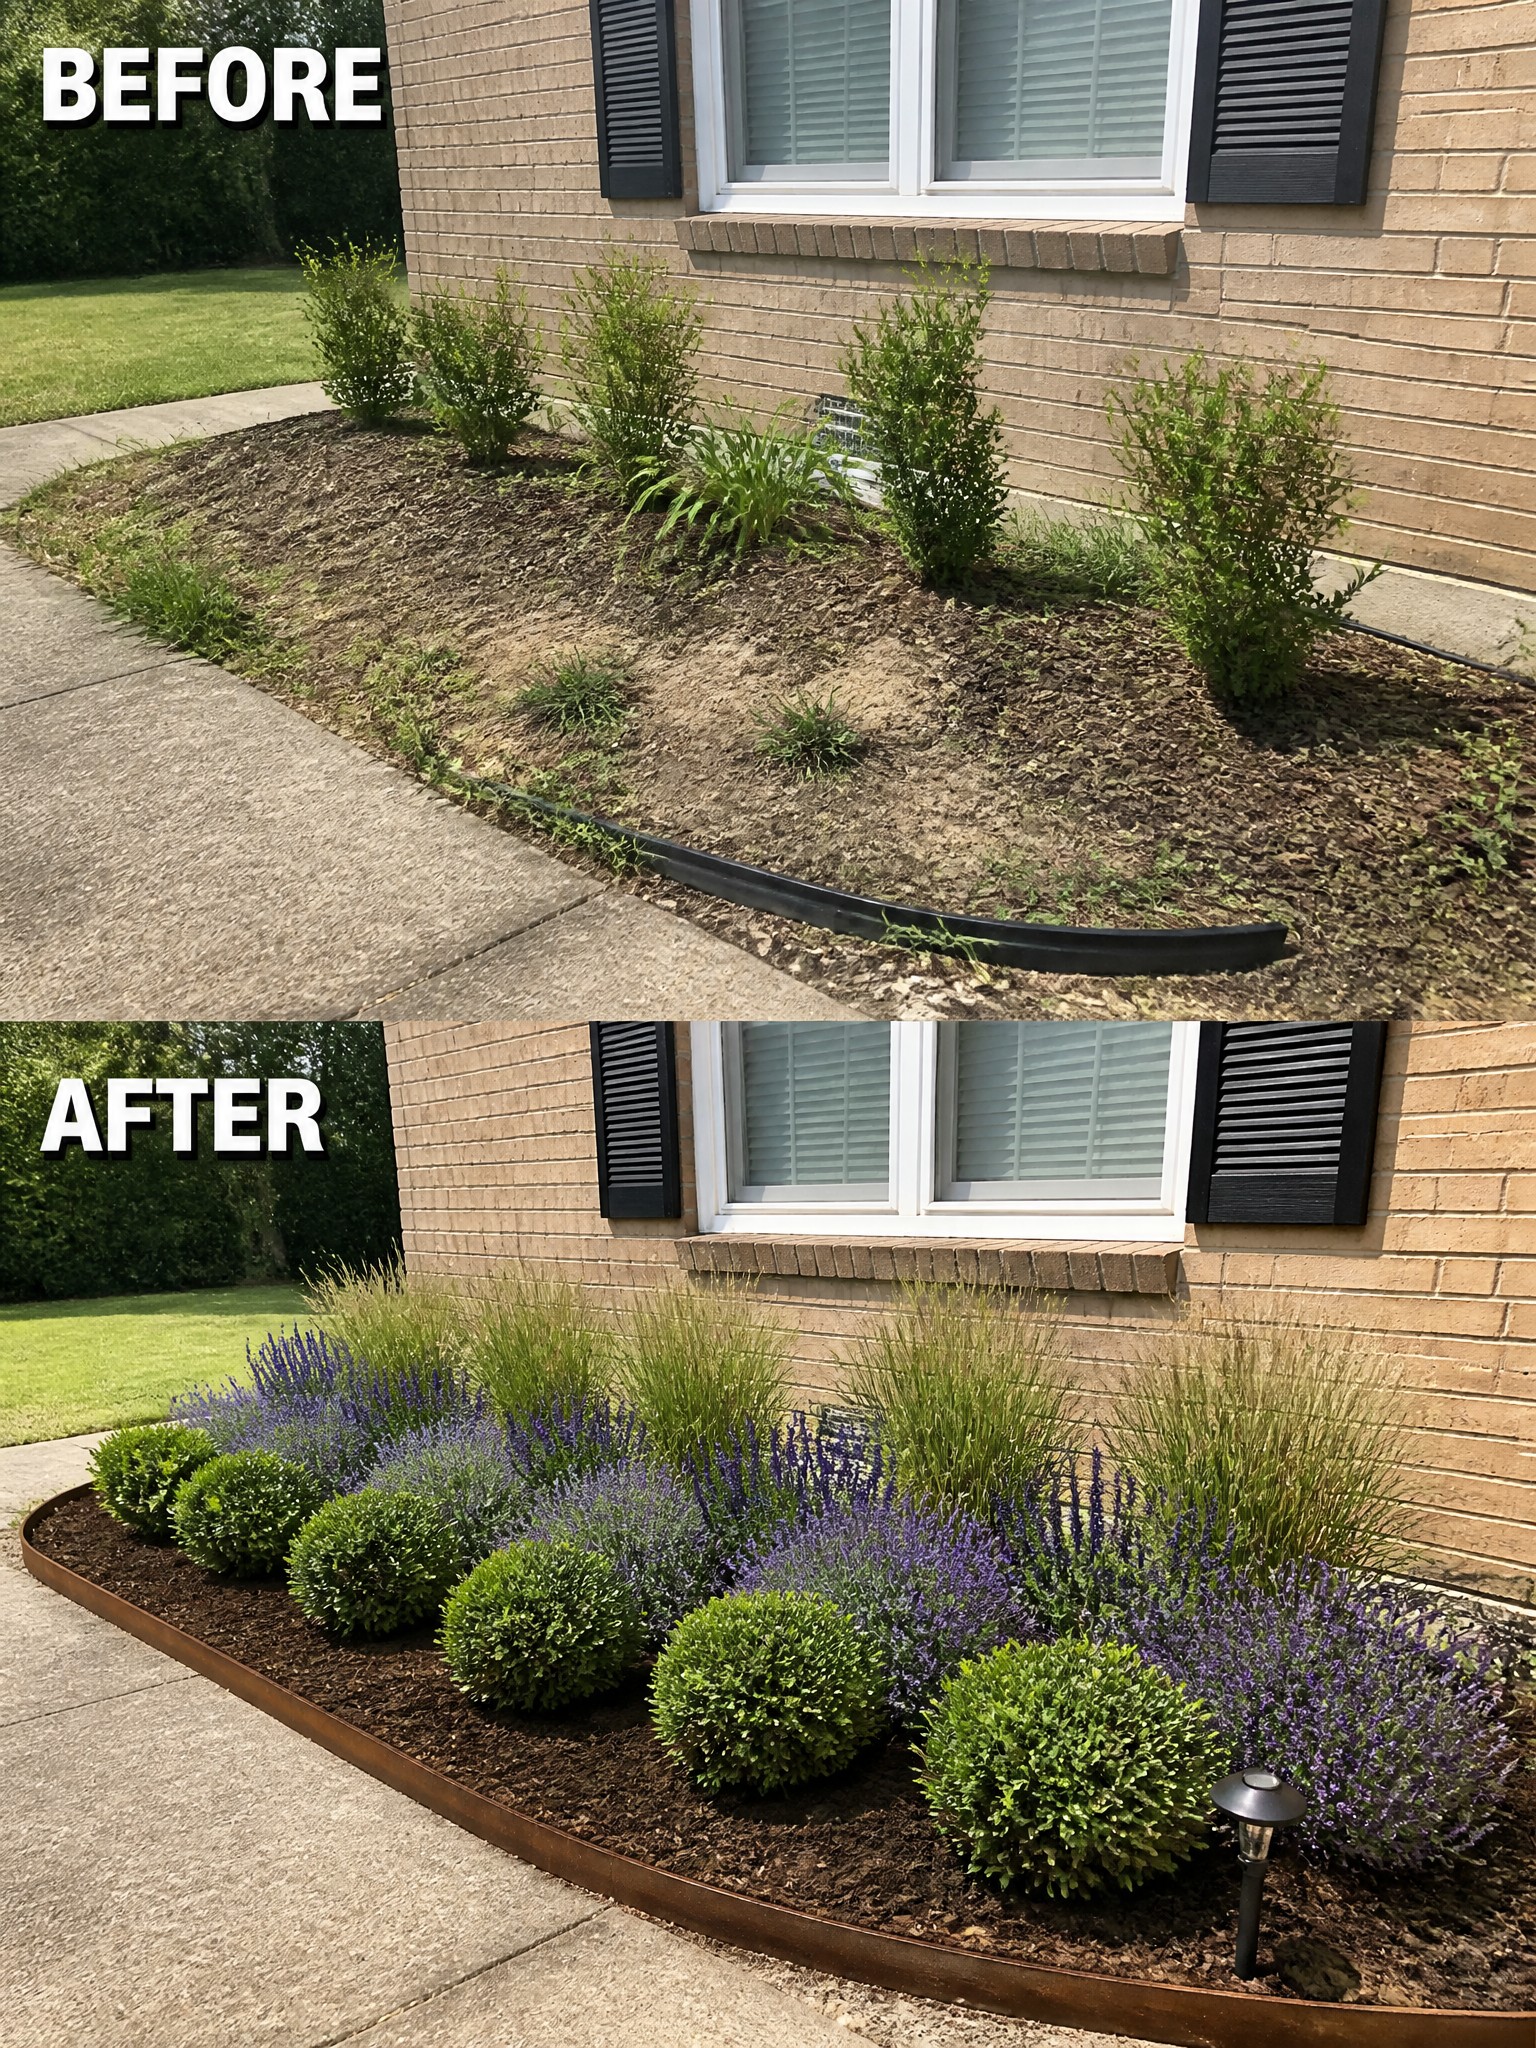
One simple way to make a garden bed feel intentional is to repeat the same plants in a steady pattern. The before photo shows a mix of shrubs in different sizes and conditions along the house. The after version lines up rounded shrubs, tall grasses, and groups of flowers so the bed reads as one clear design.
This works best along foundations or walkways where you want order without crowding the space. Pick two or three plants that match your conditions, then space them evenly and let them fill in over a season or two. The repetition does most of the work.
Create Defined Garden Beds In Empty Corners
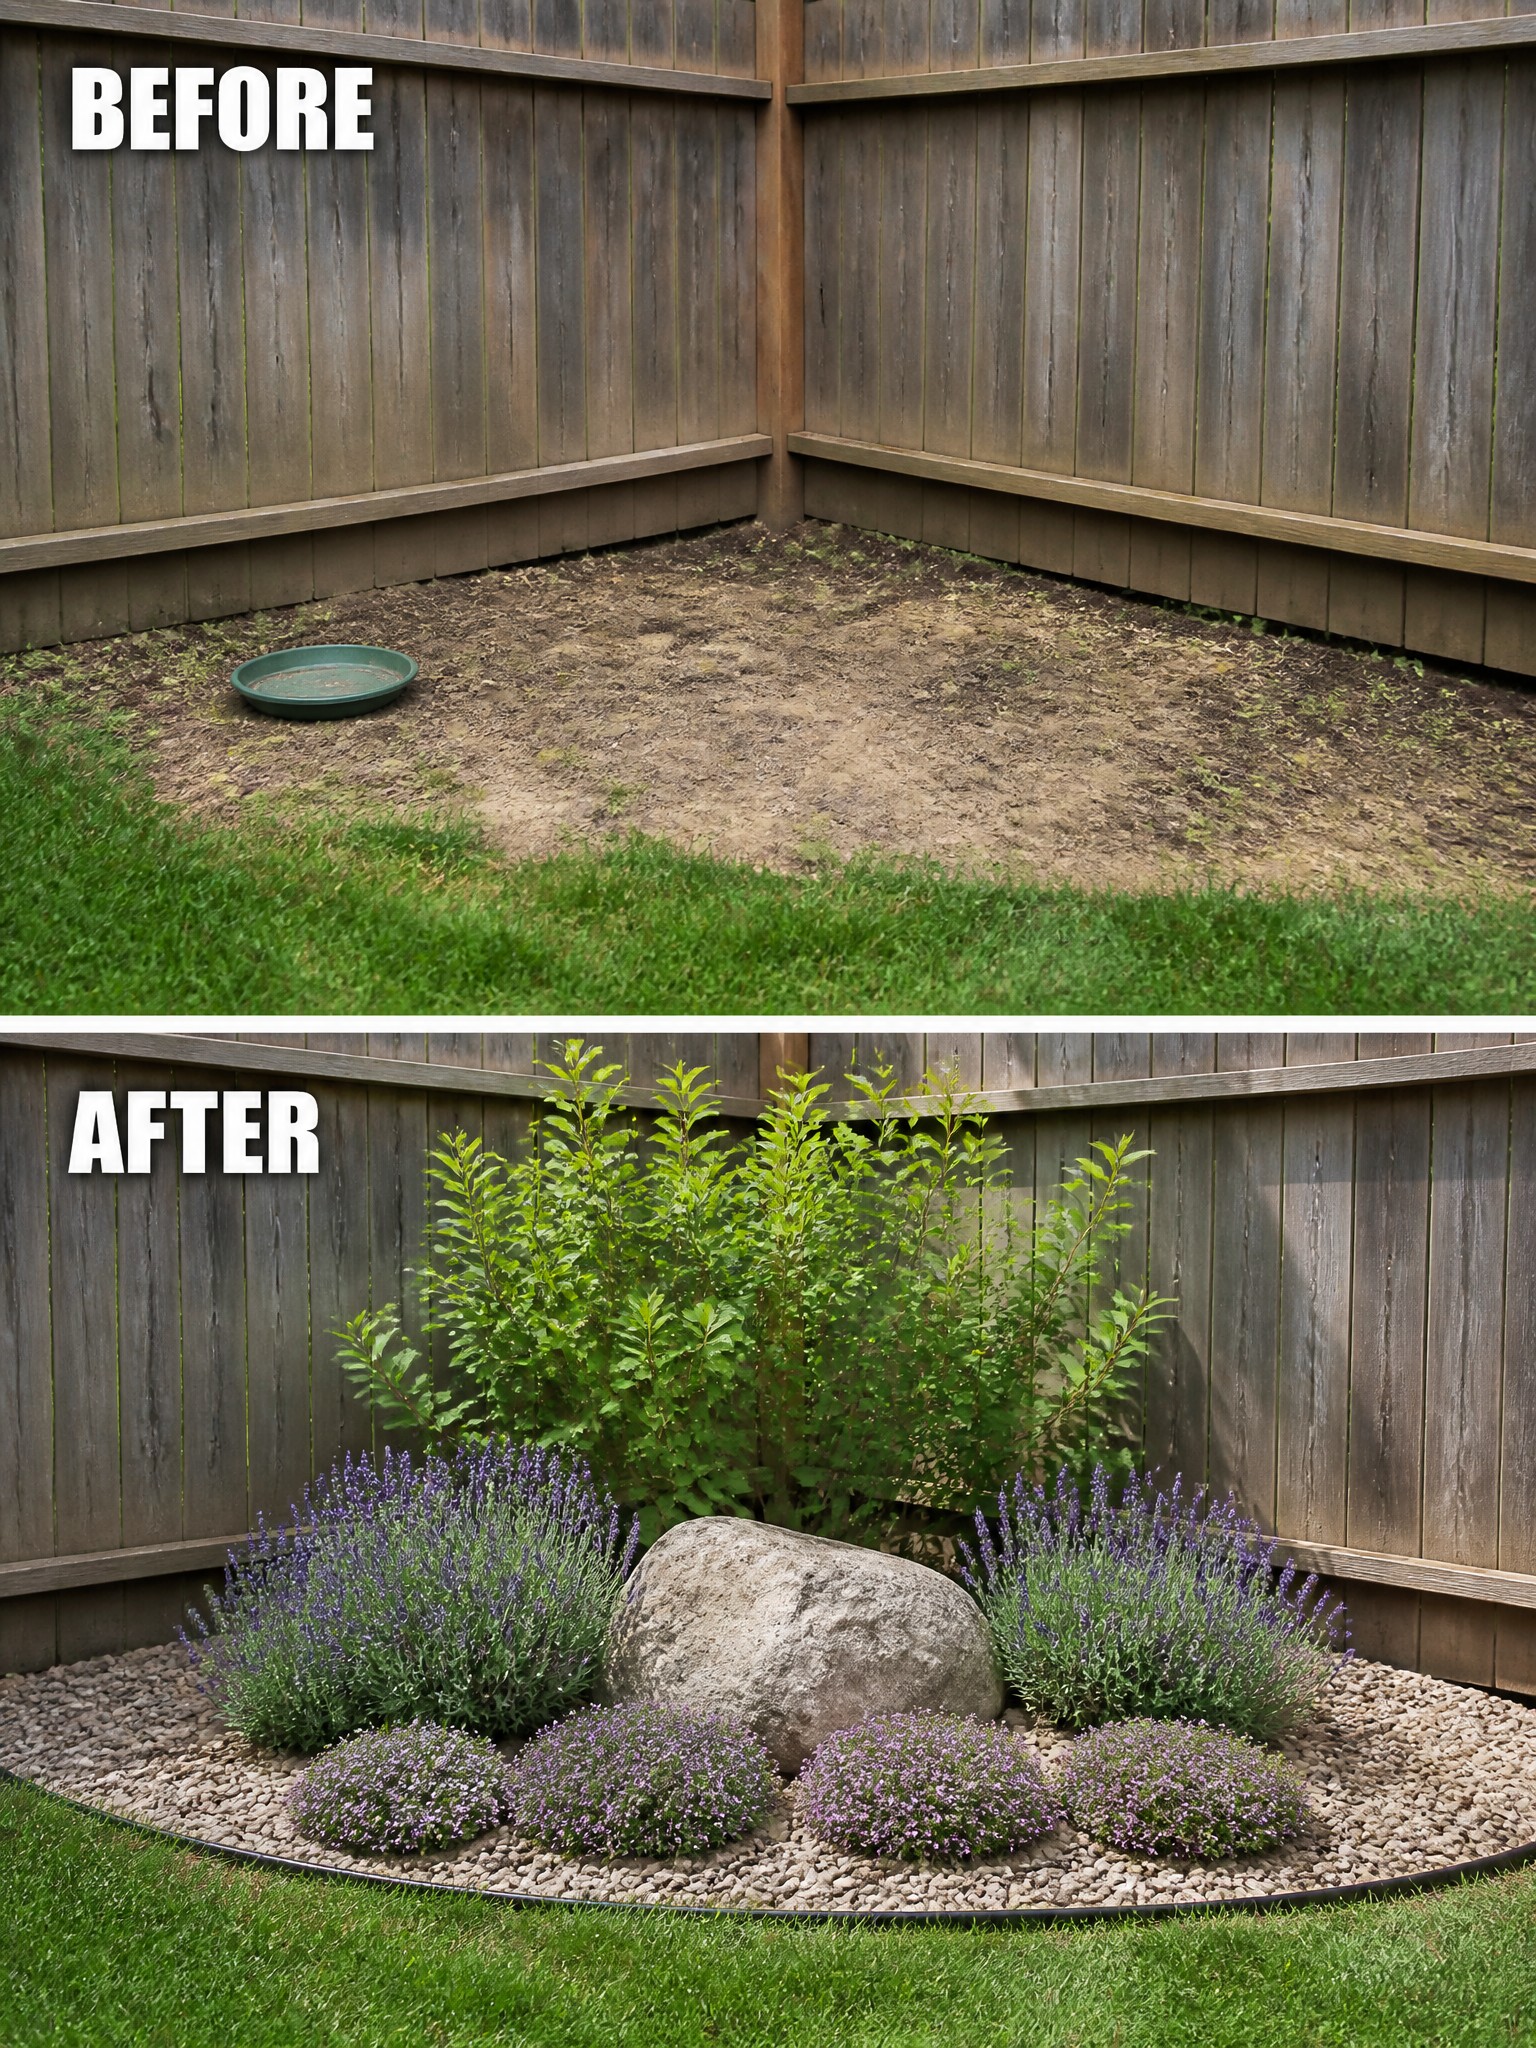
A bare dirt corner like the one in the before photo often feels like wasted space. Adding a curved edge, gravel, and a mix of low and taller plants turns it into a clear garden bed that looks intentional instead of leftover.
This approach works well along fences or in tight backyard spots where you want planting without a full redesign. Start with the edging and gravel to set the shape, then add a few larger plants and fillers that can handle the conditions. Keep the bed a manageable size so it stays easy to maintain.
Add Structure To An Overgrown Garden Bed

The biggest shift in this space came from clearing the weeds and scattered pots, then laying gravel to create a clear planting area. Once the bed had edges and a clean base, the plants could be grouped instead of left to spread randomly.
This idea works best along the side of a house or deck where space is narrow. Start with simple edging, repeat a few plant types, and keep larger elements like rocks to a minimum so the bed stays easy to maintain.
Layer Plants To Make Foundation Beds Feel Planned
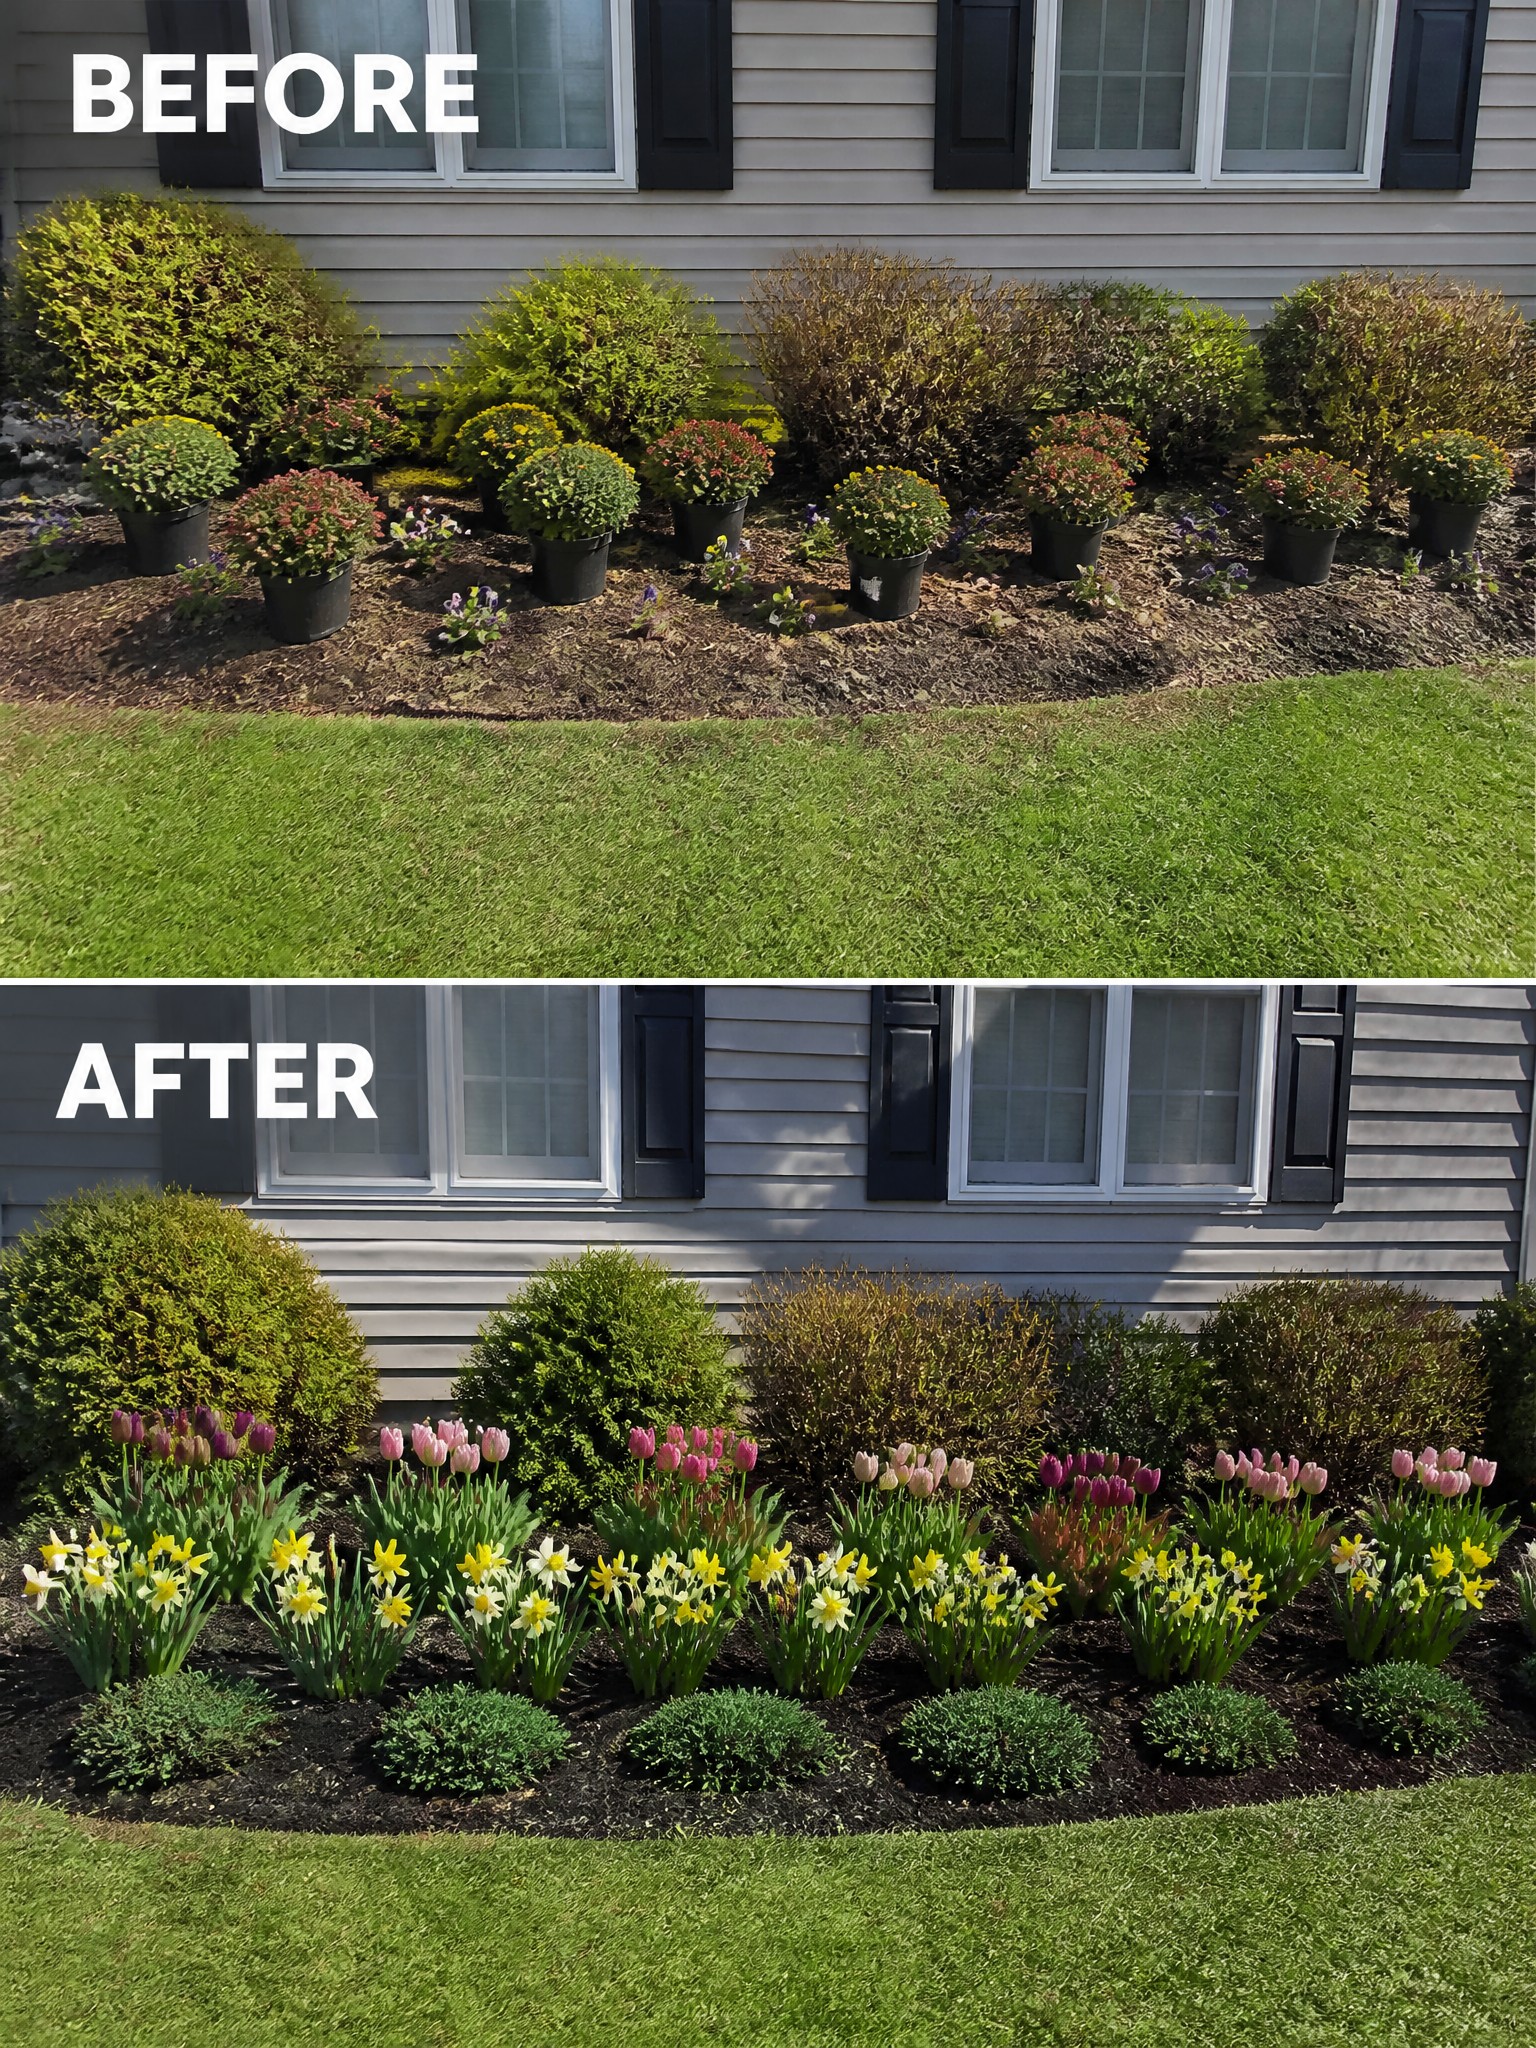
The main change here is moving from a scattered mix of pots and uneven shrubs to a single, defined bed with clear rows of plants. Shrubs stay in the back, mid-height flowers fill the middle, and low edging plants run along the front. This simple layering turns a loose collection of plants into something that looks intentional rather than thrown together.
The same approach works well along any house foundation. Start by clearing out pots and overgrown spots, then plant in three rough heights so the bed has a front, middle, and back. It keeps the area neat, makes maintenance easier, and gives the whole front a more finished look without needing a full redesign.
Layer Shrubs And Flowers To Give A Border A Planned Look

The main change here is moving from a loose strip of dirt and scattered bushes along the fence to a clear garden bed with plants arranged in layers. Taller shrubs sit at the back, mid-height flowering plants fill the middle, and low grasses edge the front. This simple ordering makes the whole length feel intentional instead of accidental.
The same approach works well along any long fence or house wall where the space feels flat. Start by clearing weeds and defining the bed edge, then place the tallest plants first and work forward with shorter ones. It keeps the border from looking random and gives you a clean line that is easy to maintain.
Define Garden Beds With Simple Edging
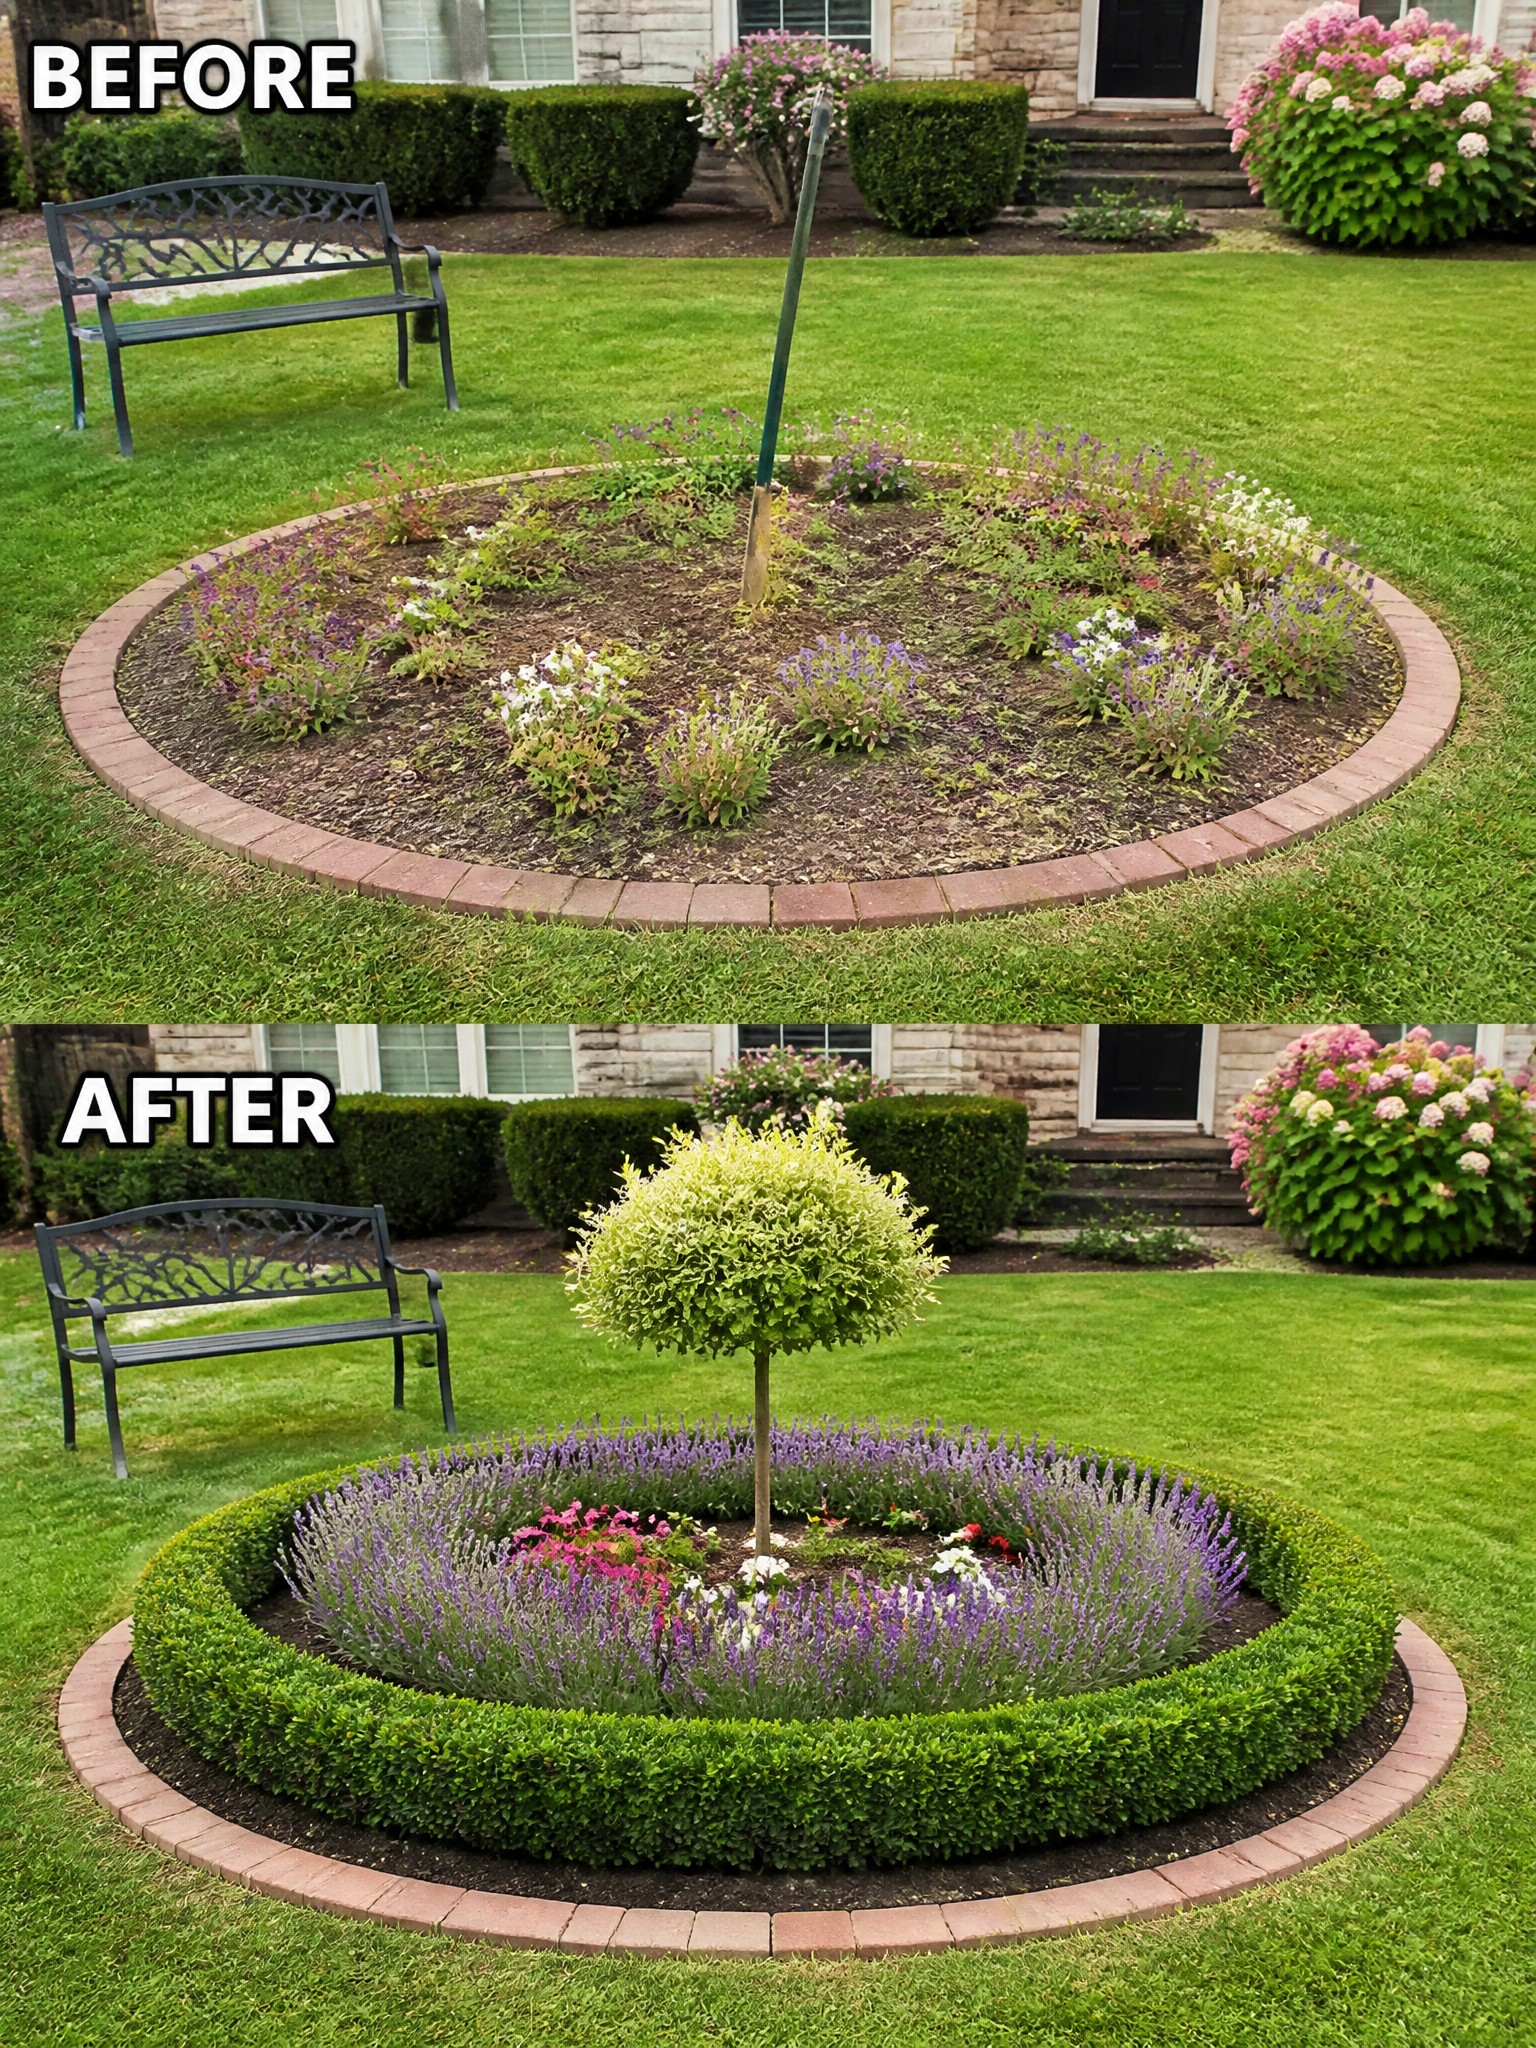
A circular bed can look scattered when the plants are uneven and the edges are soft. Adding a low boxwood hedge right along the brick border gives the whole area a clear shape and makes the flowers inside feel more intentional.
This approach works well in any yard where beds sit out in the lawn. Start with the edging or hedge first, then fill the center with a mix of taller and lower plants. The result feels planned without needing a lot of extra features.
Add Structure To An Overgrown Garden
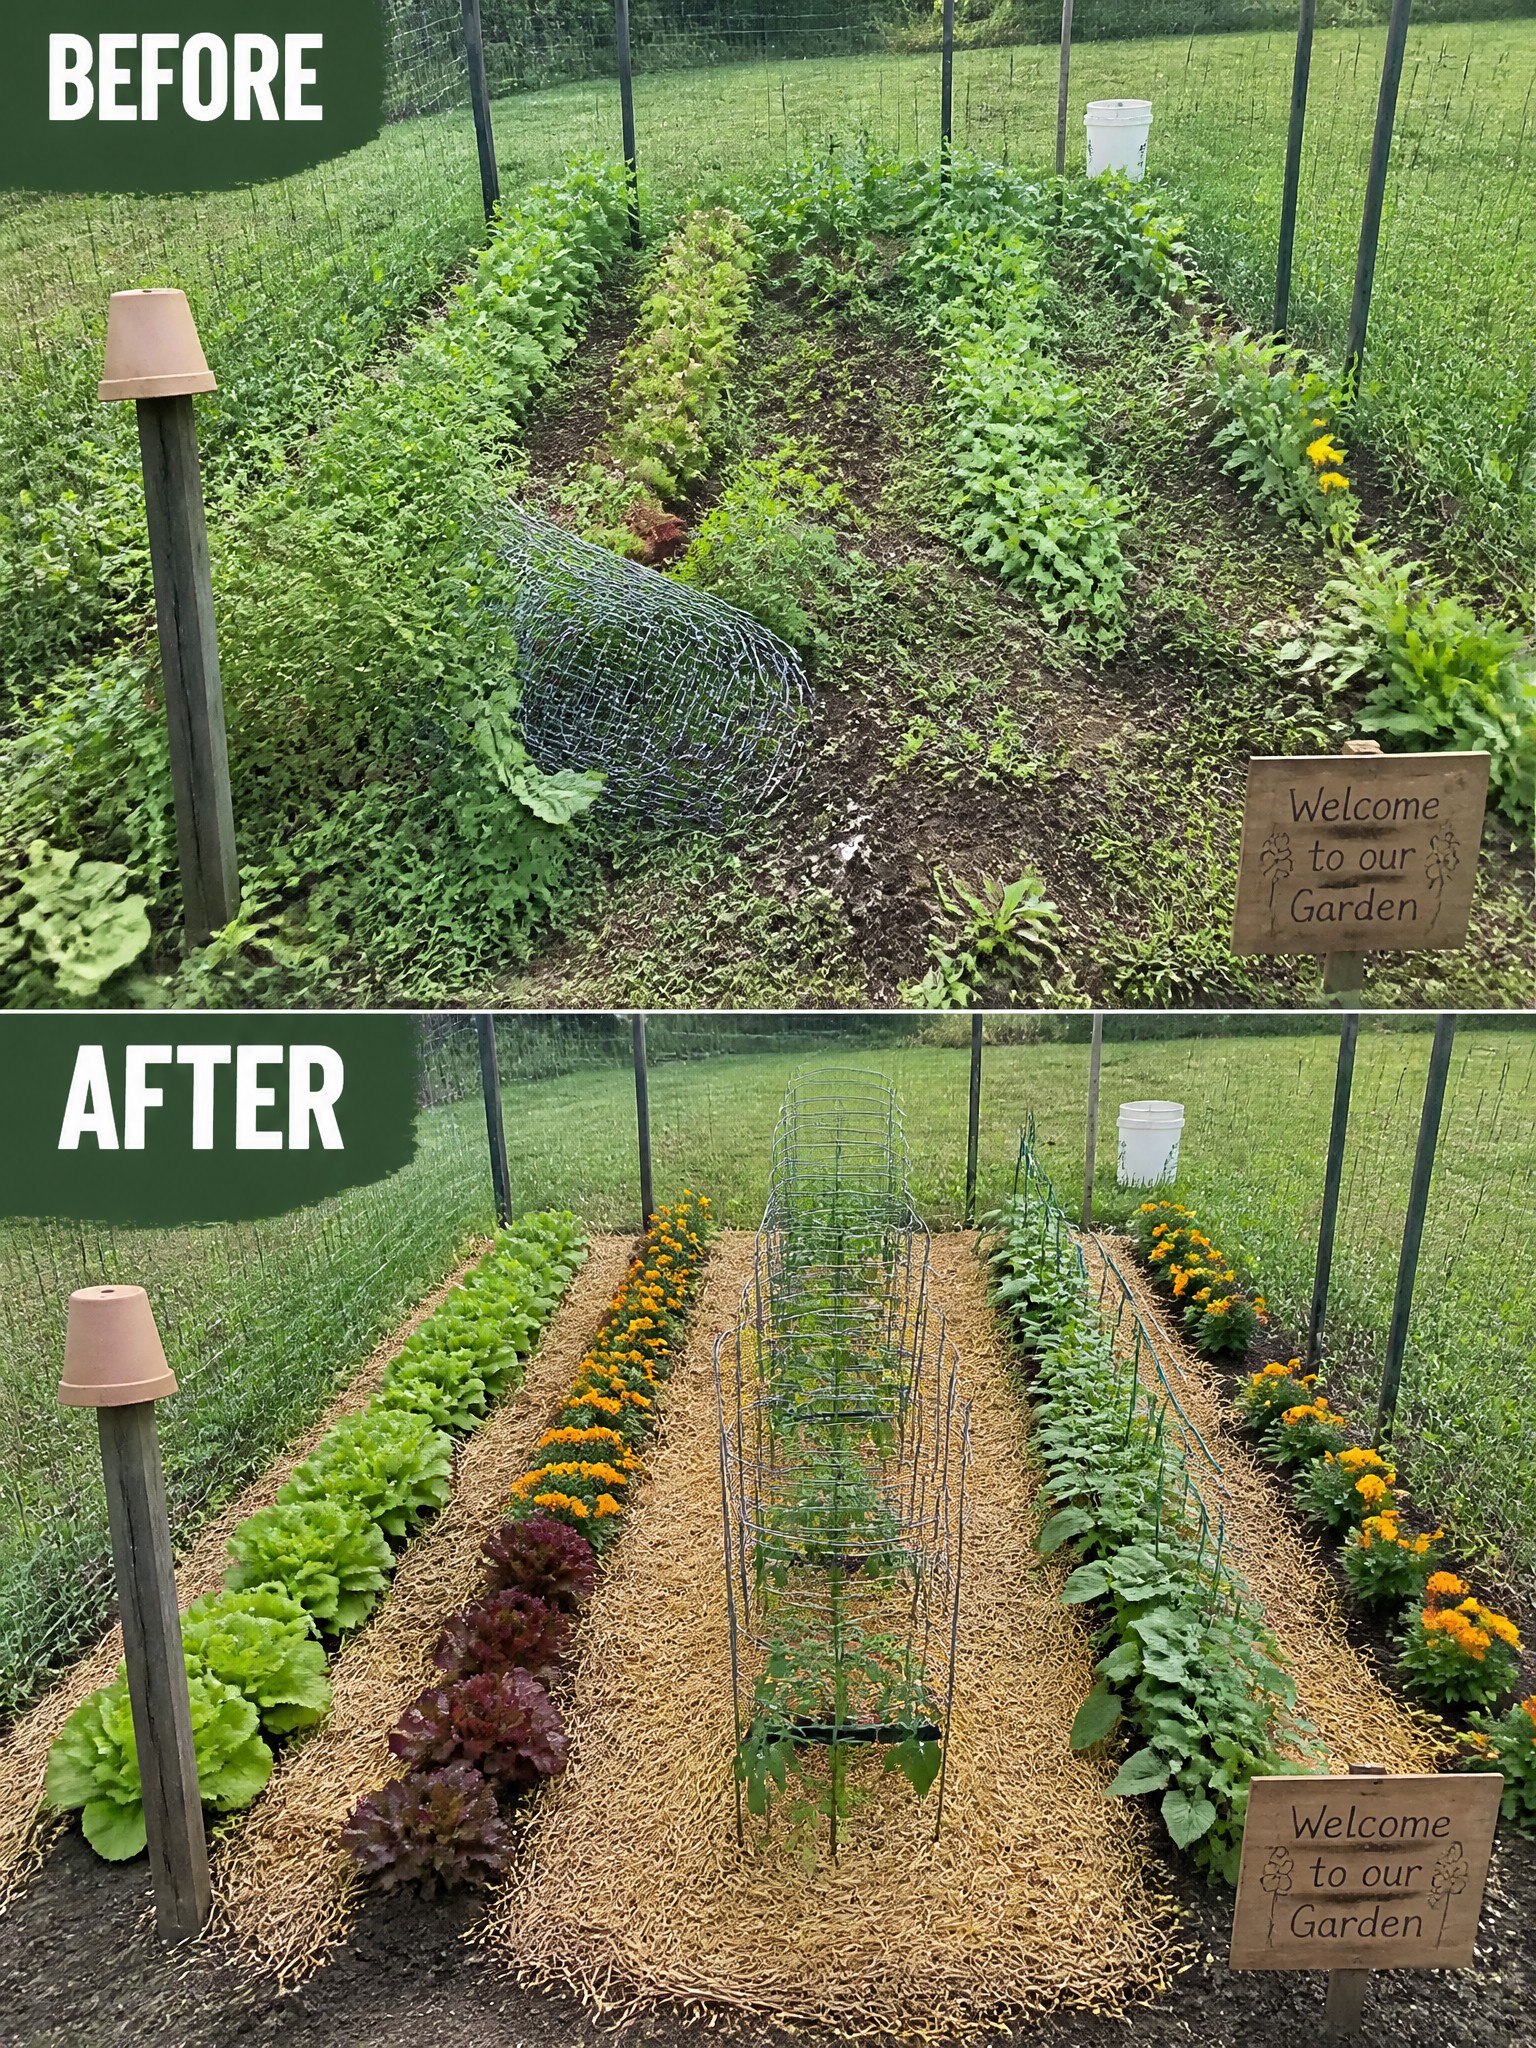
One of the easiest ways to make garden beds feel planned is to clear the overgrowth first and then add simple structure. The before photo shows a scattered mix of weeds and random plants with no clear layout. The after version uses straight rows, mulch, and basic supports to turn the same space into something that looks intentional and easy to maintain.
This idea works best in small to medium yards where the planting has gotten away from you. Start by removing the worst of the weeds, then lay mulch to define the beds and keep grass from creeping in. Group plants in rows or blocks rather than scattering them, and add simple cages or stakes where taller crops need support. The result feels organized without requiring expensive materials.
Define Bare Areas With Garden Bed Edging
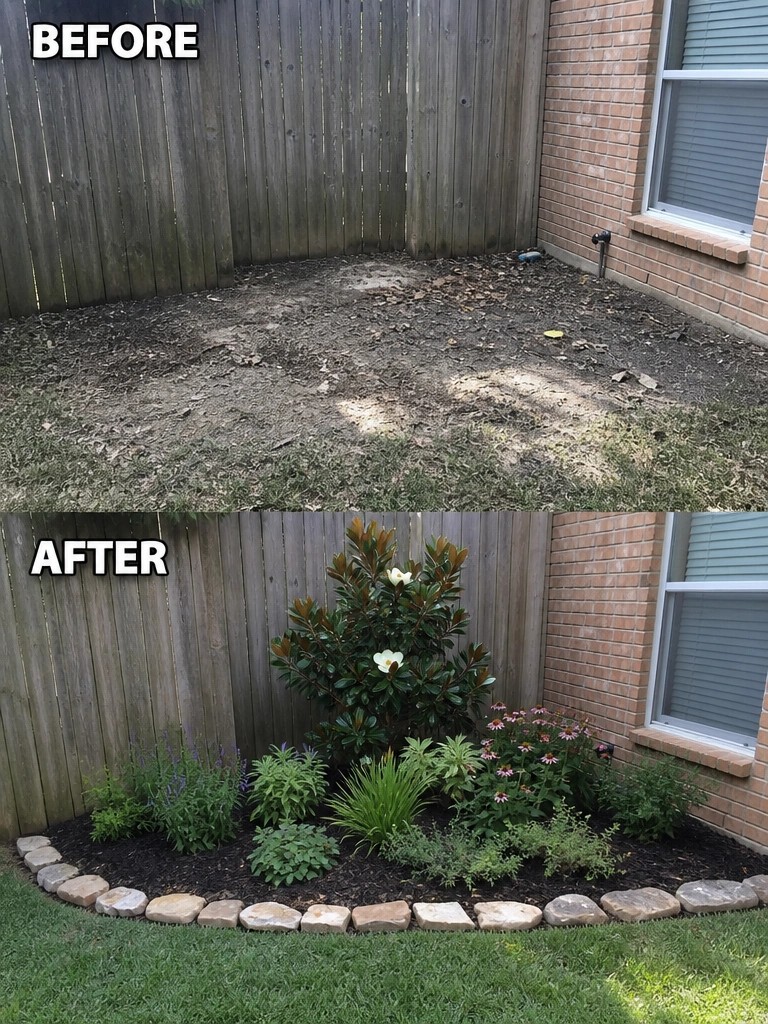
A bare patch of dirt next to the house often looks unfinished and hard to maintain. Adding a simple stone edge and filling the bed with mulch creates a clear boundary that makes the whole space feel more intentional. The plants then have a place to belong instead of looking scattered.
This approach works well along fences or house walls where the ground meets the lawn. Start with the edging to set the shape, then add a layer of mulch before planting. It keeps weeds down and gives you a clean line to follow when you add more plants later.
Add Defined Garden Beds To Make A Lawn Feel Planned
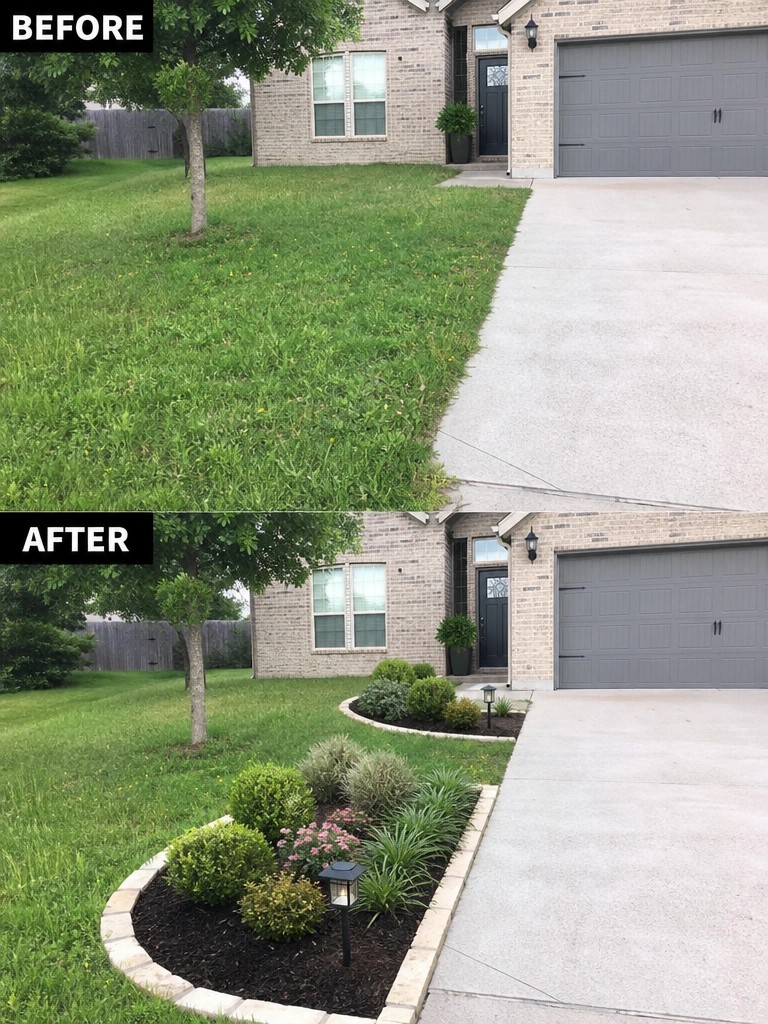
The main change here is simple. Instead of letting the grass run straight up to the driveway, a curved bed was added with clean edging and mulch. This one move gives the front of the house a clear planting area and stops the yard from looking like an afterthought.
This idea works well on homes where the lawn feels too open or flat near the entry. Mark out a gentle curve first, then install edging and mulch before adding shrubs and a few flowering plants. Keep the bed a reasonable width so it does not crowd the walkway or driveway.
Create A Defined Border Along The Patio
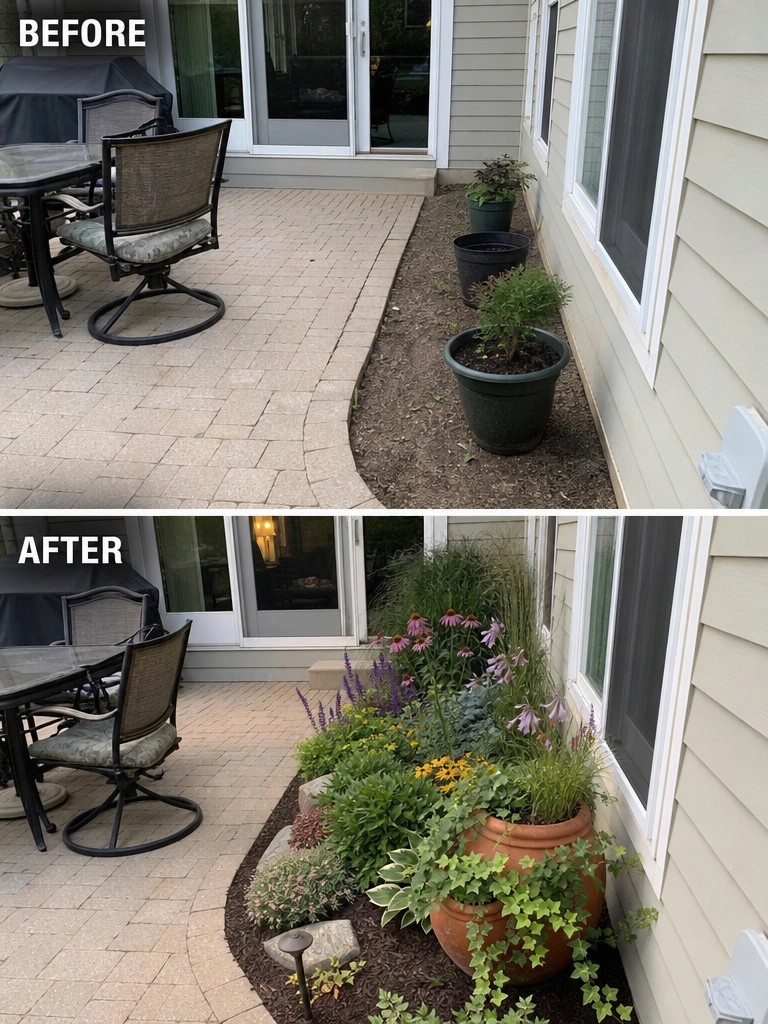
A narrow strip of dirt next to a patio often looks unfinished when it only holds a few random pots. The change here comes from carving out a clear bed shape, adding mulch, and filling it with layered plants plus one larger pot as the anchor. That single move makes the whole side of the house feel intentional instead of leftover space.
This approach works well on any patio or deck that runs along the house. Start by outlining the bed with a gentle curve, then add a few inches of mulch to keep weeds down and give the plants a finished look. Keep the largest pot or plant near the center or end so the eye has somewhere to rest, and fill around it with lower plants that repeat a couple of colors.
Add Structure To An Overgrown Strip
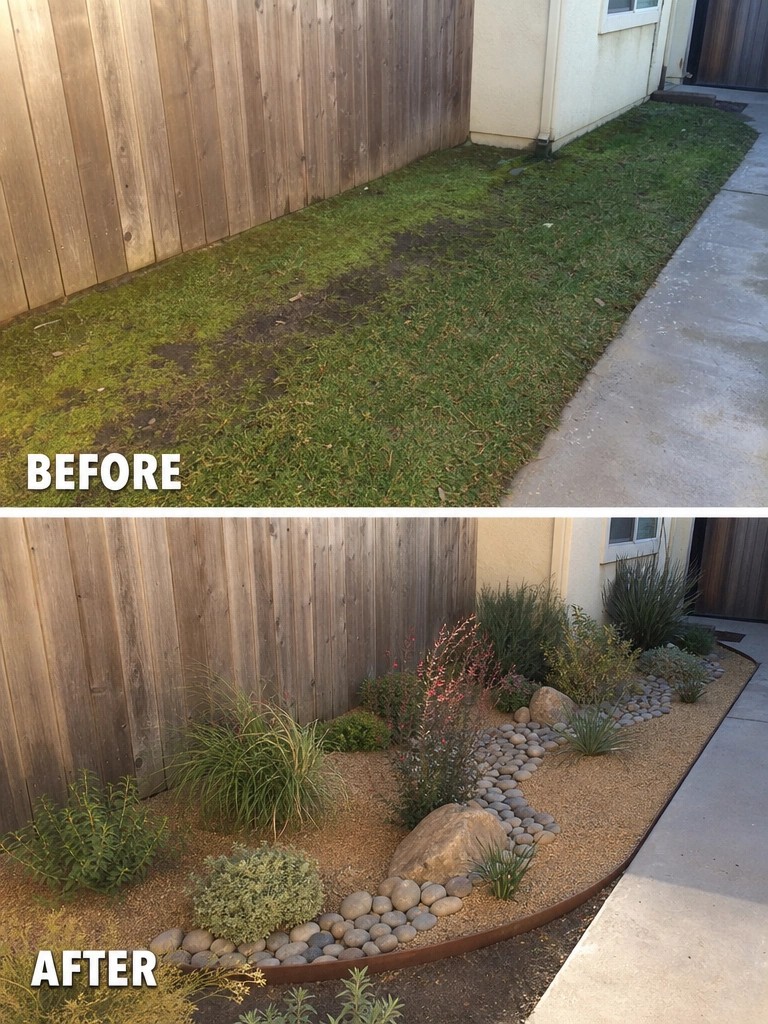
An overgrown strip of grass along a fence often looks messy because it has no clear edge or purpose. Adding a simple border with gravel and a few grouped plants turns the same space into something that feels intentional instead of neglected. The change comes mostly from the edging and the gravel layer, which stop the grass from creeping everywhere and give the plants a place to stand out.
This idea works well on narrow side yards or any thin area where lawn is hard to maintain. Start with a clean edge first, then choose one or two materials like gravel or mulch so the bed stays easy to care for. Keep the planting simple and repeat a few shapes rather than filling every inch.
Create Defined Garden Beds With Edging
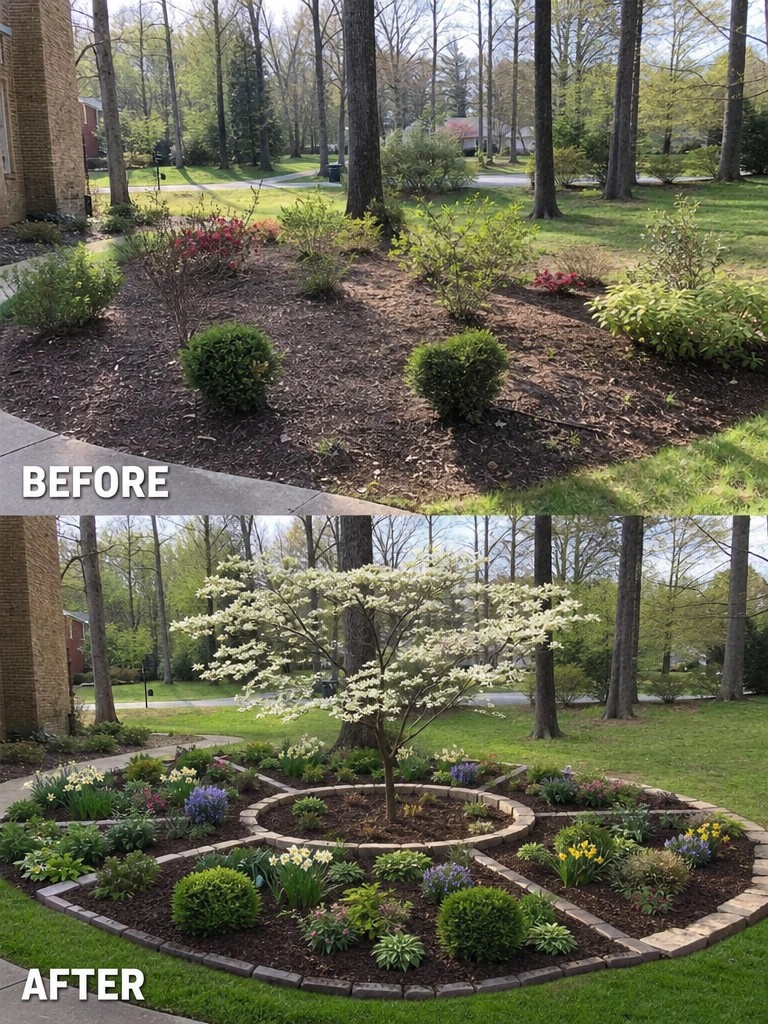
Adding a clear border turns a loose planting area into something that feels intentional. The stone edging here pulls the beds together around the central tree and gives the whole space a finished shape instead of scattered shrubs in mulch.
This idea works best in yards where open ground meets the lawn. Lay out the edging first so the beds stay balanced, then fill in plants. Keep the sections simple and repeat a few plant types so the layout stays easy to care for over time.
Define Garden Beds With Mulch And Simple Structure
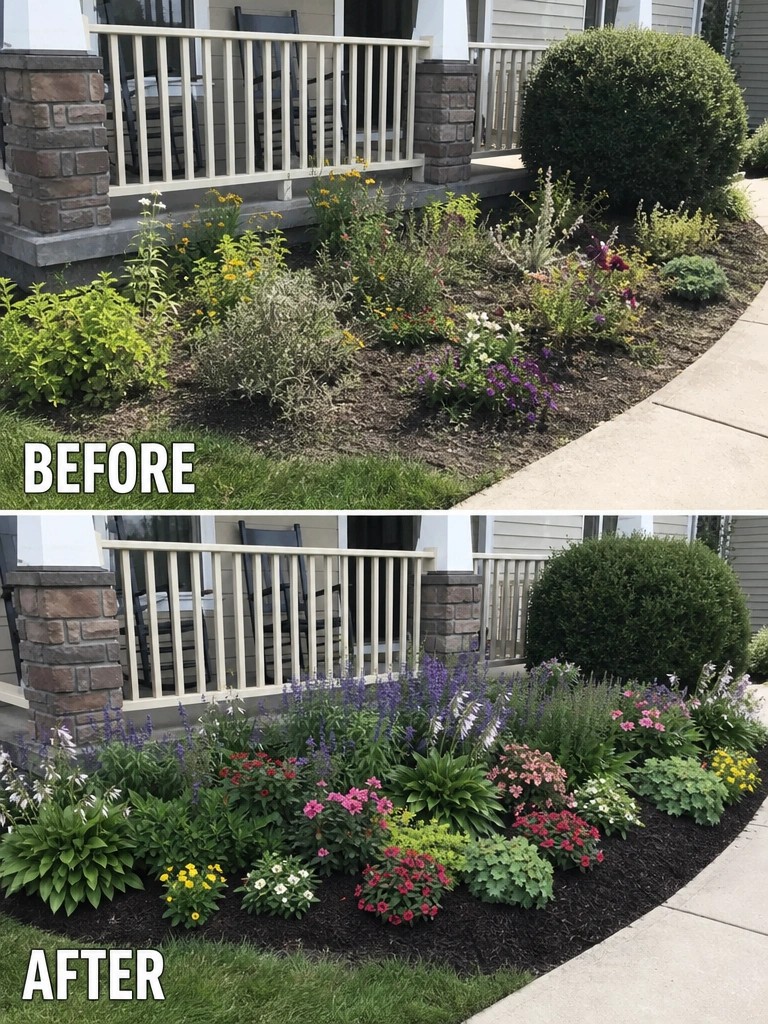
The main change here is how the messy strip of plants was turned into a clear garden bed. Removing the random growth and adding dark mulch gave the area a set border, which made the planting look intentional instead of scattered.
This approach works well along a front walk or porch where you want the beds to feel like part of the house rather than just leftover space. Start by clearing everything back to bare soil, then lay mulch thick enough to keep weeds down and show off the plants you actually want to keep. Stick to a few repeating varieties instead of mixing too many types, and keep the bed edge straight or gently curved so it stays easy to maintain.
Add A Path To Shape An Overgrown Slope
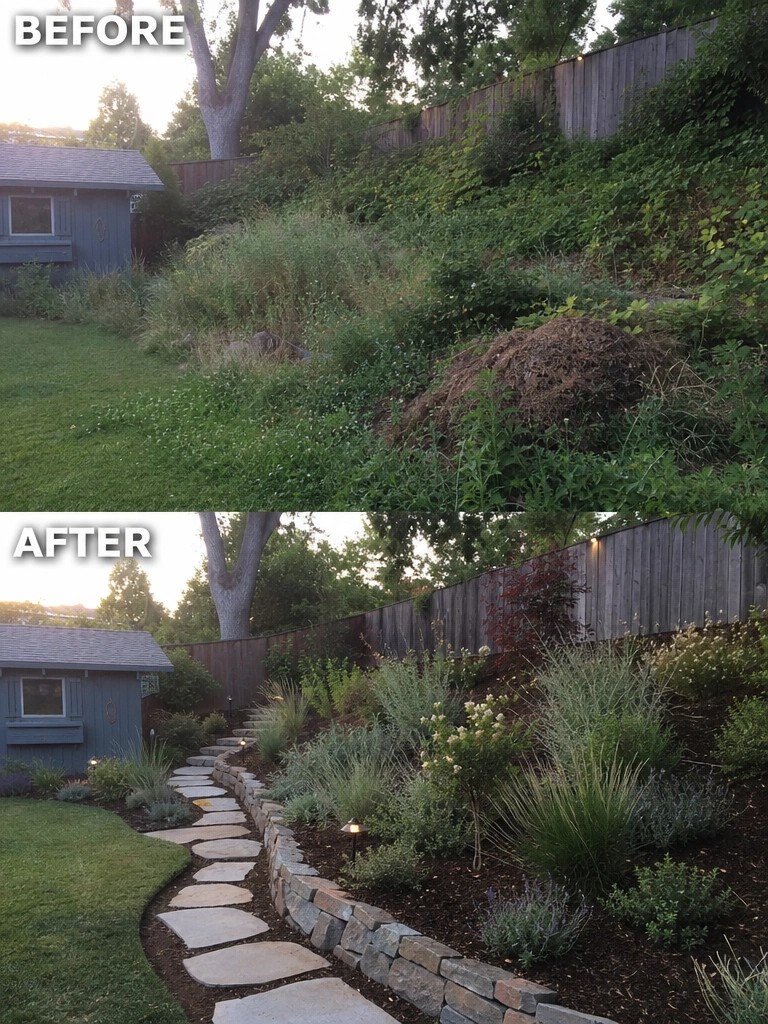
A steep, messy hillside often feels unusable until you give it a clear route through it. In this case the simple addition of a winding stone path with a low rock edge turned the slope from a tangle of weeds into something that feels intentional and easy to walk.
The same idea works on any sloped yard where the ground runs together without a focal line. Start with the path first, then plant along its edge. Keep the path width comfortable for two people and let the curve follow the natural grade instead of fighting it. Once the path is in, the rest of the planting has a place to belong.
Add Mulched Borders To Give Your Yard Clear Structure
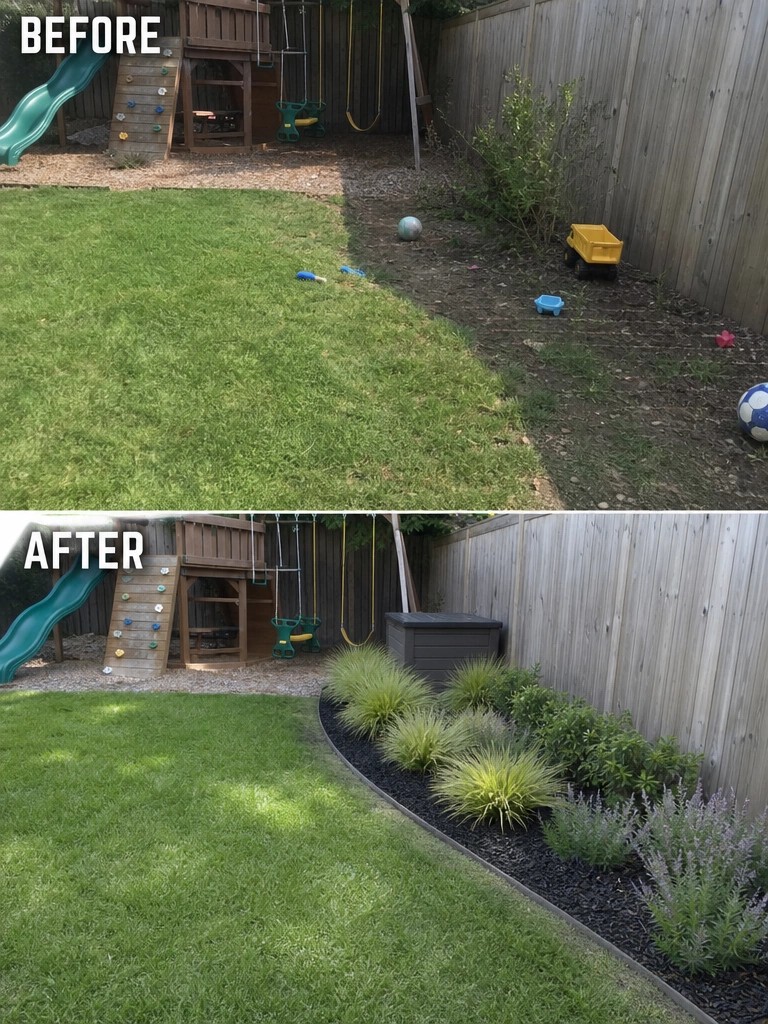
A messy strip of dirt and weeds next to the lawn makes the whole backyard feel unfinished. Adding a clean curved edge with mulch and a row of plants turns that area into a proper garden bed and keeps the grass looking tidy.
This approach works well in small yards where you want order without crowding the space. Start by marking a simple curve that follows the fence line, then lay down edging and mulch before choosing a few repeating plants that can handle the sun. The result feels intentional even when the rest of the yard stays simple.
Define A Narrow Bed With Edging And Stepping Stones
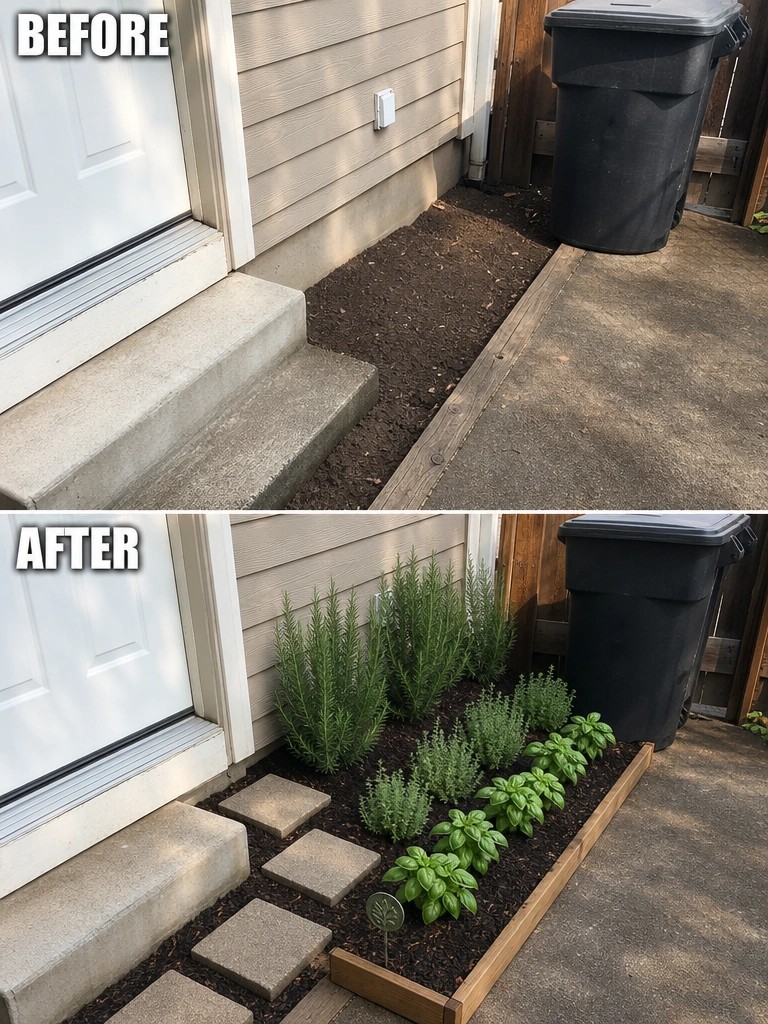
A bare strip of dirt next to the house tends to stay empty because it feels awkward to plant and hard to reach. Adding a low wood border and a line of stepping stones gives the area a clear shape and turns it into an actual bed that can be planted without looking scattered.
This works especially well along foundation walls or beside walkways where space is tight. Set the edging first to mark the limits, lay the stones for easy access, then fill in with plants that suit the light. The structure keeps the bed looking intentional even if you only grow a few herbs or small shrubs.
Define Garden Beds With Edging And Layered Planting

A messy mulch bed with random weeds and thin plants can make the whole front of a house look unfinished. Adding a clean stone edge and filling the bed with rounded shrubs plus a few colorful perennials turns the same space into something that feels intentional and easy to maintain.
This approach works well along a walkway or near the foundation where you want the planting to look settled rather than scattered. Start by cleaning out the old mulch and weeds, then set a simple border before choosing a mix of evergreen shapes and lower plants that fill in the gaps without crowding.
Define The Edge To Create A Planned Garden Bed

A narrow strip of dirt and scattered stones next to a fence usually looks like leftover space. Adding a clean border and filling the bed with mulch gives it shape right away, so the area starts to feel like an actual garden instead of an afterthought.
This idea works best in tight spots along fences or deck lines where the ground has no clear purpose. Keep the bed a consistent width, use simple edging, and plant in layers so everything stays easy to maintain.
Frequently Asked Questions
Q: How do I pick plants so the beds stop looking random?
A: Stick to two main colors and repeat them across the space. Layer taller plants behind shorter ones to build clear rows. This setup pulls everything together fast.
Q: What if I already have a mix of plants growing?
A: Shift a few taller ones toward the back edges. Fill gaps with matching lower growers to even out the heights. Small moves like that turn a jumble into something ordered.
Q: How do I keep the beds looking planned once summer hits?
A: Pull weeds weekly and trim anything that flops over the edges. Add one new plant per bed if spots open up. Steady tweaks like these hold the shape without extra fuss.
