

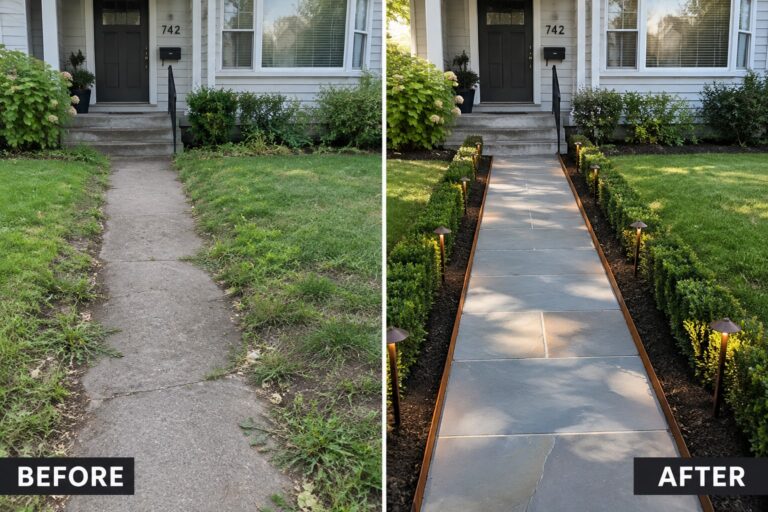
I’ve noticed that garden paths often lose their shape when grass creeps in or mulch spills over the sides after a few months.
A clean edge brings the whole line back into focus and makes the surrounding beds look more deliberate.
It makes a real difference.
Once the walkway feels defined I find myself using it more often instead of cutting across the lawn.
A couple of the edging methods here strike me as simple enough to test on the side path that runs past my vegetable beds.
Add Clean Edging To Frame A Walkway
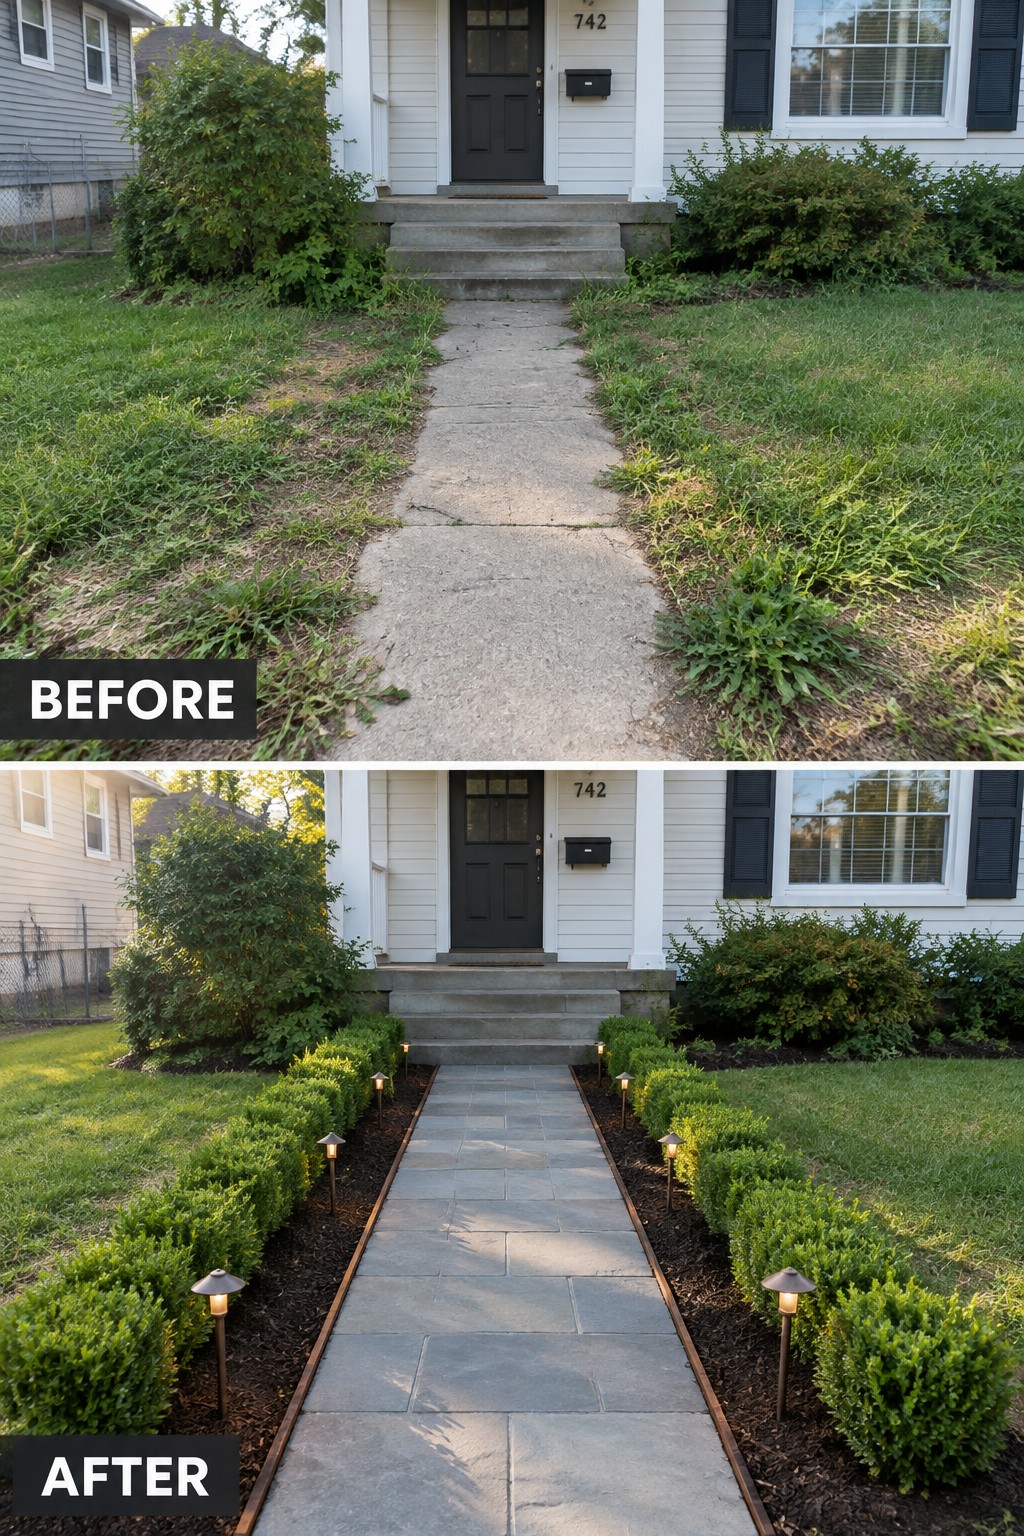
A cracked concrete path with ragged grass edges looks neglected even when the house itself is in good shape. Replacing the old path with pavers and adding straight, low hedges on both sides instantly gives the walkway a finished, intentional look. The simple border of dark mulch keeps everything neat and makes the path feel wider and more welcoming.
This approach works best on narrow front walks where the lawn creeps in from both sides. Start by cutting clean lines along the path, then add a low edging material and plant a row of compact shrubs. Keep the planting height low so the walkway stays the main feature rather than getting lost behind tall greenery.
Define A Narrow Side Path With Gravel And Edging

A narrow side yard often turns into a weedy mess because there is no clear surface or border to contain it. Switching from scattered stepping stones and bare dirt to a gravel path with brick edging gives the space a simple structure that stays neat over time. The gravel fills the walkway evenly and the bricks keep everything in place without constant trimming.
This idea works best in tight areas between a house and fence where you still need access but do not want high maintenance planting. Start by clearing the overgrowth completely, then install solid edging before adding gravel. A few low solar lights along the edge make the path safer at night without taking up extra room.
Add Clean Edging To Define A Front Walkway
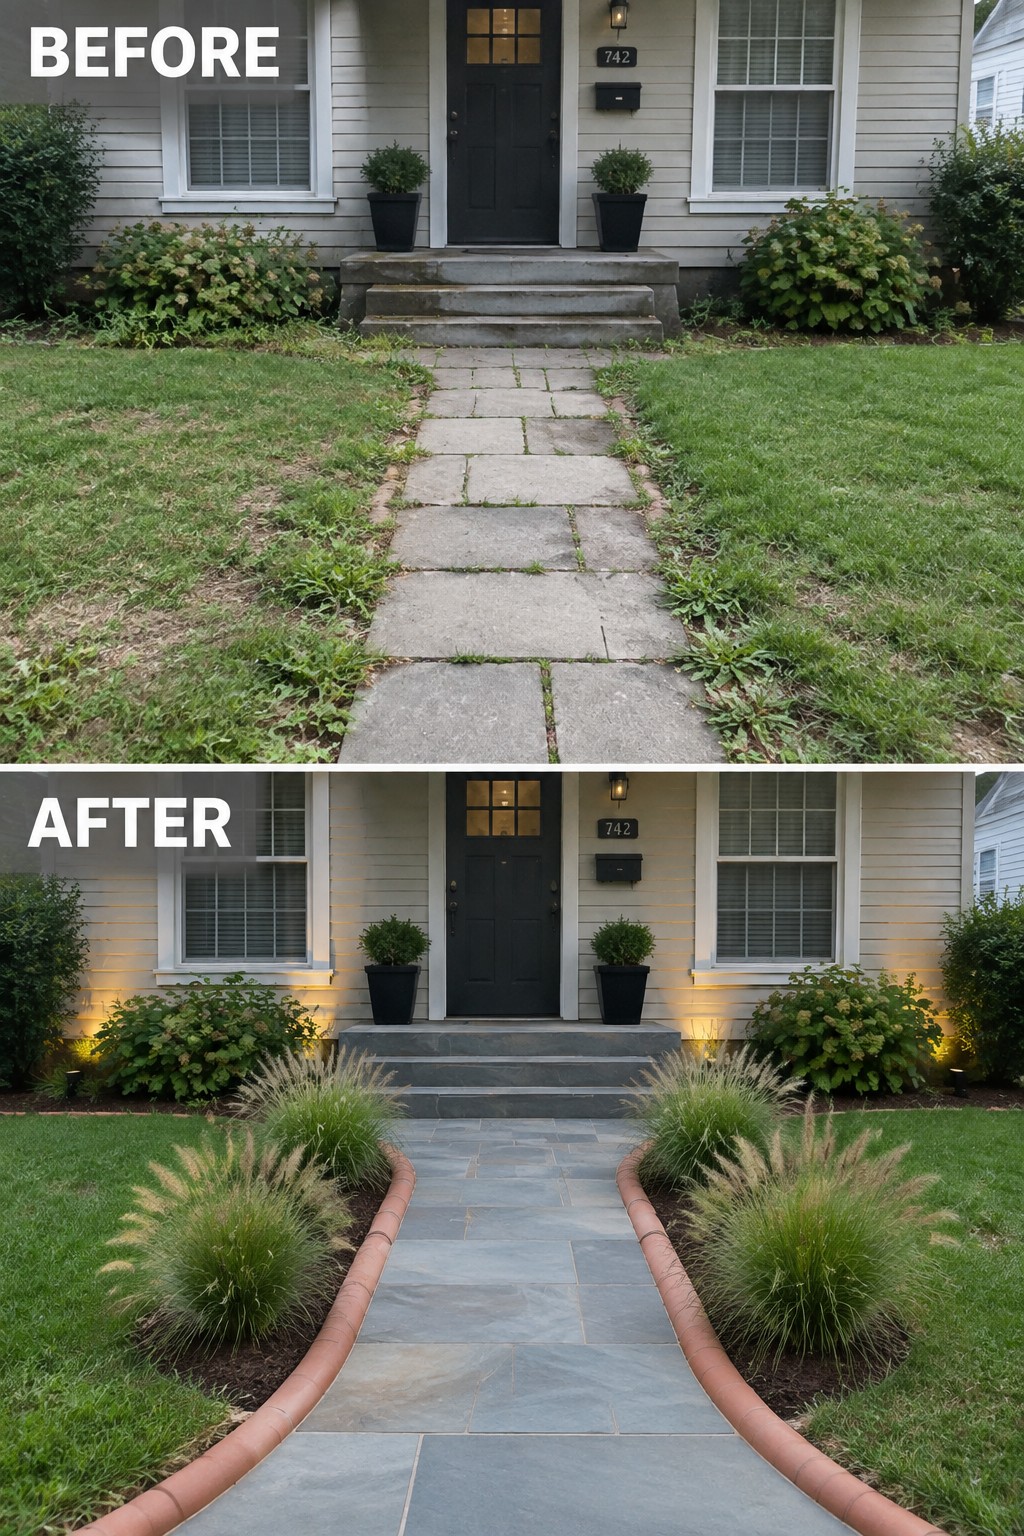
The main change here is the addition of a clear border on both sides of the path. Where grass once grew right up to the stones and made the walkway feel loose, a simple terracotta edge now holds the line and creates two narrow planting beds. The new border makes the walk feel like it belongs to the house instead of just cutting through the lawn.
This idea works on any front path that has lost its shape. Lay the edging first so it follows the natural curve, then fill the beds with a few repeating plants that stay low and tidy. It keeps the focus on the entry while giving you a place to add seasonal interest without crowding the walkway.
Add Defined Borders To A Front Walkway
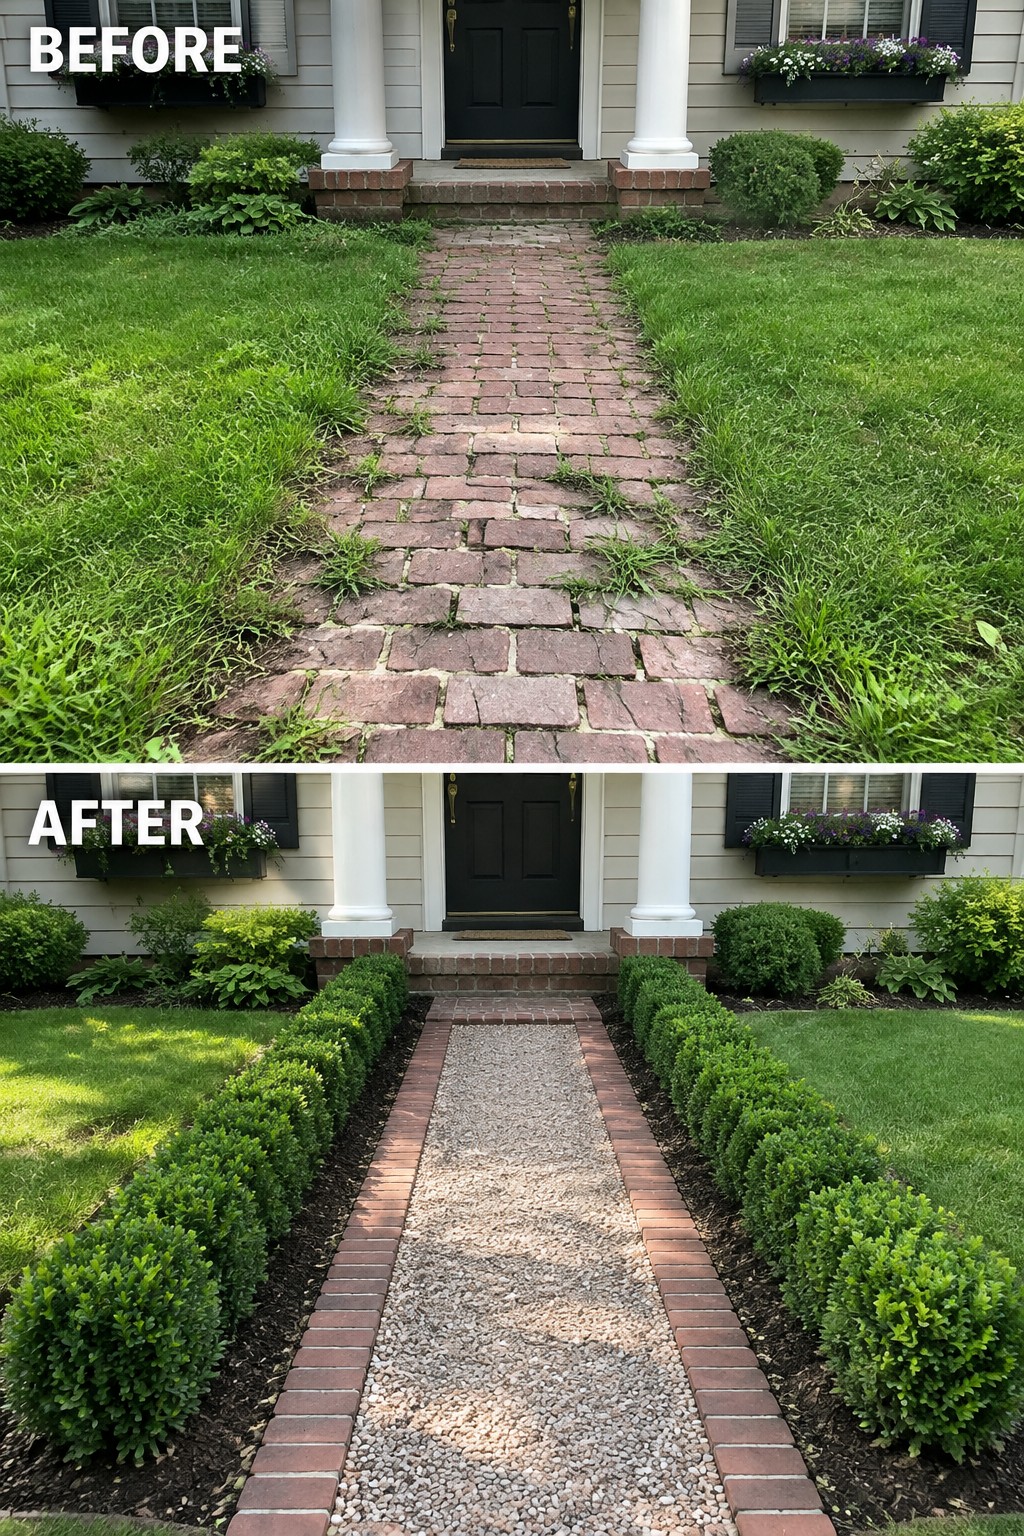
The main change here is how the path went from being swallowed by grass to having a clear shape. Once the edges were cut back and low hedges were planted along both sides, the walkway suddenly looked intentional instead of forgotten. The switch to gravel in the center also helped keep the surface tidy and easy to maintain.
This approach works well on any front path that feels lost in the lawn. Start by cutting clean edges and adding a simple border plant that stays low. The rest of the yard can stay simple as long as the walkway itself has that one strong line to follow.
Use Pavers To Create A Clear Walkway
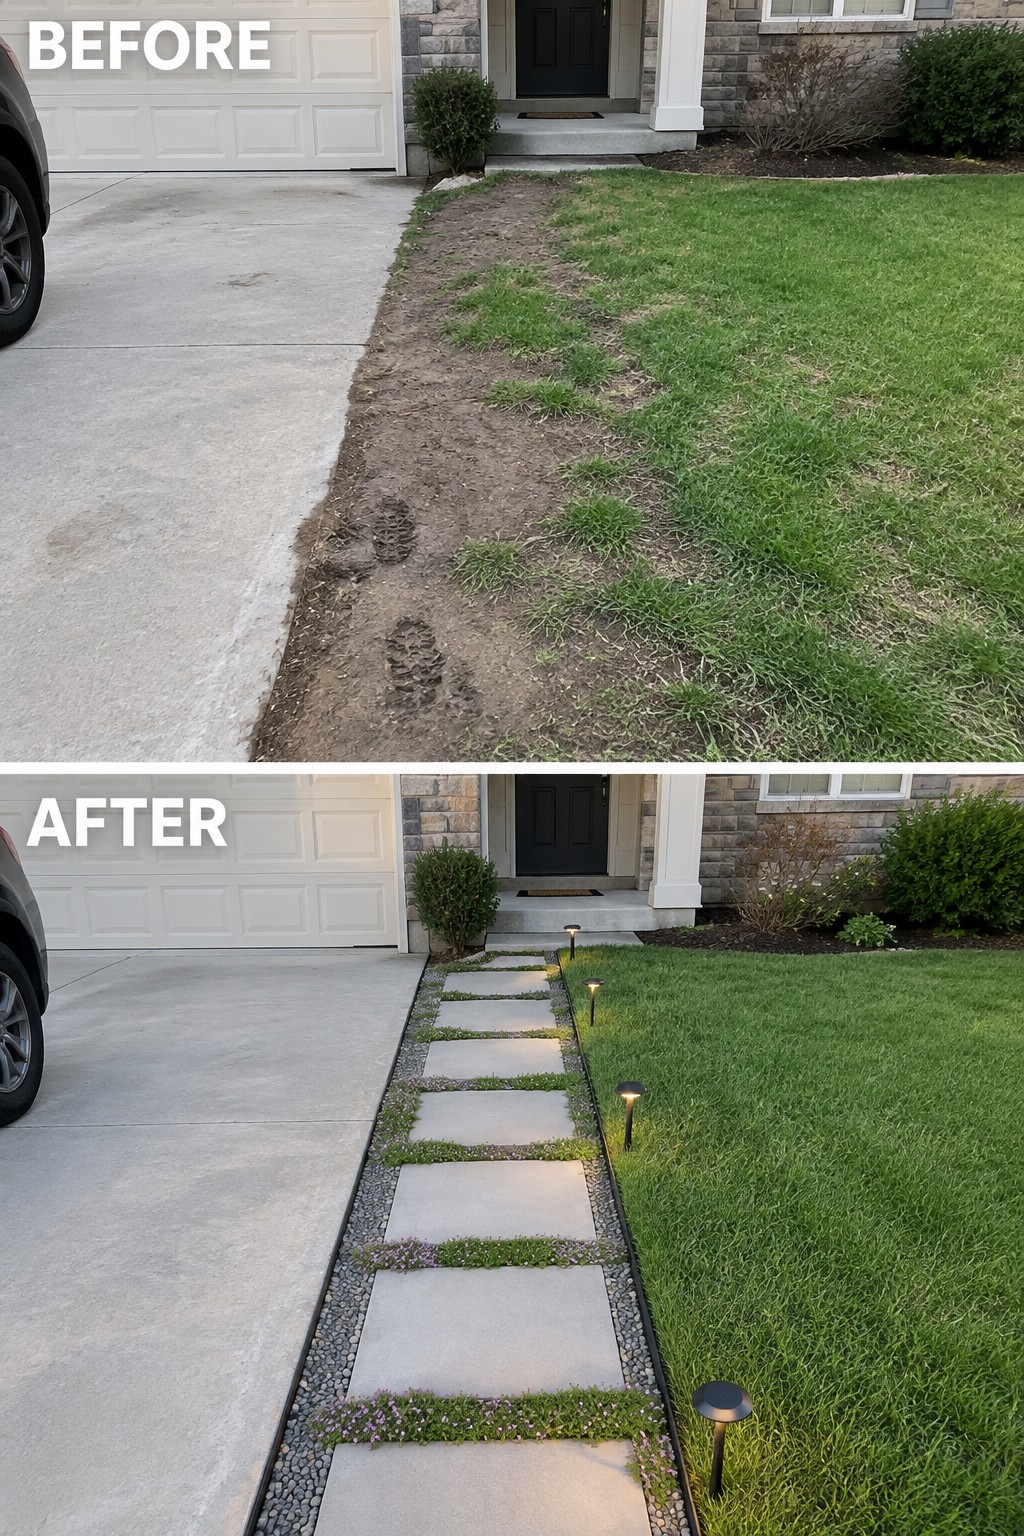
The strip of dirt and patchy grass next to the driveway made the side entrance feel unfinished and hard to use. A straight row of pavers set in gravel gave the space a defined route from the concrete to the front steps.
This idea works best on homes where the door sits off to one side of the garage. Keep the path simple and let the edging do the work. Add a few low lights only after the walkway is in place so the focus stays on the route itself.
Add Clean Edging To Shape A Narrow Path
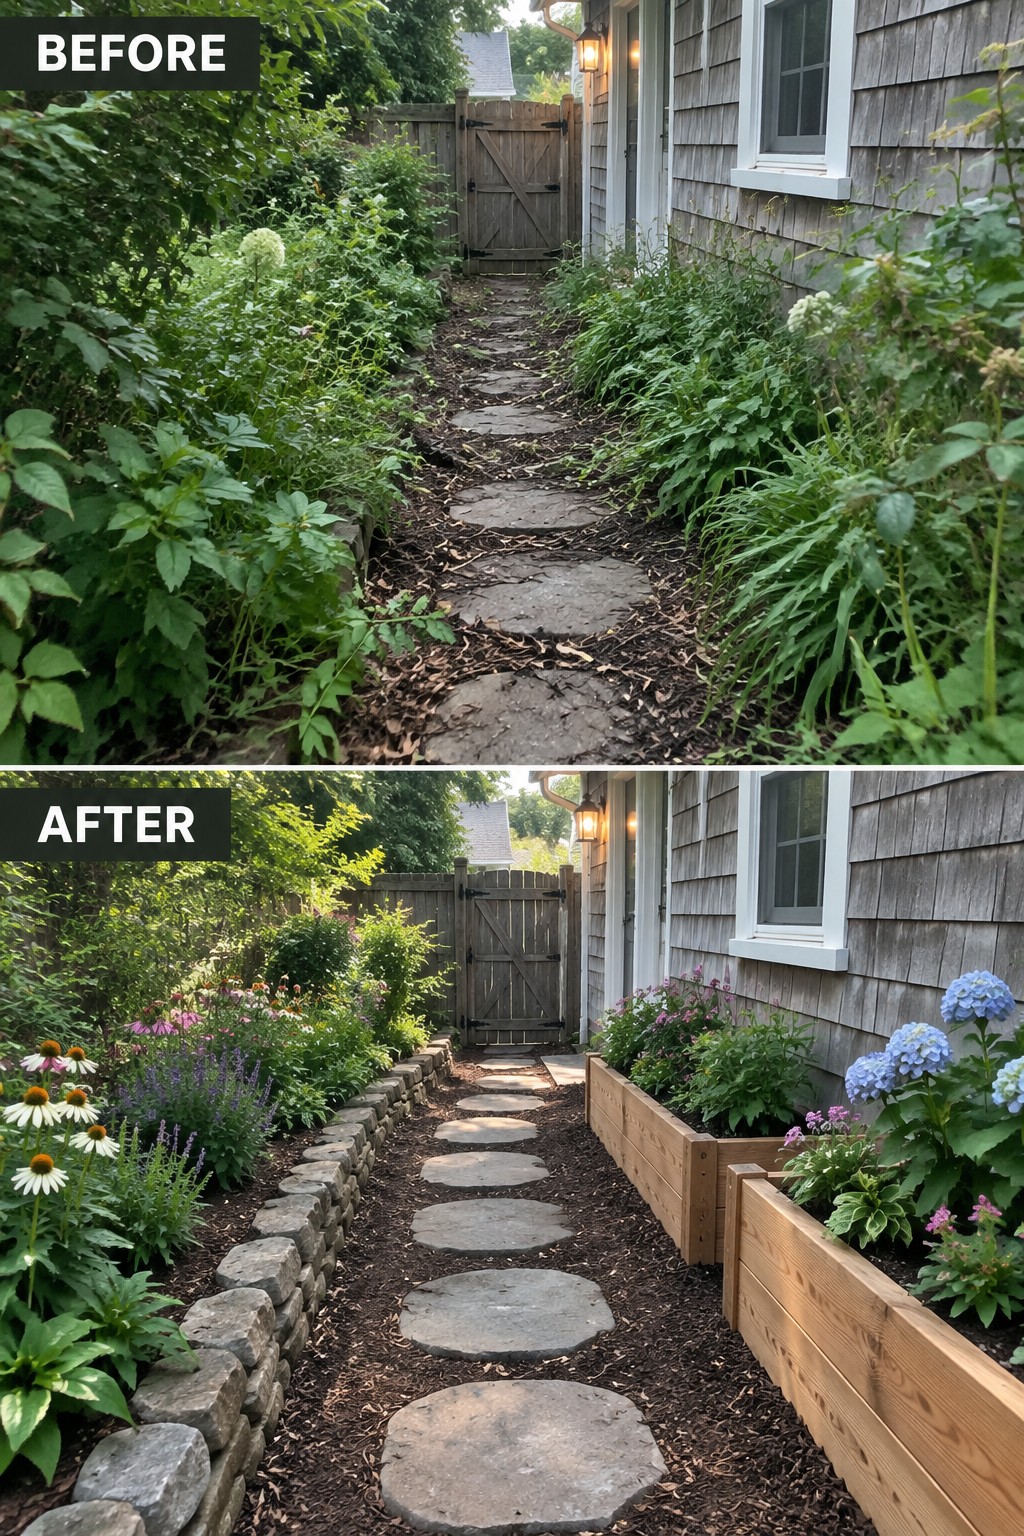
The before photo shows a path that disappears into spilling plants and loose mulch with no real edge to hold anything back. In the after, low stone borders on one side and simple wooden raised beds on the other keep the planting contained and give the stepping stones a clear route to follow.
This approach works well in tight side yards where you want to control spreading perennials without building full walls. Start with the edging first, then fill the beds with mulch and repeat a few plant varieties so the space stays tidy instead of turning wild again by midsummer.
Add Structure To A Basic Backyard With Gravel And Edging
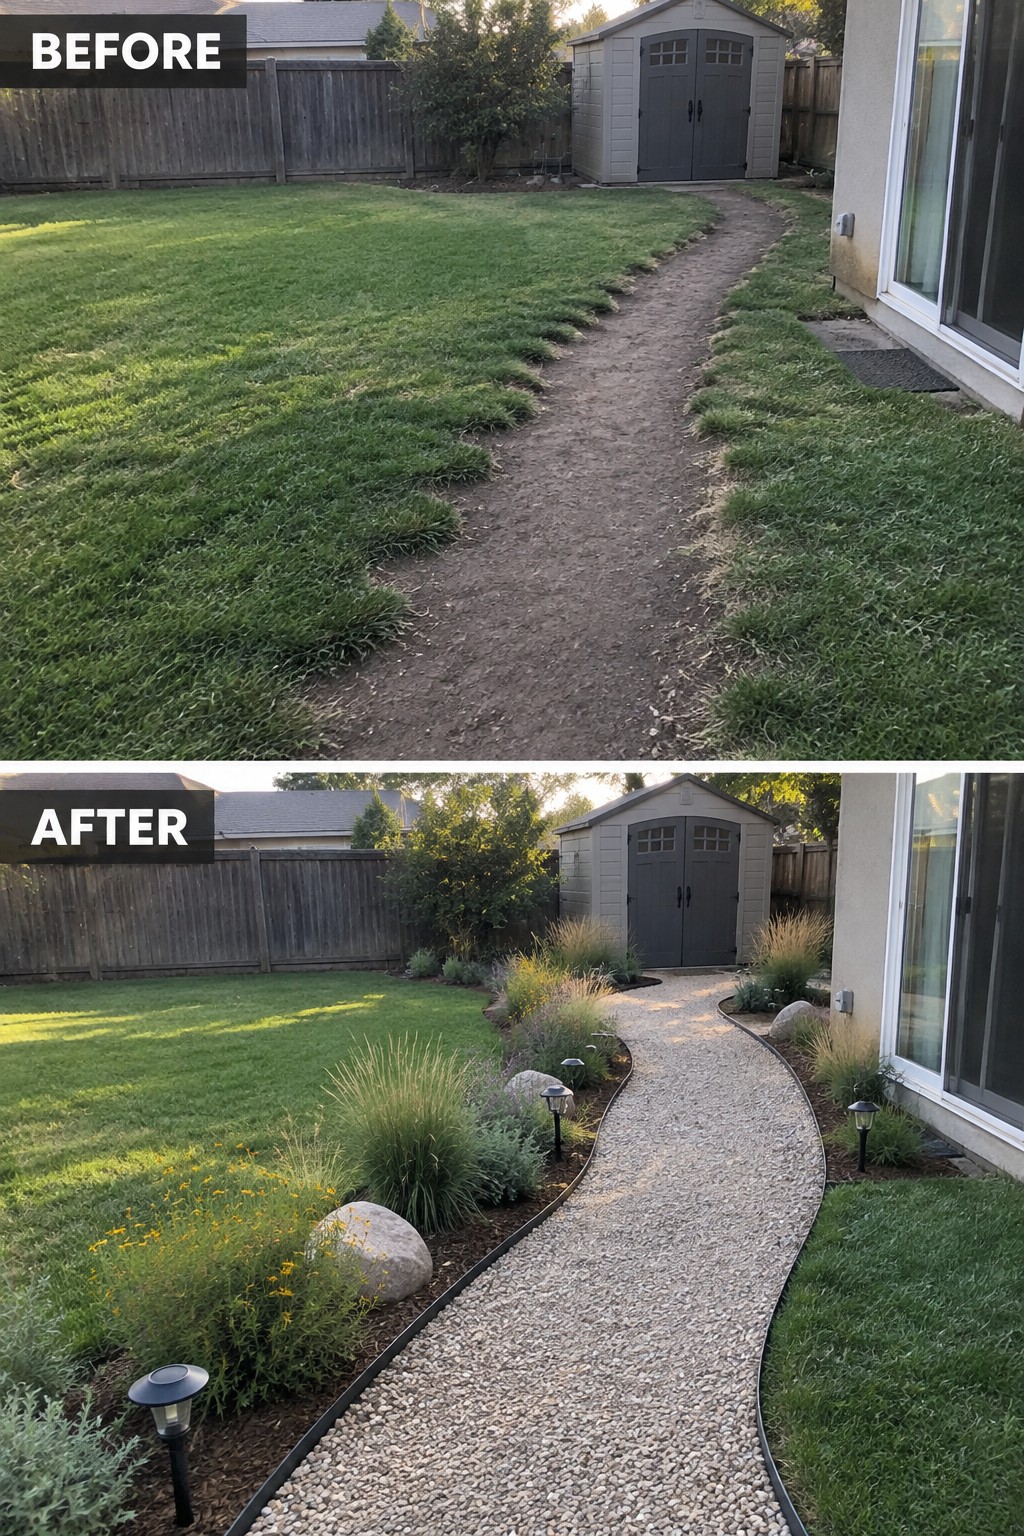
A dirt path through a lawn often leaves the yard feeling unfinished. Switching to a contained gravel walkway with solid edging gives the space a clear route and turns the edges into simple garden beds. The planted borders now frame the path instead of letting grass creep in from both sides.
This idea suits homes with an existing walking line across the yard. Lay edging first to keep the gravel in place, then add a few low clusters of plants along the sides. It works best when you keep the lawn open and let the path do the organizing.
Turn A Muddy Path Into A Paved Walkway With Clean Edging
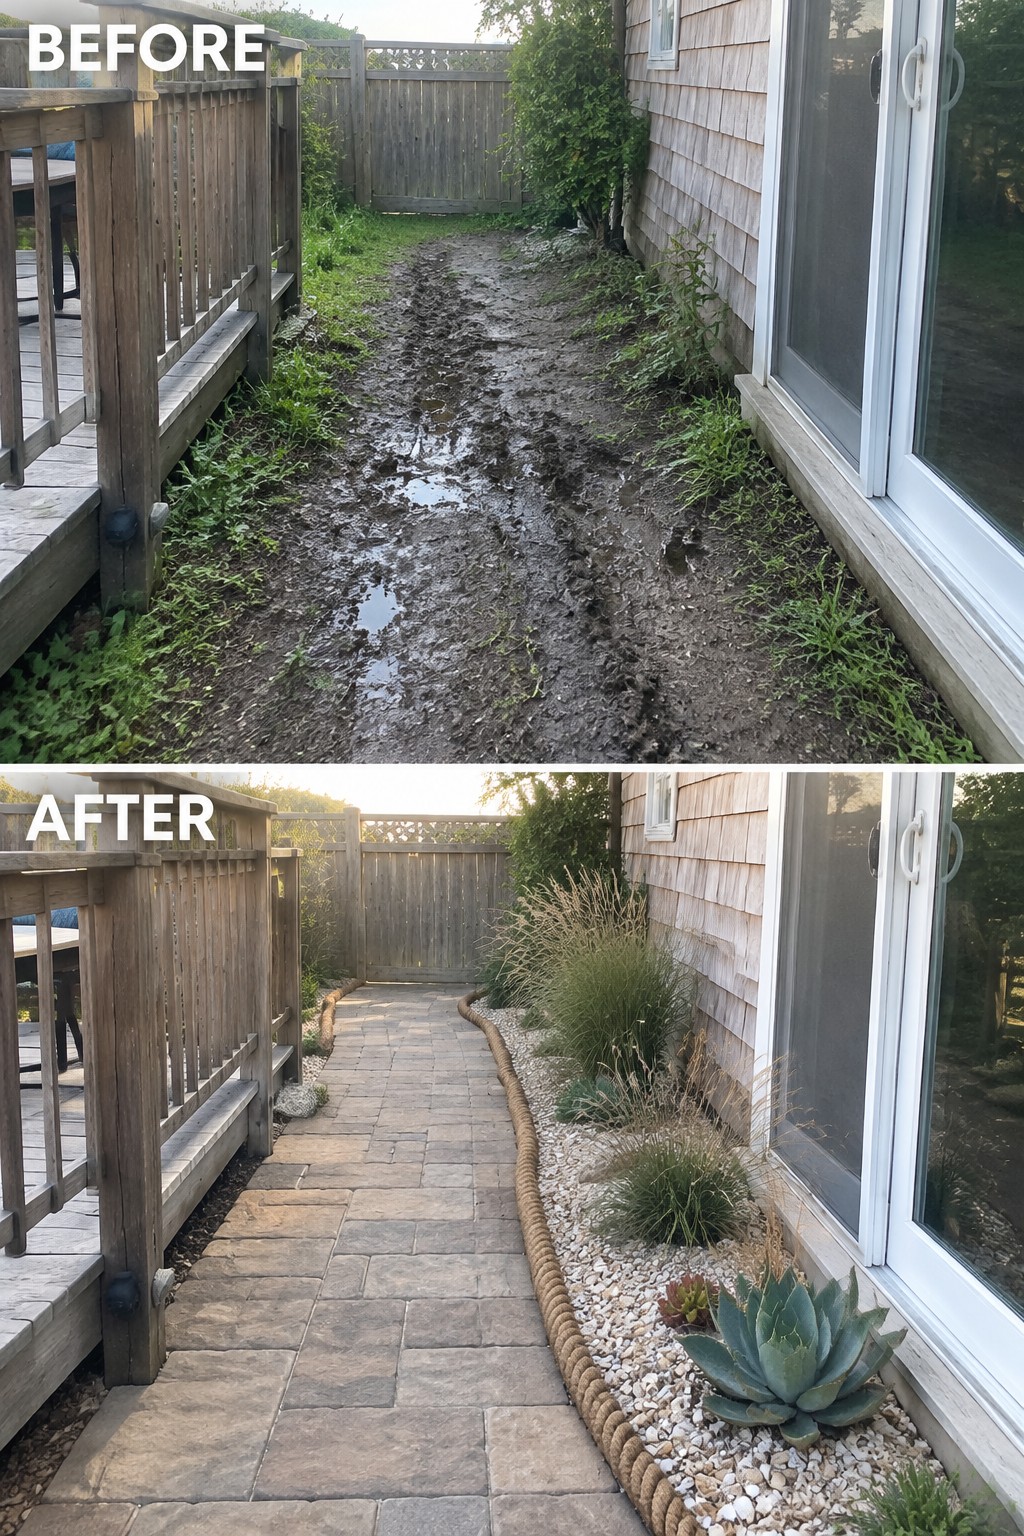
A muddy, worn-down side path is one of those problems that gets worse every season. Once you lay down pavers and add a clear edge with gravel beds, the whole area stops collecting water and starts looking intentional instead of neglected. The shift from slick mud to a flat stone surface makes the space feel finished and much easier to walk through.
This approach works well along the side of a house where space is narrow and drainage is an issue. Start with the path itself before adding plants, and keep the edging simple so water can still move away from the foundation. It suits older homes with existing decks or fences because the materials blend in without fighting the wood tones.
Add Structure To An Overgrown Front Walkway
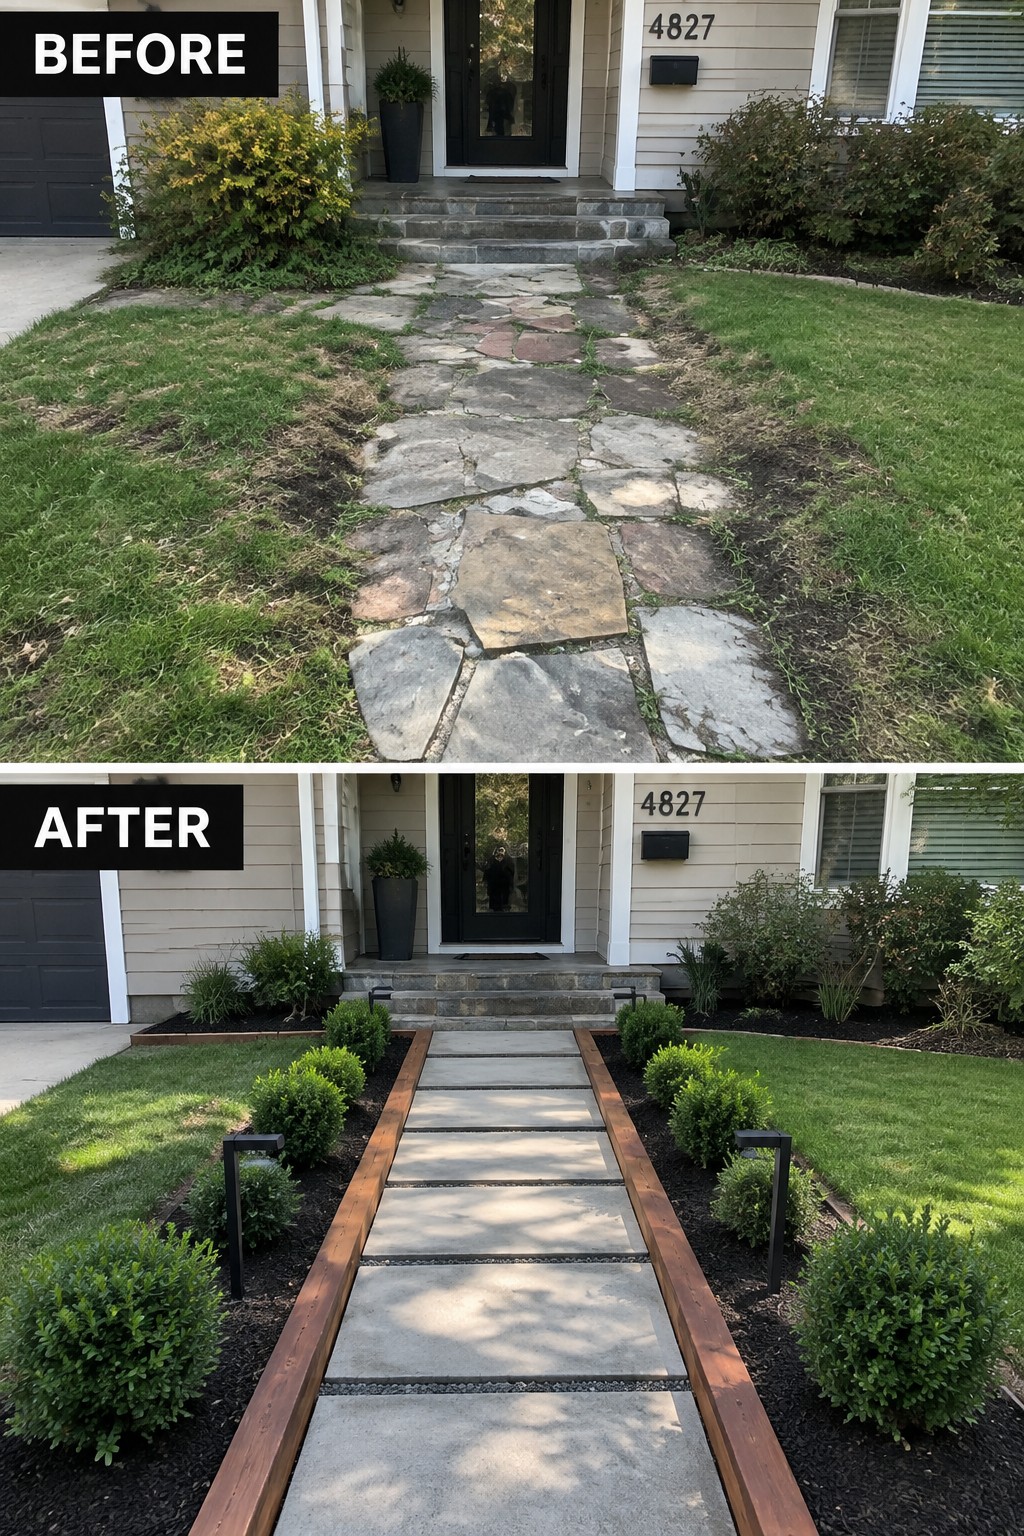
The main change here is turning a wandering stone path with grass creeping right up to the edges into a straight walkway with clear wooden borders. That simple definition stops the lawn from swallowing the path and makes the whole front look intentional instead of neglected.
This idea works on any front walk that has lost its shape over time. Clean the edges first, add a border material that matches your house style, then fill the beds with mulch and a few repeated low shrubs so the walkway feels like it belongs to the house instead of cutting through random grass.
Define A Side Path With Pavers And Edging
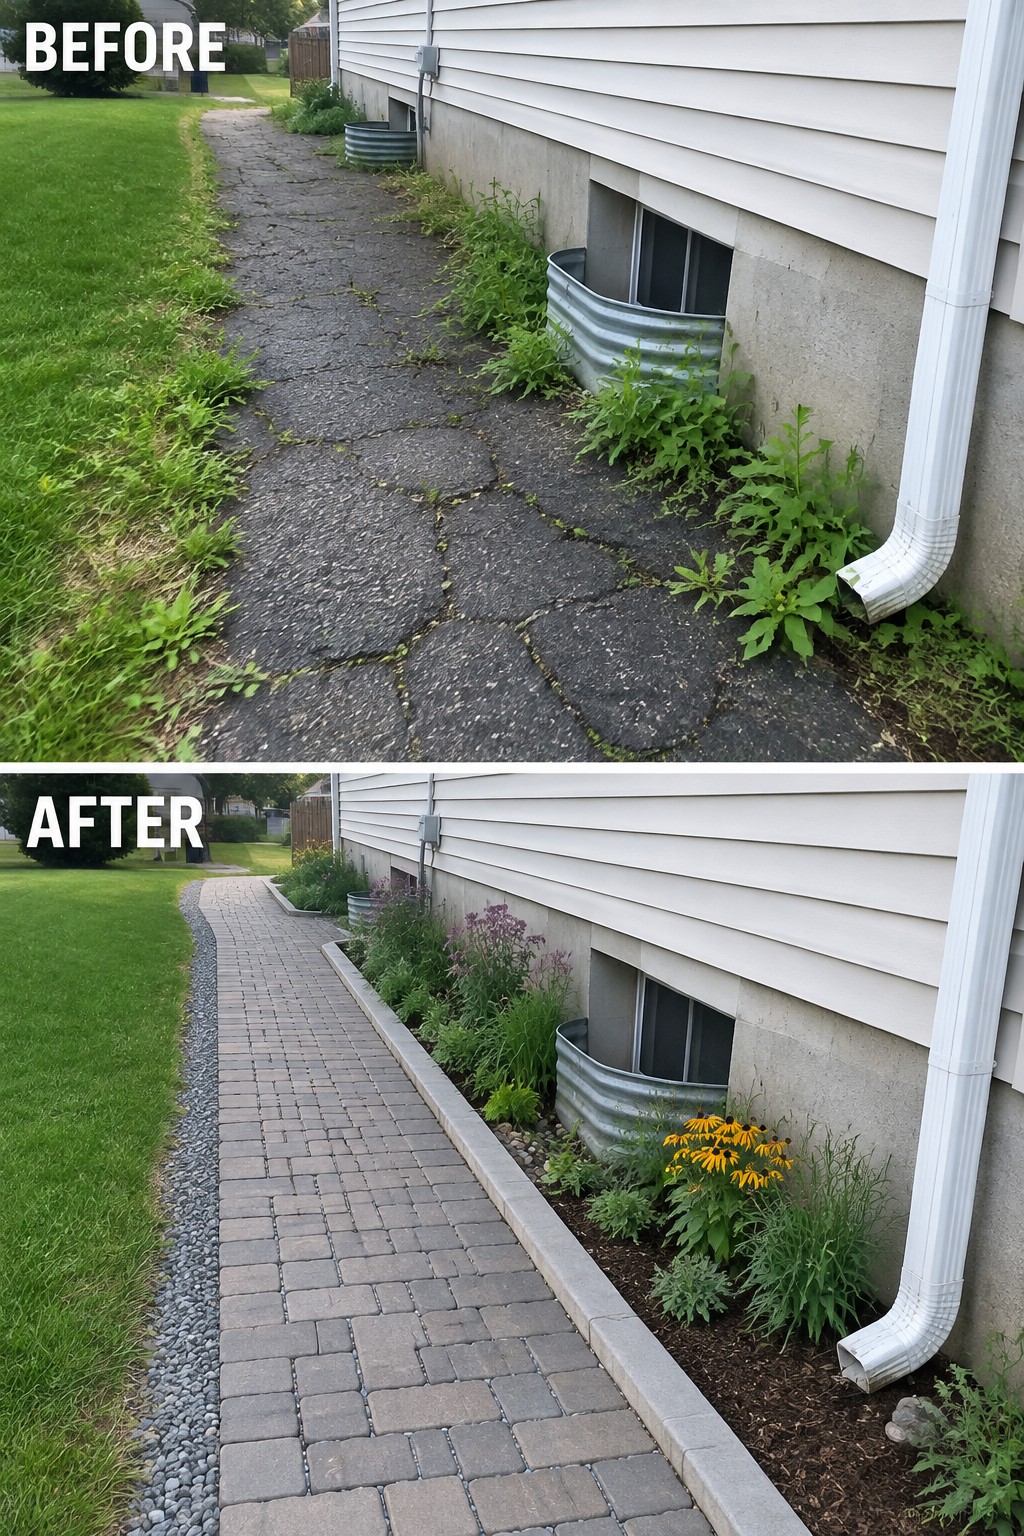
A cracked asphalt path next to the house usually ends up looking messy because there is no clear edge between the walkway and the planting area. Switching to brick pavers with a simple concrete border and a gravel strip on the lawn side gives the path a finished shape and keeps the garden bed separate and easy to maintain.
This approach works well on narrow side yards where space is limited. Start by removing the old surface and weeds, then set the edging first so the pavers have something solid to follow. Keep the planting simple with a few repeating perennials and mulch so the path stays the main feature instead of competing with too many plants.
Add Clean Edging And Pavers To A Wild Front Path
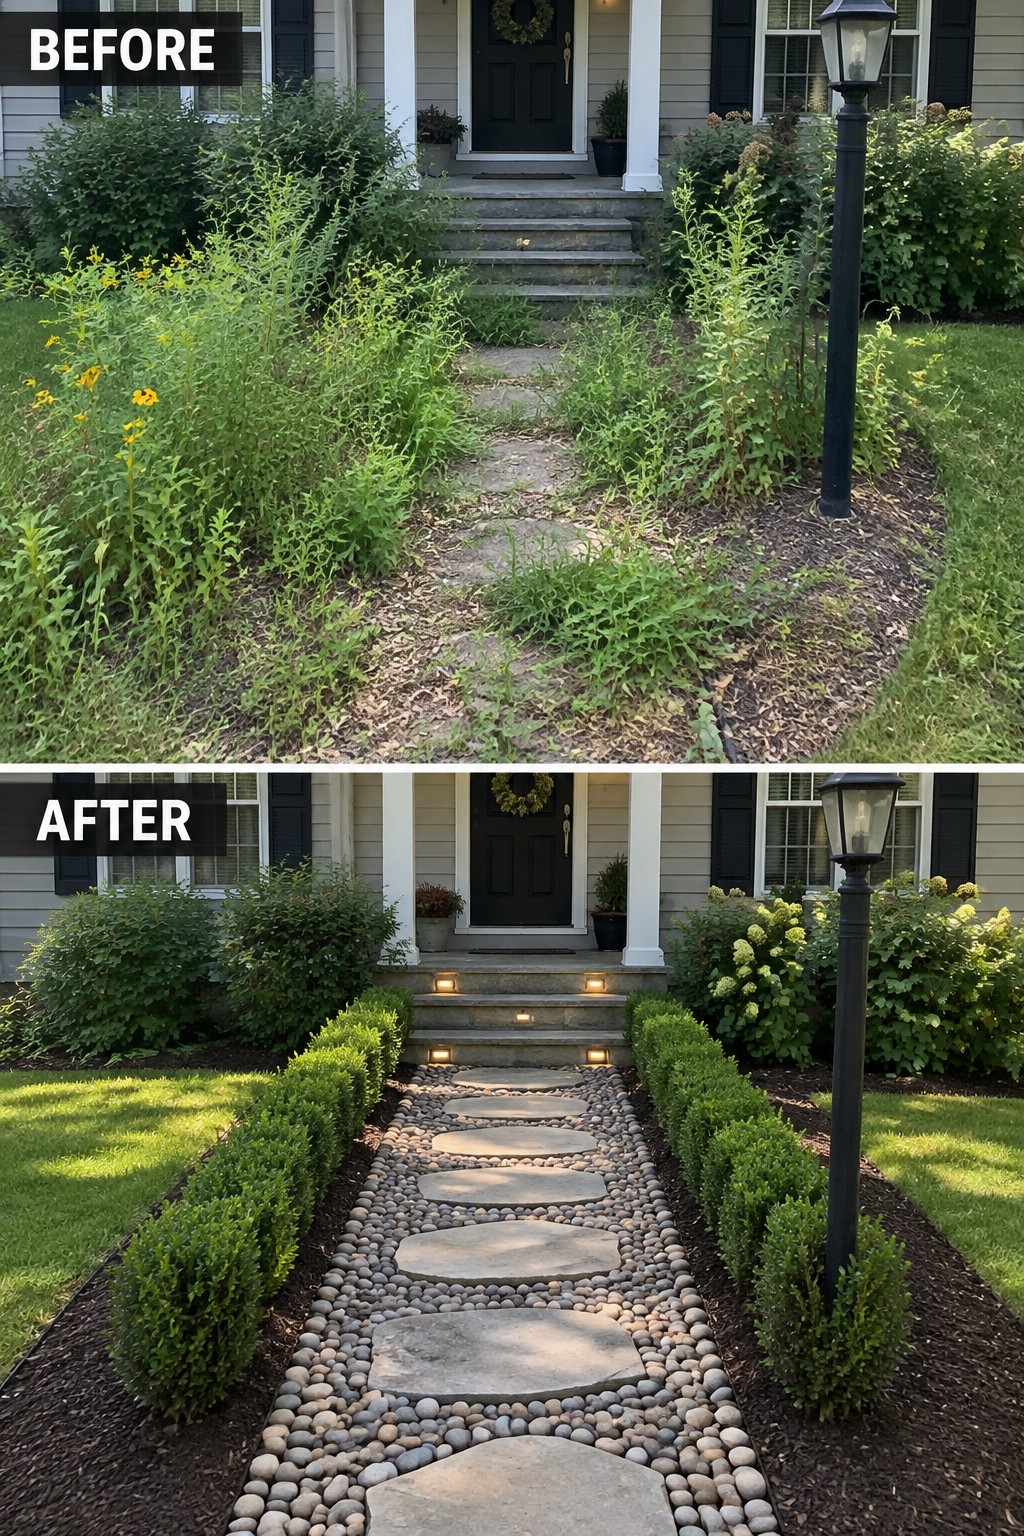
The biggest change here is how the walkway went from a mess of tall weeds and scattered stones to a clear path with flat pavers set in gravel. That simple structure makes the whole front feel pulled together instead of neglected. Clean borders also keep the grass and mulch from spilling over, which is often the first thing that starts to look sloppy again after a few weeks.
This idea works best on narrow front walks where you want to guide people straight to the door without adding a lot of new plants. Start by pulling everything out and laying a solid base so the pavers stay level. Keep the beds on either side low and simple, then use the same gravel or mulch throughout so the path feels like one planned piece rather than a collection of fixes.
Define A Narrow Walkway With Pavers And Planting
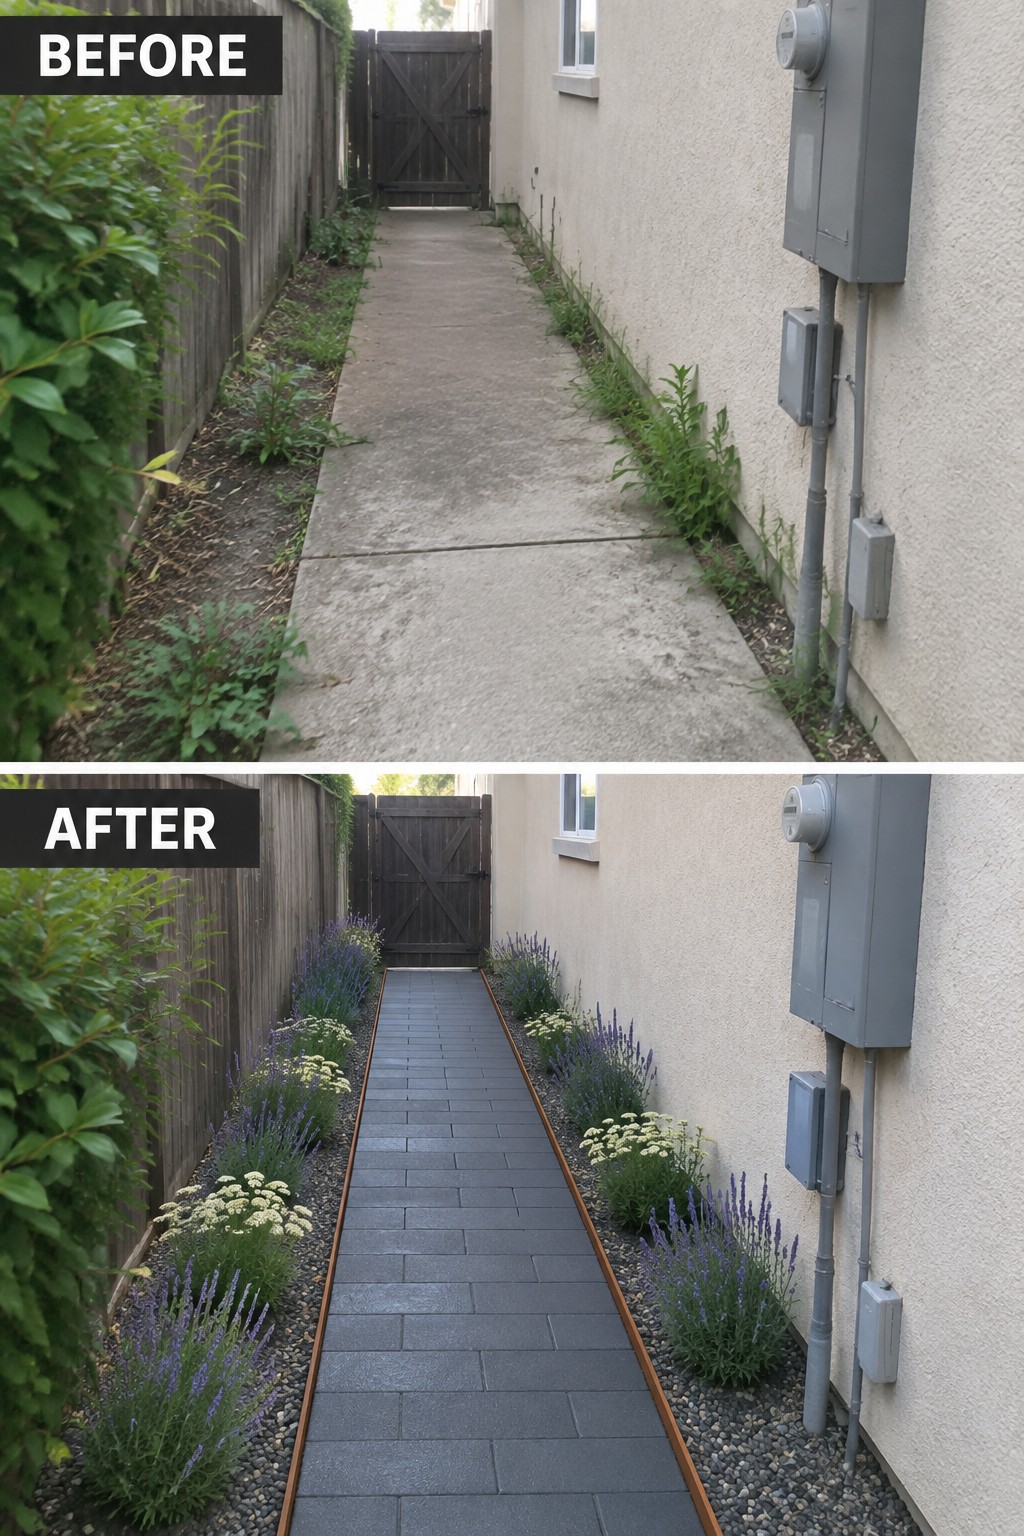
A plain concrete path with weeds along the edges can feel like wasted space, especially in a narrow side yard. Laying pavers down the center and adding gravel borders gives the walkway a clear shape while the new planting beds keep everything contained and tidy.
This idea works best in tight areas where you need to keep foot traffic separate from garden beds. Focus on low-growing perennials that stay within bounds, and make sure the gravel strip is wide enough to handle occasional overflow from the plants.
Add Structure To An Overgrown Front Walkway
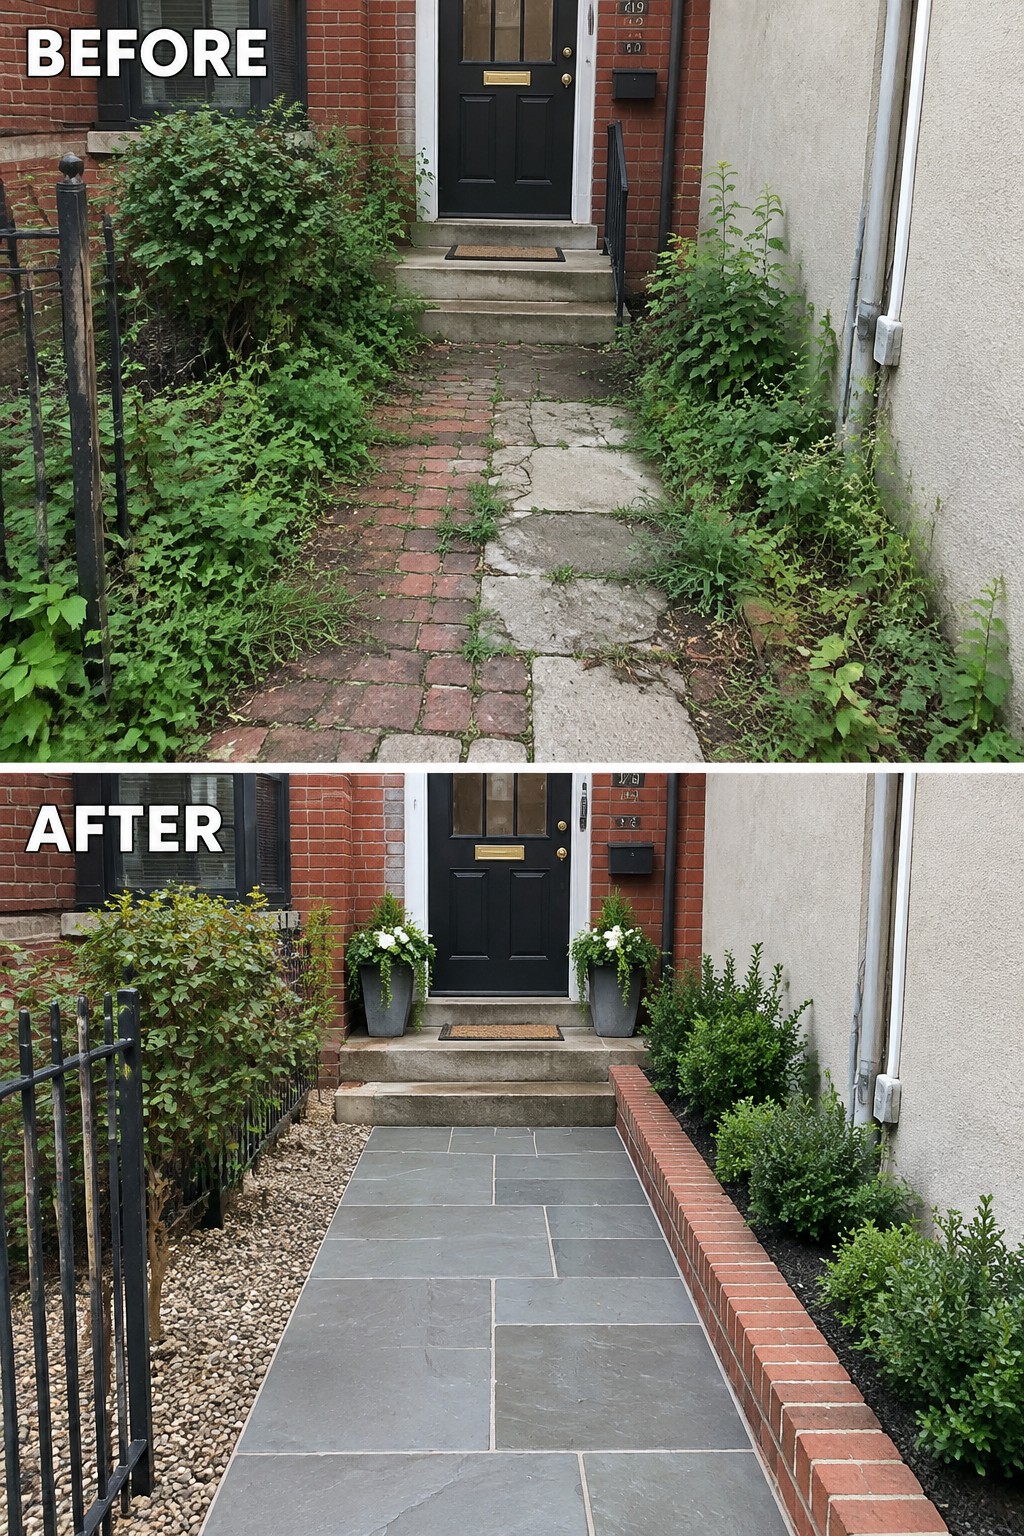
The main improvement comes from replacing the cracked, uneven path with a clean row of large gray pavers and adding a low brick edge along one side. Once the overgrowth was cleared and the ground was leveled, the walkway stopped looking like an afterthought and started guiding visitors straight to the door.
This approach works best on narrow side entries or small urban lots where space is tight. Mark the path width first so it stays practical for walking, then choose paving that can handle weather and foot traffic. Keep new planting low and contained so it frames the path without taking over.
Replace Irregular Stones With A Smooth Concrete Path
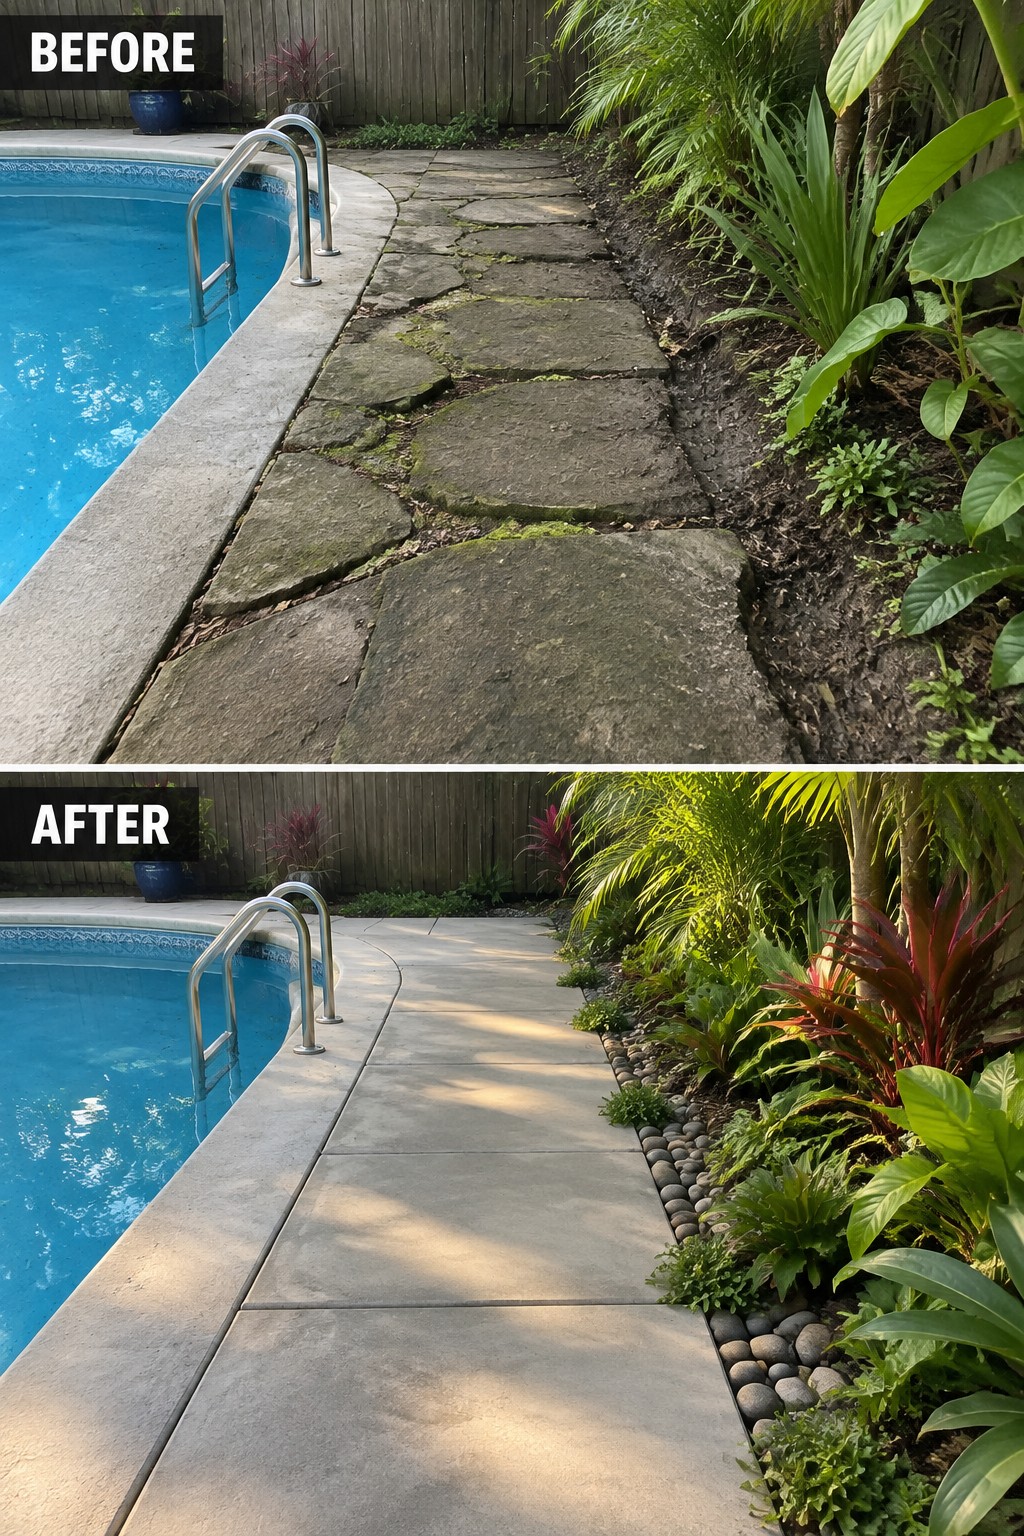
The old path used uneven flagstones that had settled over time, leaving gaps filled with moss and dirt along the pool edge. Switching to a poured concrete walkway with a straight border gives the whole area a much cleaner line and makes walking safer and simpler.
This approach suits pool decks and side yards where you want low maintenance without losing function. Lay the concrete first to create a solid base, then add a narrow strip of pebbles or gravel along the garden side to hold back soil and plants. Keep the planting simple so the path stays the main feature.
Add Clean Edging To Define A Garden Path
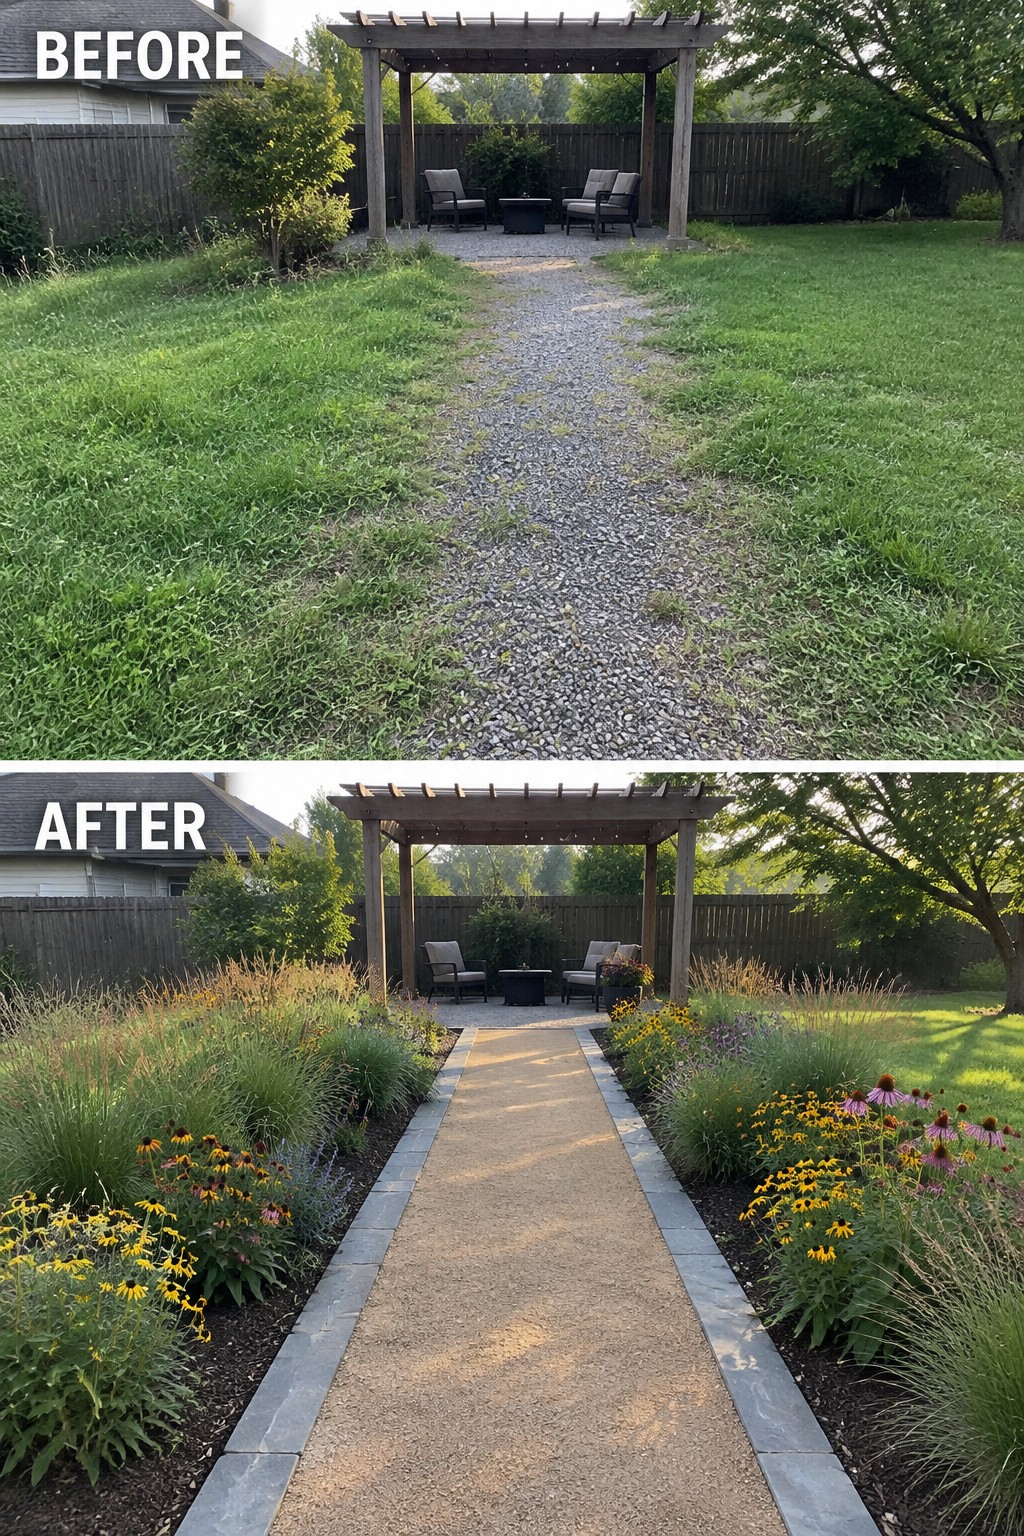
A gravel path can start to look messy once the lawn creeps in from both sides. The fix here was simple stone edging that created a hard line between the path and the new planting beds. That single change made the whole walkway feel planned instead of accidental.
This approach works best in backyards where the grass has no clear boundary. Lay the edging first so the beds have a set width, then fill them with a mix of taller grasses and lower flowers. The path stays usable and the beds stay contained without constant trimming.
Replace Cracked Concrete With Pavers For A Tidy Side Path
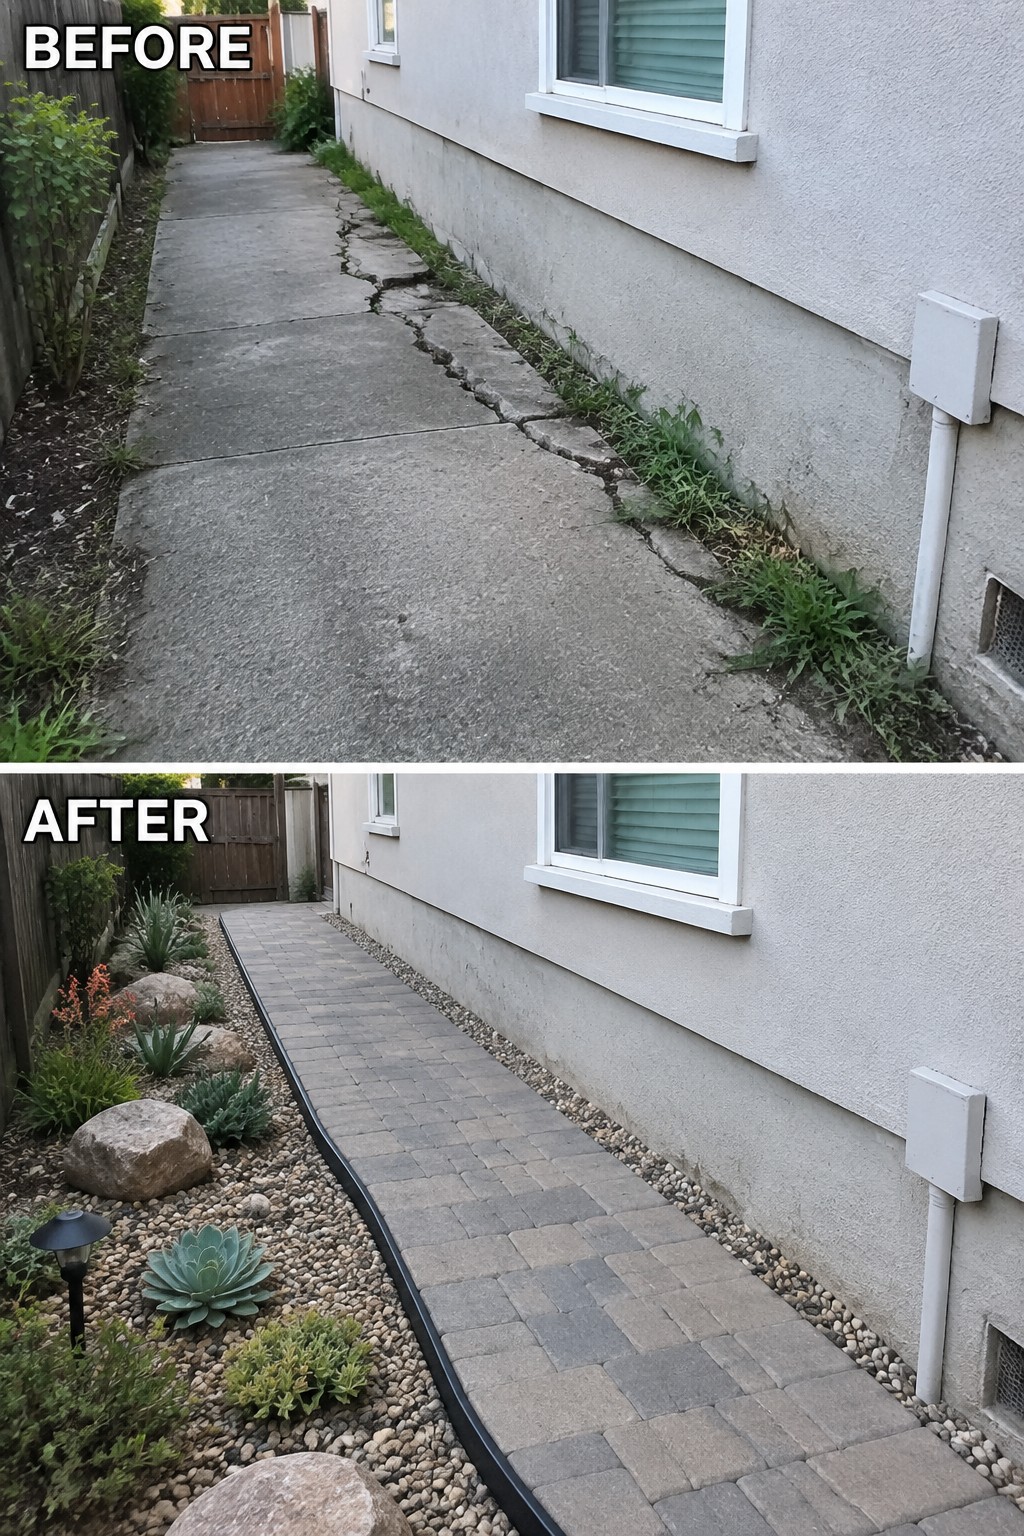
A cracked concrete walkway next to the house tends to collect weeds and look worse over time. Switching to pavers with a gravel strip along the edge gives the path a solid surface and creates a clear separation between the walkway and the planting area.
This idea works best on narrow side yards where you want the path to feel intentional rather than leftover space. Start by removing the old concrete, then choose pavers in a neutral tone that blends with the house and keep the planting simple so the path remains the main feature.
Define A Front Walkway With Pavers And Clean Edging
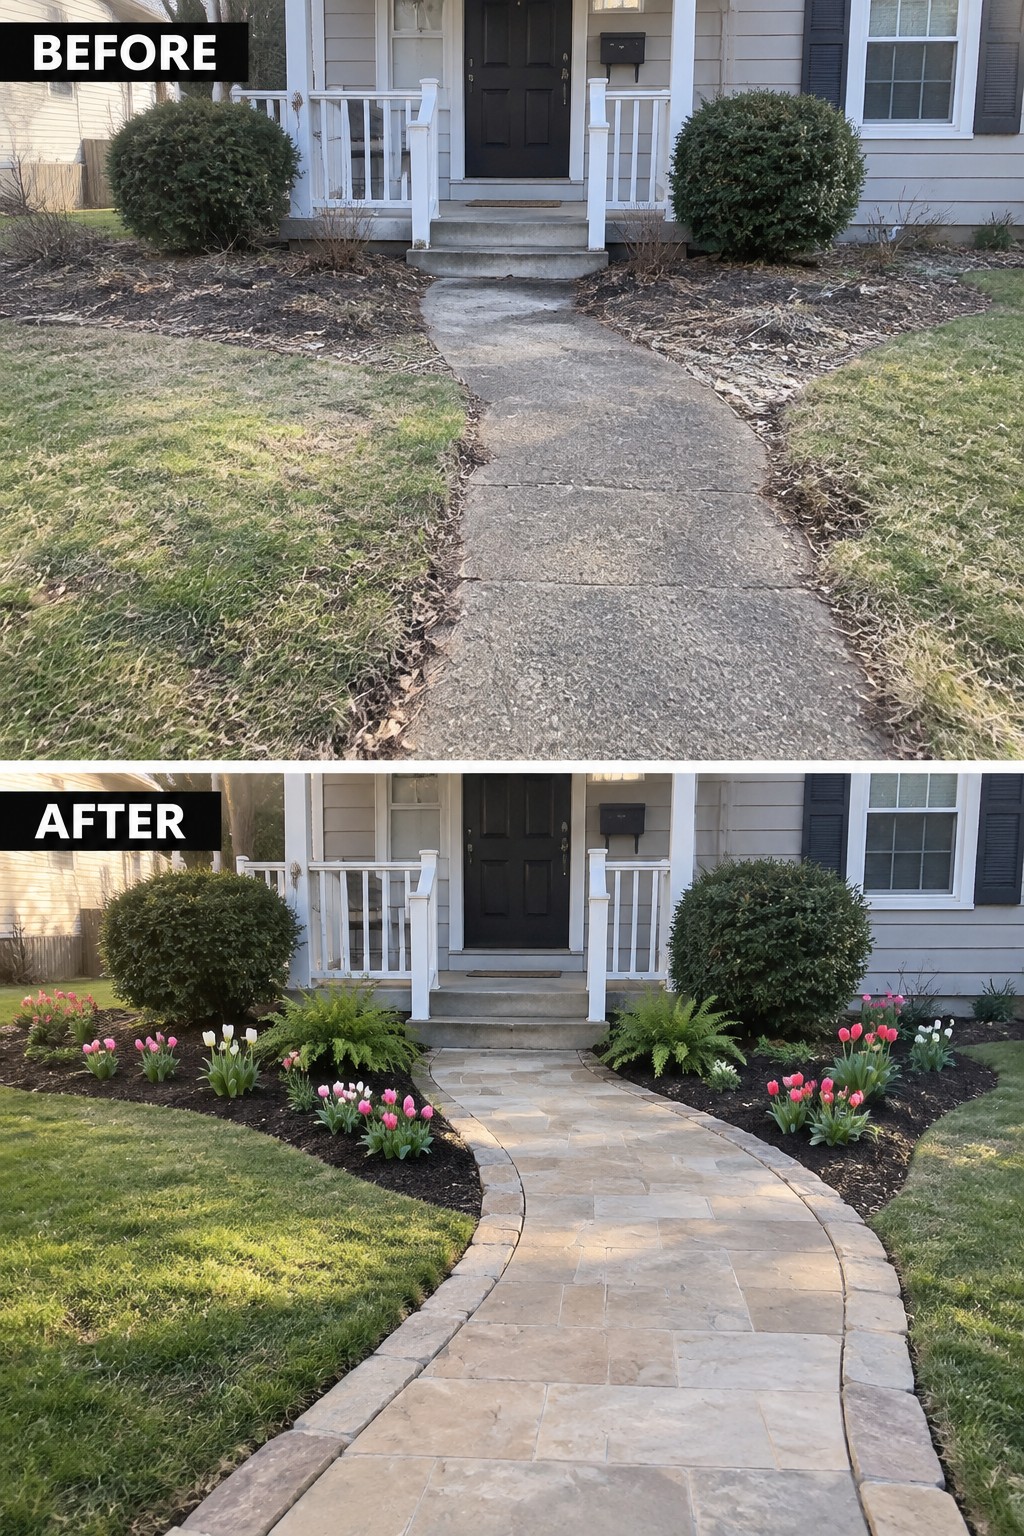
A plain concrete path often makes the front of a house feel unfinished, especially when the grass grows right up to the edges. Switching to pavers with a clear border and adding mulched beds on both sides gives the walkway a settled look and makes the whole front yard feel more intentional.
This approach works well on smaller lots or houses with simple facades. Start by deciding the width of the beds so they stay in proportion to the path, then choose pavers that match the style of the house. Keep the planting simple at first so the edging and path remain the main features.
Add Pavers To Create A Defined Walkway Edge
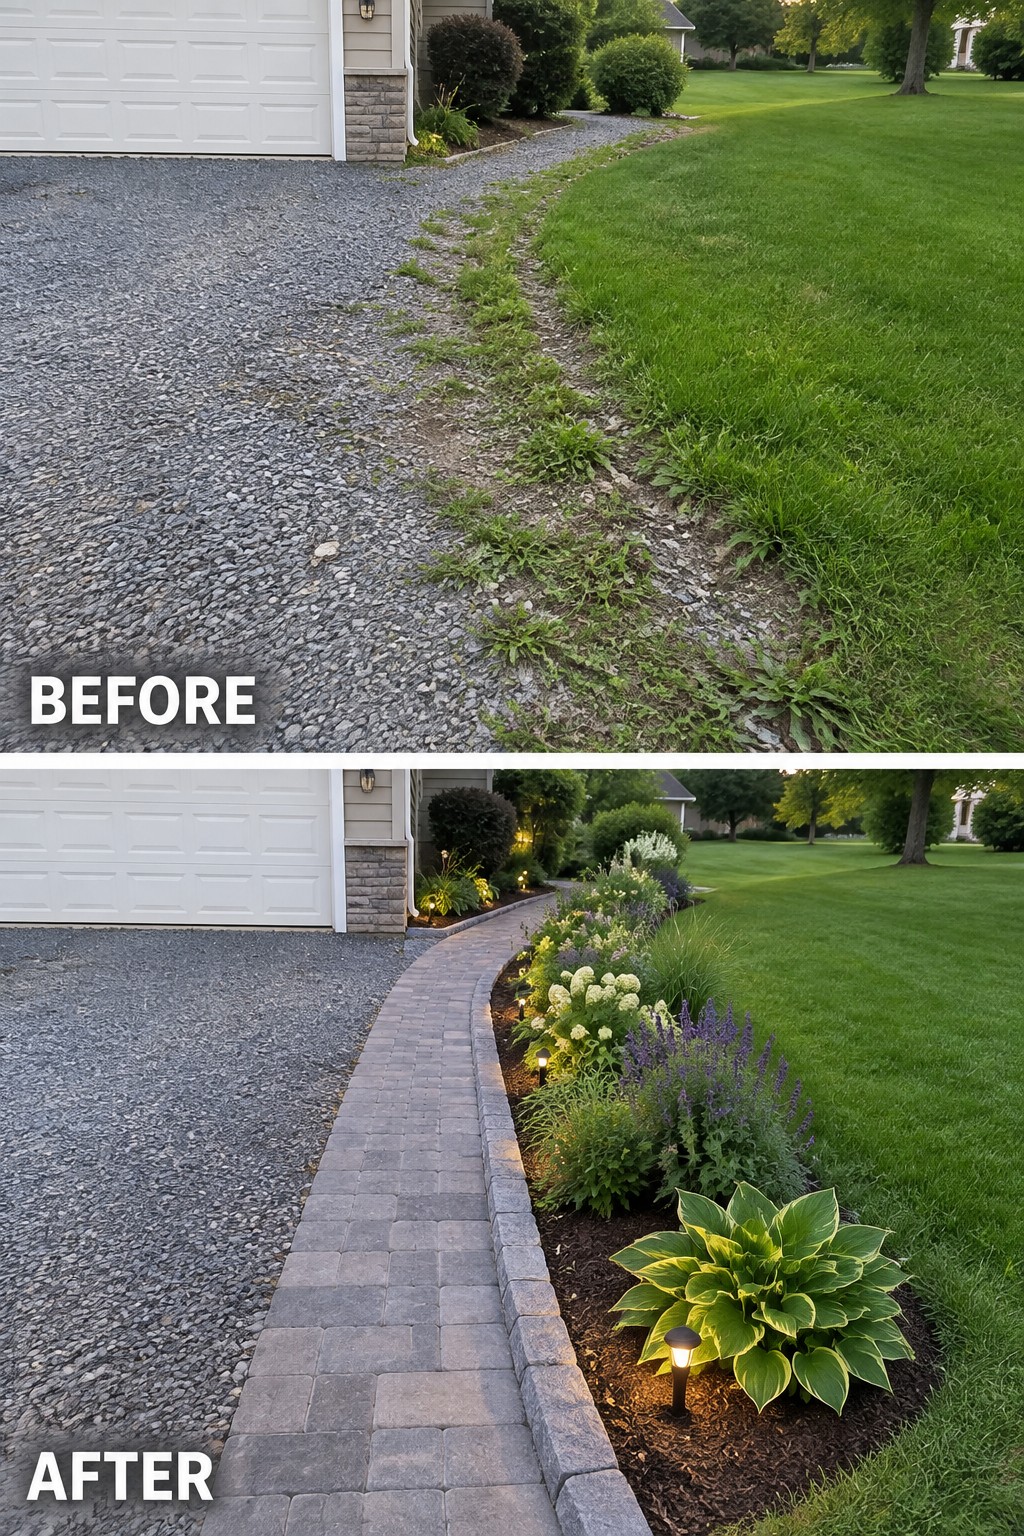
A gravel driveway often meets the lawn in a ragged line where grass and weeds keep creeping in. Adding a paver walkway gives that edge a hard, lasting border so the gravel stays put and the lawn stays neat. The curve also softens the look and leads the eye toward the side yard.
This approach works well on homes where the driveway runs close to the house and you want a simple walking path without pouring concrete. Keep the bed width modest, use mulch to hold down weeds, and add a few low lights so the path feels finished at night.
Add Edging To Shape An Overgrown Garden Path

An overgrown path quickly loses its purpose when plants spill across the stones and leaves pile up. In this case the before photo shows stepping stones almost hidden under debris and sprawling shrubs, while the after shows the same path cleaned up with gravel fill and bamboo edging that holds everything in place. The edging creates a clear line that makes the walkway feel intentional instead of accidental.
This approach works well in narrow side yards or back gardens where paths tend to disappear under fast-growing plants. Start by clearing the worst of the overgrowth, then add simple edging and a layer of gravel to keep the stones visible and the edges tidy. It keeps maintenance lower and stops the path from feeling like an afterthought.
Add Clean Edging To A Plain Walkway
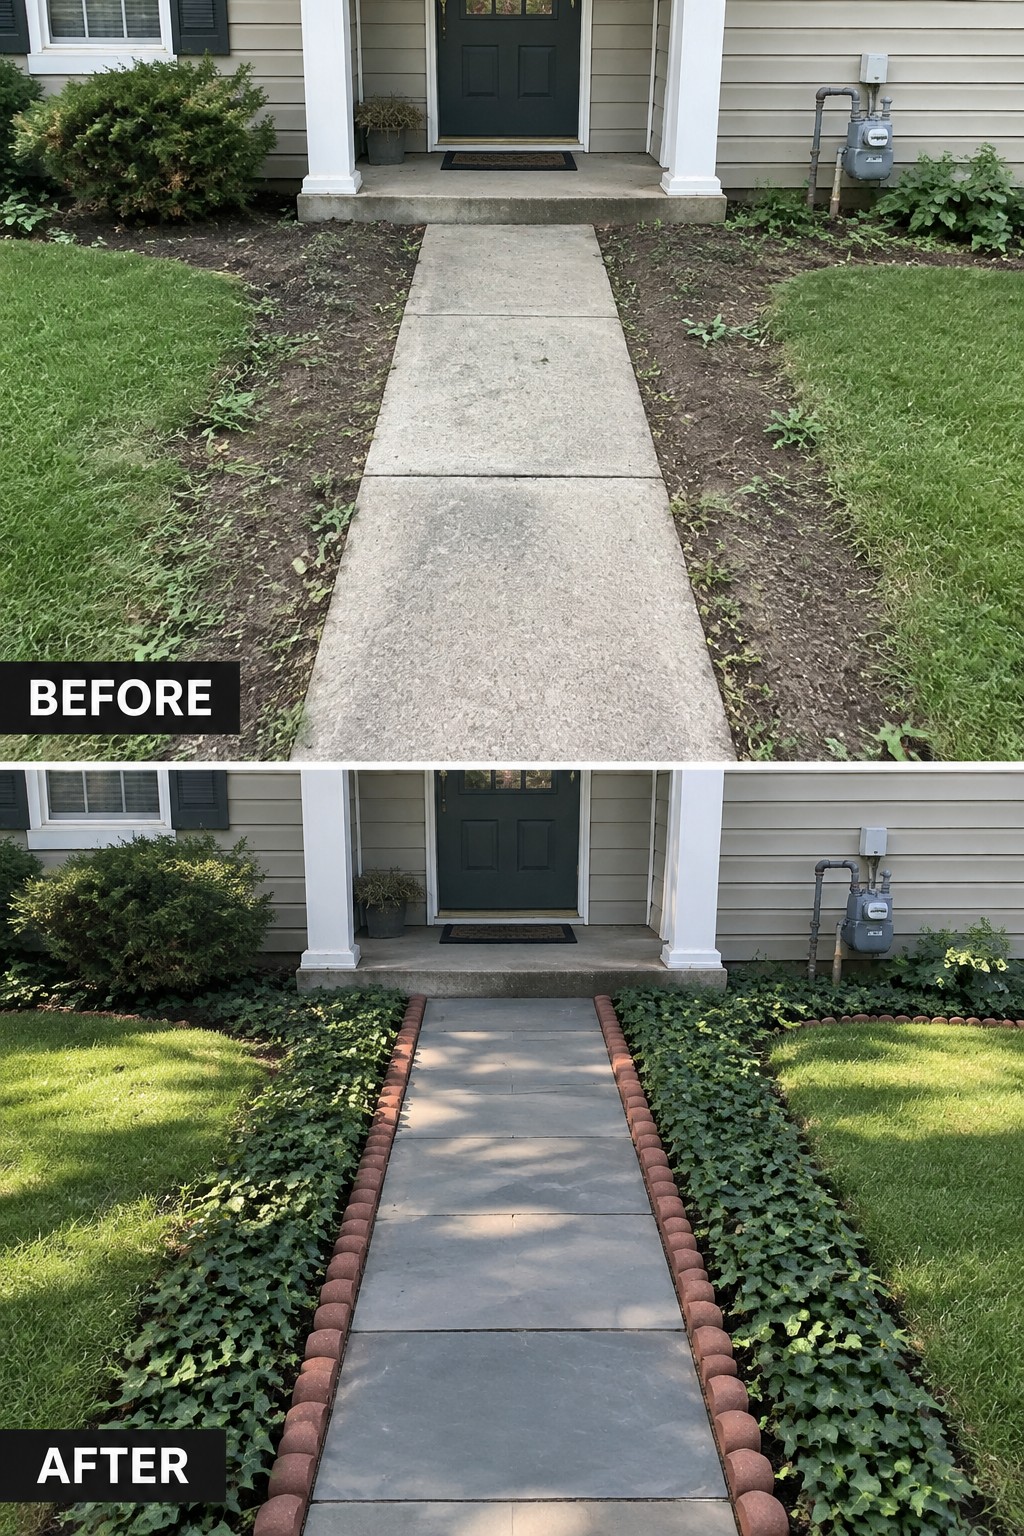
A wide concrete slab often looks unfinished when it runs straight through grass and dirt with nothing to mark the edges. Switching to stone pavers and adding a low brick border on both sides gives the path clear shape and makes the whole front look more settled. The ivy planted along the edges fills the space without crowding the walkway.
This idea suits simple front paths where you want structure without adding much height. Lay the edging first so the shape is set, then choose a ground cover that spreads low and stays neat. It works especially well on homes where the walkway is the main view from the street.
Define An Overgrown Yard With A Clear Paver Path
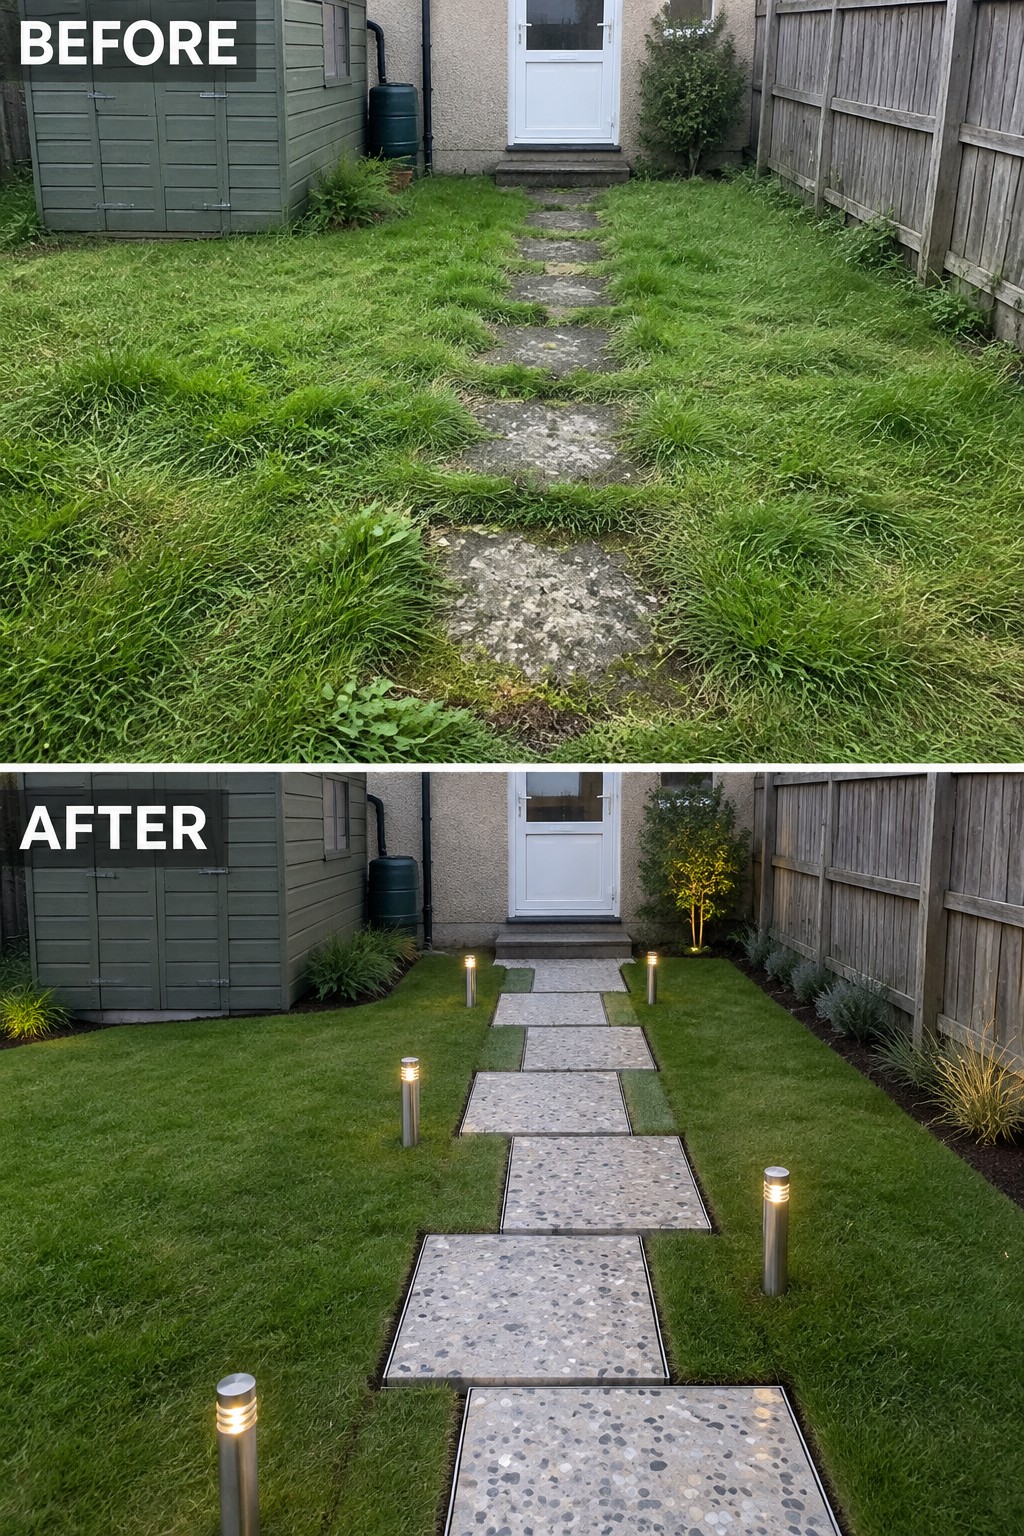
An overgrown path buried in tall grass makes a yard feel neglected and hard to use. Laying down a straight line of pavers with clean grass edges on both sides instantly gives the space structure, and the addition of a few low lights turns the walkway into something you can actually follow after dark.
This approach works best in small or narrow backyards where you want to keep most of the lawn but still need a practical route to the door or shed. Start by cutting the grass back sharply on both sides of the path, then choose pavers that sit low enough for easy mowing. Keep the lights simple and spaced evenly so the focus stays on the walkway itself rather than extra decoration.
Define A Front Walkway With Straight Pavers
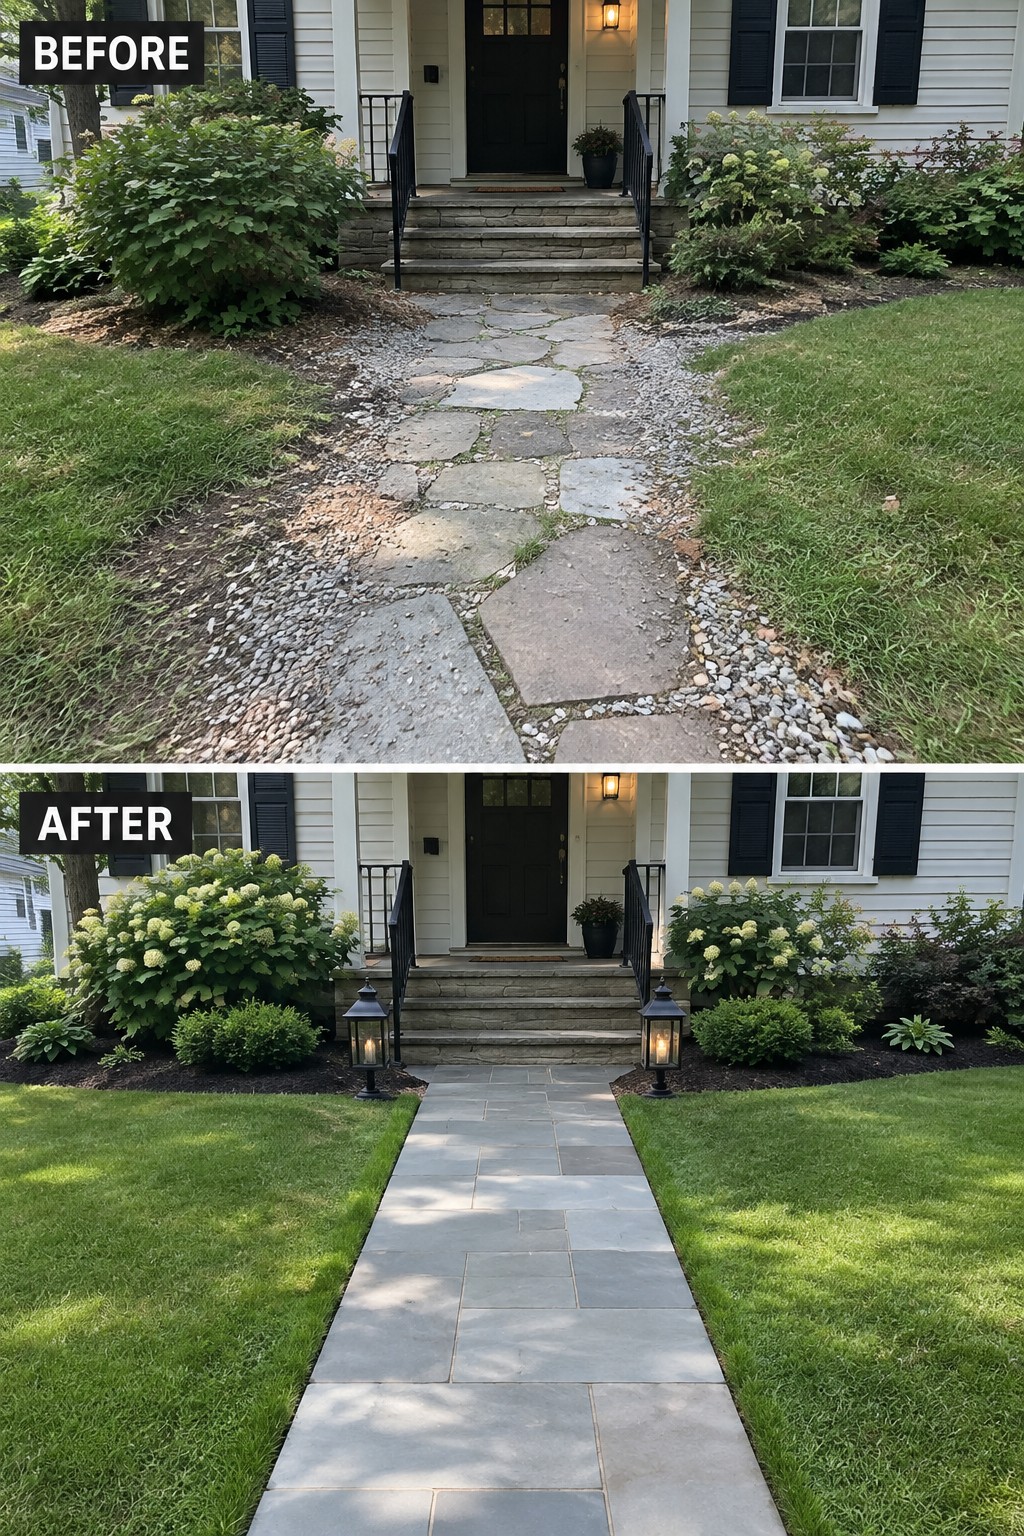
An irregular path made of mixed stones and loose gravel can make even a nice house feel unfinished. Switching to a straight run of uniform rectangular pavers gives the entry a clear route and stops the gravel from spilling into the lawn. The change also makes room for simple planted borders on each side instead of the scattered shrubs that were there before.
This idea works well on older homes where the original walk has shifted or grown uneven over time. Keep the new path the same width from the sidewalk to the steps, use a dark mulch in the beds, and add just a few low plants so the walkway stays the main feature. Two lanterns near the steps are enough to light the way without adding clutter.
Frequently Asked Questions
Q: Can I add clean edging to my old concrete walkway without tearing it up?
A: Yes you can. Dig a narrow trench right next to the concrete and press in metal or plastic edging to create a sharp line. Then backfill with soil or mulch on the other side.
Q: How wide should the edging strip be around the walkway?
A: Keep it narrow so the focus stays on the path itself. A few inches on each side works well for most yards.
Q: My yard slopes a bit. Will that mess up a straight edged walkway?
A: You can still make it work. Follow the slope gradually with your edging instead of fighting it. This keeps water flowing away from the path naturally.
