

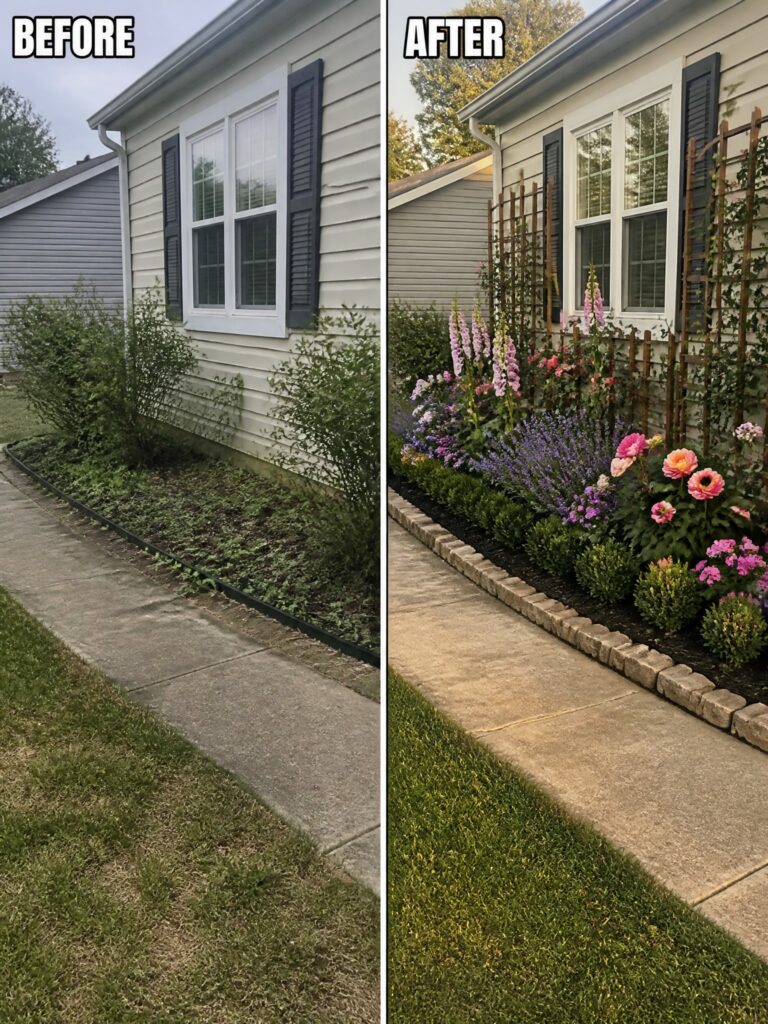
I have noticed that front yards often lose their shape when flower beds sit without clear edges or any planting layers to hold them together.
Adding structure through shrubs and seasonal color tends to make the space feel more settled even if the rest of the yard stays the same.
Small layout choices like these usually help a home feel more looked after.
I would probably start with edging and a basic plant arrangement if I were fixing up my own front yard.
The examples in the article show how those steps build up to something that feels refreshed without needing a complete overhaul.
Define Foundation Beds With Simple Edging
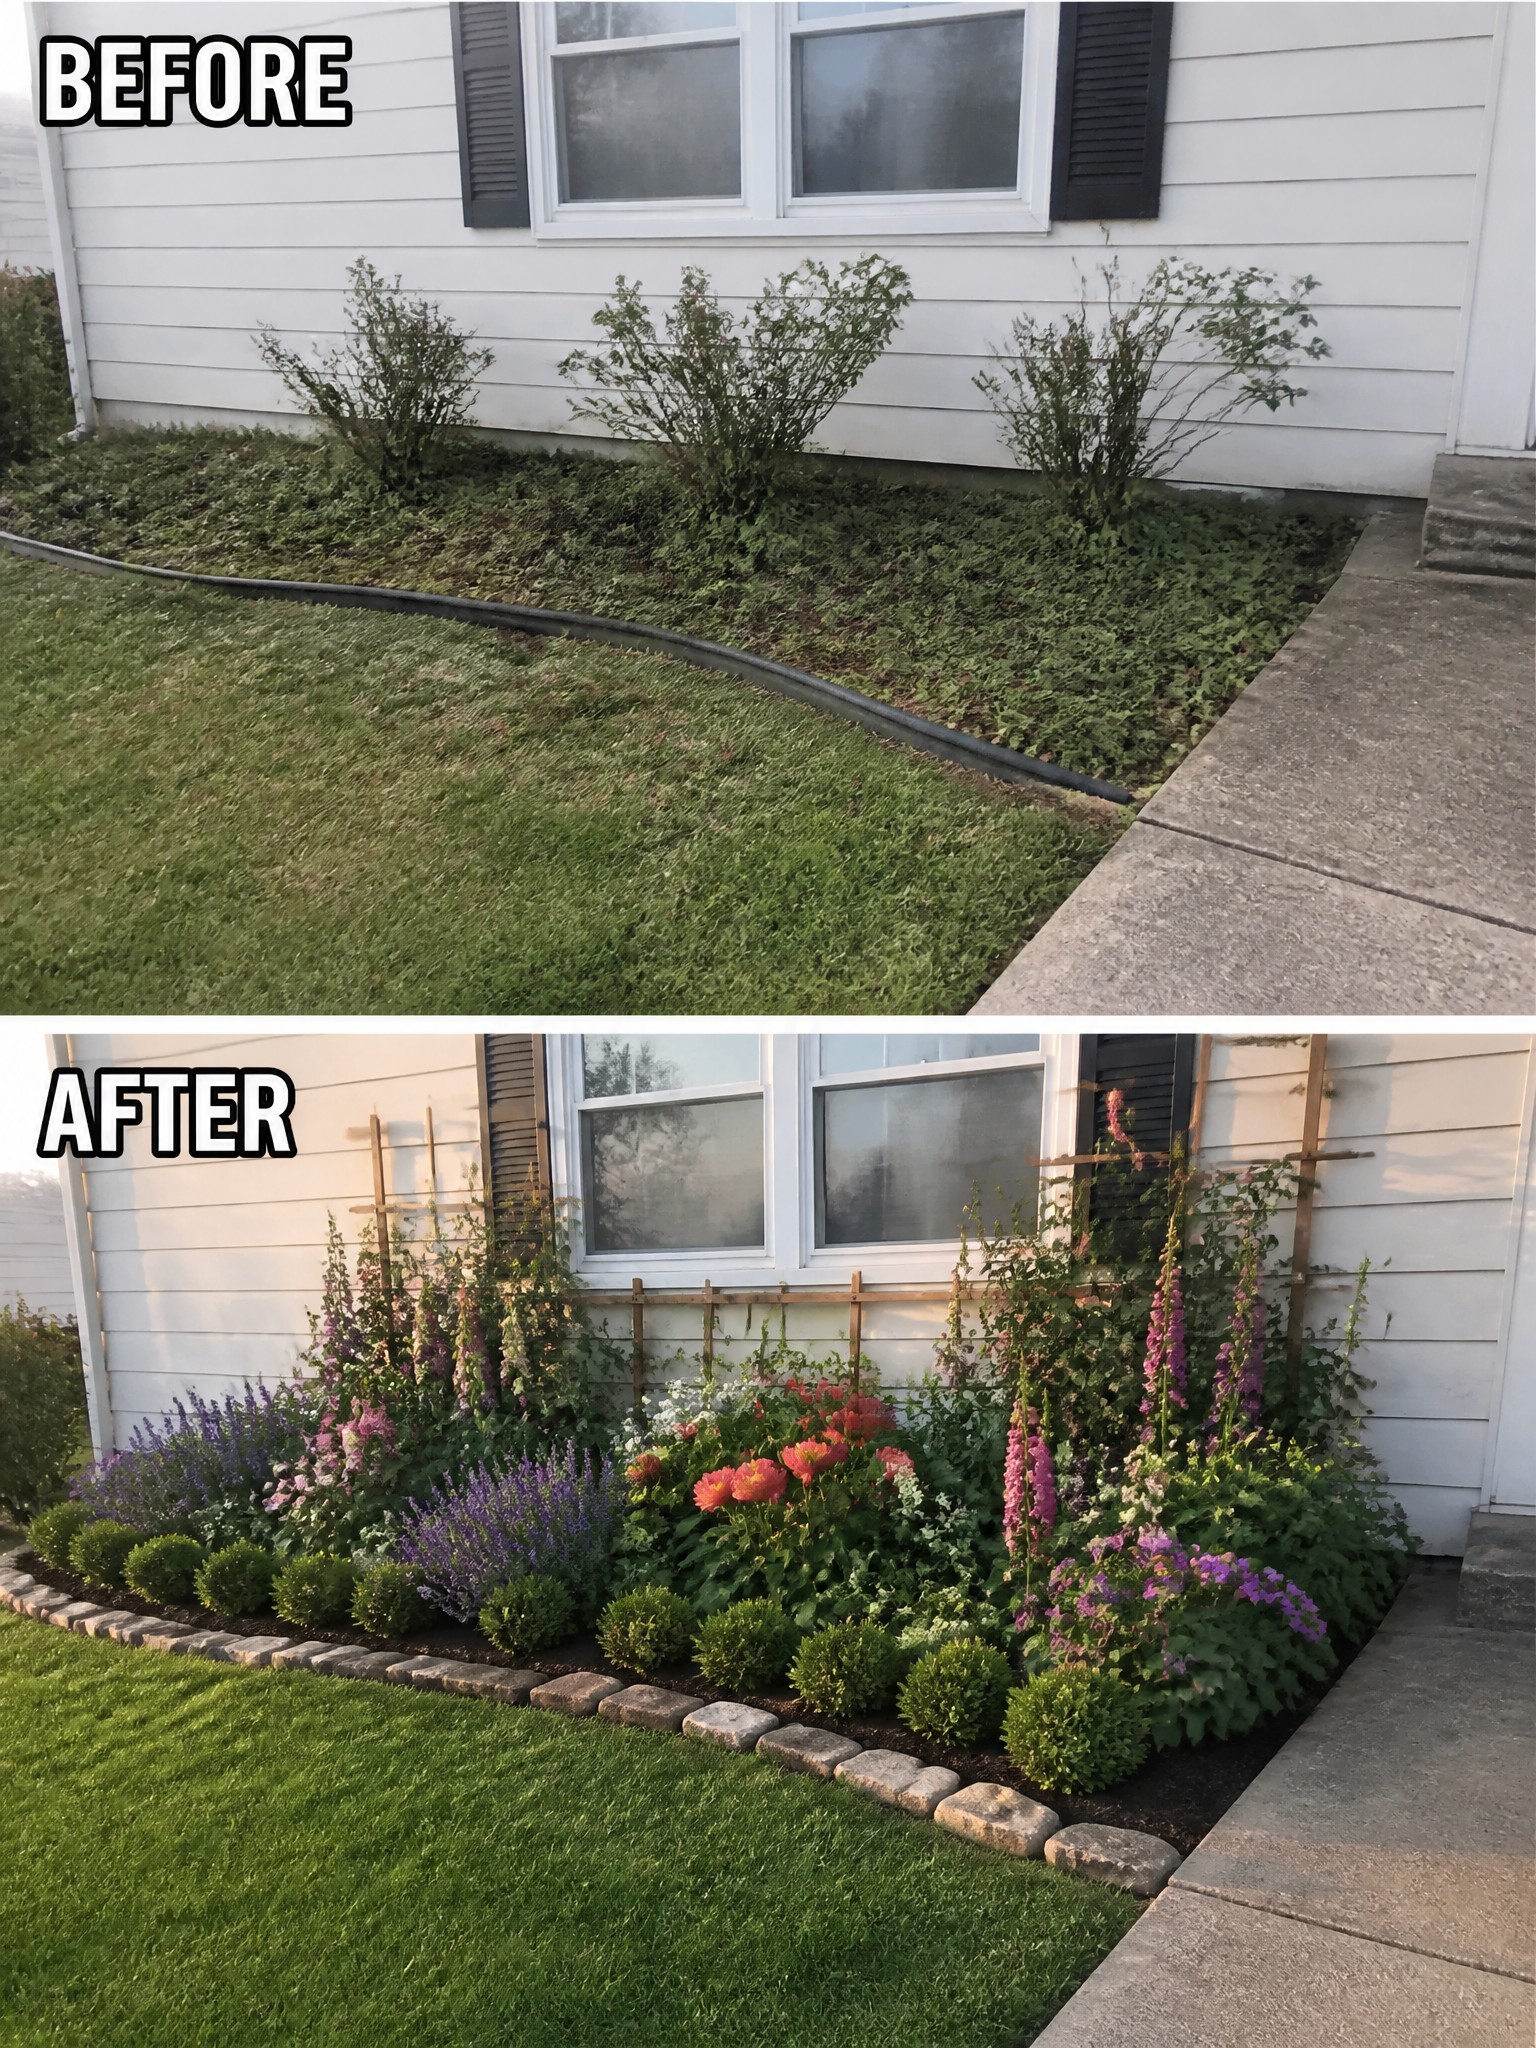
The biggest change here came from giving the messy strip along the house a clear edge. Before, the plants just faded into the lawn with no real shape. Adding a low stone border and pulling everything into one defined bed made the whole front look intentional instead of neglected.
This approach works especially well on narrow foundation areas where things tend to sprawl. Lay out the edging first so you can see the shape before you plant, then fill in with a mix of low shrubs and taller flowers that stay in scale with the windows. Keep the curve gentle and leave enough room between plants so they can fill in without crowding.
Turn A Messy Front Strip Into A Defined Bed
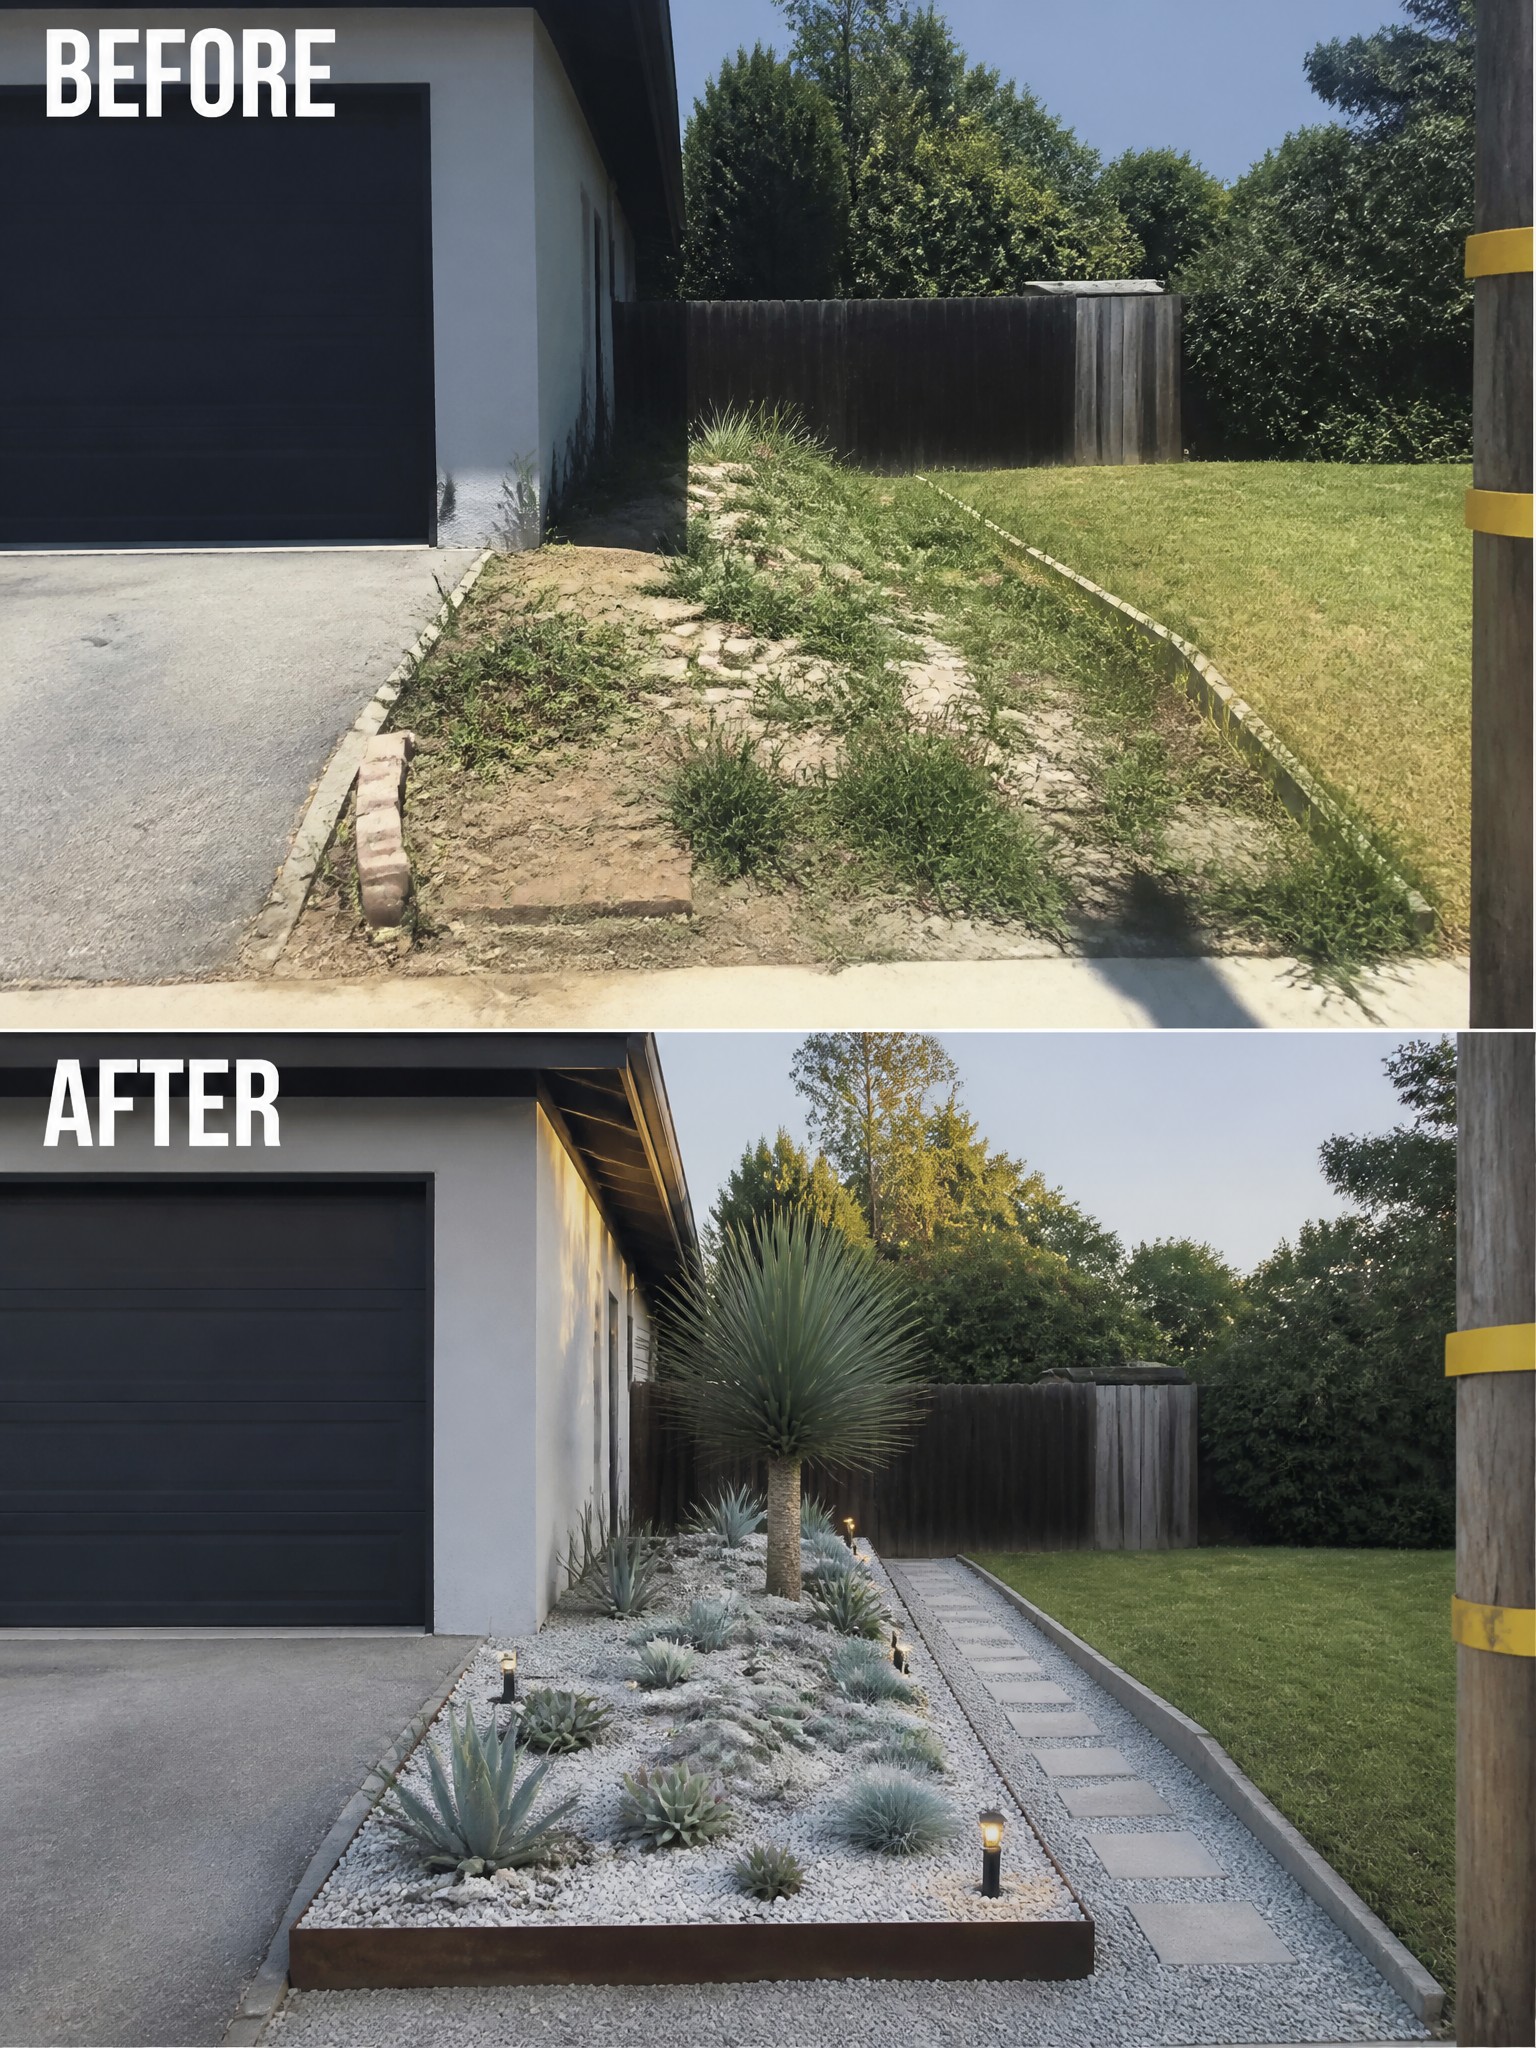
A weedy dirt path next to the house can make the whole front look unfinished. The change here came from adding a raised metal edge, filling it with gravel, and planting a few larger agaves and a yucca. That single move gave the area clear shape and turned the side strip into something that actually belongs with the house.
This idea works well on narrow spaces between the driveway and lawn. Start with a simple border and gravel to keep weeds down, then add just a few bigger plants so the bed does not feel crowded. It keeps maintenance low and gives the front a tidier look without needing a full redesign.
Use Edging To Create Defined Garden Beds
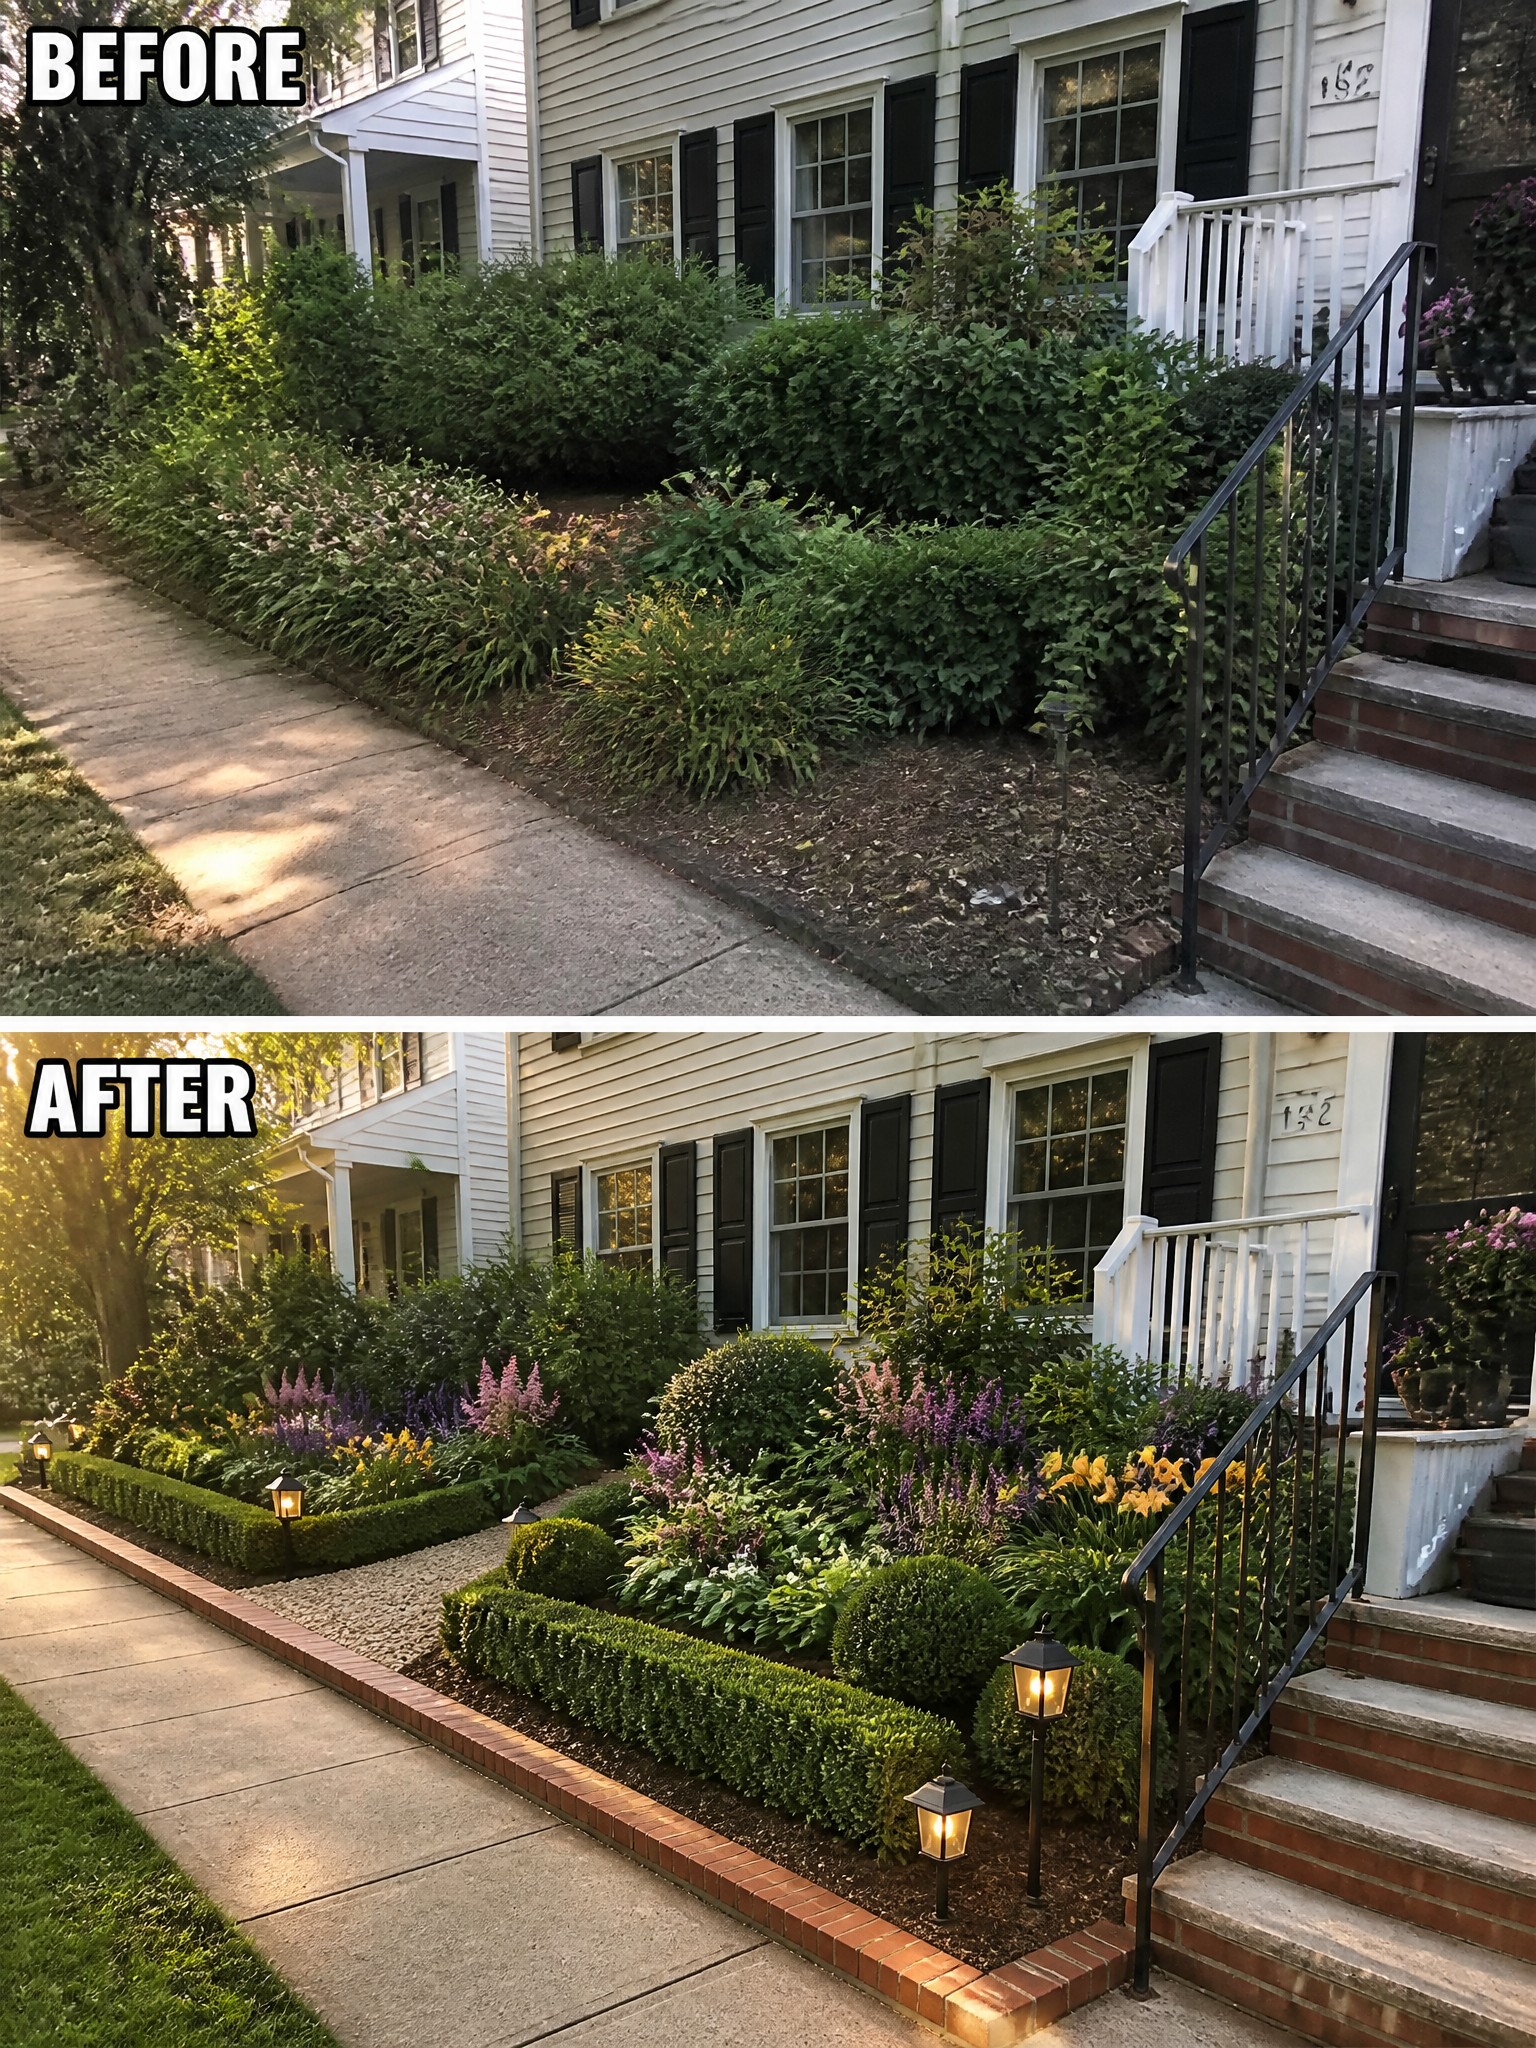
The front strip along the sidewalk looked messy and overgrown before any work was done. Adding a clear brick edge changed the whole feel by giving the planting area a firm boundary and letting the beds sit at a consistent height.
This approach works well on narrow strips next to walkways or driveways where the lawn and garden tend to blend together. Start with the edging first, then fill in with a simple mix of low shrubs and a few taller plants so the bed stays easy to maintain.
Add Raised Planters Along A Front Walkway
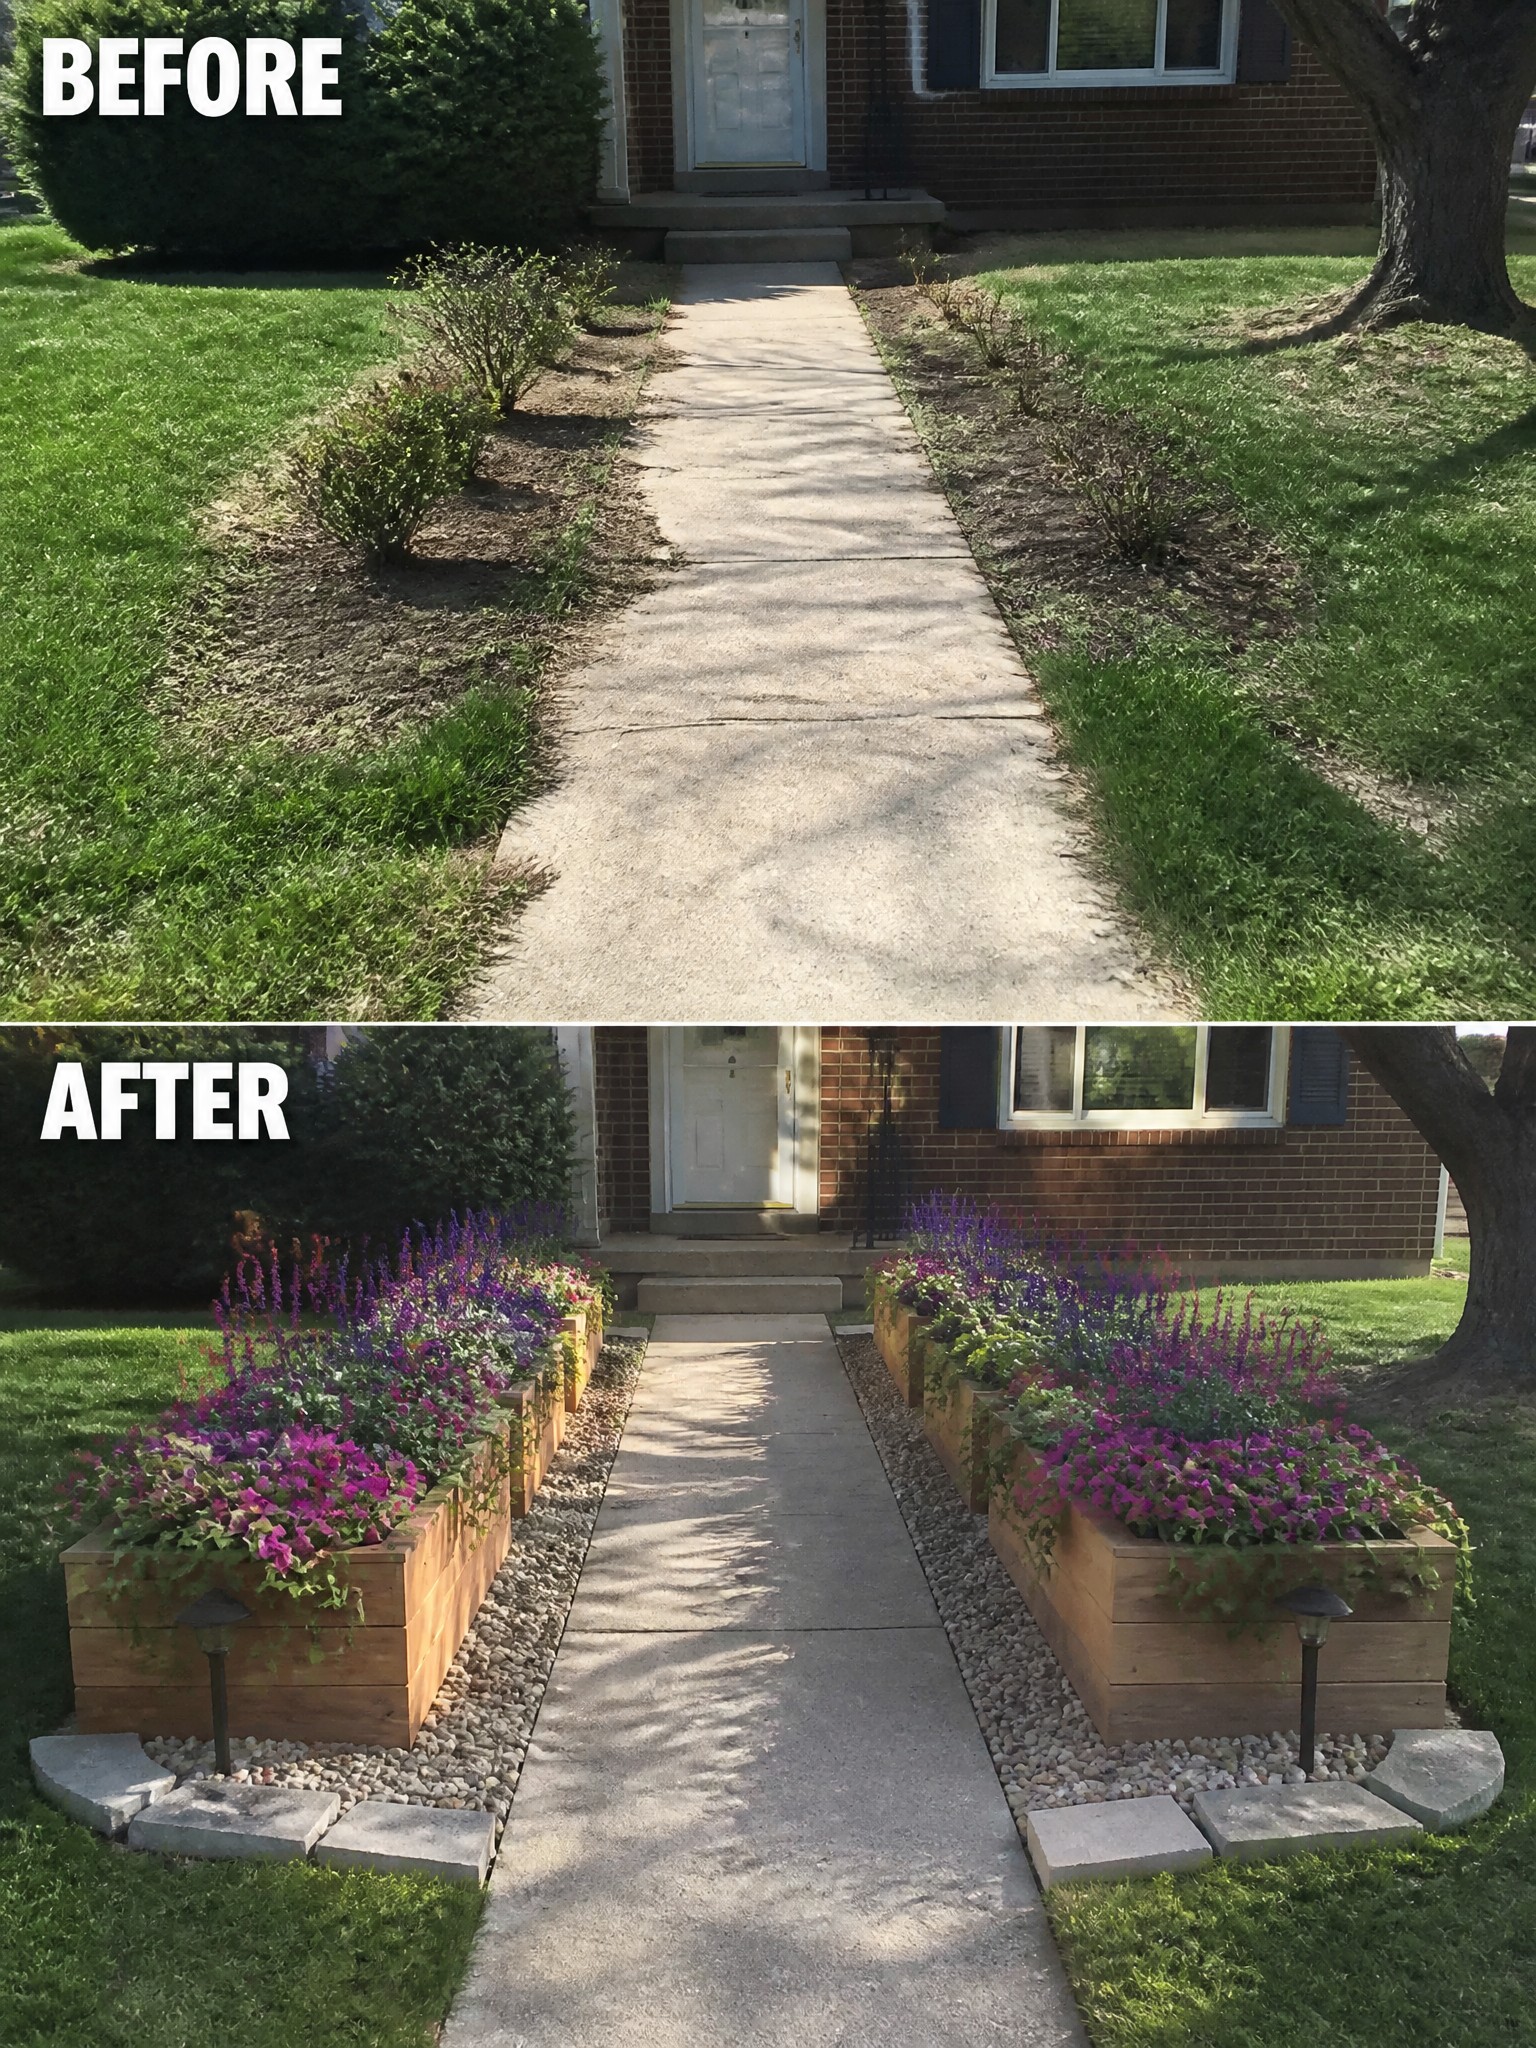
Raised planters give a straight concrete path clear borders and turn empty strips of dirt into something useful. In the before photo the edges looked neglected with only a few small shrubs. After the change the walkway feels more finished because the wooden boxes hold full plantings and the gravel base keeps everything neat.
This works well on homes with a simple front path that leads straight to the door. Use weather-treated wood and keep the boxes low enough that they do not block the view from the street. Fill them with a mix of taller flowers in the back and trailing plants in front so the color stays visible from the sidewalk.
Add Retaining Walls To Create Defined Flower Beds

A sloped front yard often stays bare because the soil washes away and nothing seems to hold. Stacking a low stone retaining wall turns that slope into a flat planting bed where flowers and shrubs can actually stay in place. The change from patchy grass to a clean edge with layered plants makes the whole yard look planned instead of neglected.
This idea works best on gentle slopes where you still want lawn below. Build the wall first, then fill behind it with decent soil and repeat the same plants across the bed so the look stays simple. Keep the wall height low enough that it does not need extra permits, and add a few lights along the edge if you want the bed to show up at night.
Define A Street-Side Strip With Flower Beds
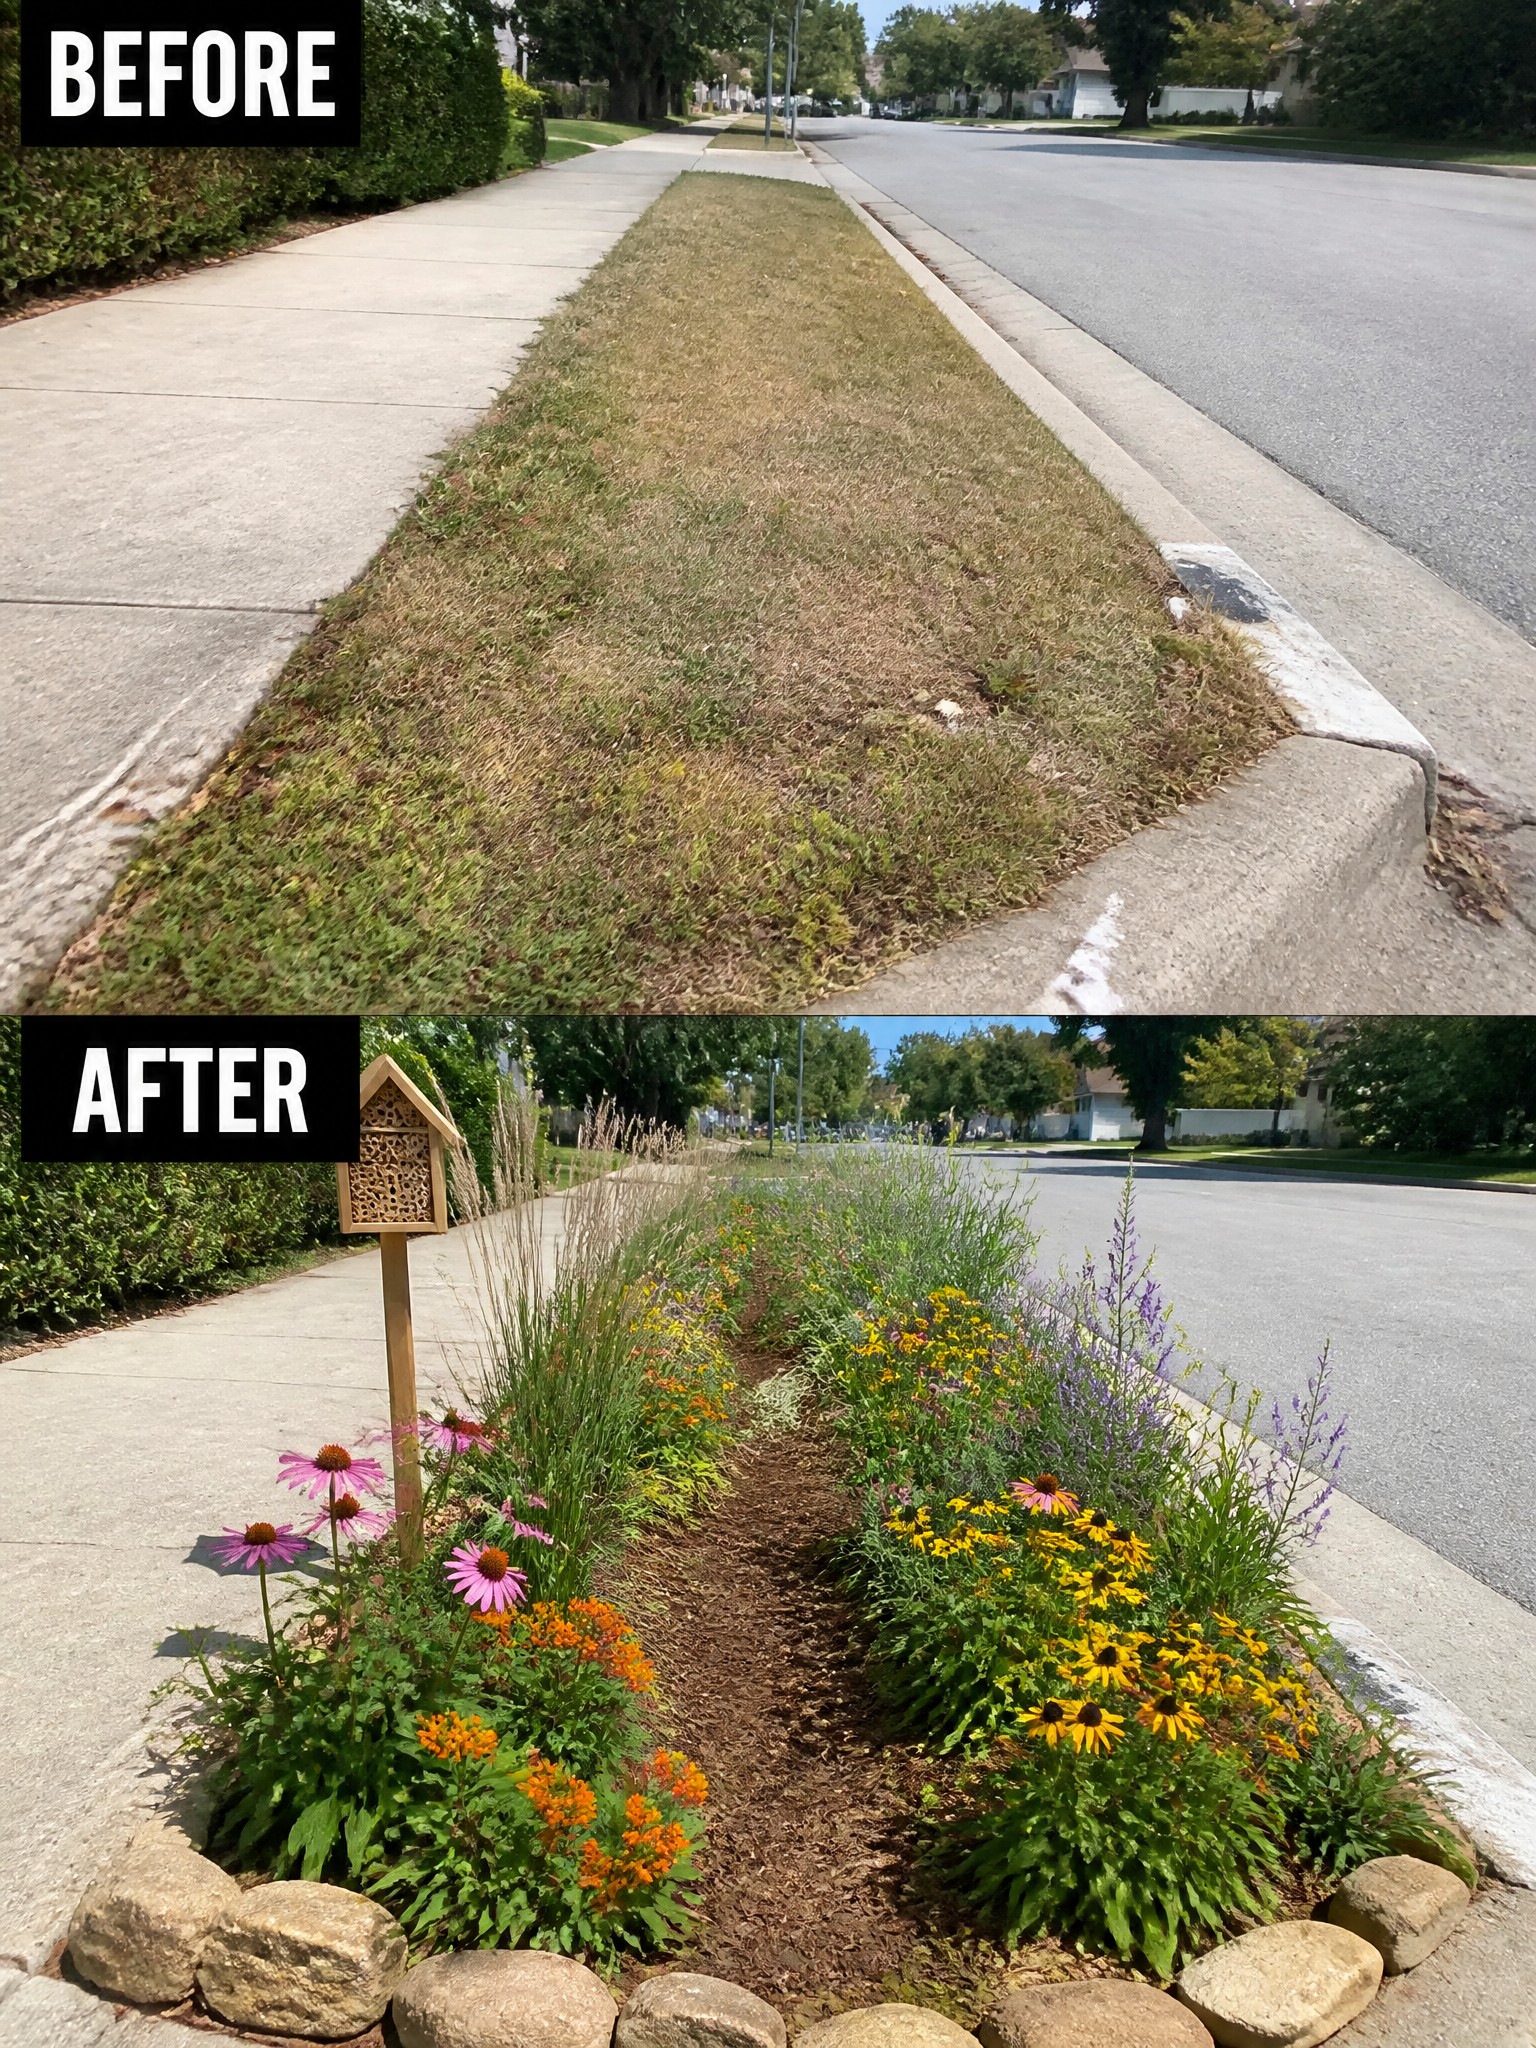
Many homes have that narrow strip of grass between the sidewalk and curb that turns patchy and difficult to mow. Adding clear borders and planting turns the space into something useful instead of an eyesore.
This approach suits suburban streets where you want color without losing too much lawn space. Use stones or similar edging to mark the beds, spread mulch to control weeds, and pick tough perennials that can handle sun and occasional foot traffic.
Add Defined Flower Beds Along The Front

A messy strip of mulch and scattered plants can make the front of a house look unfinished. Clearing the bed and planting in clear rows turns the same space into a neat border that gives the whole yard more purpose. The clean edge against the grass and the mix of low flowers in front with taller ones behind make the change feel planned rather than random.
This idea works on almost any home with a foundation bed. Focus first on cleanup and a simple layout, then choose plants that bloom at different times so the color lasts longer. Keep the rows straightforward so the bed stays easy to maintain and still looks good from the street.
Define Front Beds With Simple Edging
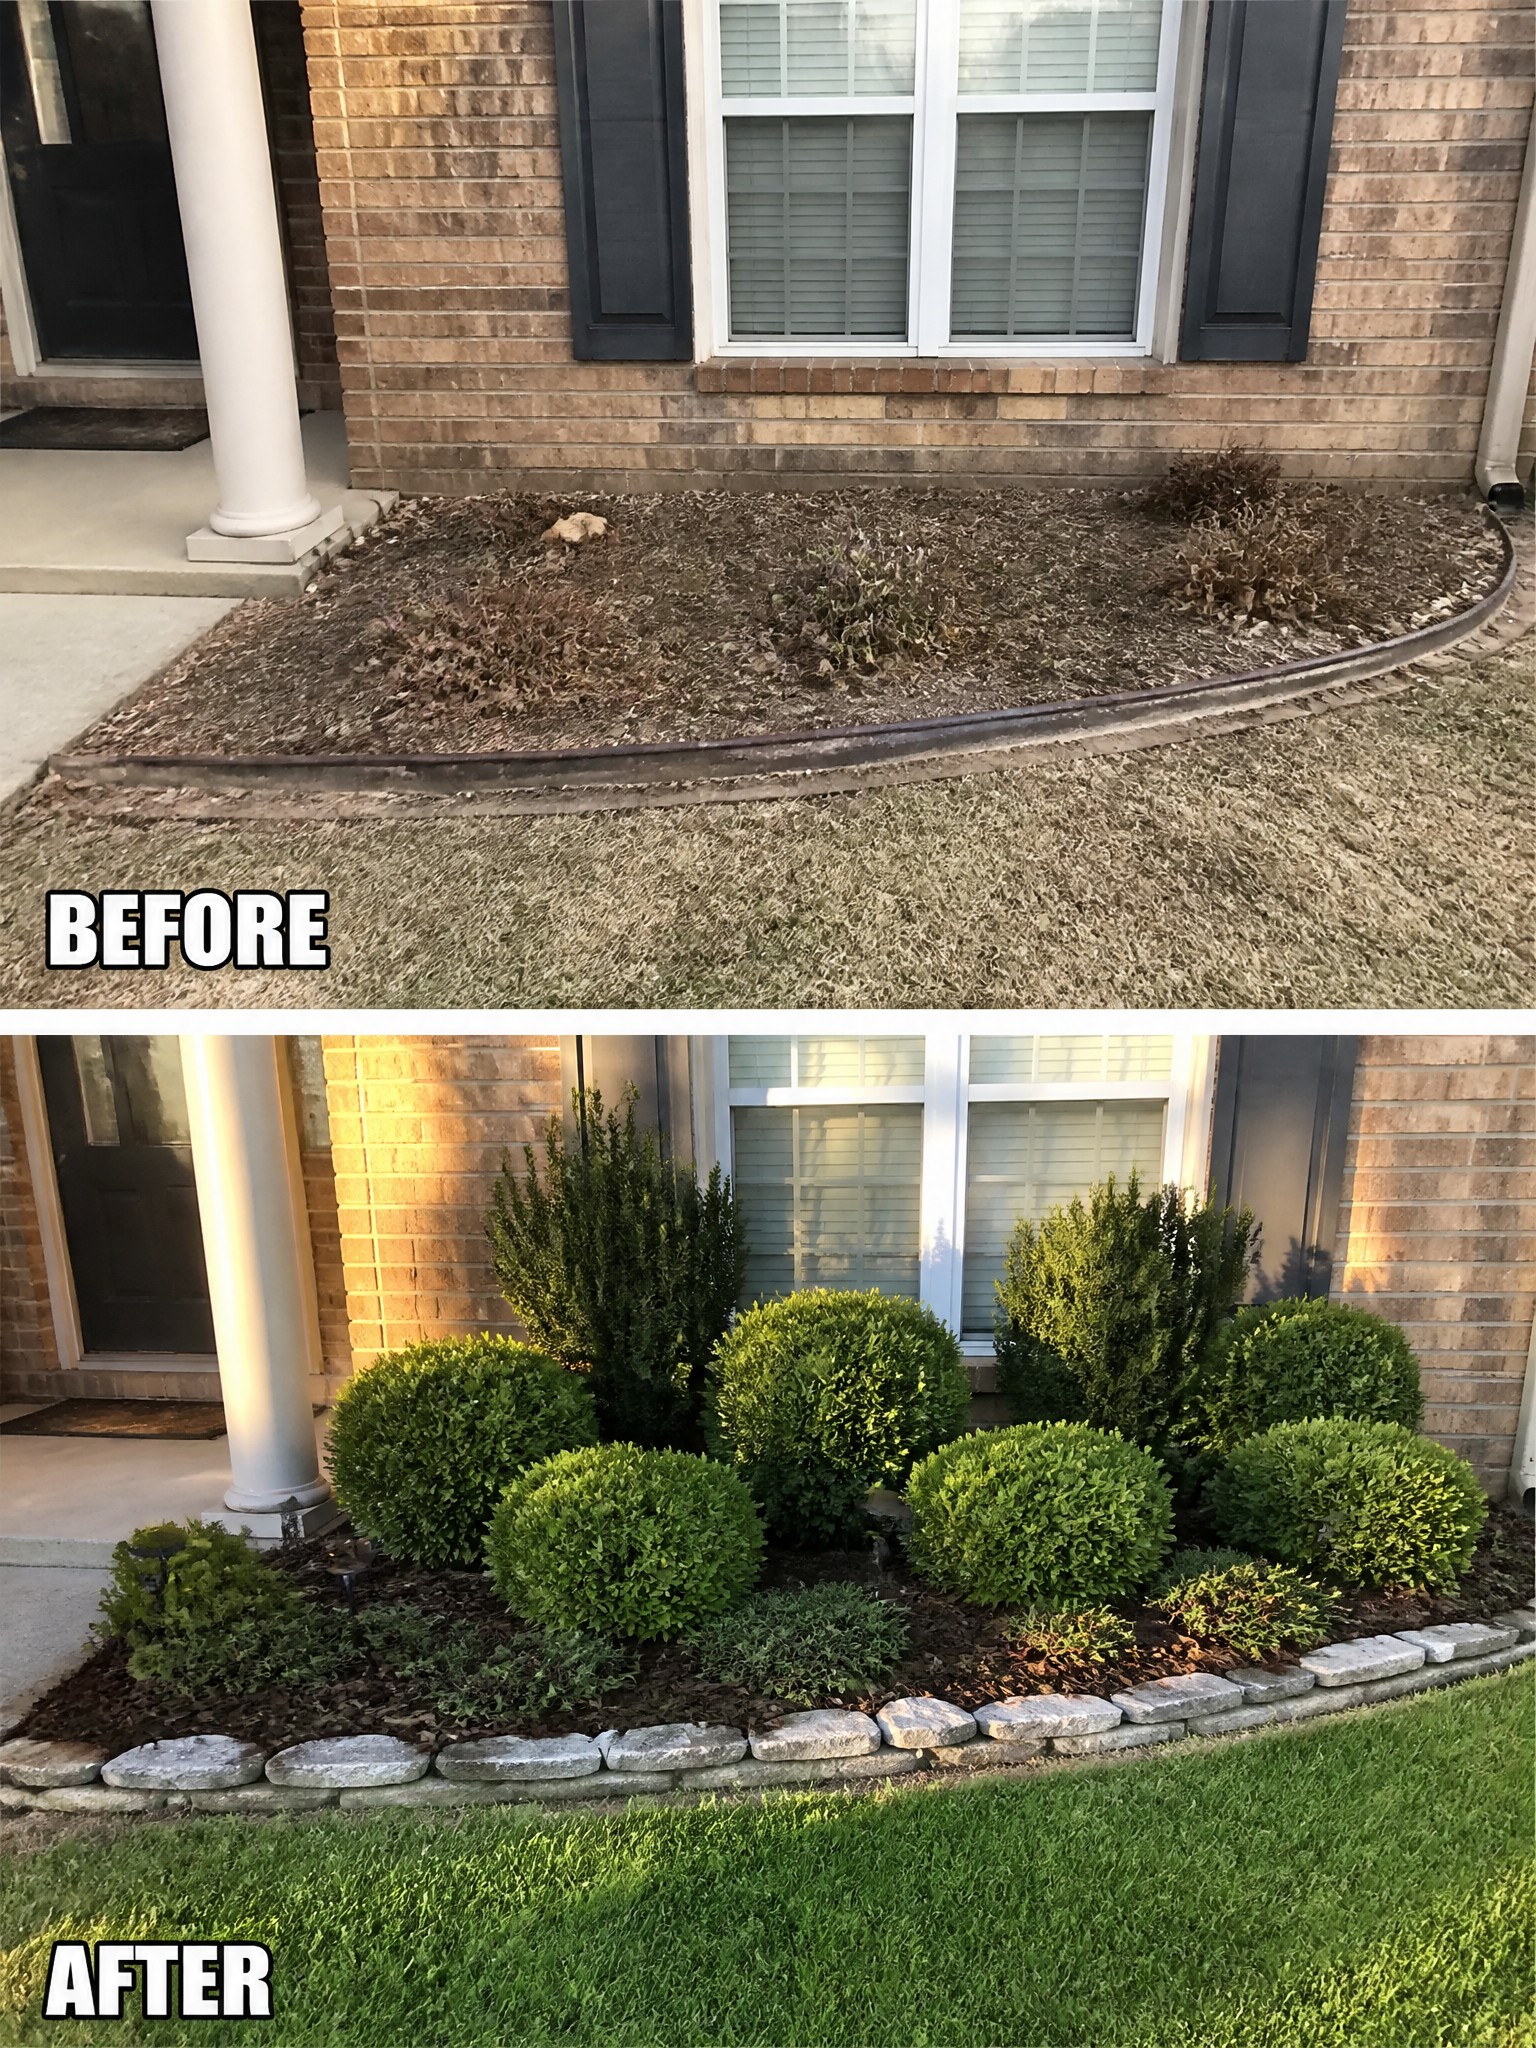
One of the quickest ways to improve a front yard is to give the flower beds clear edges instead of letting them fade into the lawn. The before photo shows a messy strip of dead plants and scattered mulch right against the house. Adding a low stone border and filling it with mulch and shrubs makes the bed look planned and contained.
This idea works best on homes where the beds run along the foundation. Clean out the old growth first, then lay edging to hold everything in place. Rounded shrubs keep the look full without needing constant trimming, and the result stays neat even in small front yards.
Add Layered Planting To A Front Flower Bed
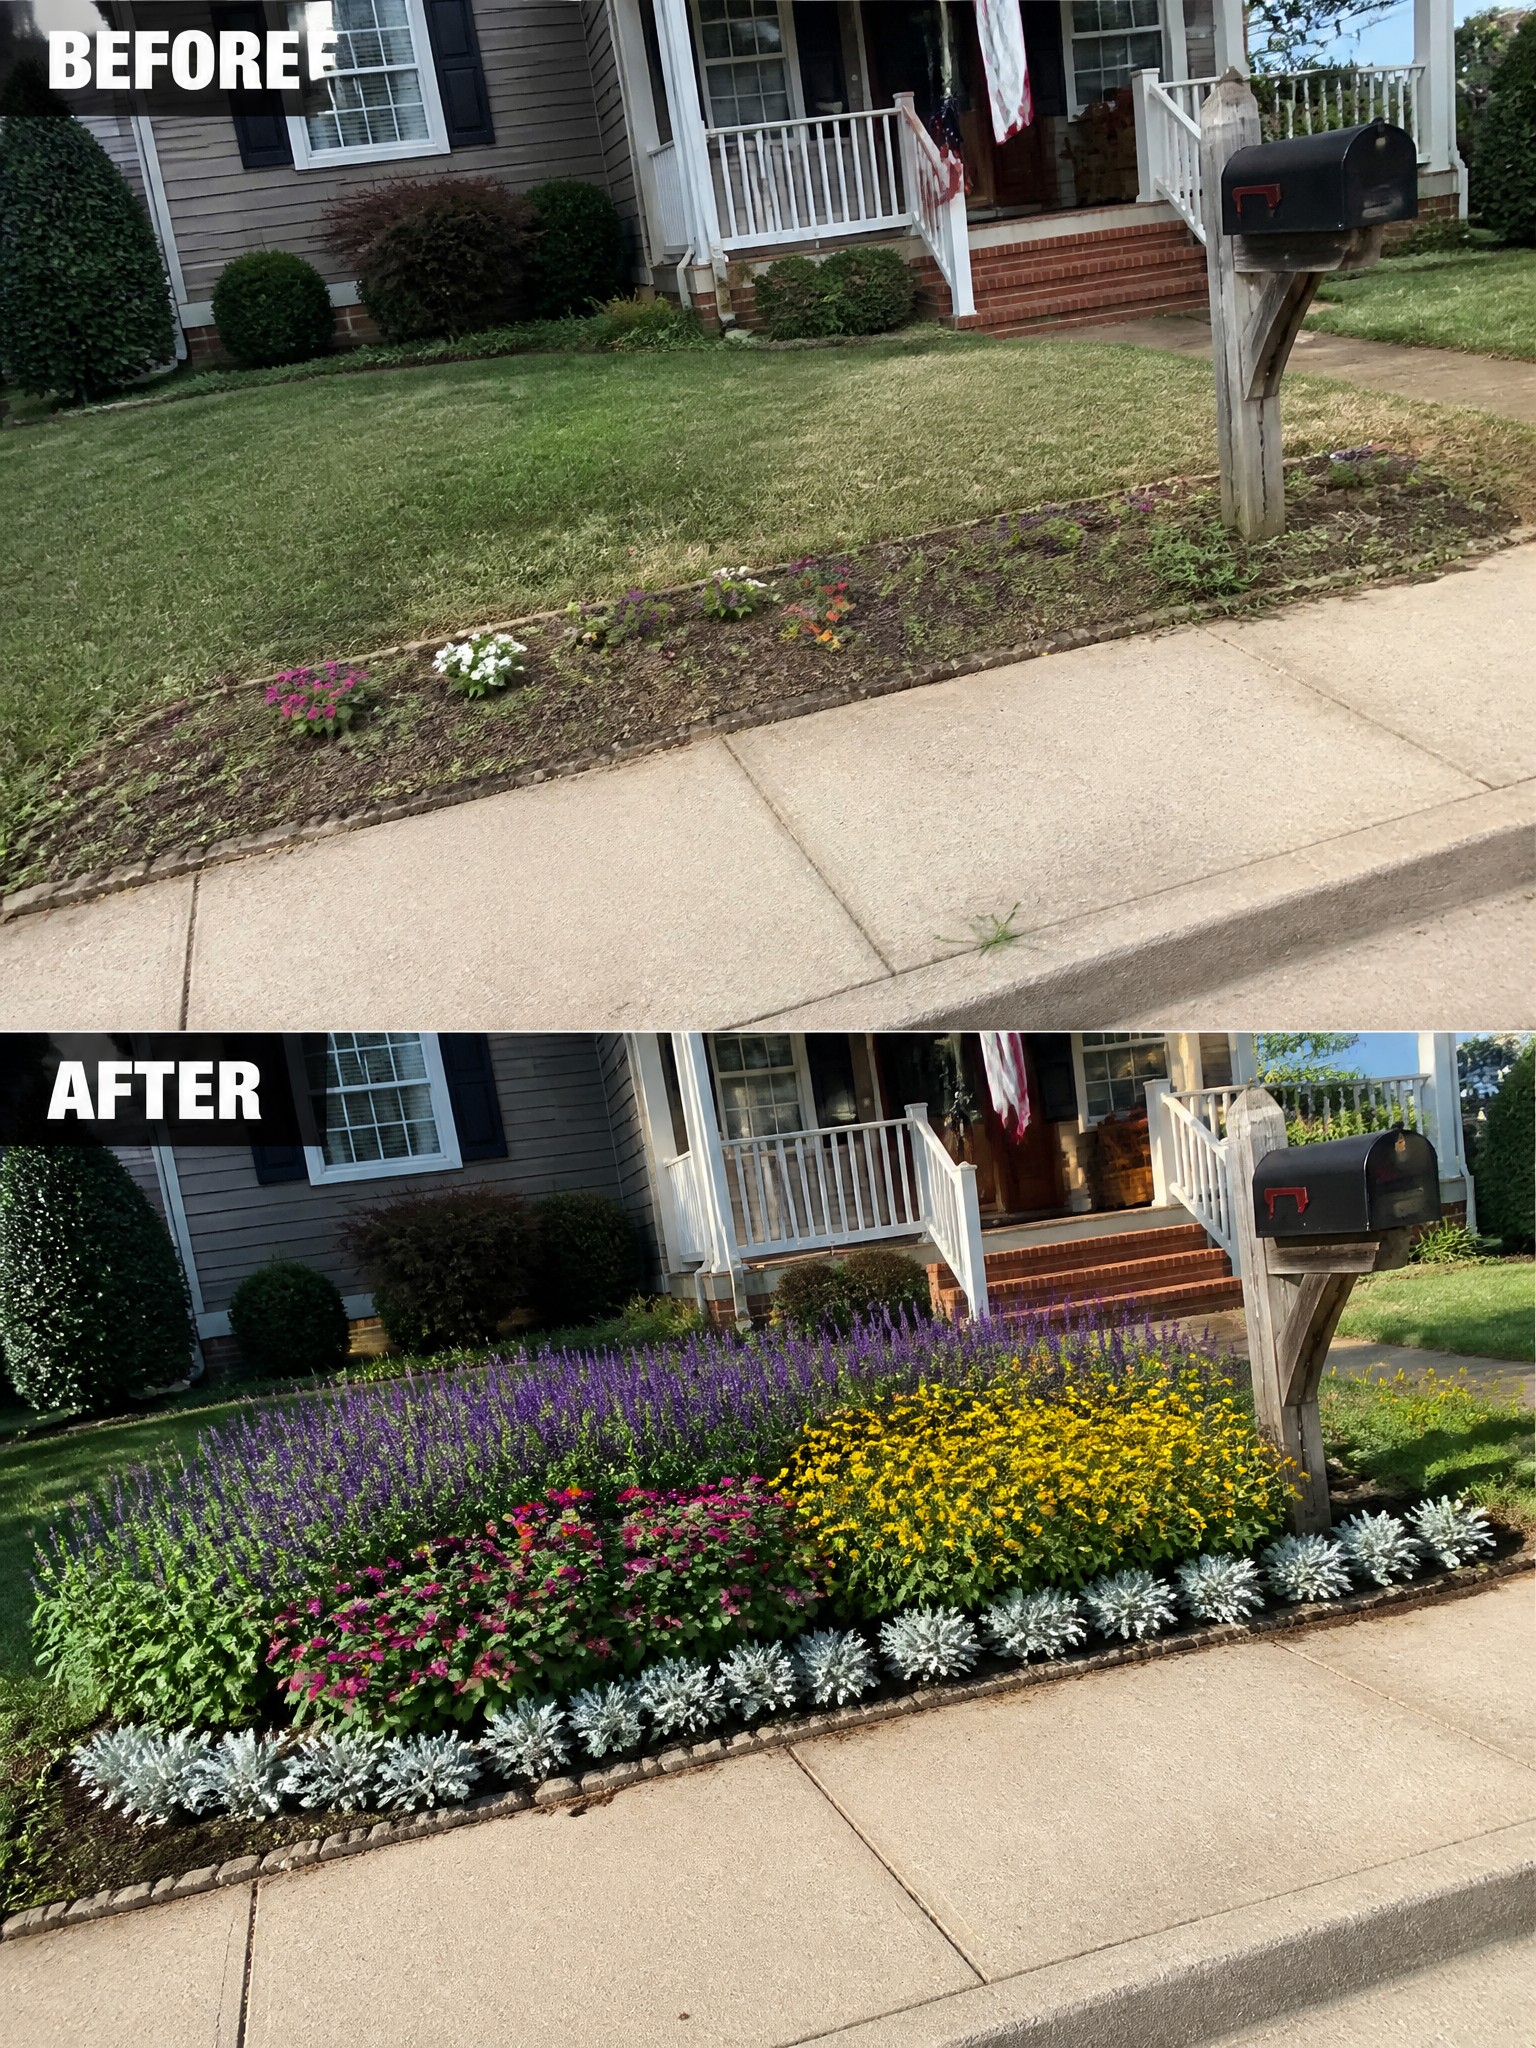
A thin strip of flowers next to the sidewalk does not do much for the house. Expanding that area into a wide bed with rows of taller plants in back and shorter ones in front gives the front yard real presence and makes the entry feel more intentional.
This idea works best on older homes that already have a clear lawn edge. Lay down simple brick or stone edging first, then choose plants with different bloom times and foliage colors so the bed stays full without looking crowded. Keep the front row low so the view from the street stays open.
Give The Foundation Bed A Clear Structure
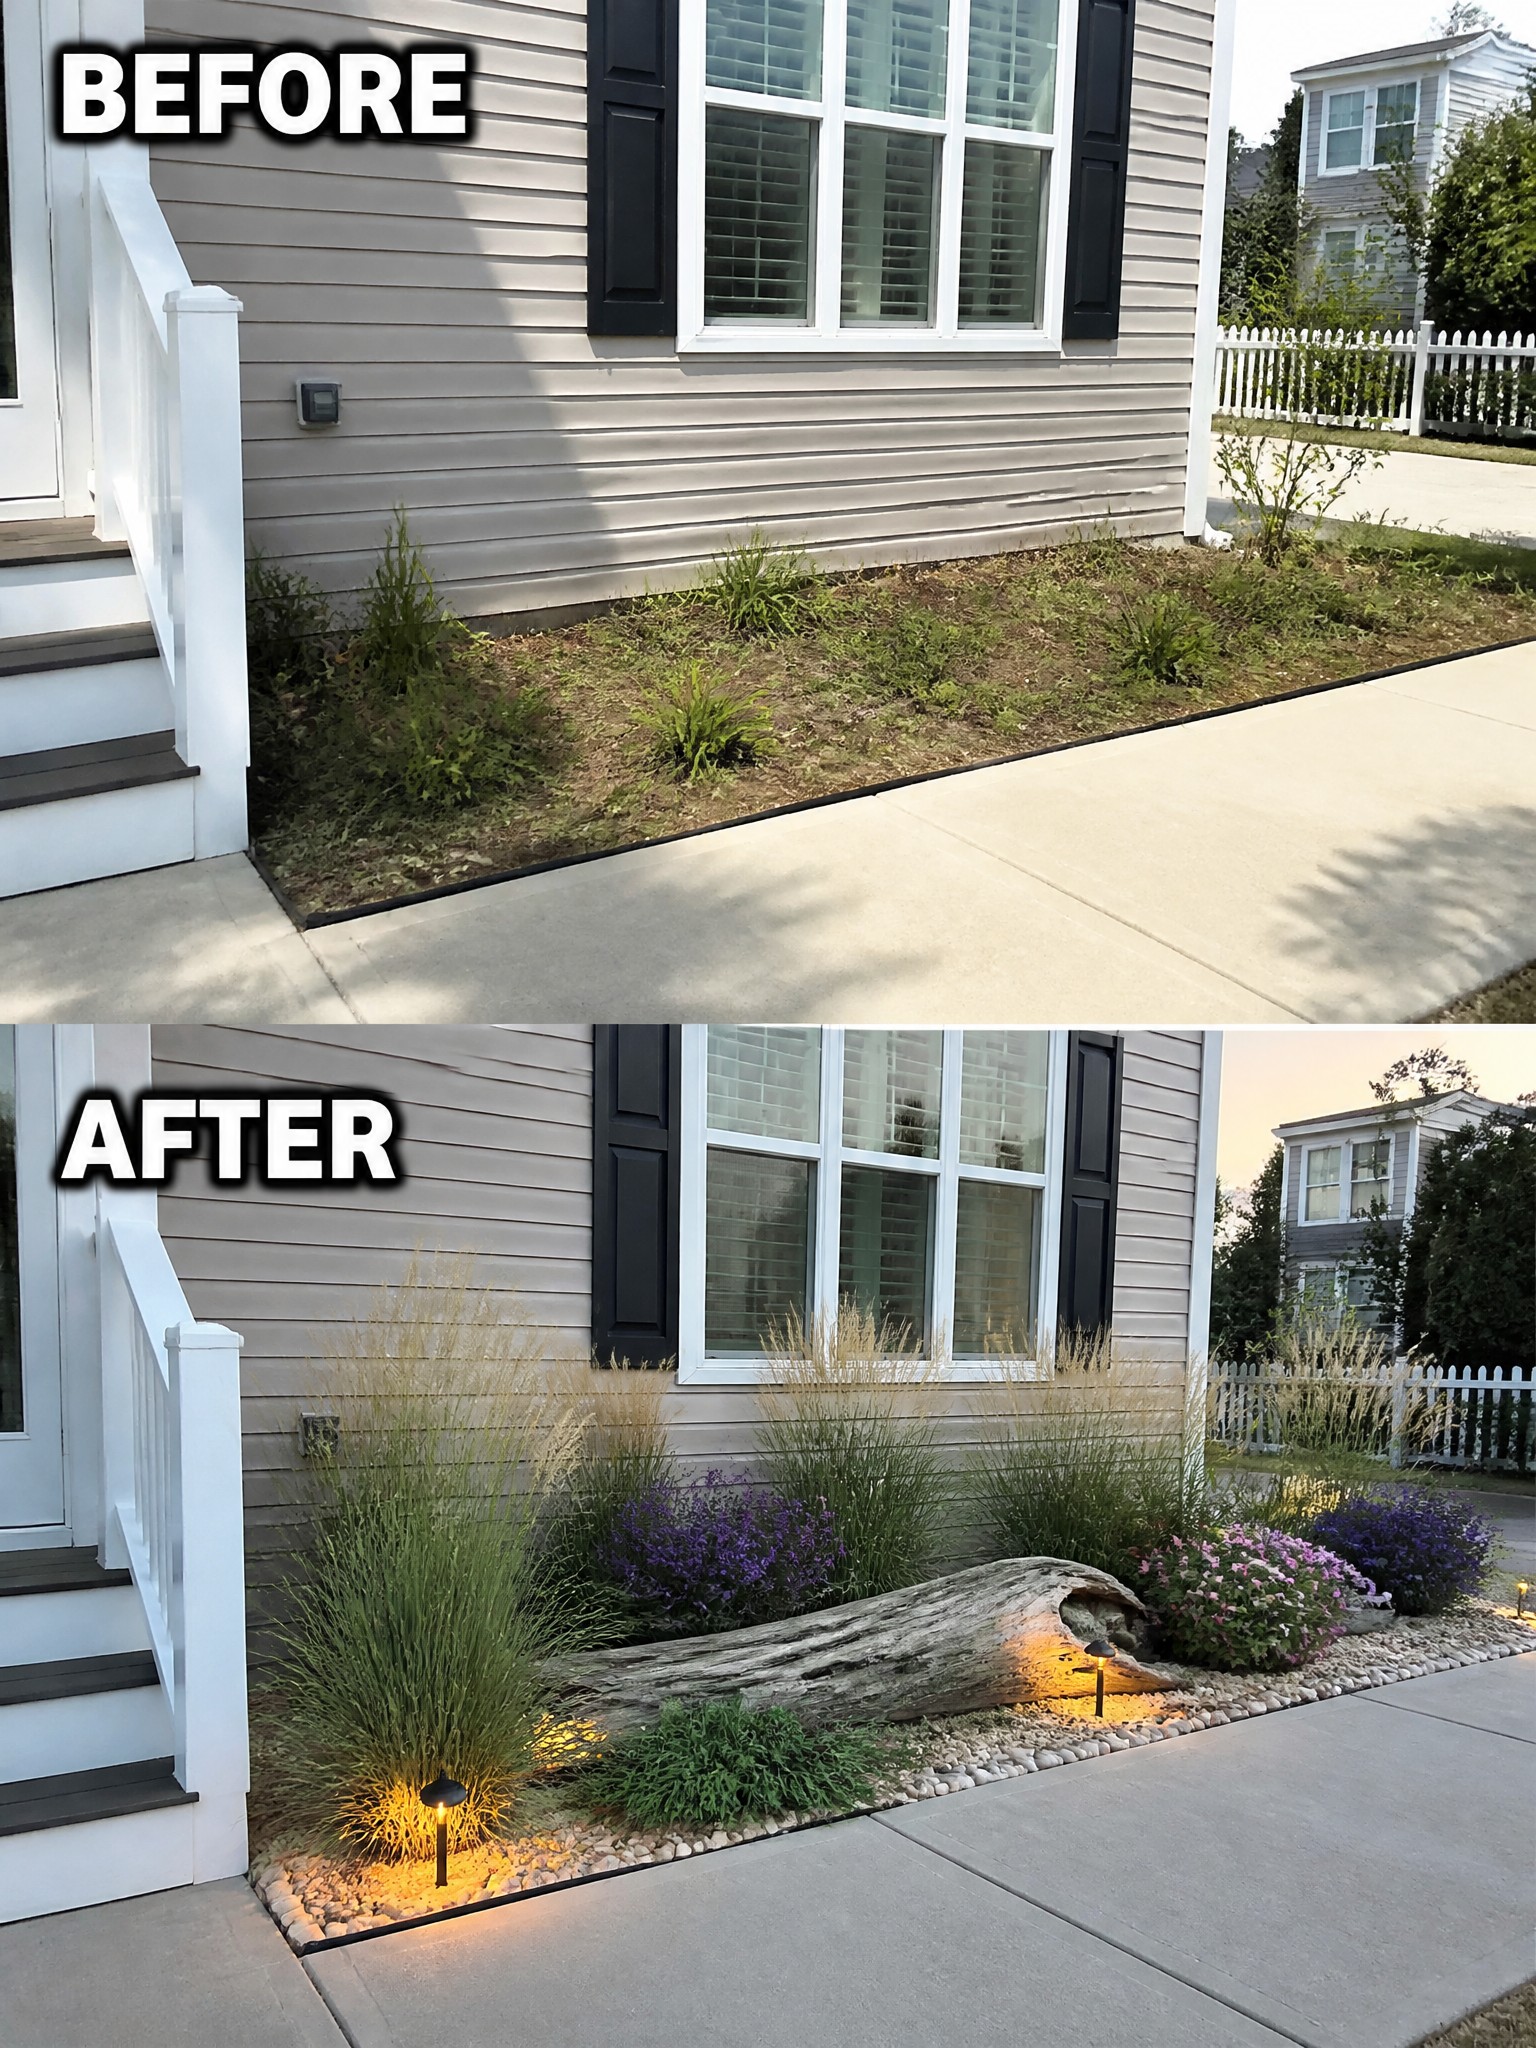
The main change here is turning a narrow, weedy strip of dirt along the house into a defined planting bed. Edging keeps the gravel in place, the plants are grouped for height and color, and one large log adds a focal point without crowding the space. The result makes the front of the house look finished instead of neglected.
This idea works well on any home where the foundation planting has grown messy or thin. Start by laying down a clean edge and mulch or gravel so the bed has shape. Then add a few taller grasses or shrubs for backbone and fill in with lower plants. Keep the scale modest so the bed does not block windows or walkways.
Add Defined Flower Beds Around The Front Entry

Replacing random pots with actual garden beds gives the entry a much cleaner look. The before version had plants scattered in mismatched containers that felt temporary, while the after uses neat beds filled with rounded shrubs and seasonal flowers to frame the steps.
This idea works especially well on older homes where the foundation area has grown uneven over time. Clear out the loose pots first, then shape two matching beds on either side of the walkway and repeat a few simple plants so the whole front feels planned rather than collected.
Add Structure To A Foundation Bed
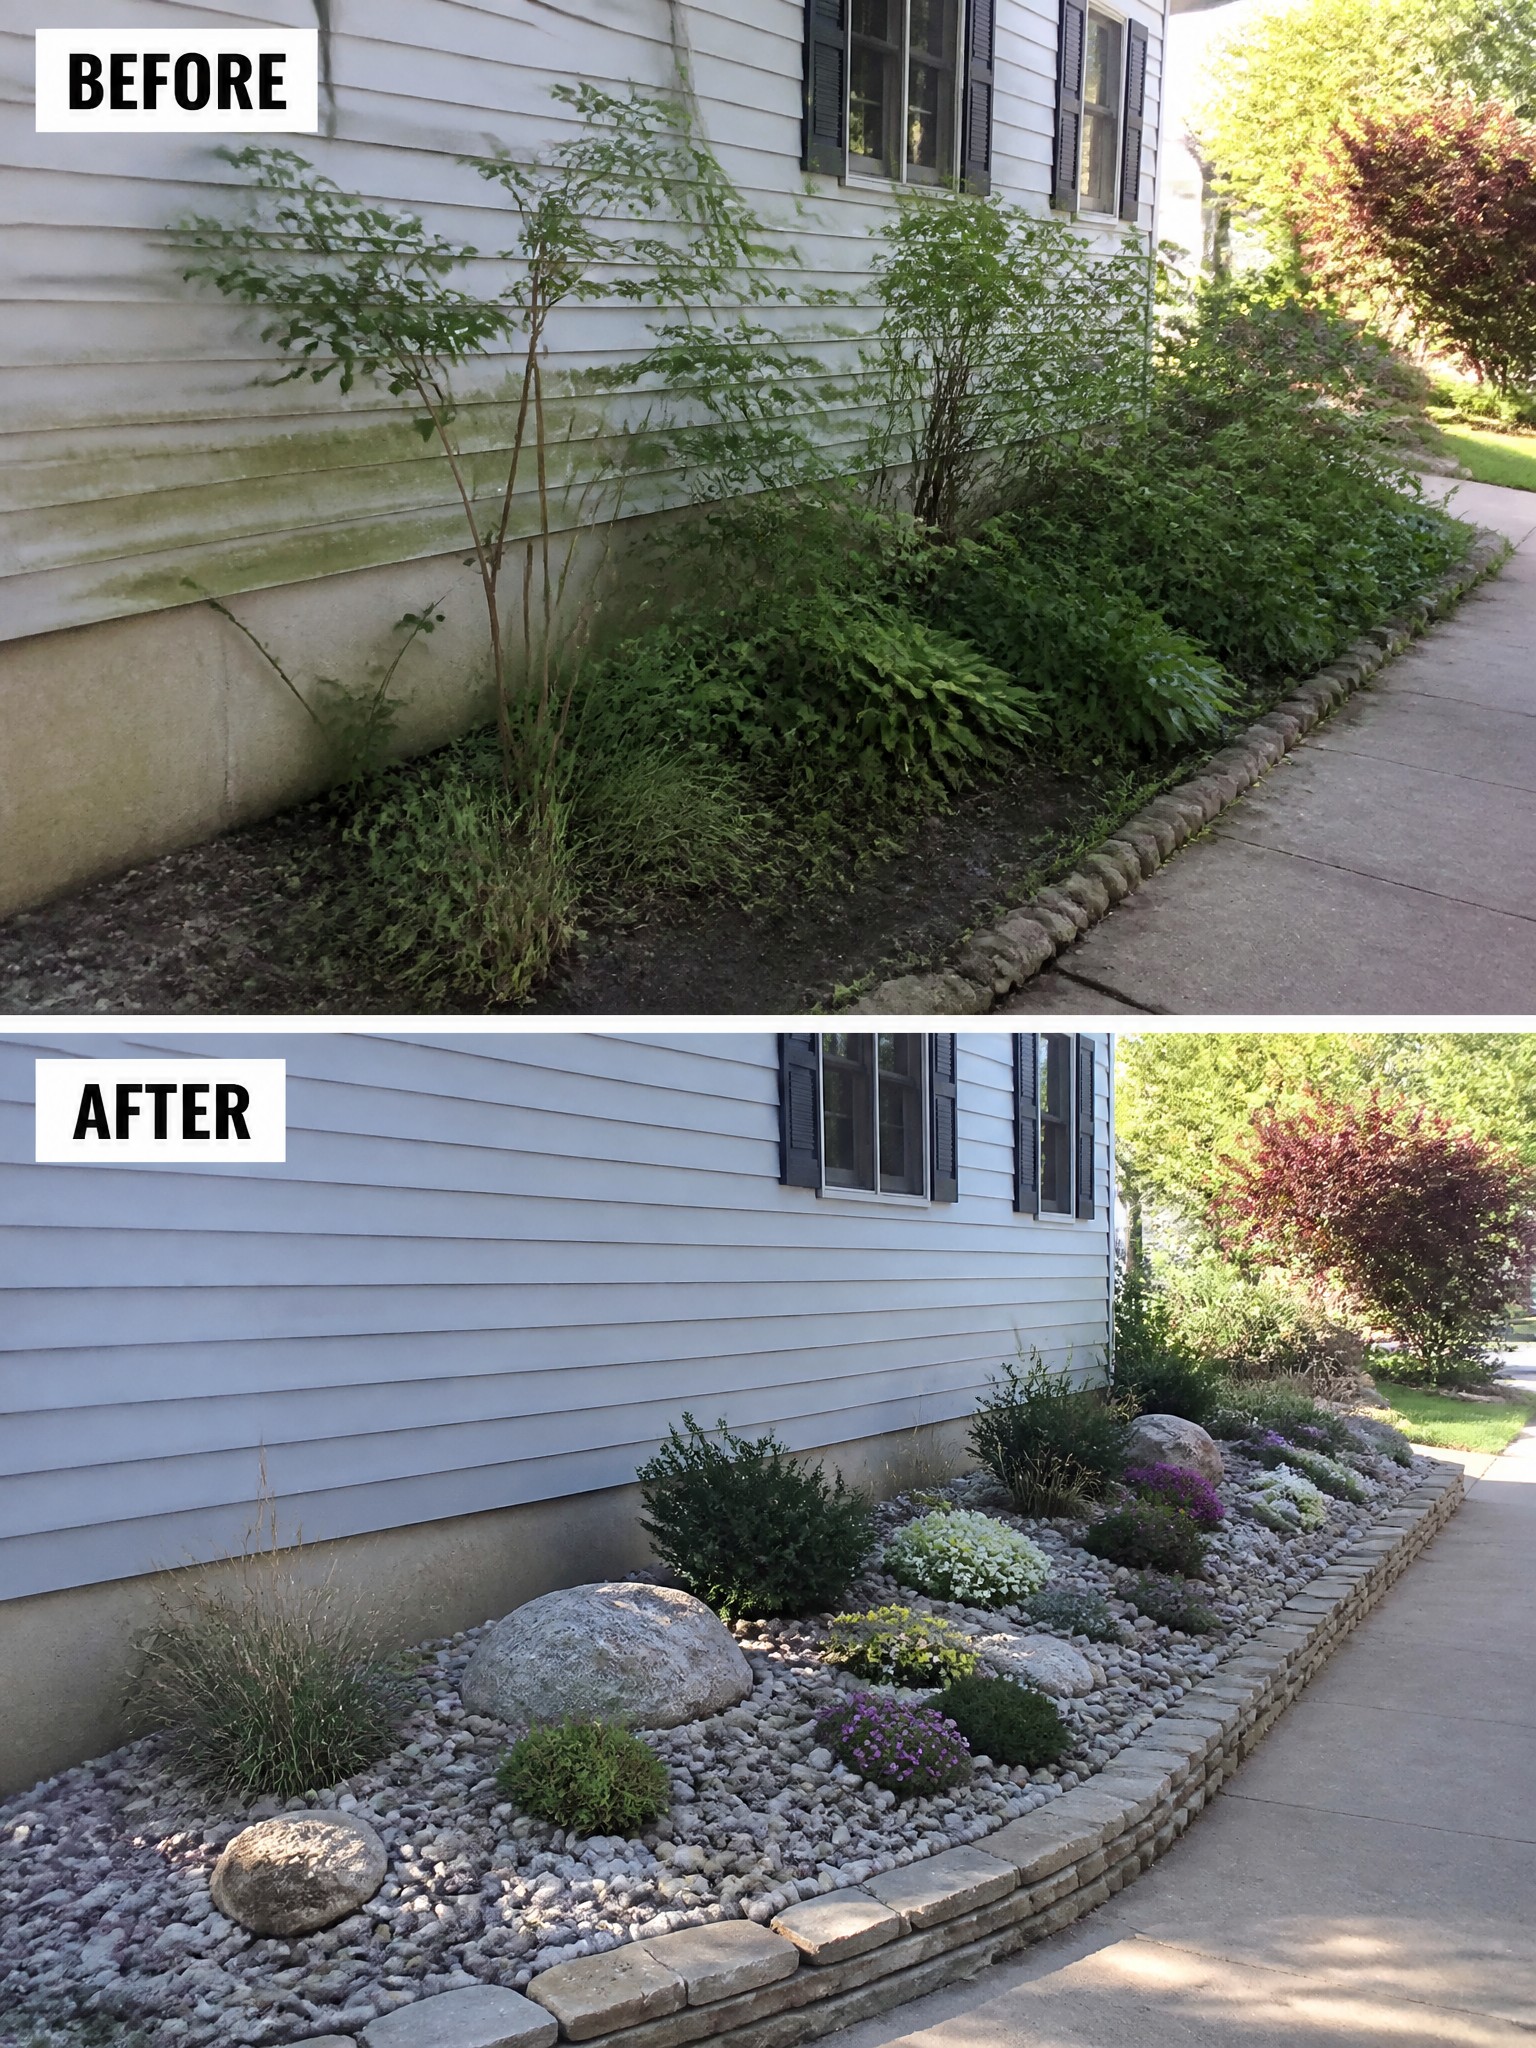
Many homes have a narrow strip of dirt along the foundation that quickly turns into a tangle of weeds and volunteer plants. Clearing that area and laying down a gravel base with a few larger rocks creates clear edges and keeps the house looking intentional instead of neglected.
The same approach works on any side of the house where you want low maintenance. Start by removing the old growth, add a simple border if needed, then use gravel to cover the soil and place a few boulders for weight. Low shrubs and ground cover can fill in the rest without crowding the wall.
Add Edging To Shape A Small Front Bed
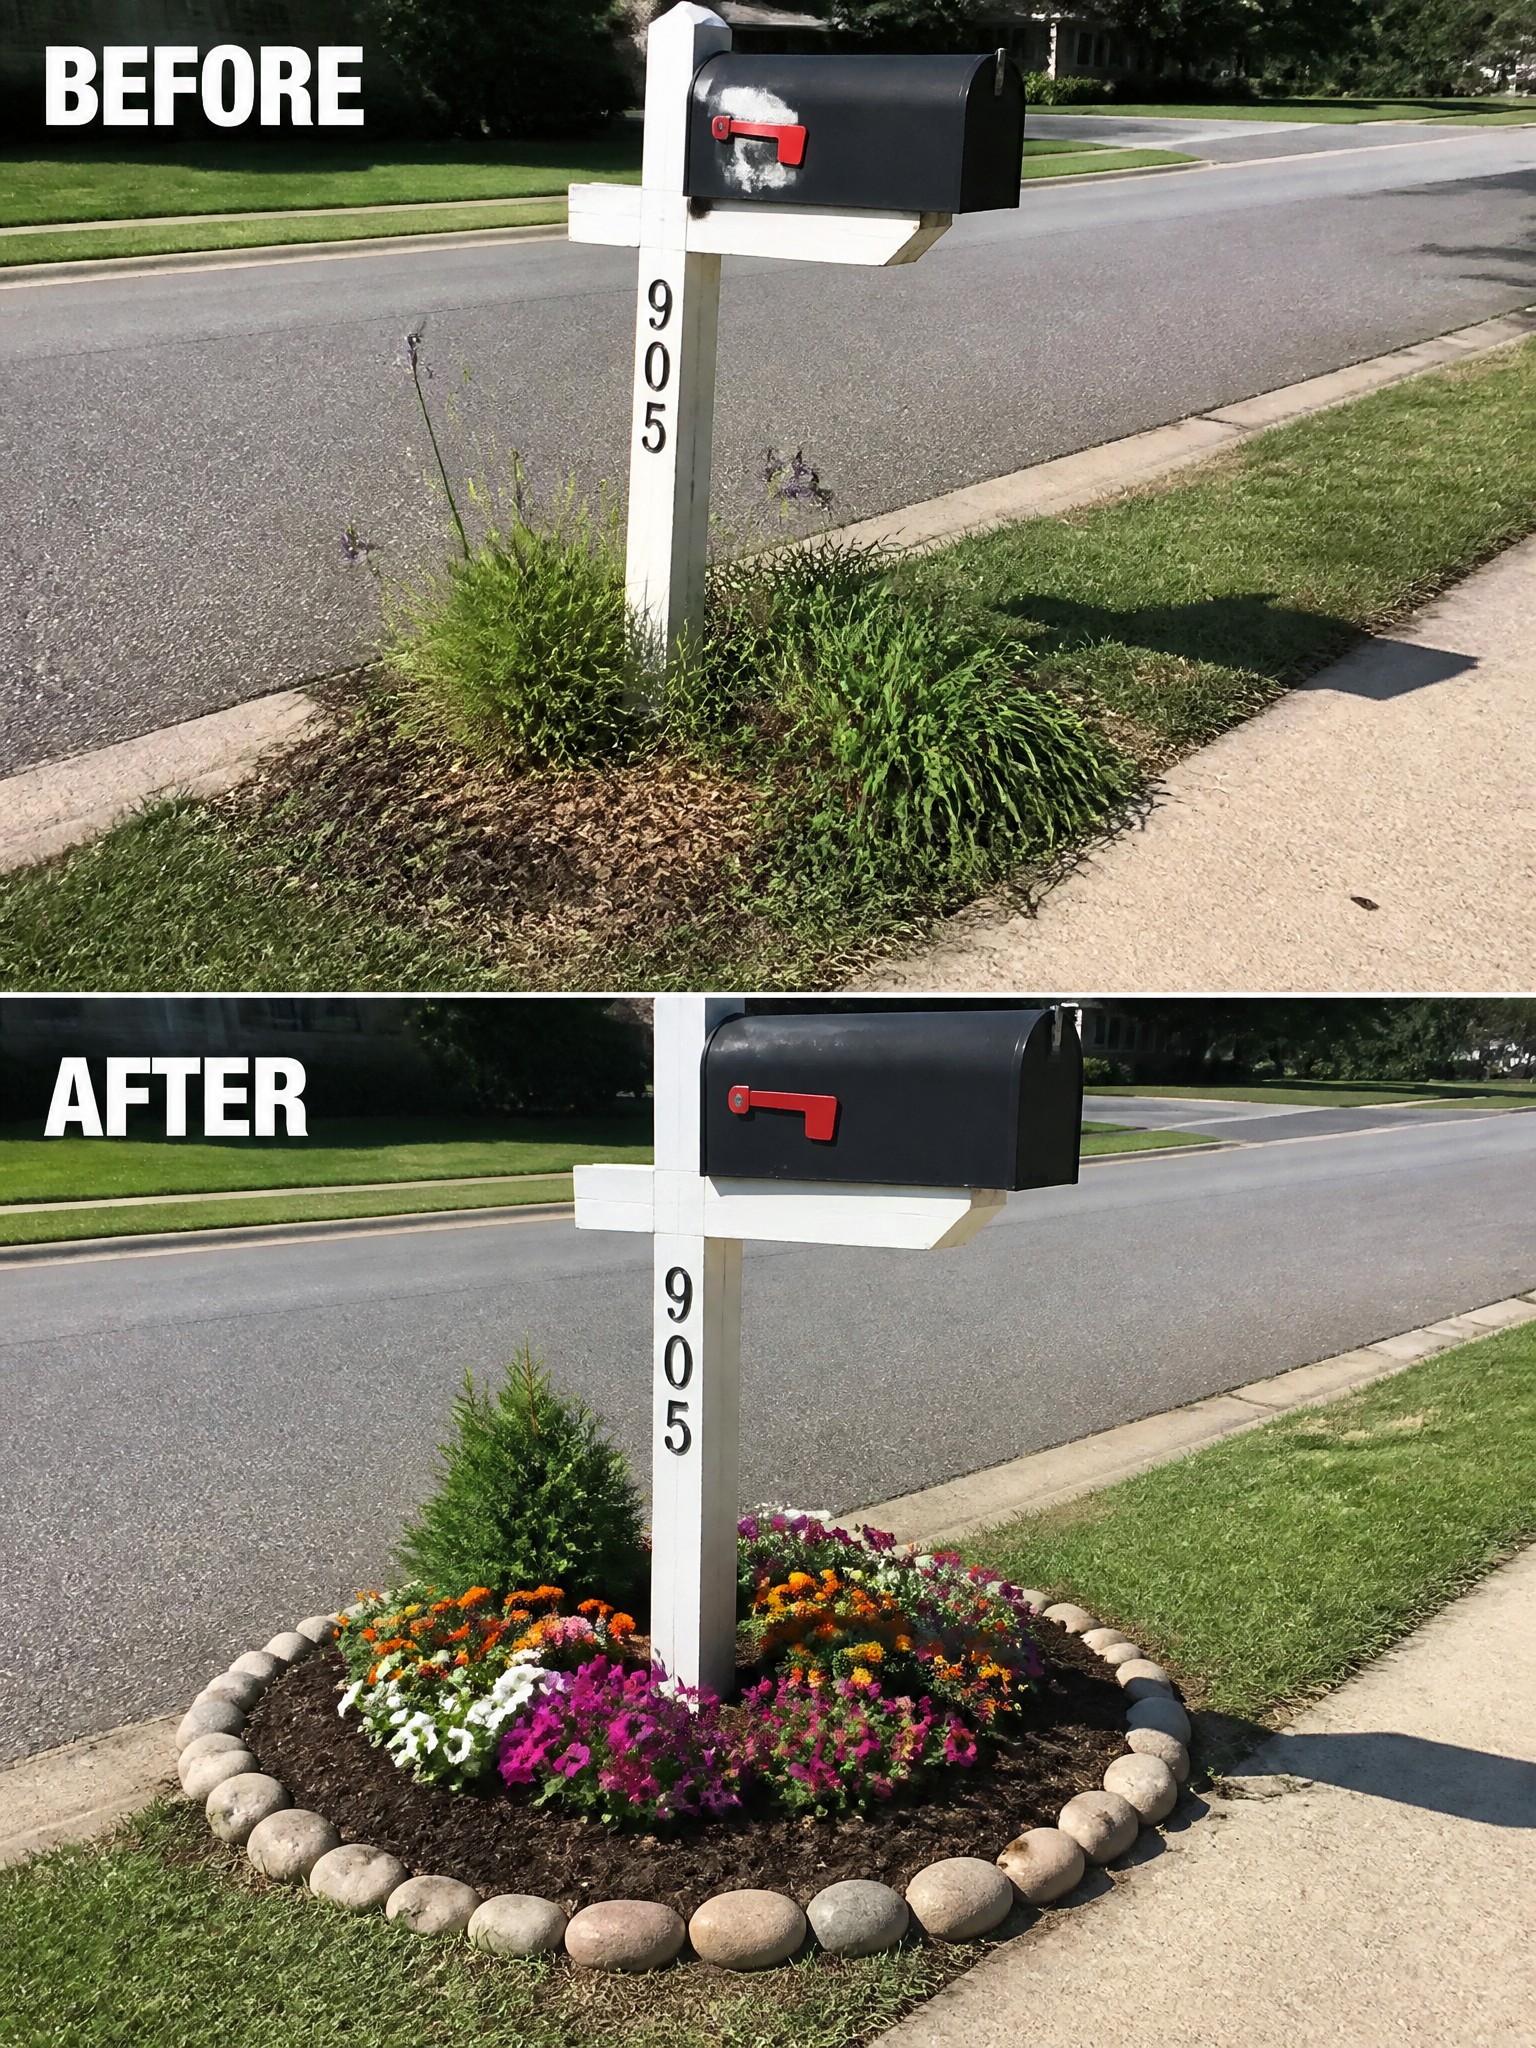
A simple rock border can turn an overgrown patch into a real planting area. The before photo shows weeds and scattered mulch around the mailbox post. The after version uses stones to create a clear circle, then fills it with flowers and a small shrub. That edge keeps everything looking planned instead of accidental.
This idea works best in narrow front strips or around posts where you want color without much lawn loss. It suits older homes with basic landscaping. Keep the bed small enough to reach from the sidewalk, and choose plants that match the light in that spot.
Define Planting Areas Around Large Trees

Adding a clear edge and mulch around a big tree turns a plain patch of ground into a real garden bed. The before photo shows just bare soil and scattered leaves at the base, while the after shows a low stone border holding in dark mulch and a mix of hostas and other plants that soften the trunk without crowding it.
This approach works well on any front yard with mature trees because it gives the eye a place to rest and keeps grass from creeping right up to the bark. Start with a simple border material that matches your house style, then fill in with shade-tolerant plants in groups rather than single rows. The result feels planned even if you keep the rest of the lawn simple.
Anchor A Plain Bed With One Small Tree
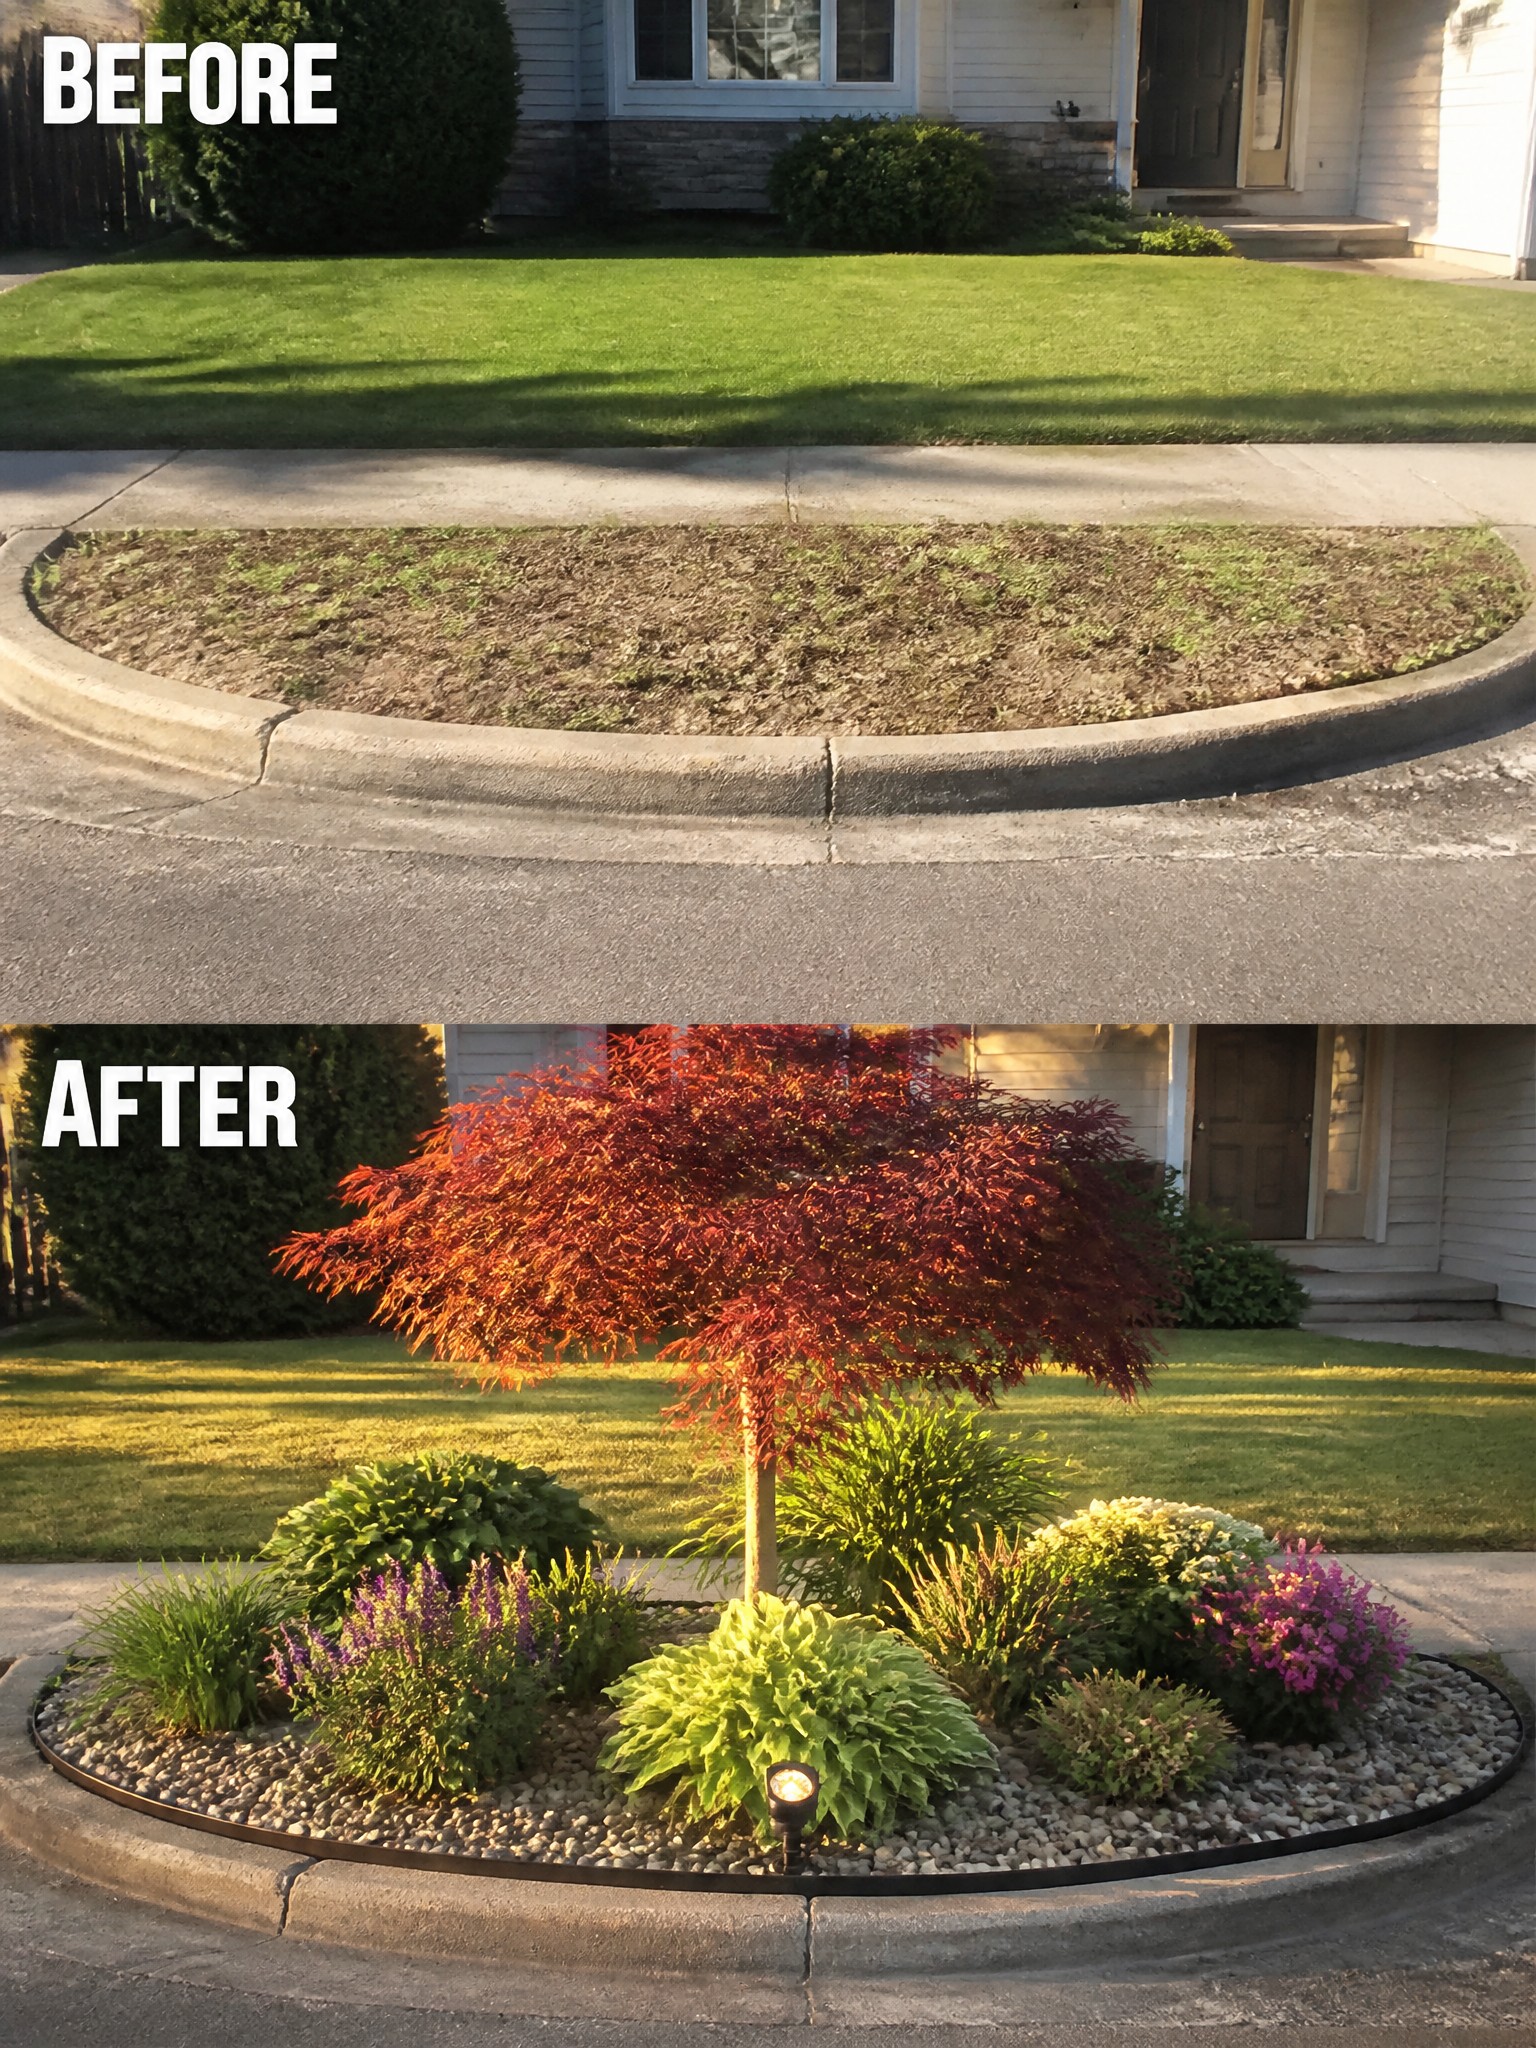
A bare strip of dirt next to the curb often looks unfinished next to a lawn. Placing one small tree in the center gives the bed a clear starting point and adds height without crowding the space. The red maple here draws the eye and makes the rest of the planting feel intentional.
This approach suits narrow front beds where a full garden would feel too busy. Choose a tree that fits the scale, then add a few lower shrubs and perennials around it. Simple edging and gravel keep the bed looking neat and separate from the grass.
Define Flower Beds With Simple Edging
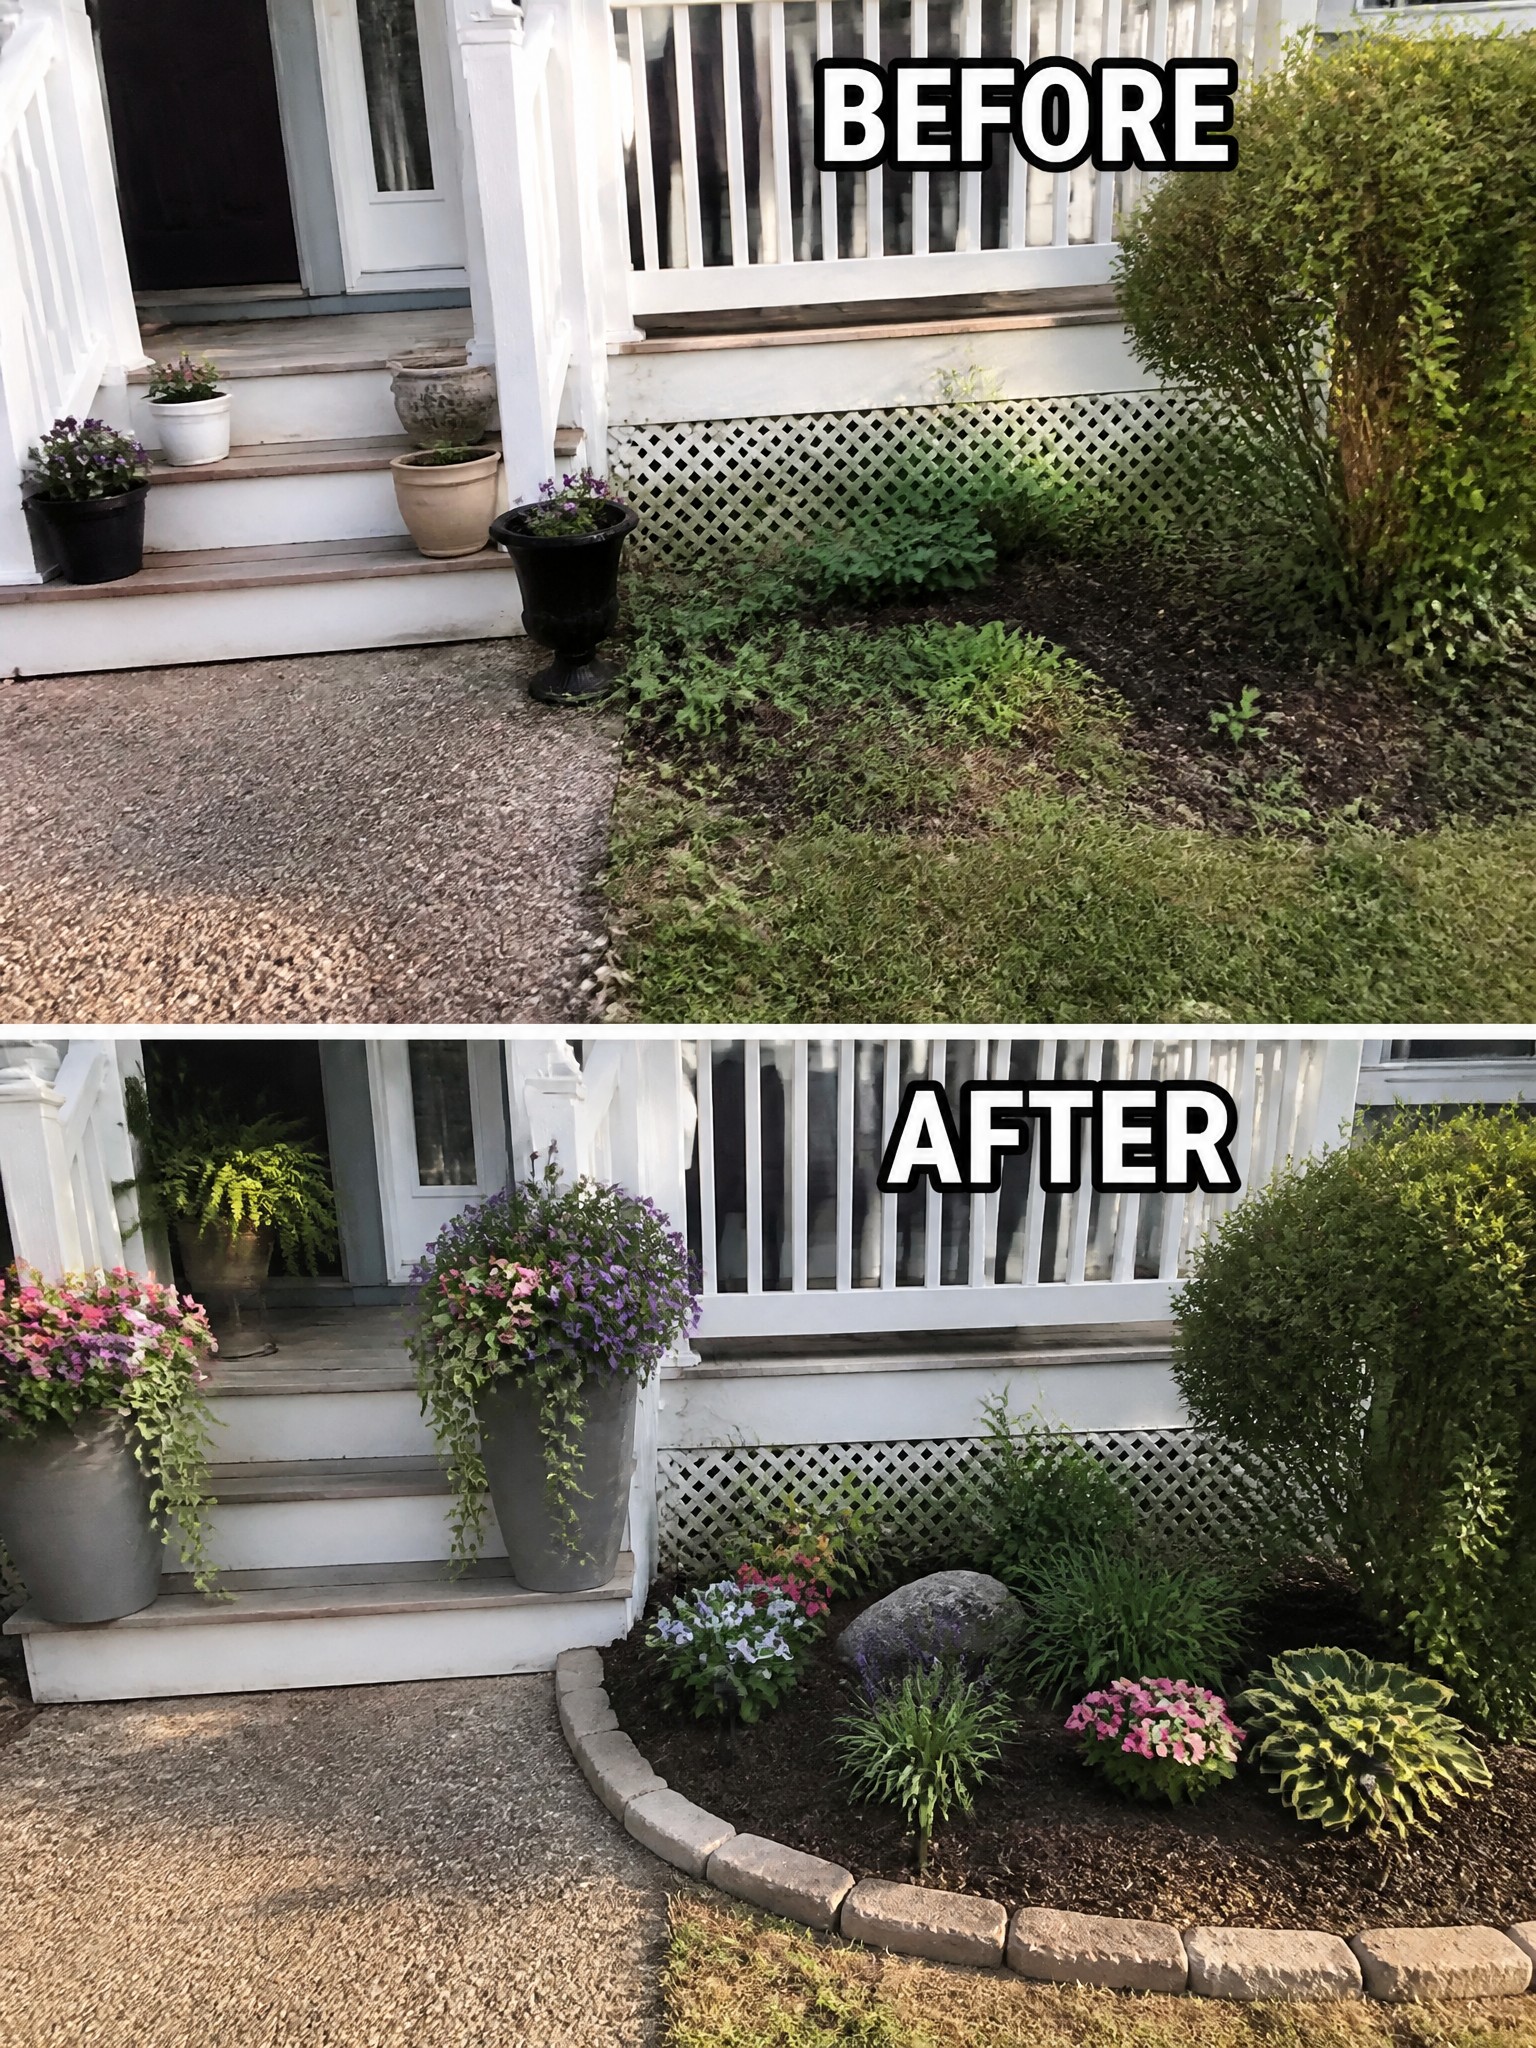
One of the easiest ways to improve a front yard is to give the planting areas a clear shape. The before view showed scattered weeds and uneven ground along the house. Adding a low stone border and fresh mulch turned the space into neat beds that look planned instead of neglected.
This idea works on almost any older home where the beds have lost their edge over time. Keep the outline simple, use basic materials like stones or bricks, and plant in small groups so the new shape stays visible. Start with the edging before adding more plants.
Add Gravel And Defined Beds To Refresh A Neglected Area
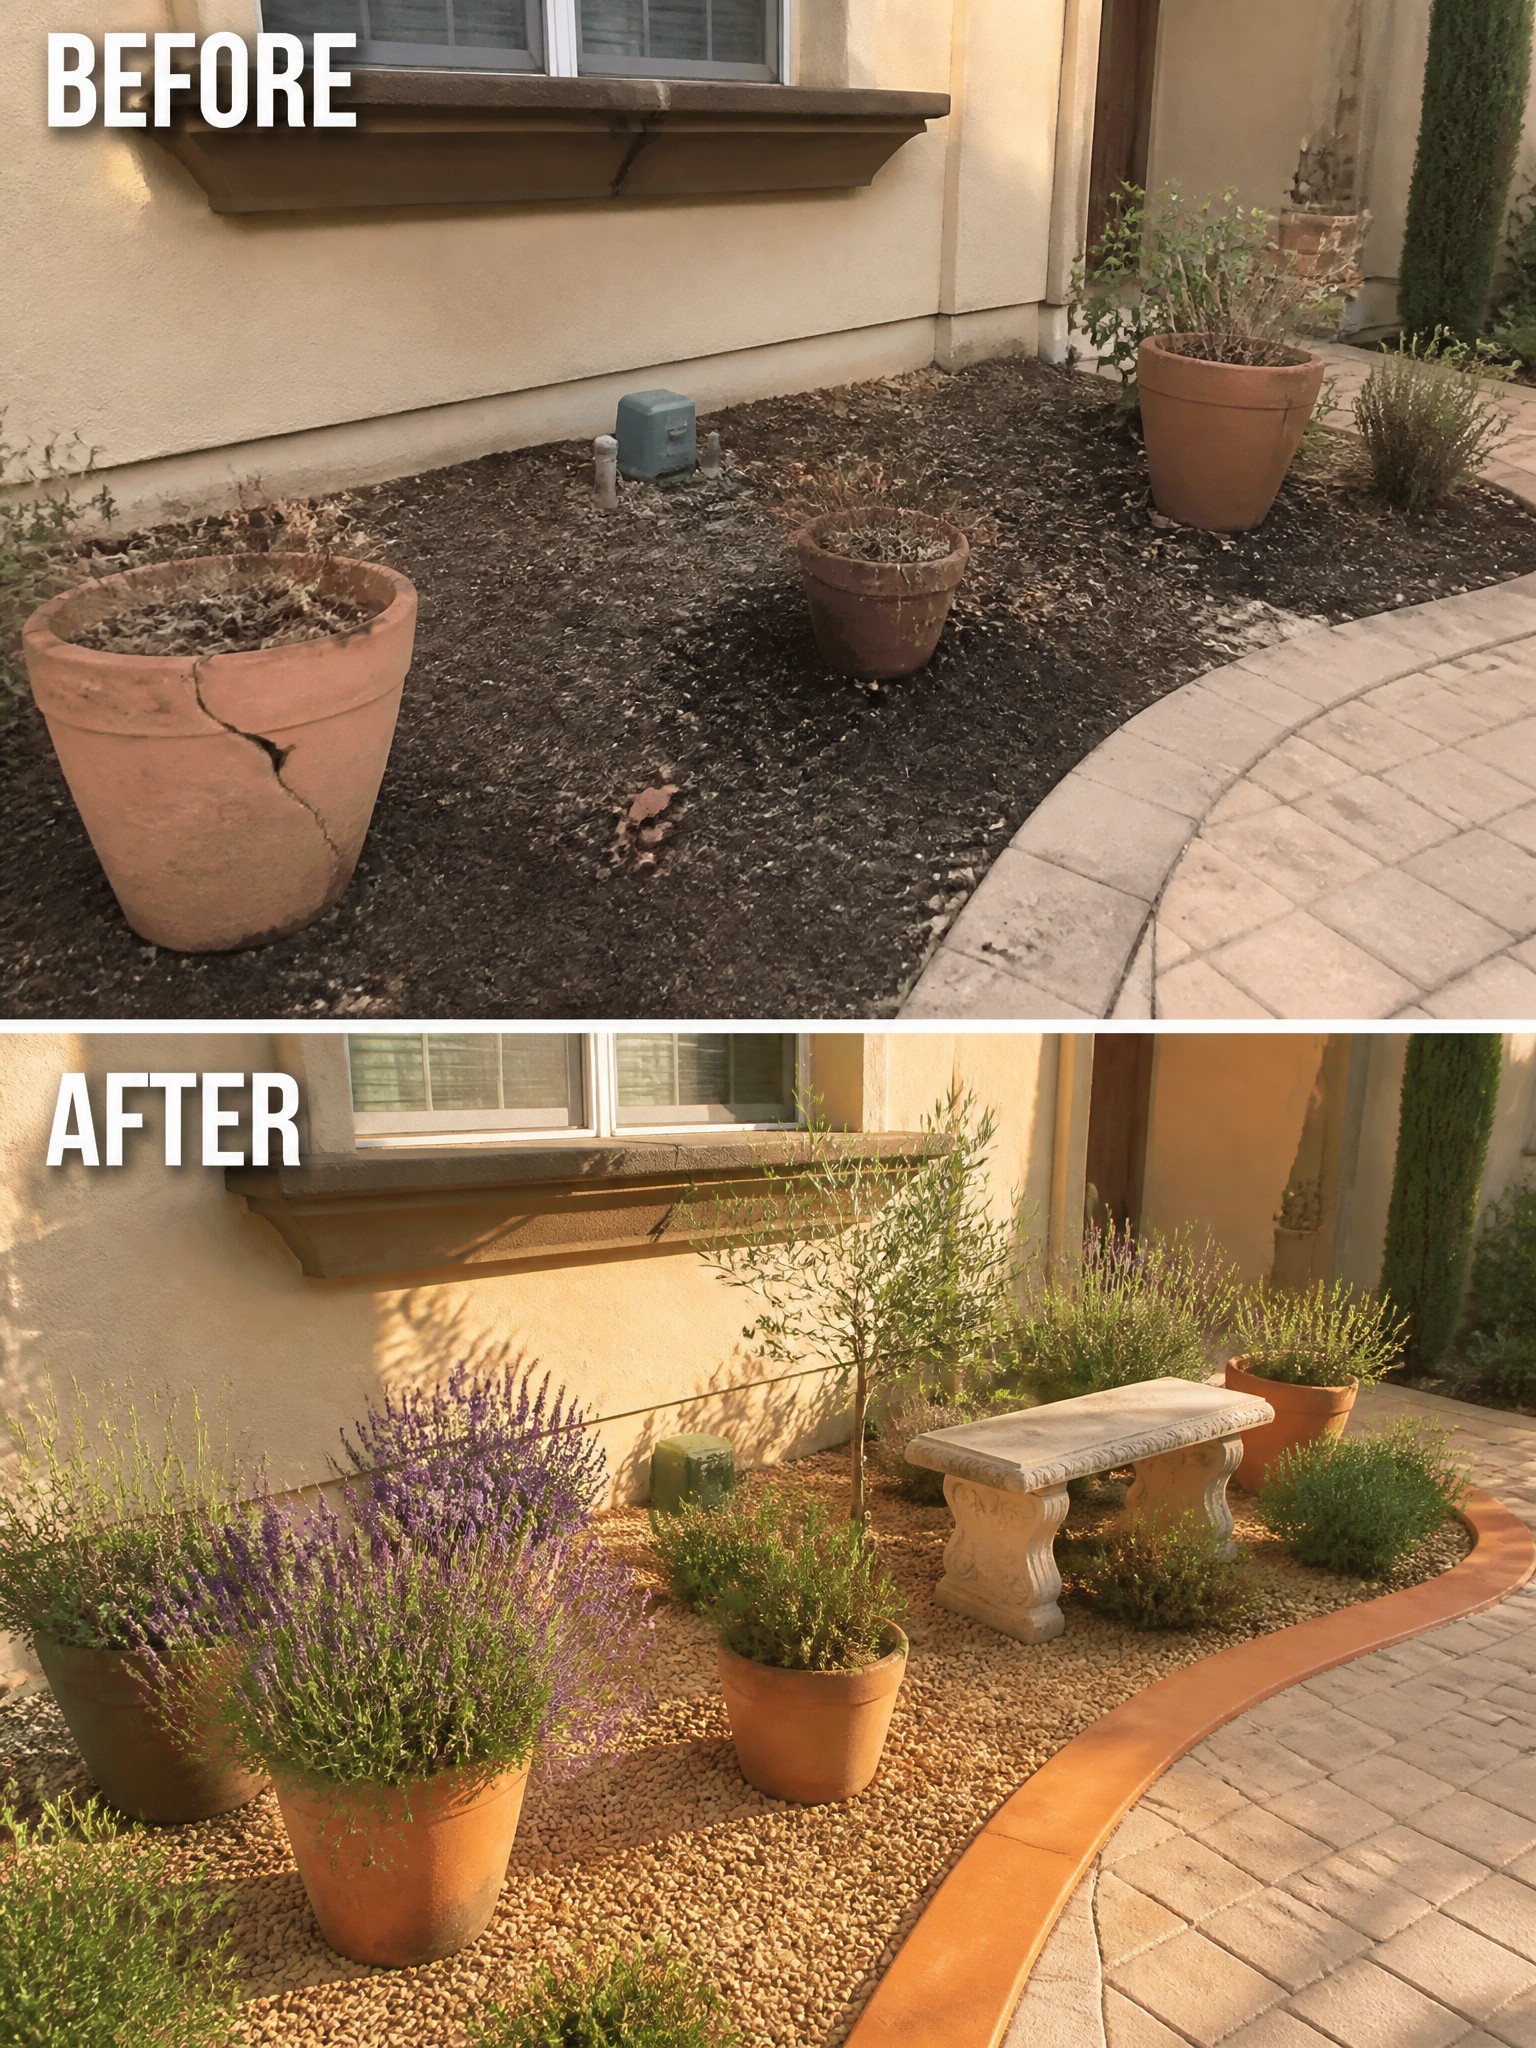
The main change here is covering the bare dirt with gravel and grouping plants into clear beds instead of leaving random pots scattered around. This gives the space a finished look and keeps the planting from feeling messy or forgotten.
This idea works best along a house wall or next to a path where you want something simple and low maintenance. Clear the old pots and debris first, add edging to hold the gravel in place, then plant in clusters so everything feels intentional.
Create Structure With Mulched Beds And A Simple Path
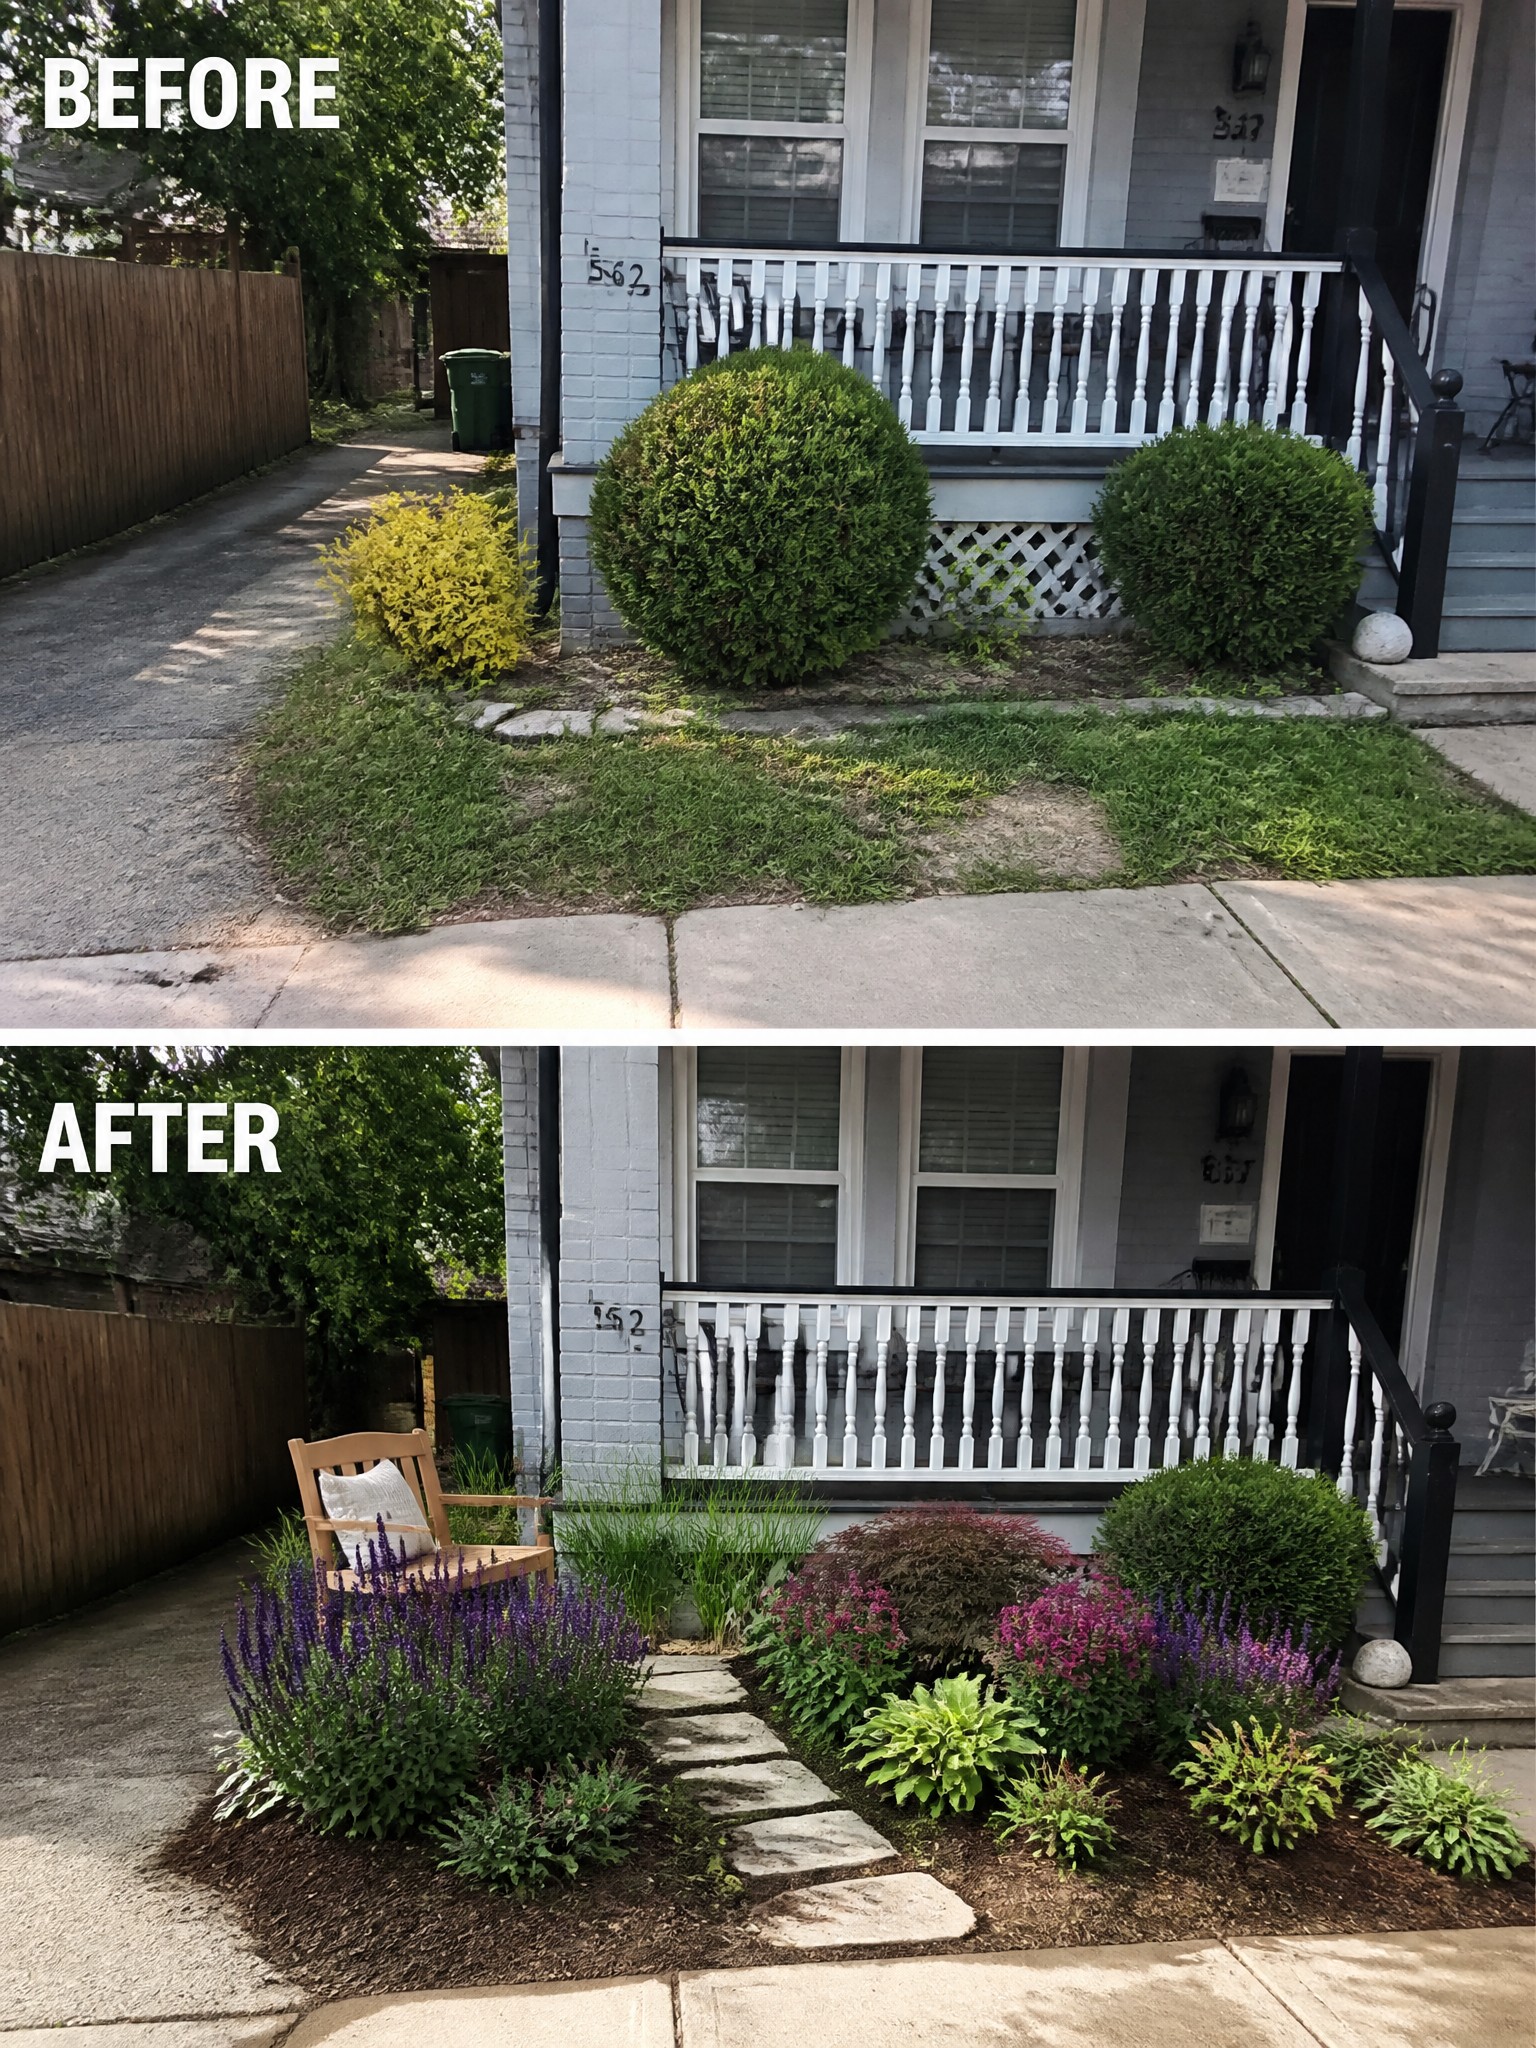
A patchy lawn and random shrubs make a front yard feel unplanned. Mulched beds and a short stone path fix that by giving the space clear edges and a sense of order.
This idea suits small front yards where you want the planting to look deliberate without a full redesign. Clear the grass first, add a basic path, and keep the beds narrow so they do not block movement. One chair tucked into the planting is enough to show the area is meant to be used.
Create A Defined Flower Bed Along The Foundation
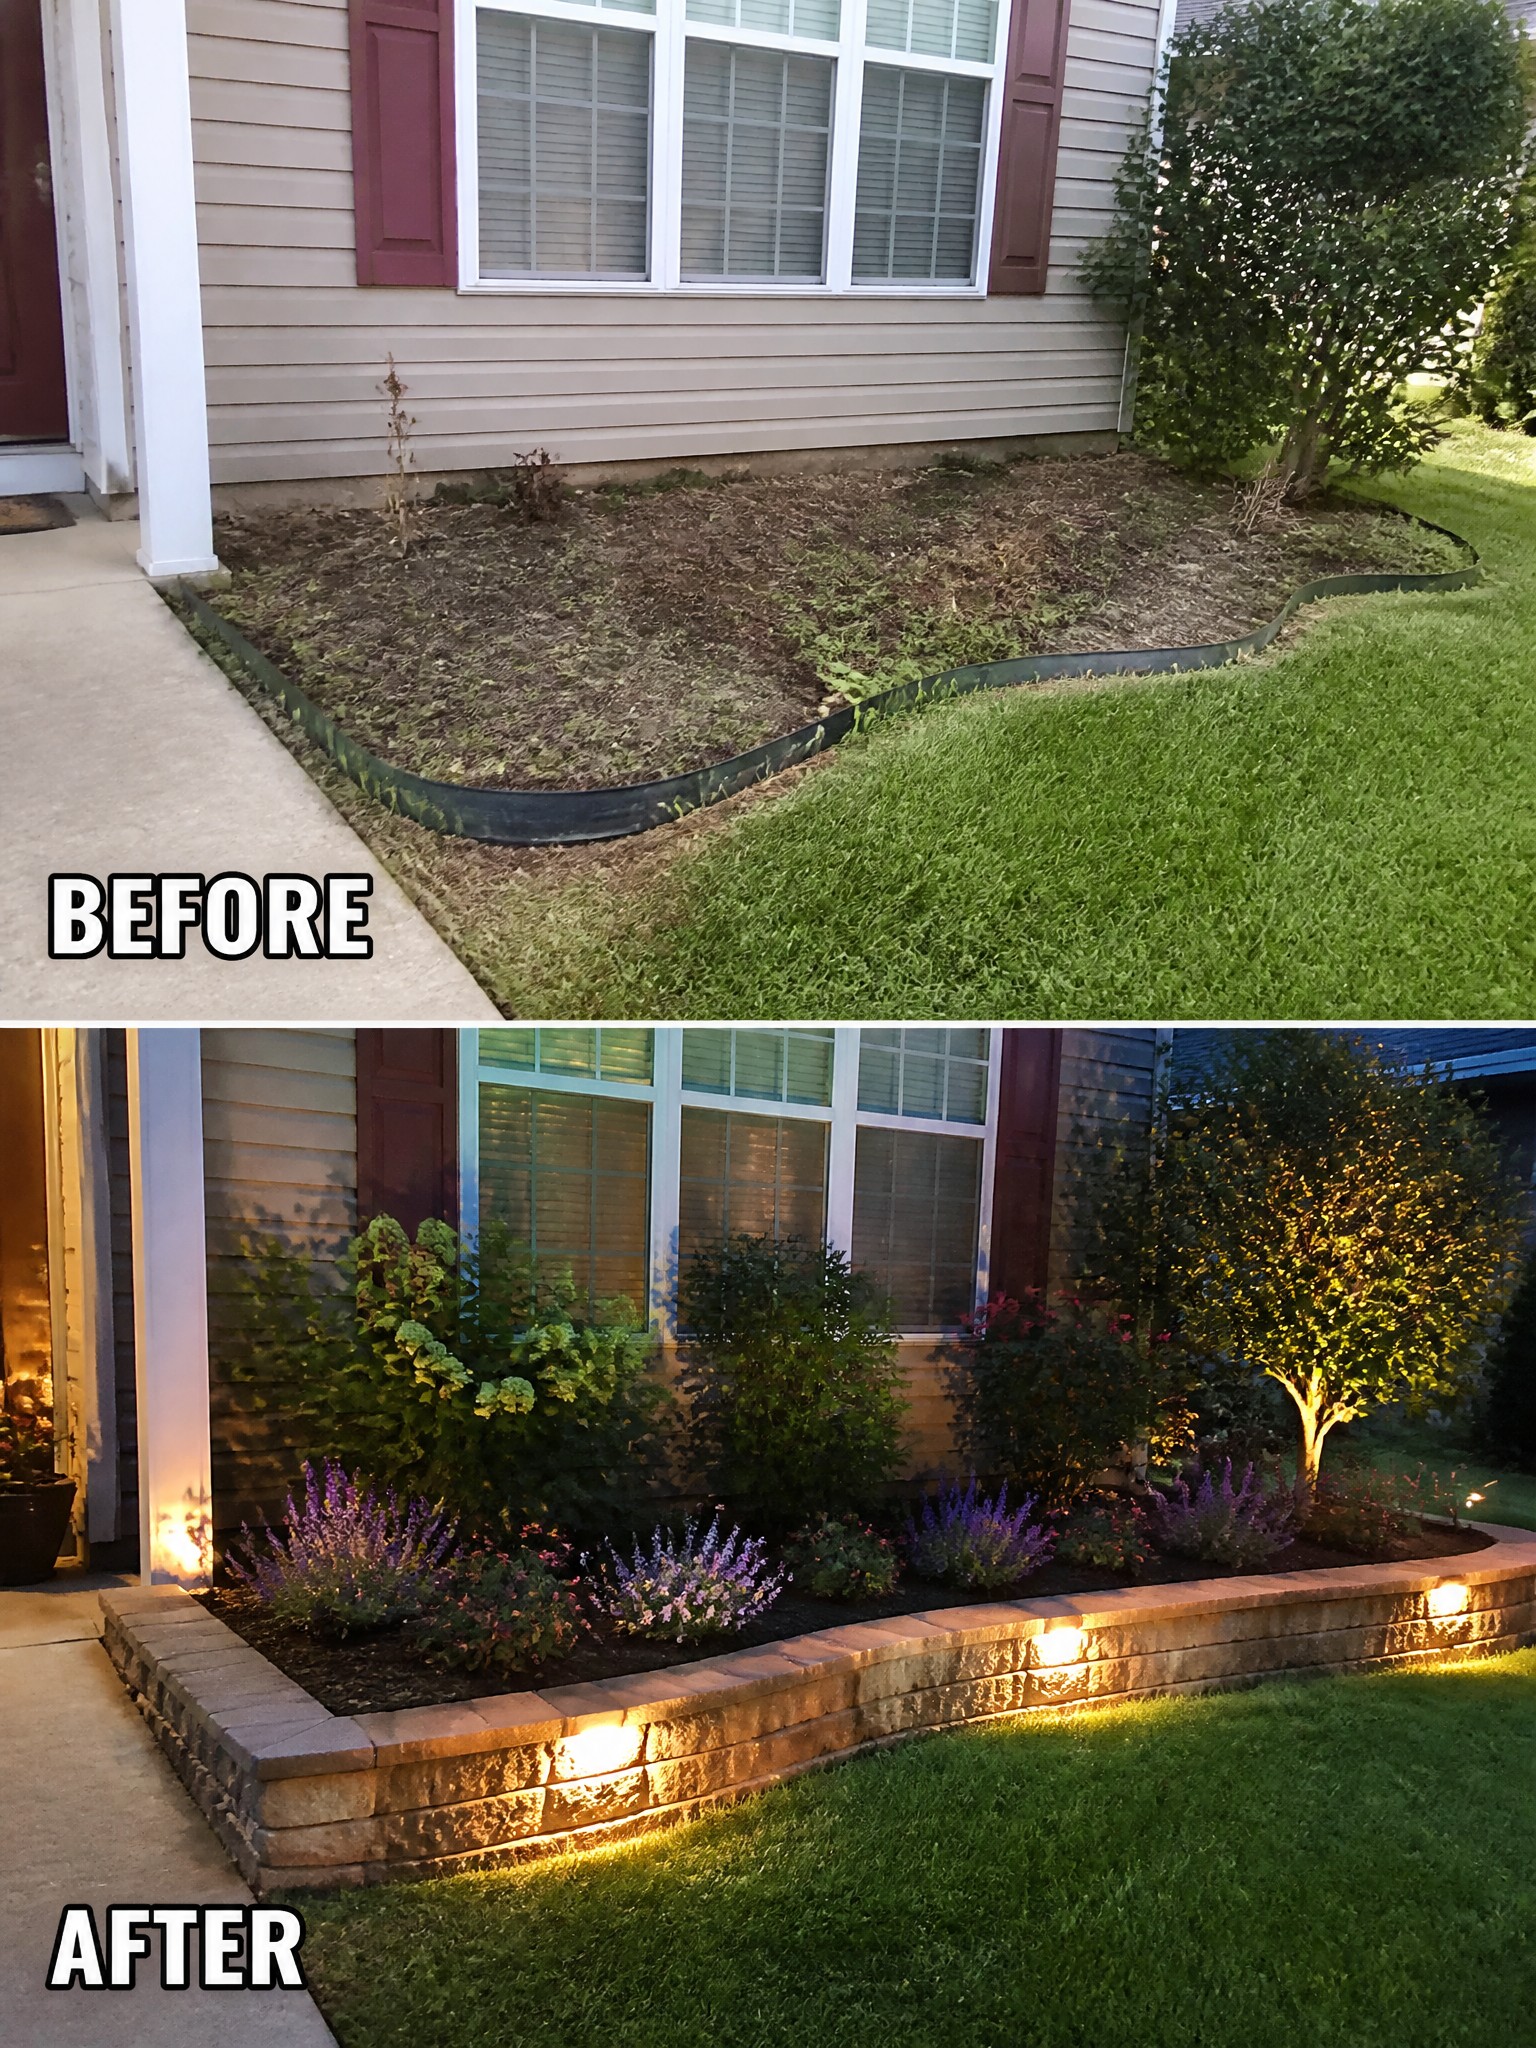
A bare strip of dirt along the house can make the whole front look unfinished. Adding a low brick border turns that same area into a proper bed that holds mulch, plants, and lighting in place. The clean edge also keeps the lawn from creeping in and gives the house a more finished base.
This idea works best on simple ranch or two-story homes where the foundation planting feels flat or neglected. Start with the edging first so the shape stays consistent, then fill in with a mix of shrubs and lower perennials. The lighting at the base adds evening interest without needing a full landscape overhaul.
Add Edging To Define A Front Walkway
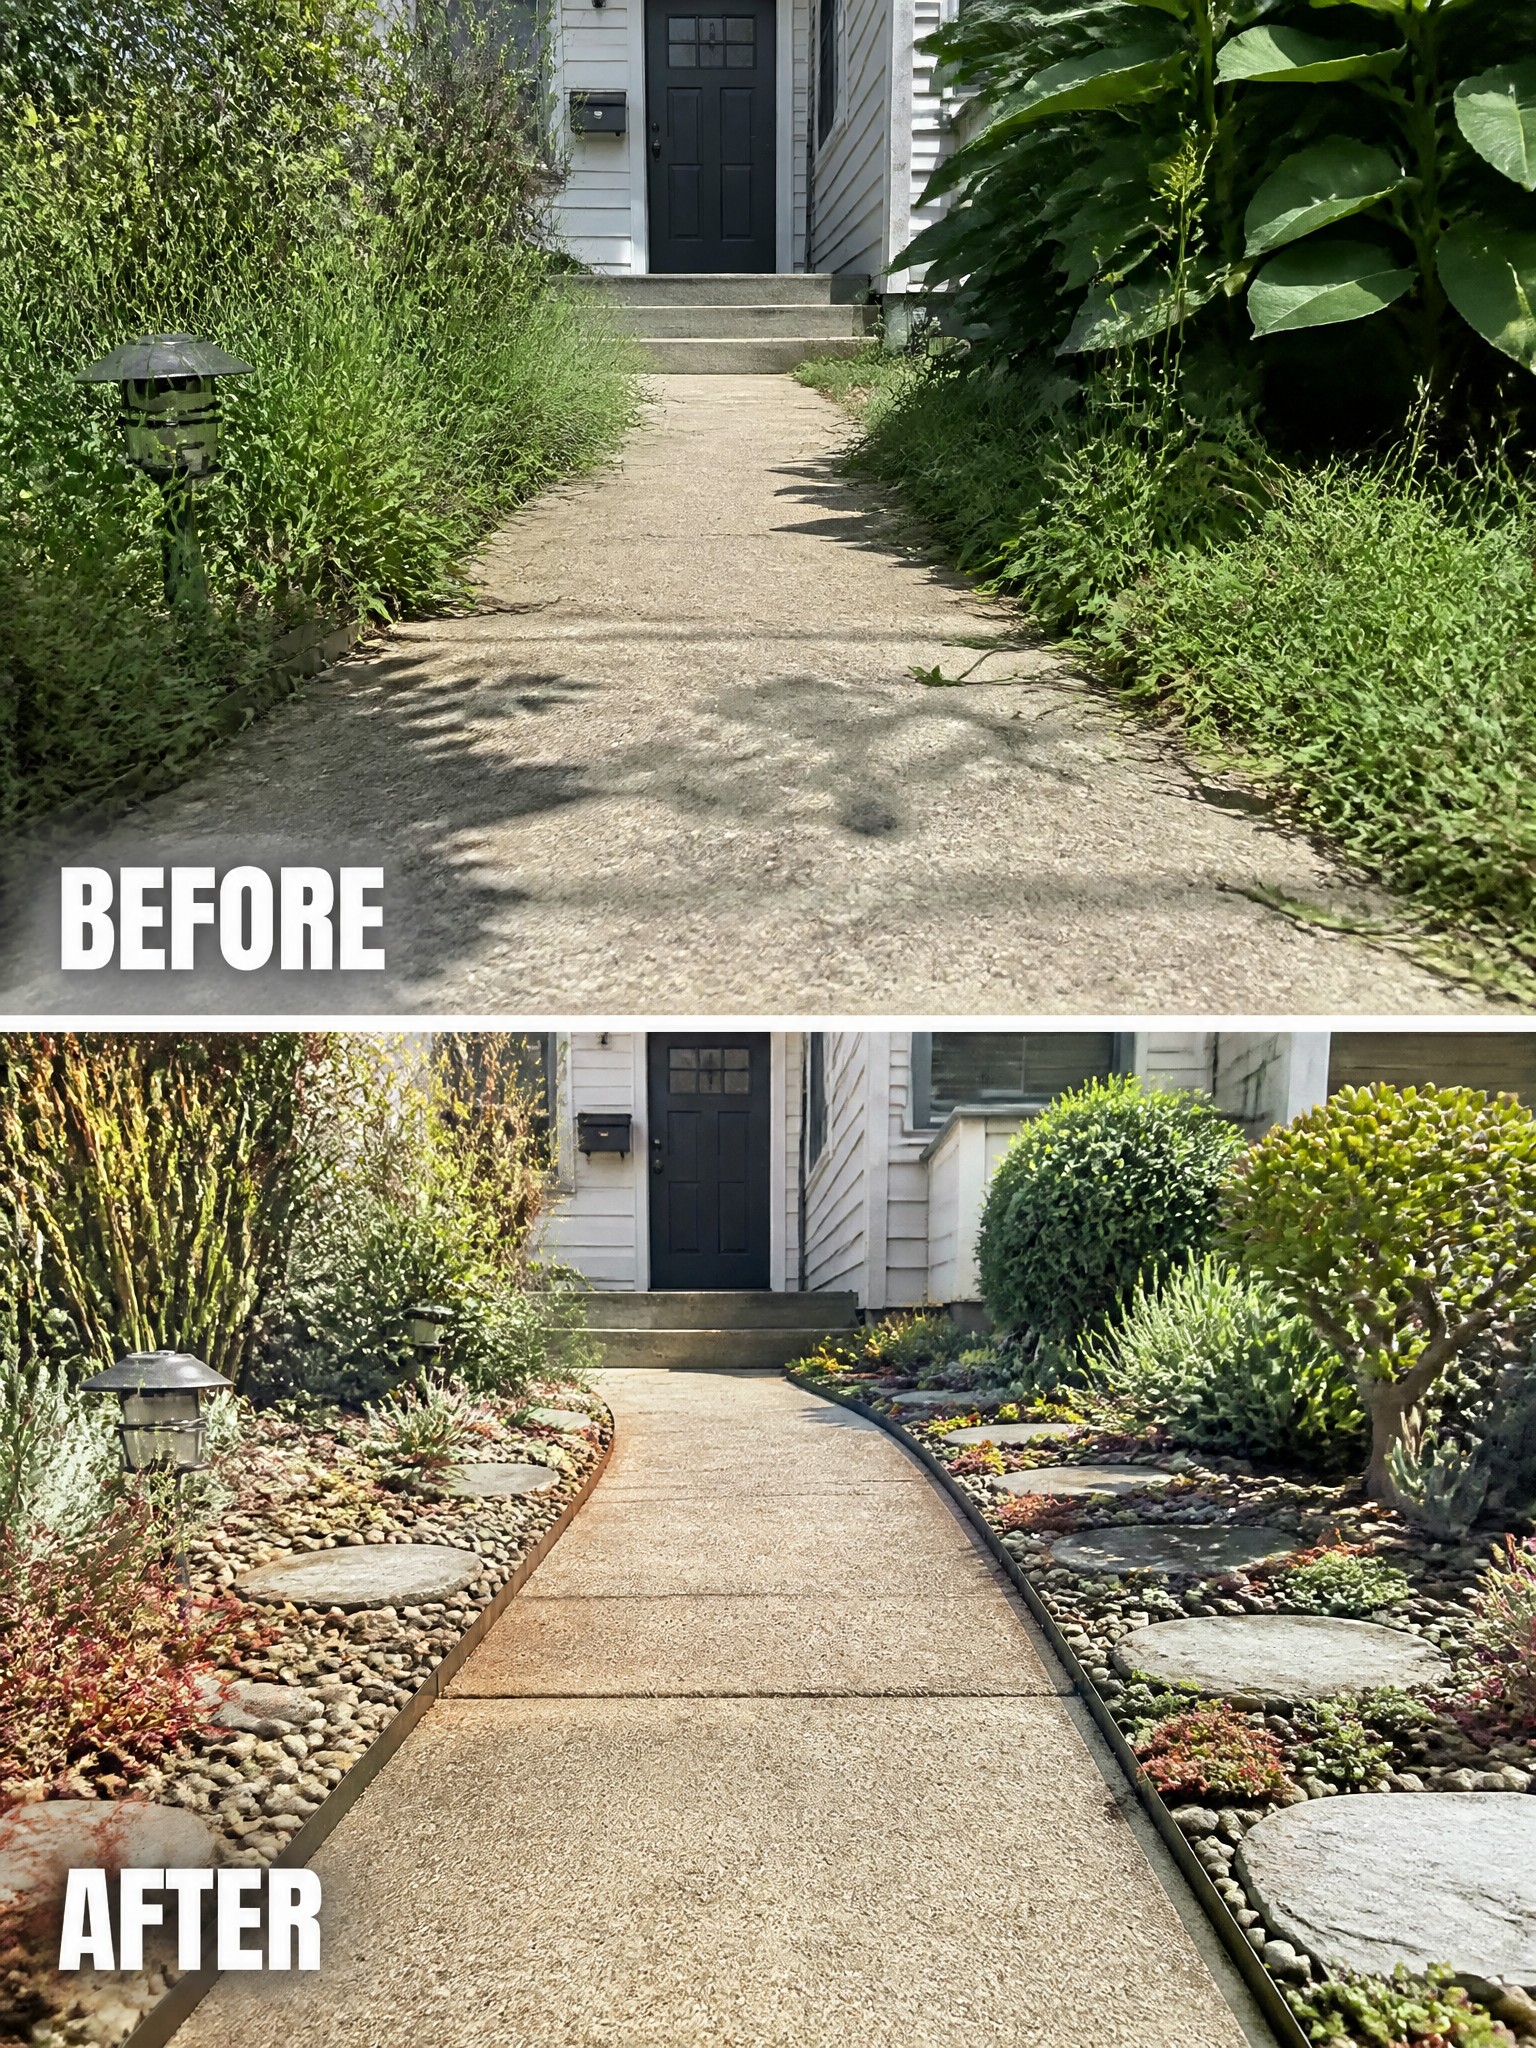
Clearing out the messy growth first made the biggest difference here. Once the weeds were gone, simple metal edging and a layer of gravel turned the sides of the path into neat beds that actually stay in place. The result feels much more intentional without adding a lot of new hardscaping.
This approach works well on homes with a straight concrete walk that leads straight to the door. Start by cutting back the overgrowth, then install edging to create clean lines before you fill the beds. It keeps the focus on the path itself and gives you room to add plants later without things looking scattered.
Group Planters To Add Structure To A Front Bed
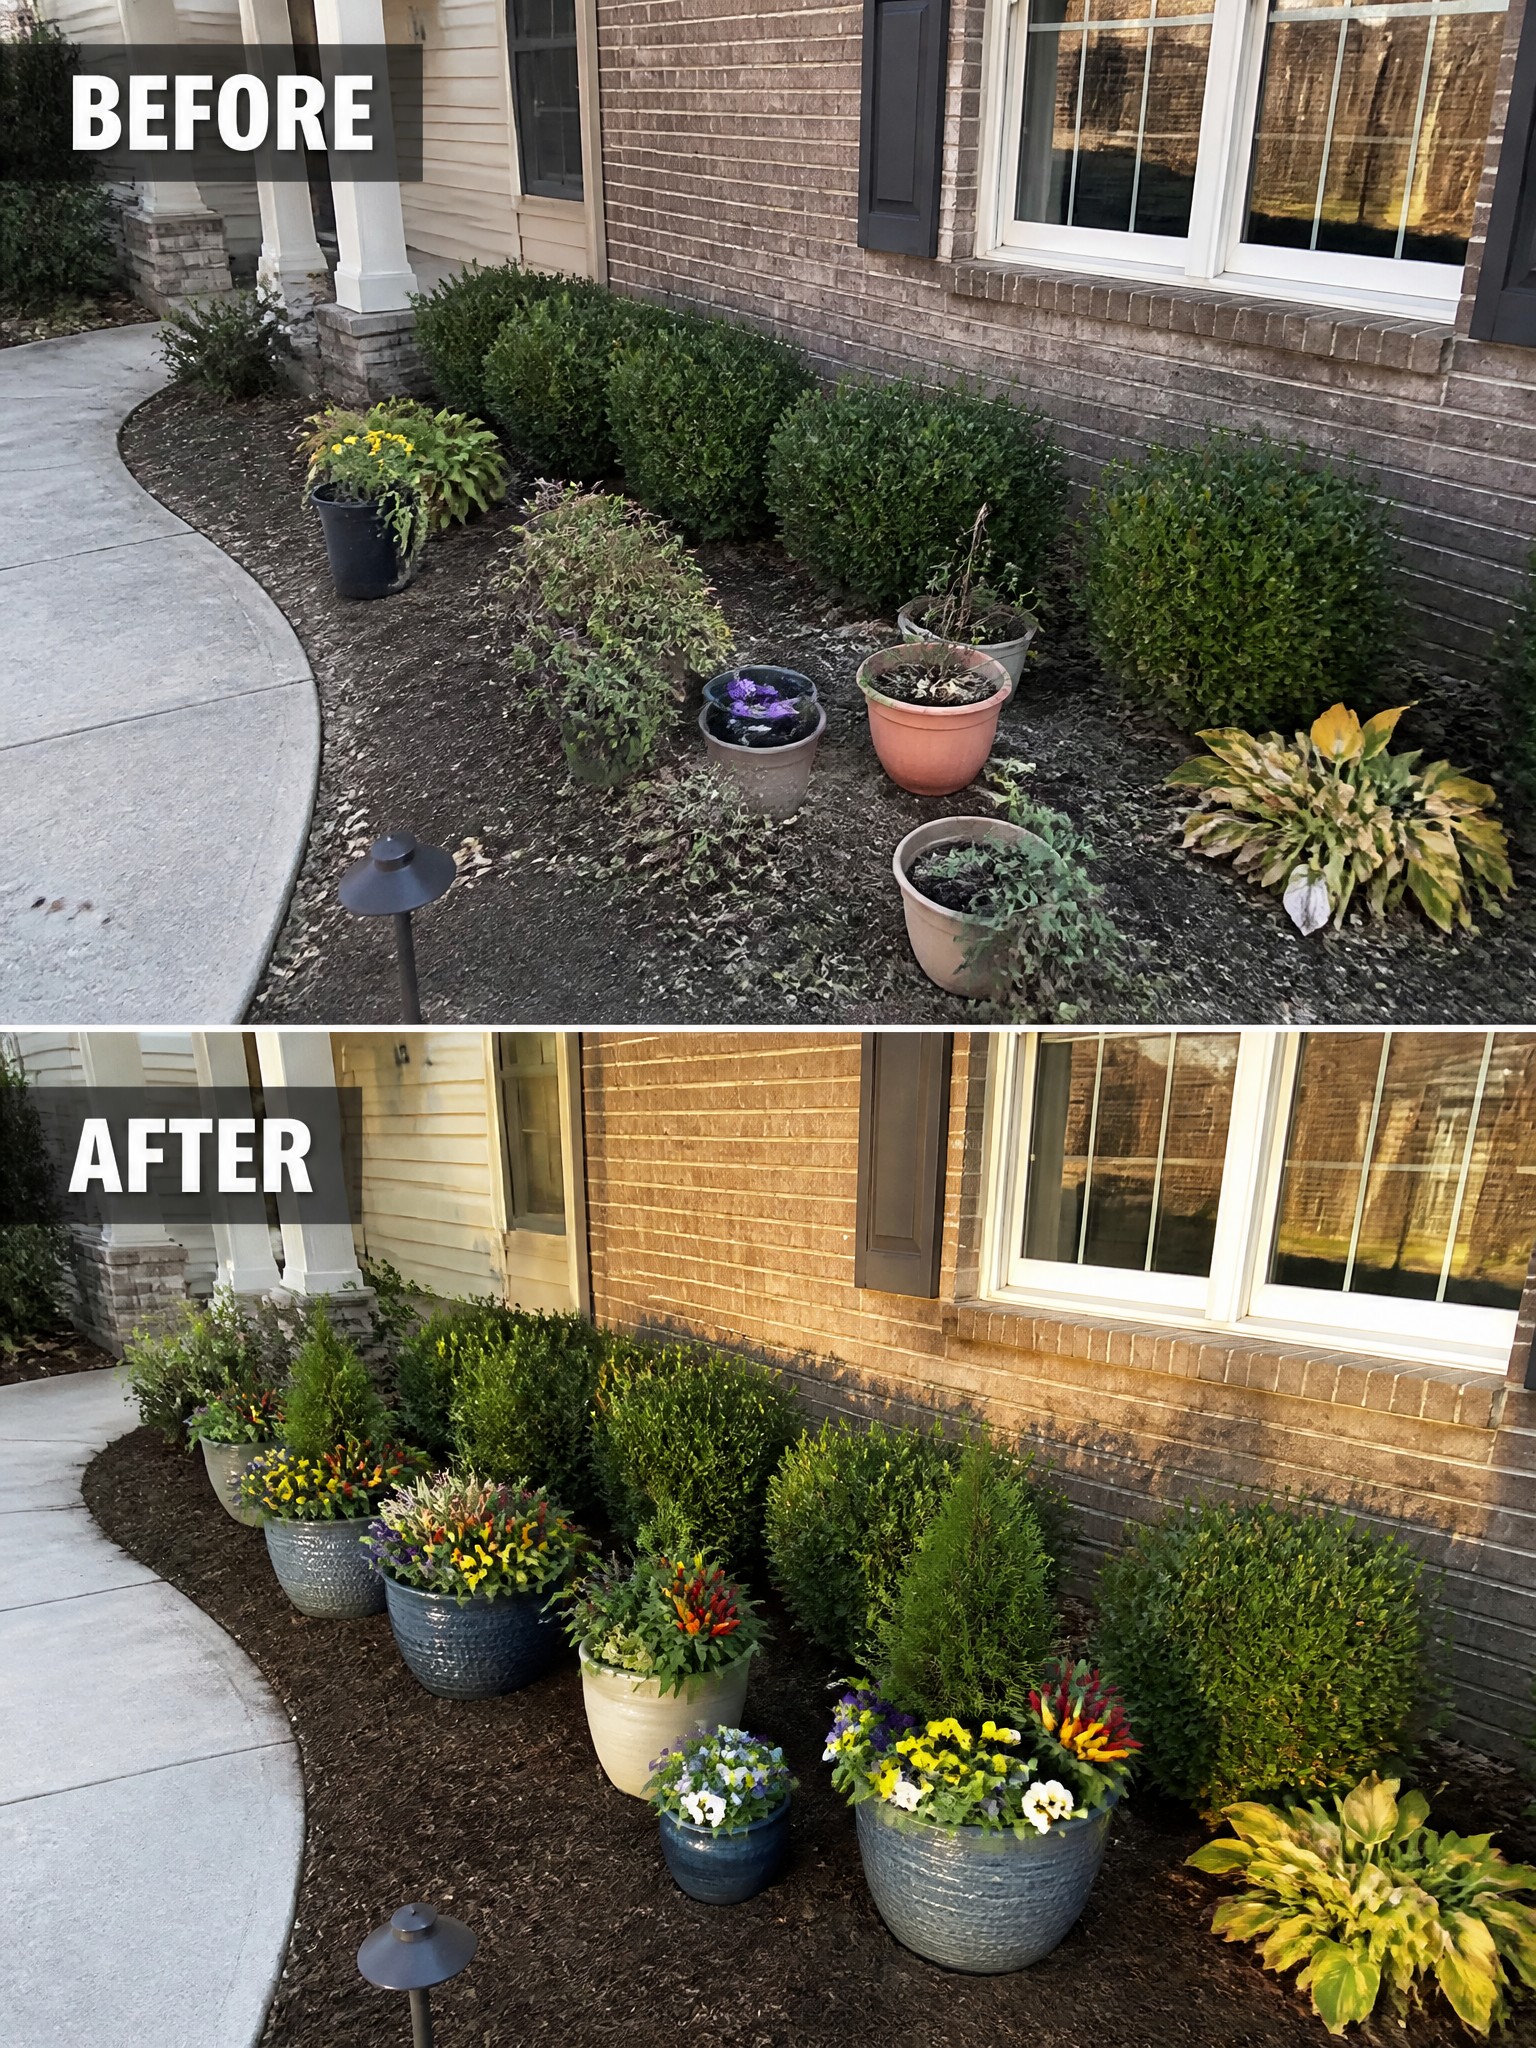
The before photo shows a row of mismatched pots spread out along the foundation with uneven spacing and thin planting. In the after photo the same bed has tighter clusters of larger containers filled with fuller mixes of flowers. The grouping pulls the bed together and gives the walkway a clearer edge without any major digging or new hardscaping.
This idea suits homes that already have a basic mulch bed but need more color and order. Use three or four pots in similar tones, place them in small groups with a little breathing room between clusters, and repeat a couple of flower colors across the pots. It keeps the bed looking planned even if the permanent shrubs stay the same.
Add Structure To An Overgrown Border

An overgrown hedge can quickly take over a fence line and make the whole yard feel closed in. Clearing it out and replacing it with a defined bed of evergreens, flowering shrubs, and low perennials gives the space a much cleaner shape while still keeping some privacy.
This approach works well along side yards or back fences where you want order without losing the green screen. Start by removing the old growth completely, then plant taller evergreens toward the back and layer shorter flowers and ground cover in front. Mulch helps keep the bed looking neat between seasons.
Frequently Asked Questions
Q: What if my front yard gets almost no sun? A: Pick shade-loving plants like hostas or ferns for those beds. They fill in fast and stay green without much fuss. Add a layer of mulch to hold moisture.
Q: How do I stop weeds from taking over after I plant? A: Lay down newspaper or cardboard before adding soil and plants. This blocks most weeds while everything gets established. Pull any stragglers by hand every week or two.
Q: Can I try these looks without spending much money? A: Split existing plants from other parts of your yard or ask neighbors for divisions. Start with just one or two beds instead of redoing the whole front at once. Seeds and small starts cost less than full-grown plants.
Q: Will the beds still look decent in winter? A: Leave seed heads and dried stems for texture. Evergreens or grasses hold shape when flowers fade. A light layer of mulch keeps roots safe until spring.
