

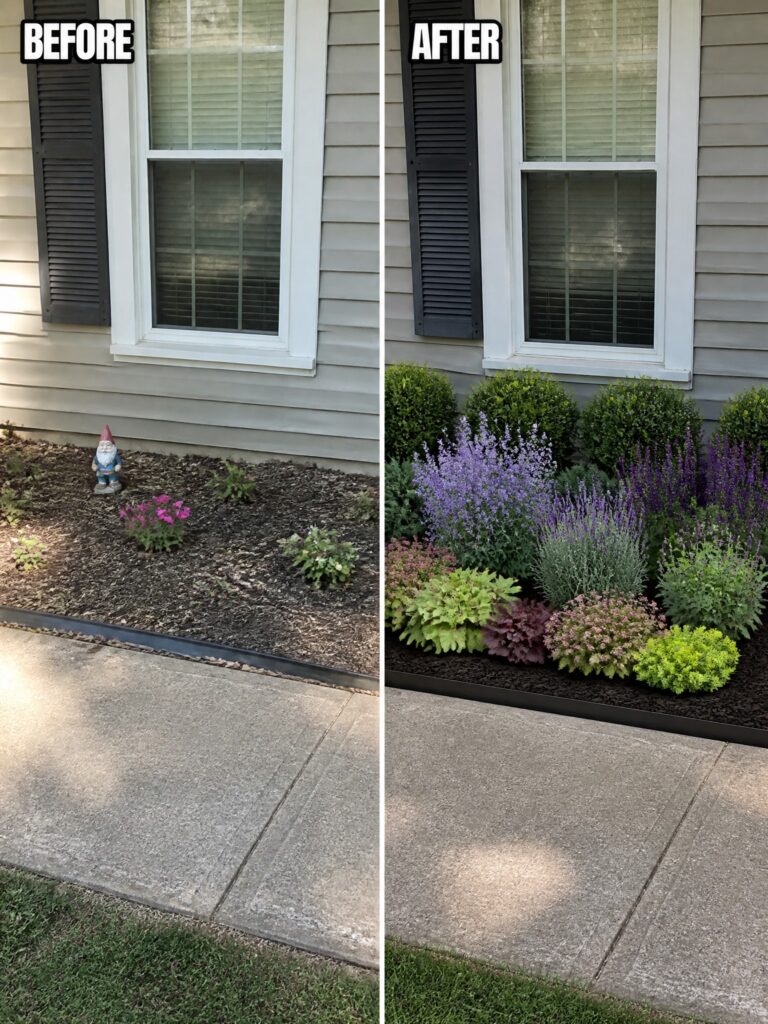
Over the years I have seen how flower beds start to look neglected when the layout lacks clear borders and the plants do not grow together densely enough.
Picking varieties that spread on their own and adding a layer of mulch usually brings more structure without extra effort each week.
Structure matters more than I expected.
In my own garden I tend to try edging changes first because they instantly make the beds feel more defined.
The ideas that focus on steady coverage rather than constant replanting are the ones I keep coming back to when I want results that last.
Fill Out A Thin Border With Layered Planting
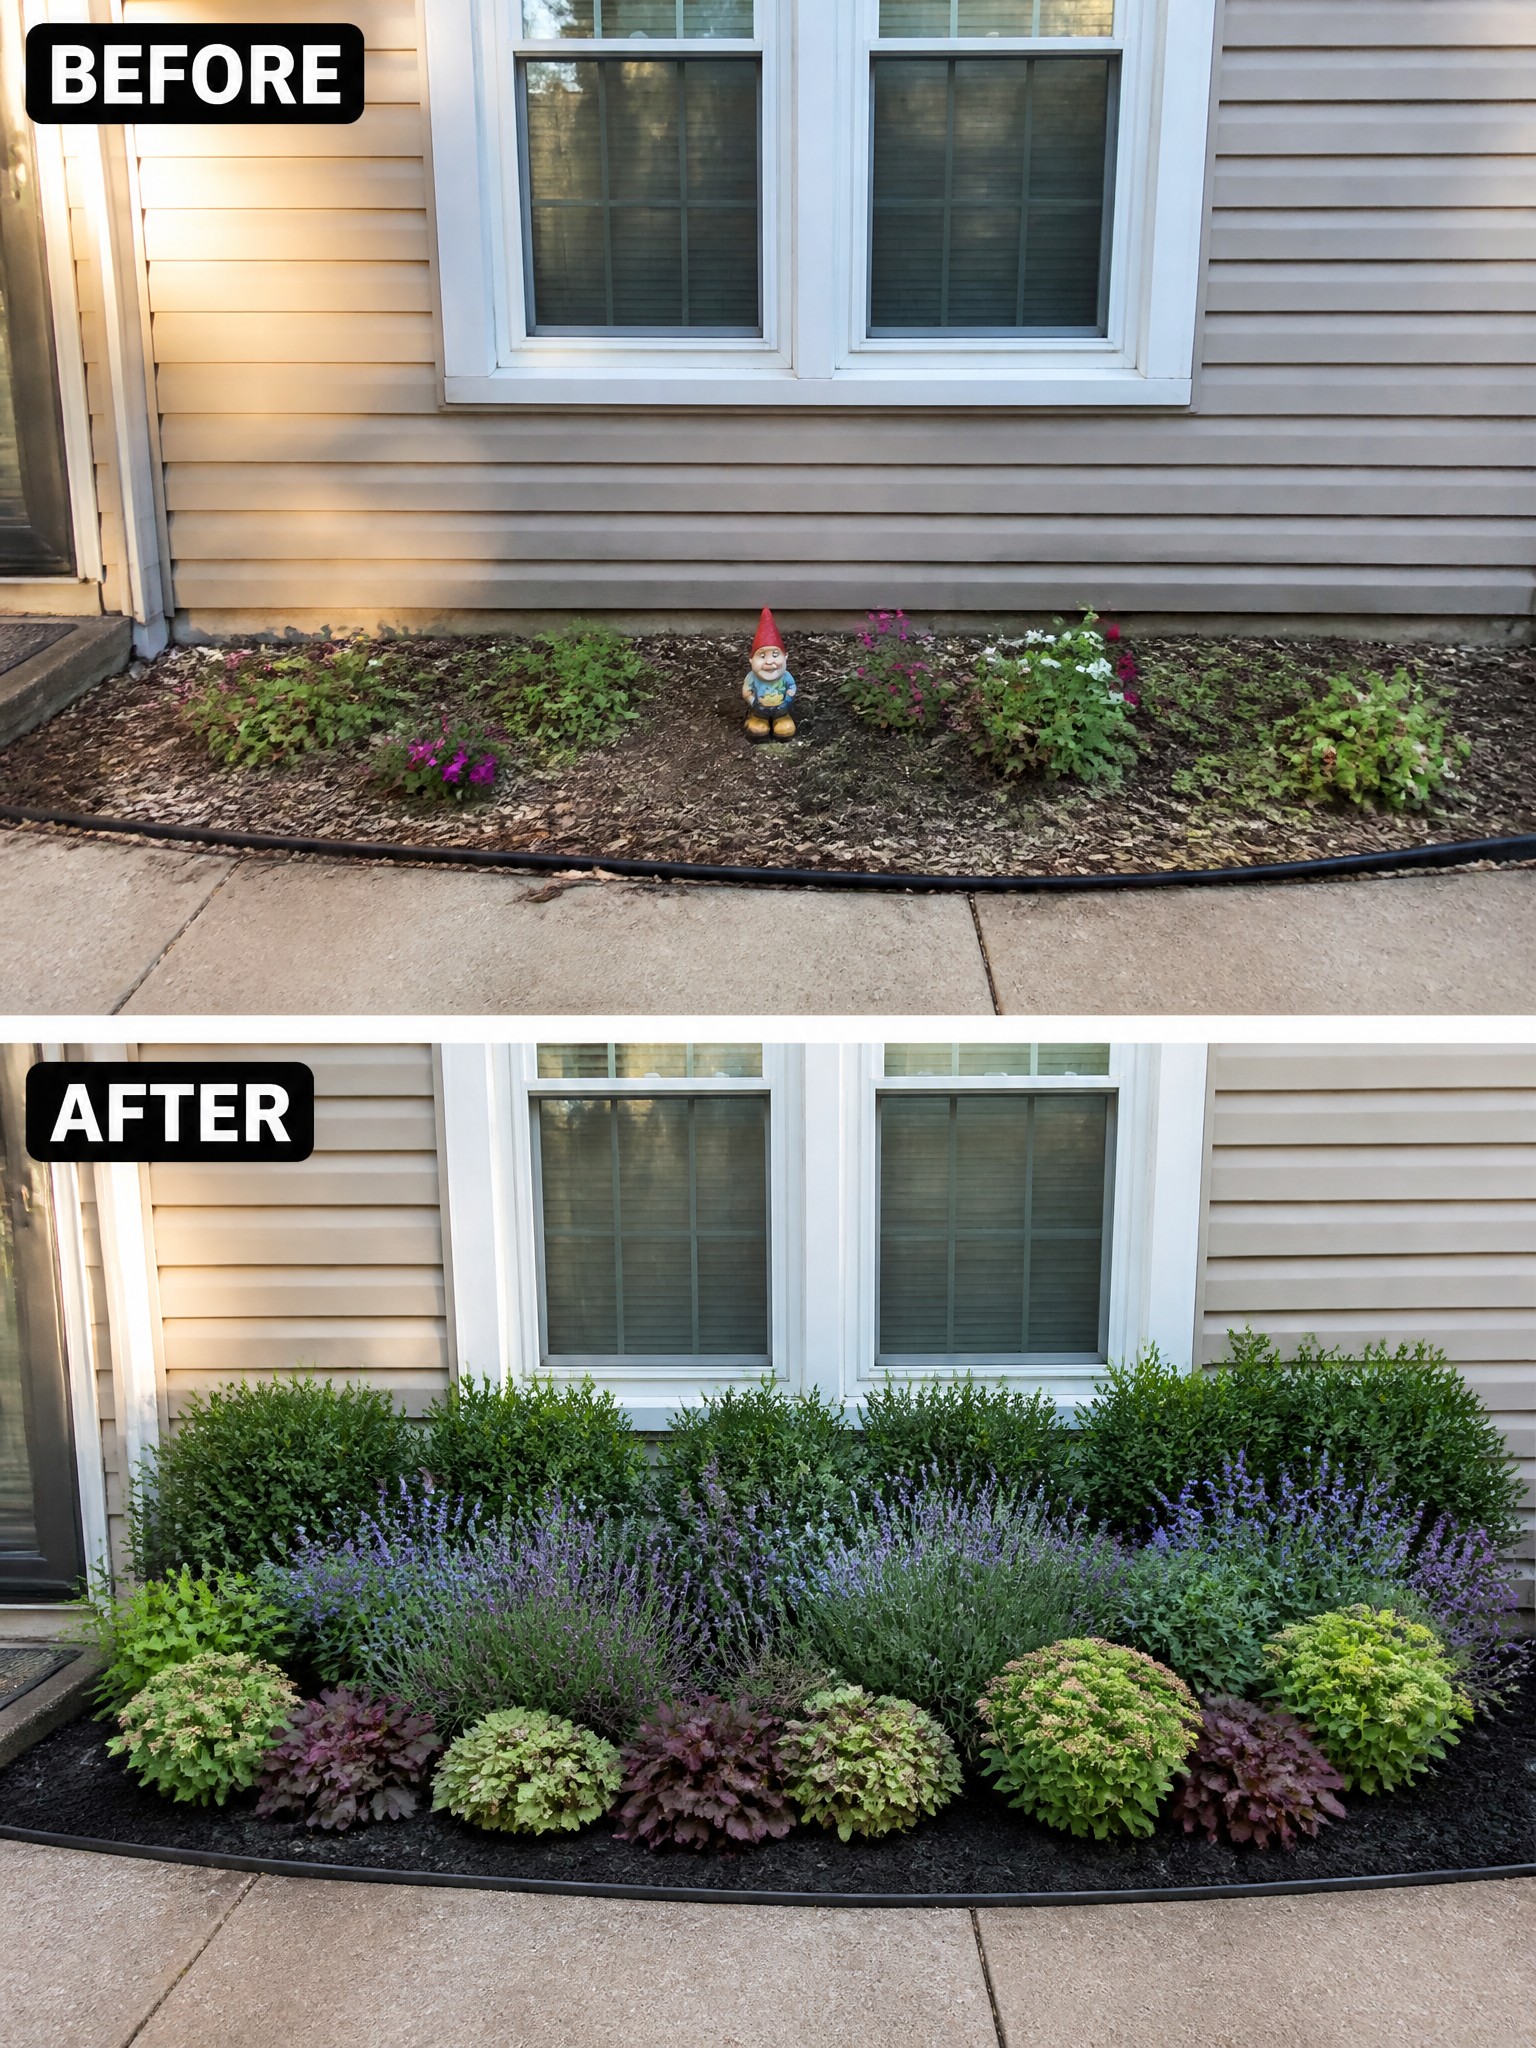
A narrow strip of ground under windows often looks empty even when a few plants are added. The change here comes from packing in different heights and textures instead of spacing things out. Low shrubs in front, mid-height perennials in the middle, and taller greenery at the back create a solid wall of green without crowding the space.
This approach works well along any house foundation where the bed is only a couple feet deep. Start with a few larger shrubs for structure, then fill gaps with smaller perennials that spread. Mulch keeps the look clean and cuts down on weeding, so the bed stays full with minimal effort once the plants settle in.
Create Defined Beds With Gravel And Rocks
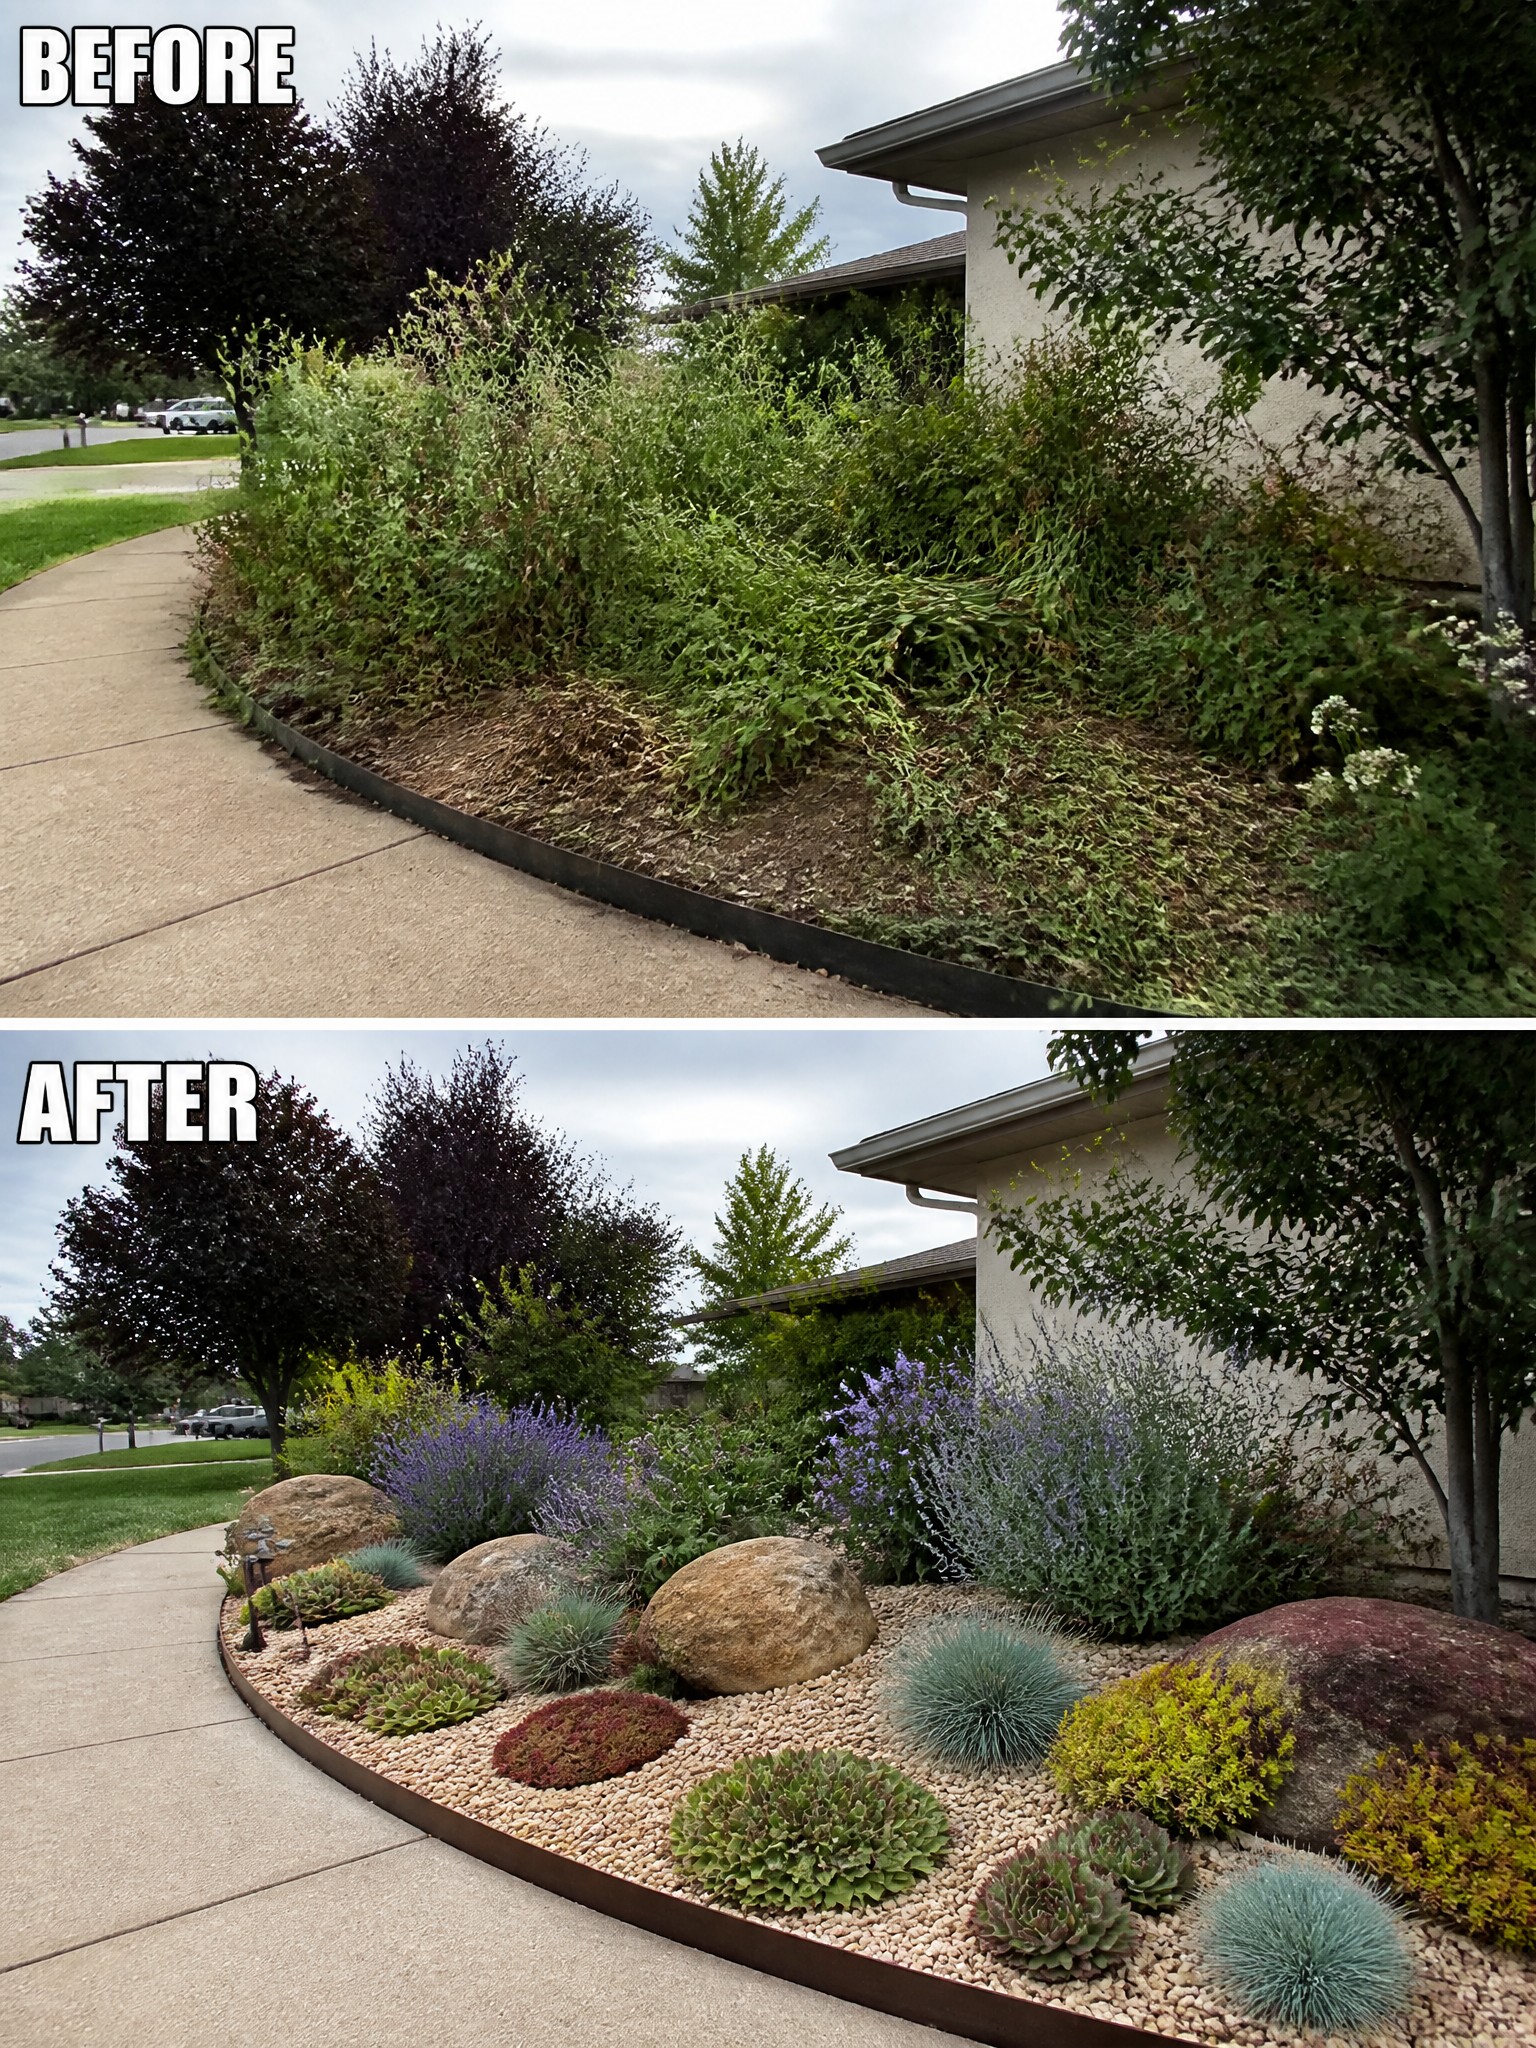
Clearing out the weeds and overgrowth first makes the biggest difference here. Once the bed has a clean edge, adding gravel gives it shape and keeps the area from looking sparse even when the plants are still small. The rocks add weight so the bed feels finished without needing a lot of different flowers.
This approach works well along sidewalks or house foundations where you want something neat but do not want constant weeding. Start with good edging to hold the gravel in place, then choose a few compact plants that stay low. The result stays looking full with far less work than a traditional flower border.
Add Edging To Shape A Simple Border Garden
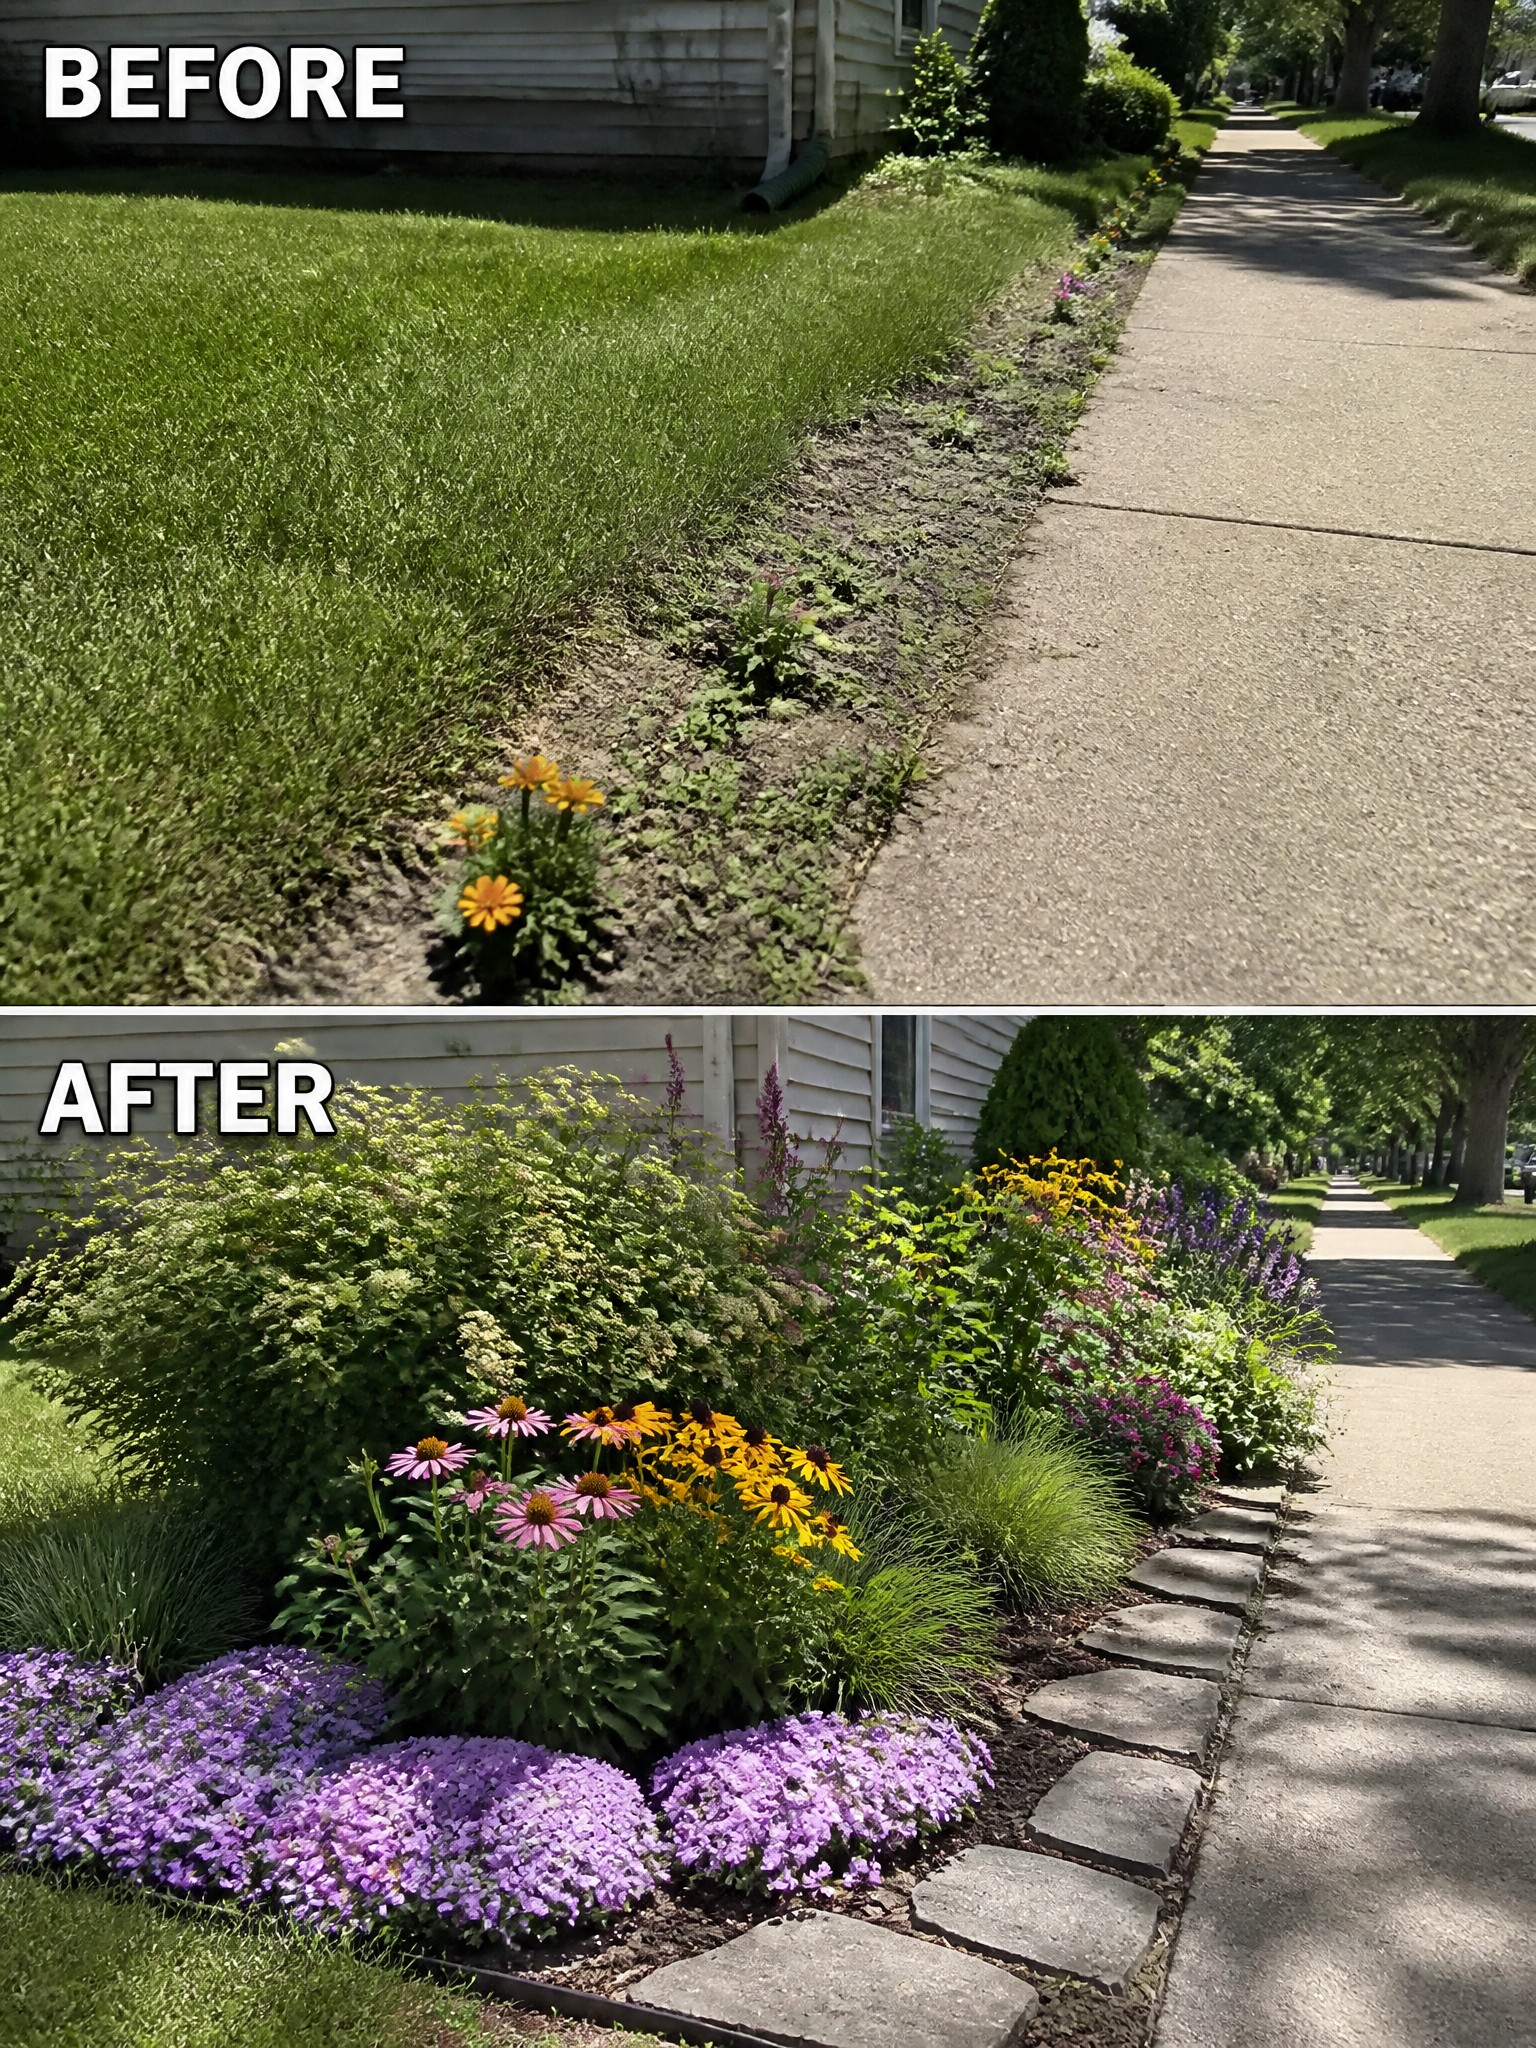
A weedy strip along a walkway often looks messy because there is no clear line between lawn and bed. Adding a low stone edge and filling the space with layers of plants gives the area instant structure while keeping the look full without constant work.
This approach works well along sidewalks or driveways where space is narrow. Start with the edging to hold the shape, then choose a mix of low ground cover, mid-height flowers, and a few taller accents so the bed stays interesting but stays low maintenance.
Add Edging To Shape Narrow Side Beds
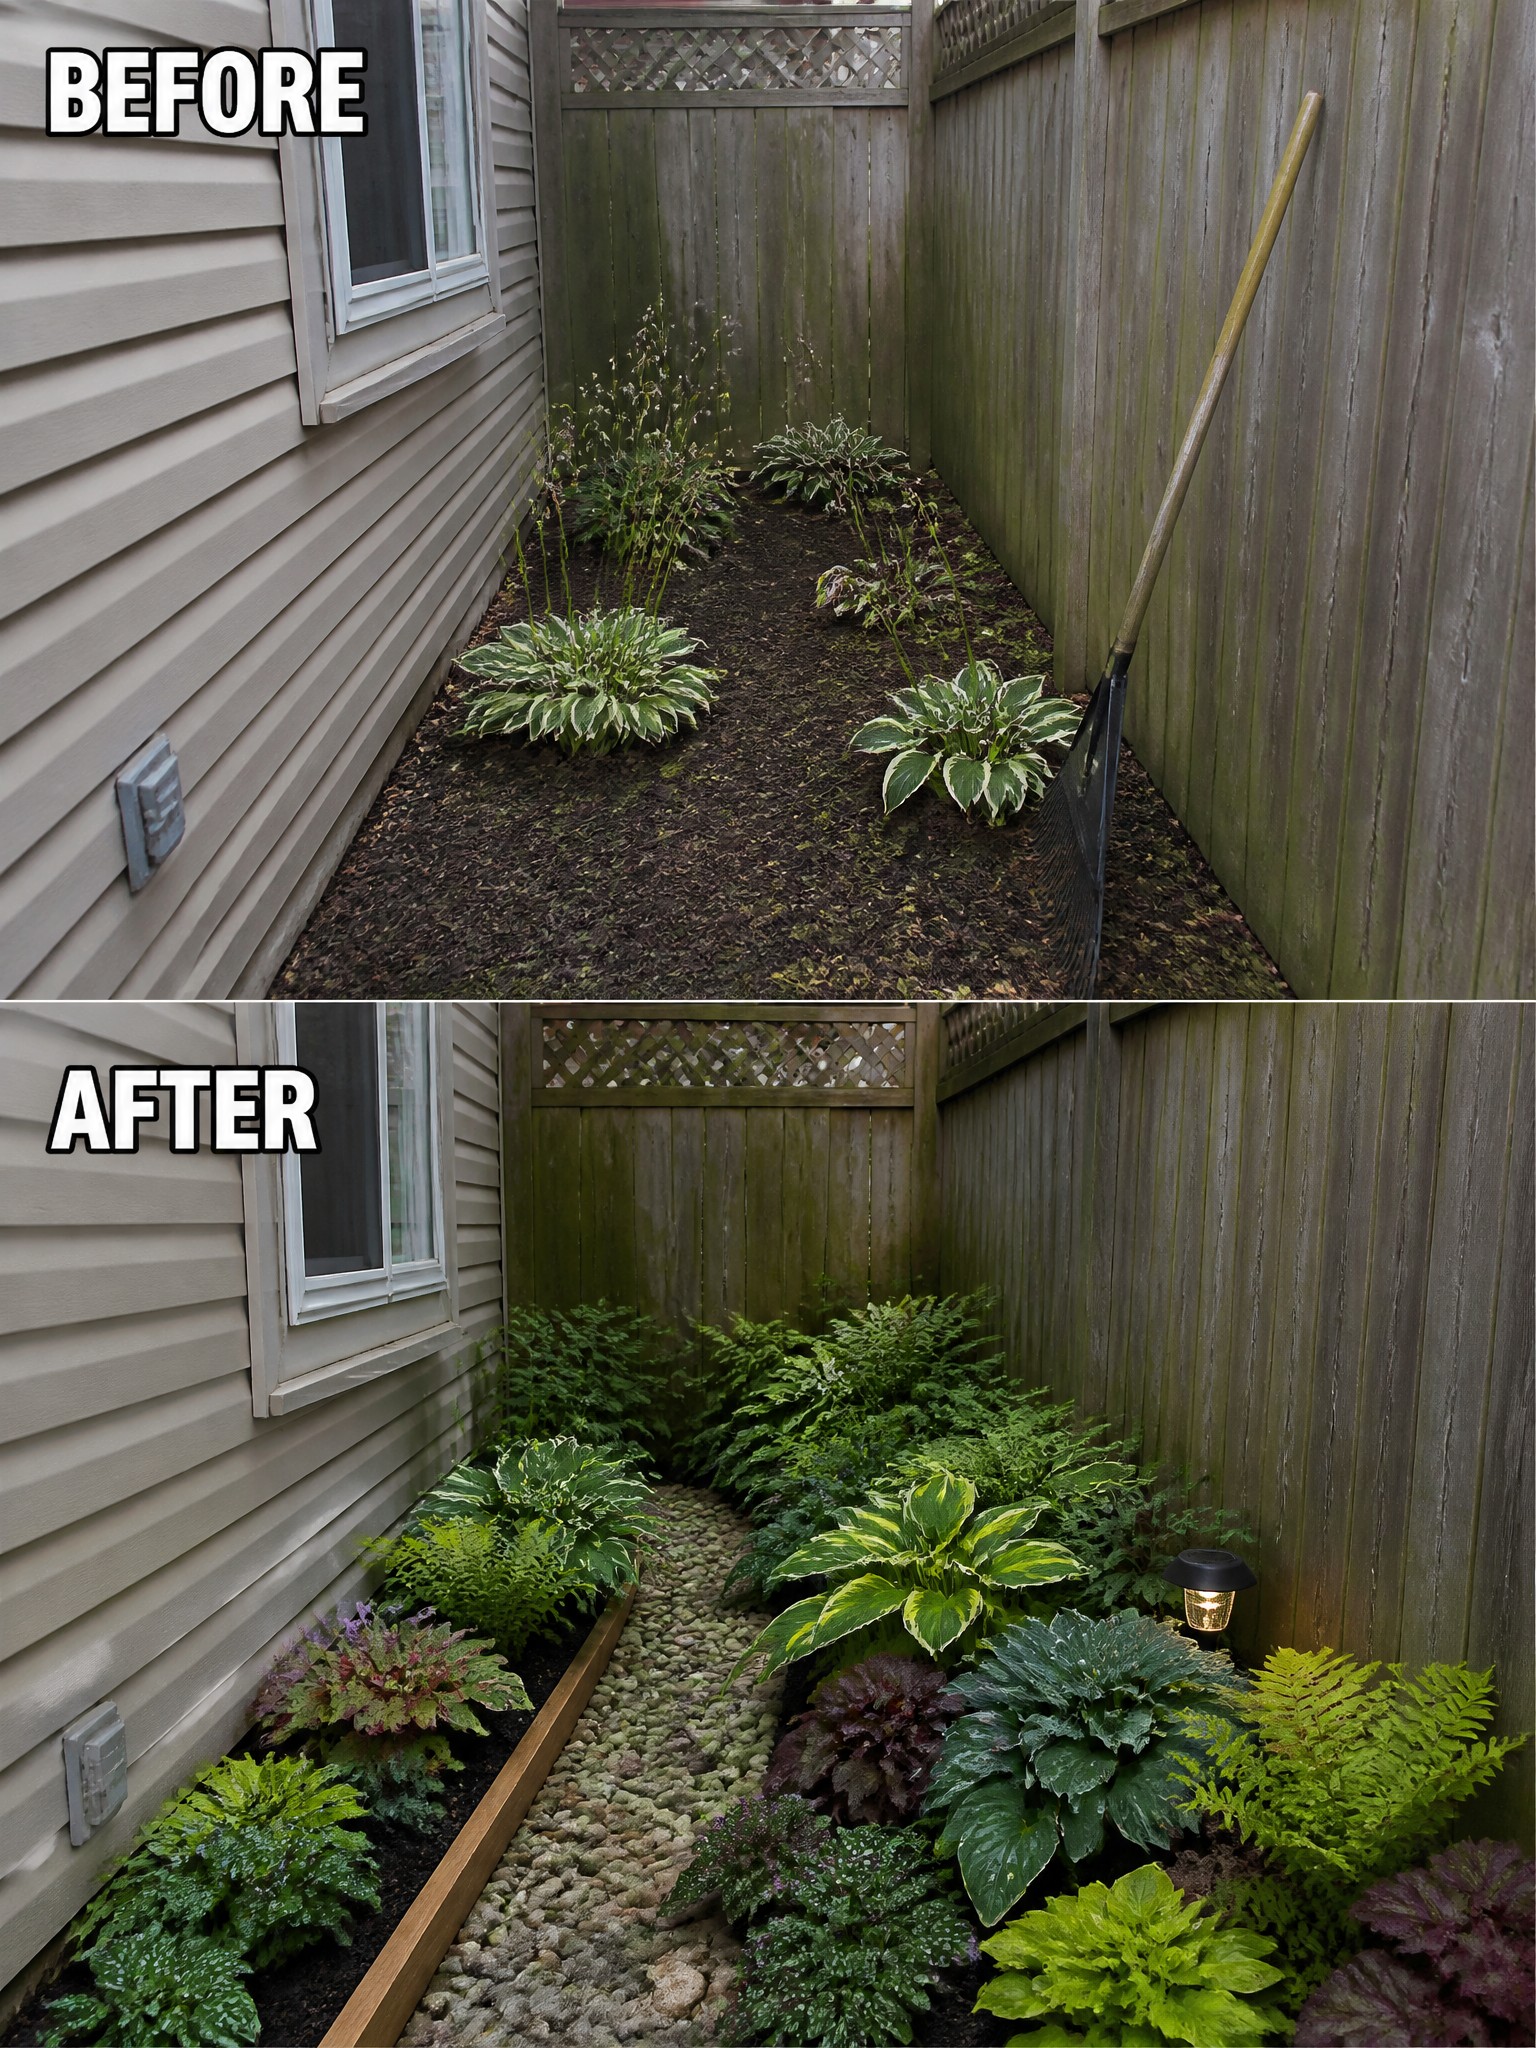
A narrow strip along the house often ends up as an afterthought, with weeds taking over and no clear boundary. Adding a simple wood edge and a gravel path gives the bed definition right away. The plants can then fill in densely without looking scattered or messy.
This approach works well on side yards where space is tight. Focus first on cleanup and edging before choosing plants. Hostas and ferns do a good job of filling the area while staying low maintenance once established.
Add Defined Planting Beds Around Trees
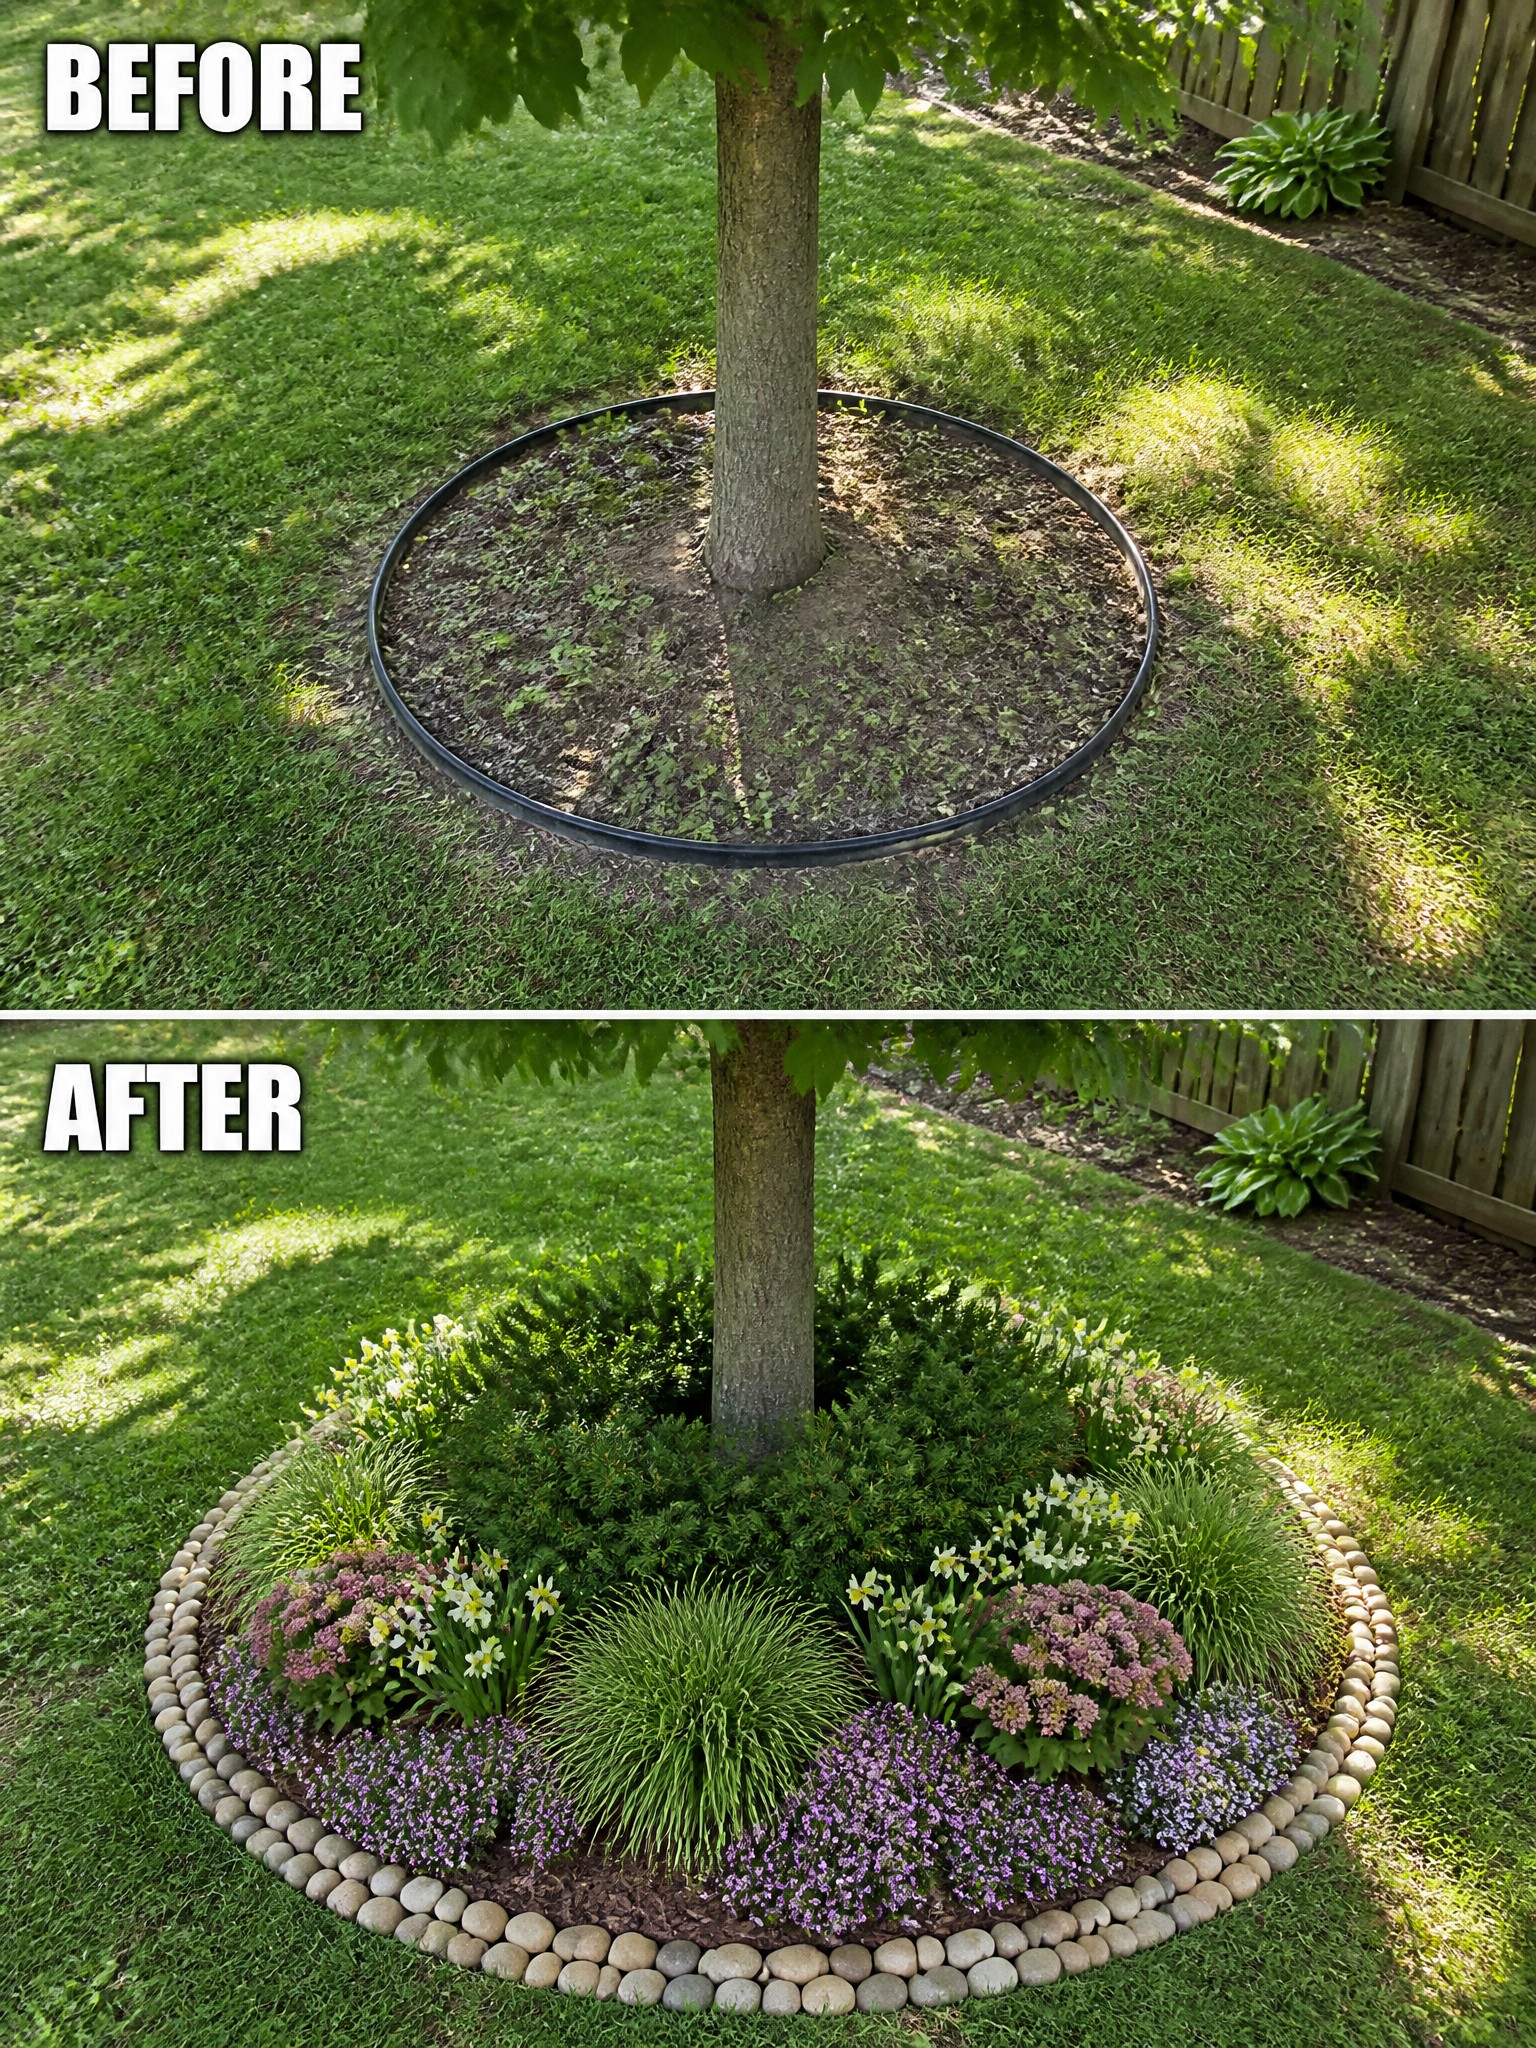
A plain ring of soil or mulch around a tree often looks unfinished next to a lawn. Filling that space with low plants and flowers gives the area purpose and makes the whole yard feel more put together without adding much work.
This approach works best around mature trees where the lawn already has good grass. Use shade-tolerant perennials and small shrubs, keep the bed a manageable size, and finish the edge with stones or pavers so it stays neat over time.
Give Overgrown Beds Clear Shape With Edging
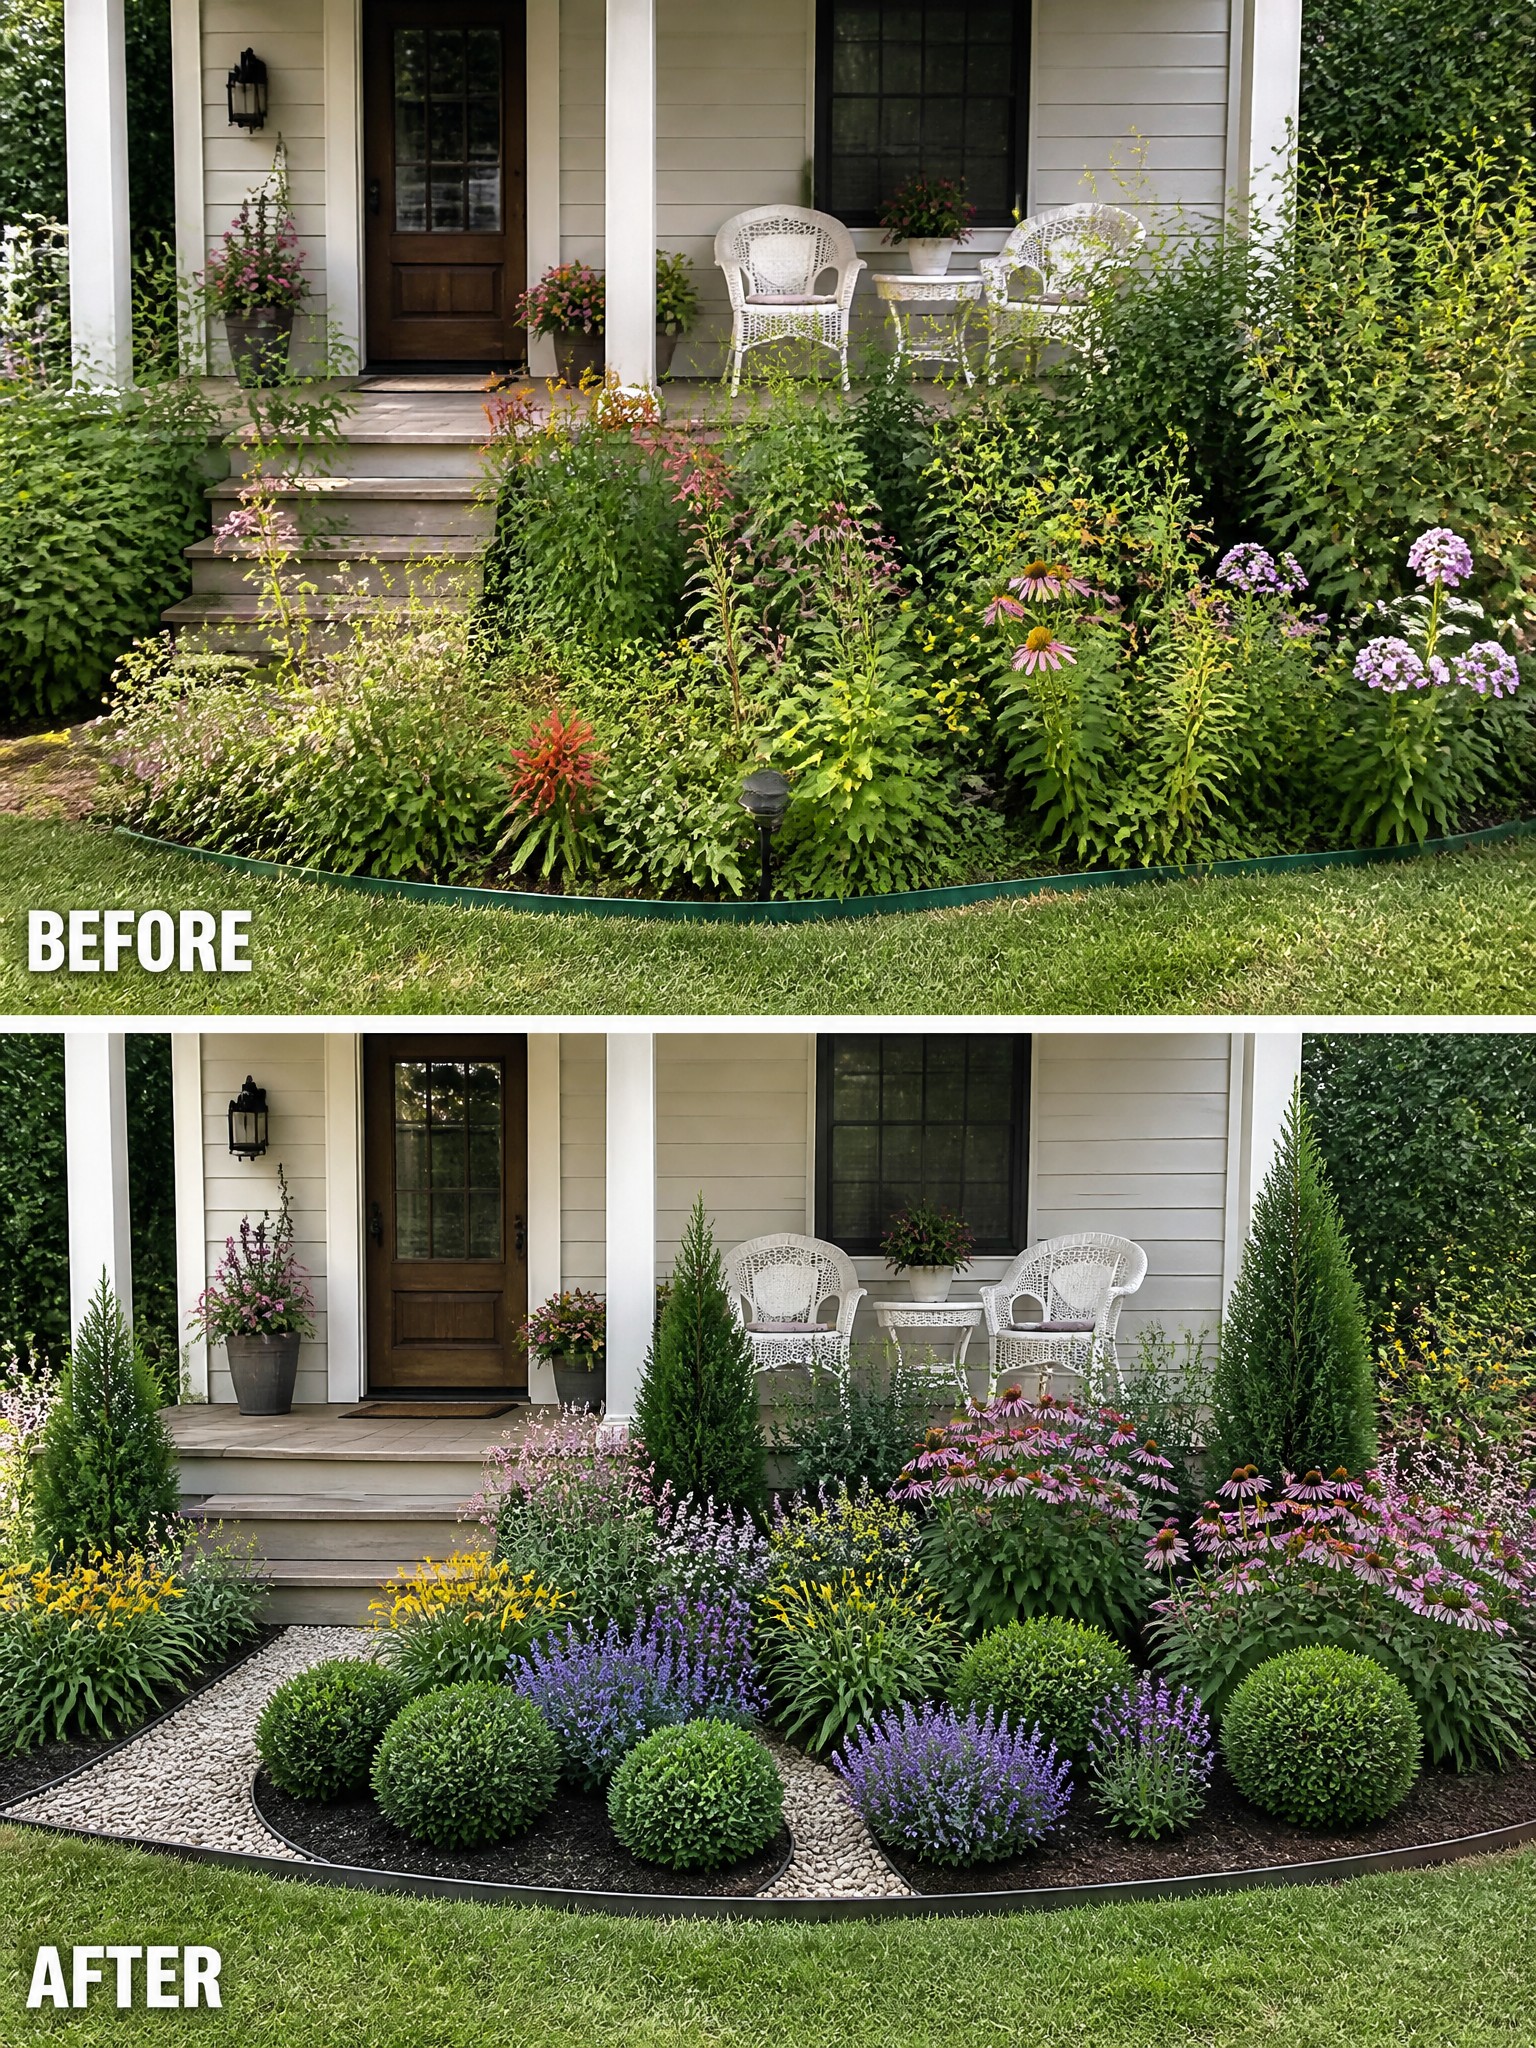
Many front beds end up looking messy because the plants spread without any real boundary. The before photo shows everything blending into the lawn with no separation, while the after uses a clean edge and gravel to keep the beds looking intentional and contained.
This works especially well on smaller front yards where you want the planting to feel full but still controlled. Lay out the shape first, add the edging and gravel or mulch, then fill in with plants. It keeps the bed looking neat even after the flowers grow in.
Add Structure To An Overgrown Flower Bed
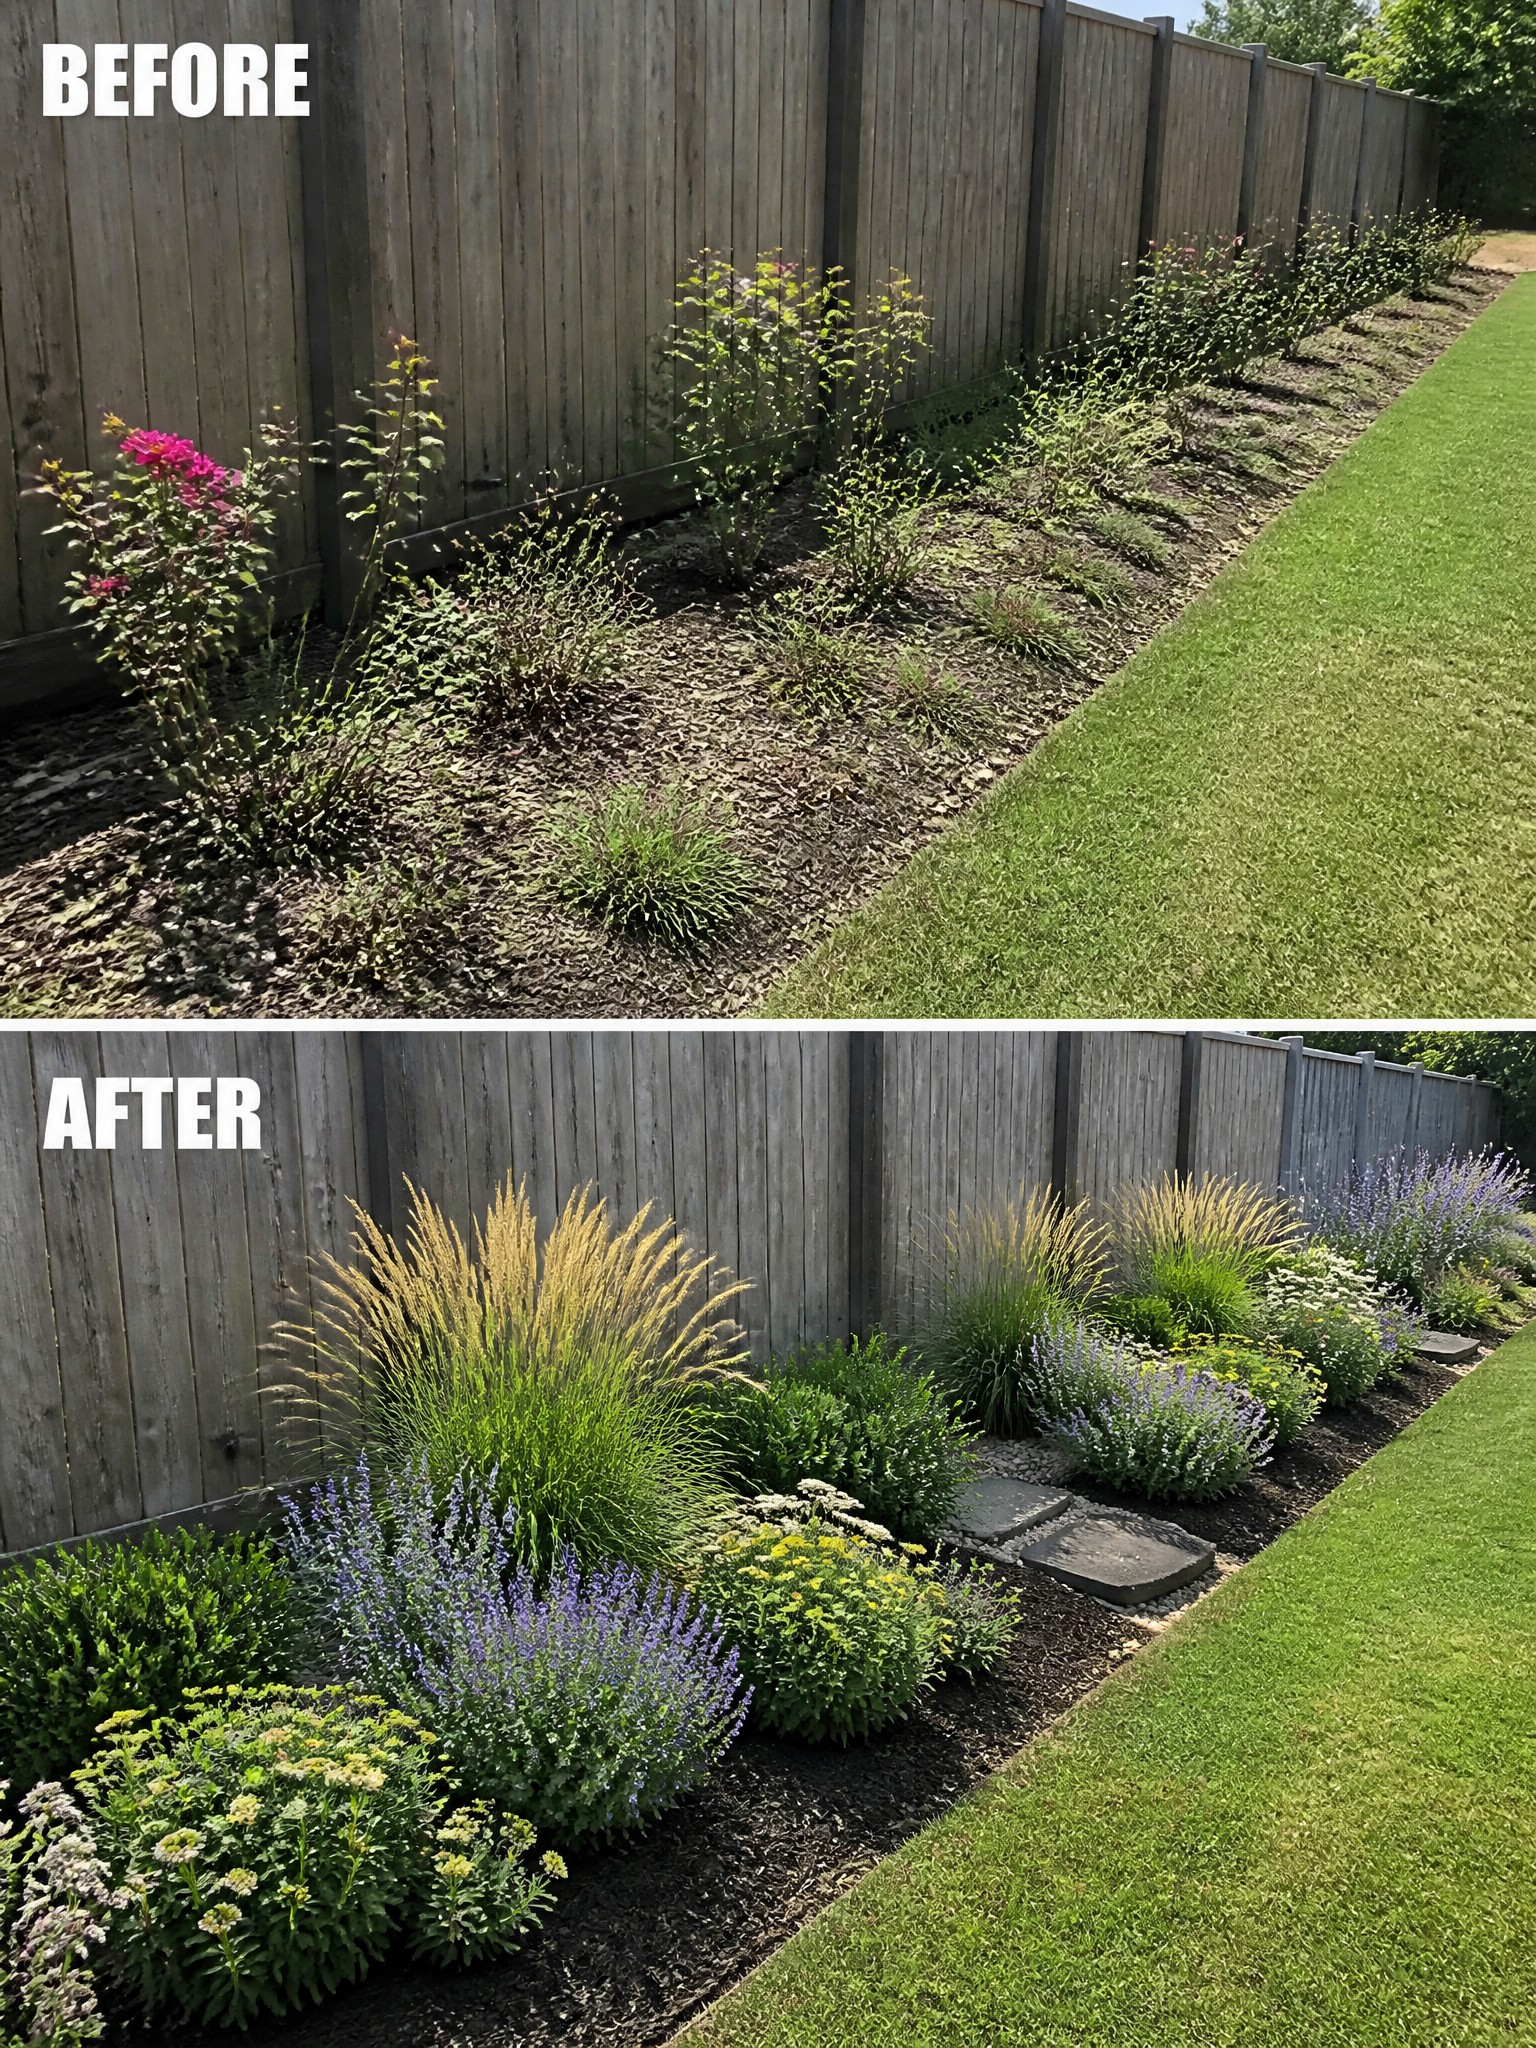
A neglected strip along a fence often ends up with weeds, thin patches, and random plants that never quite fill in. The change here came from clearing the old growth first, then laying out a clear bed edge with mulch and placing plants in layers so everything grows together instead of leaving gaps.
This approach works well along fences or property lines where you want coverage without constant weeding. Start by removing the worst of the weeds and old plants, then choose a mix of grasses, shrubs, and perennials that reach similar heights so the bed looks full even in the first season. Adding a few stepping stones keeps the area easy to walk through for maintenance later.
Add Structure To An Overgrown Planter Bed
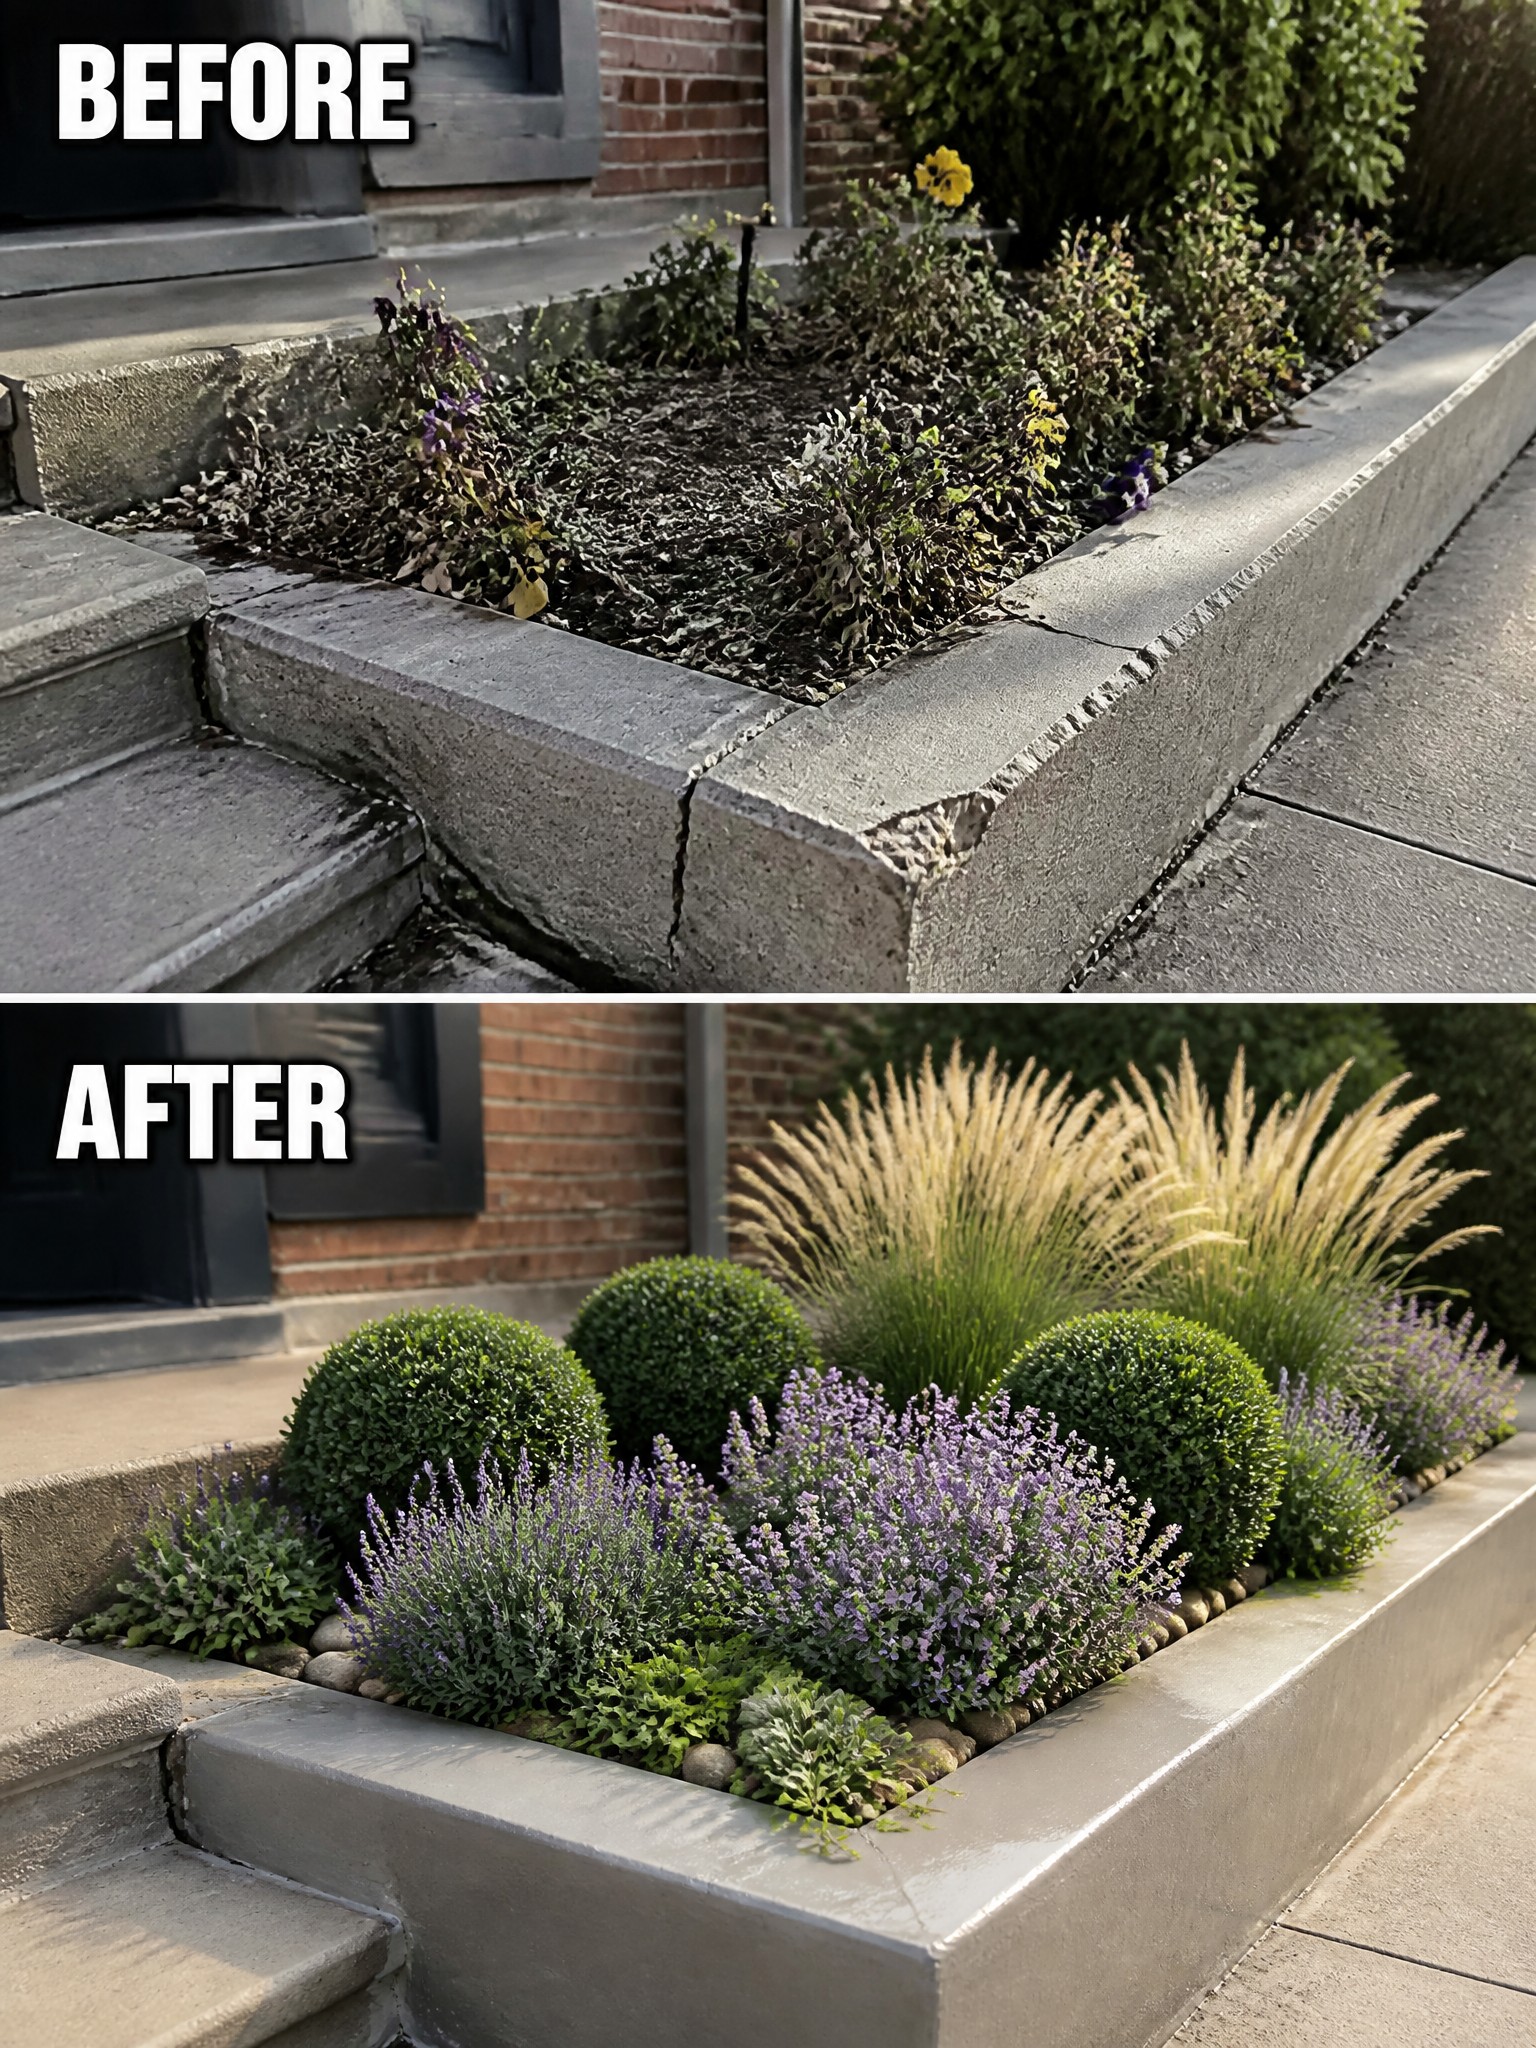
Concrete planter beds often fill with weeds when left alone for a season or two. Clearing the mess first and then planting in clear layers turns the same box into something that looks intentional instead of neglected.
This approach works best along front steps or walkways where you want order without constant trimming. Use a few rounded shrubs as the backbone, add mid-height flowering plants in front, and finish with a simple ground cover or pebbles to keep the soil tidy and reduce future weeding.
Create Terraced Beds On A Hillside Slope
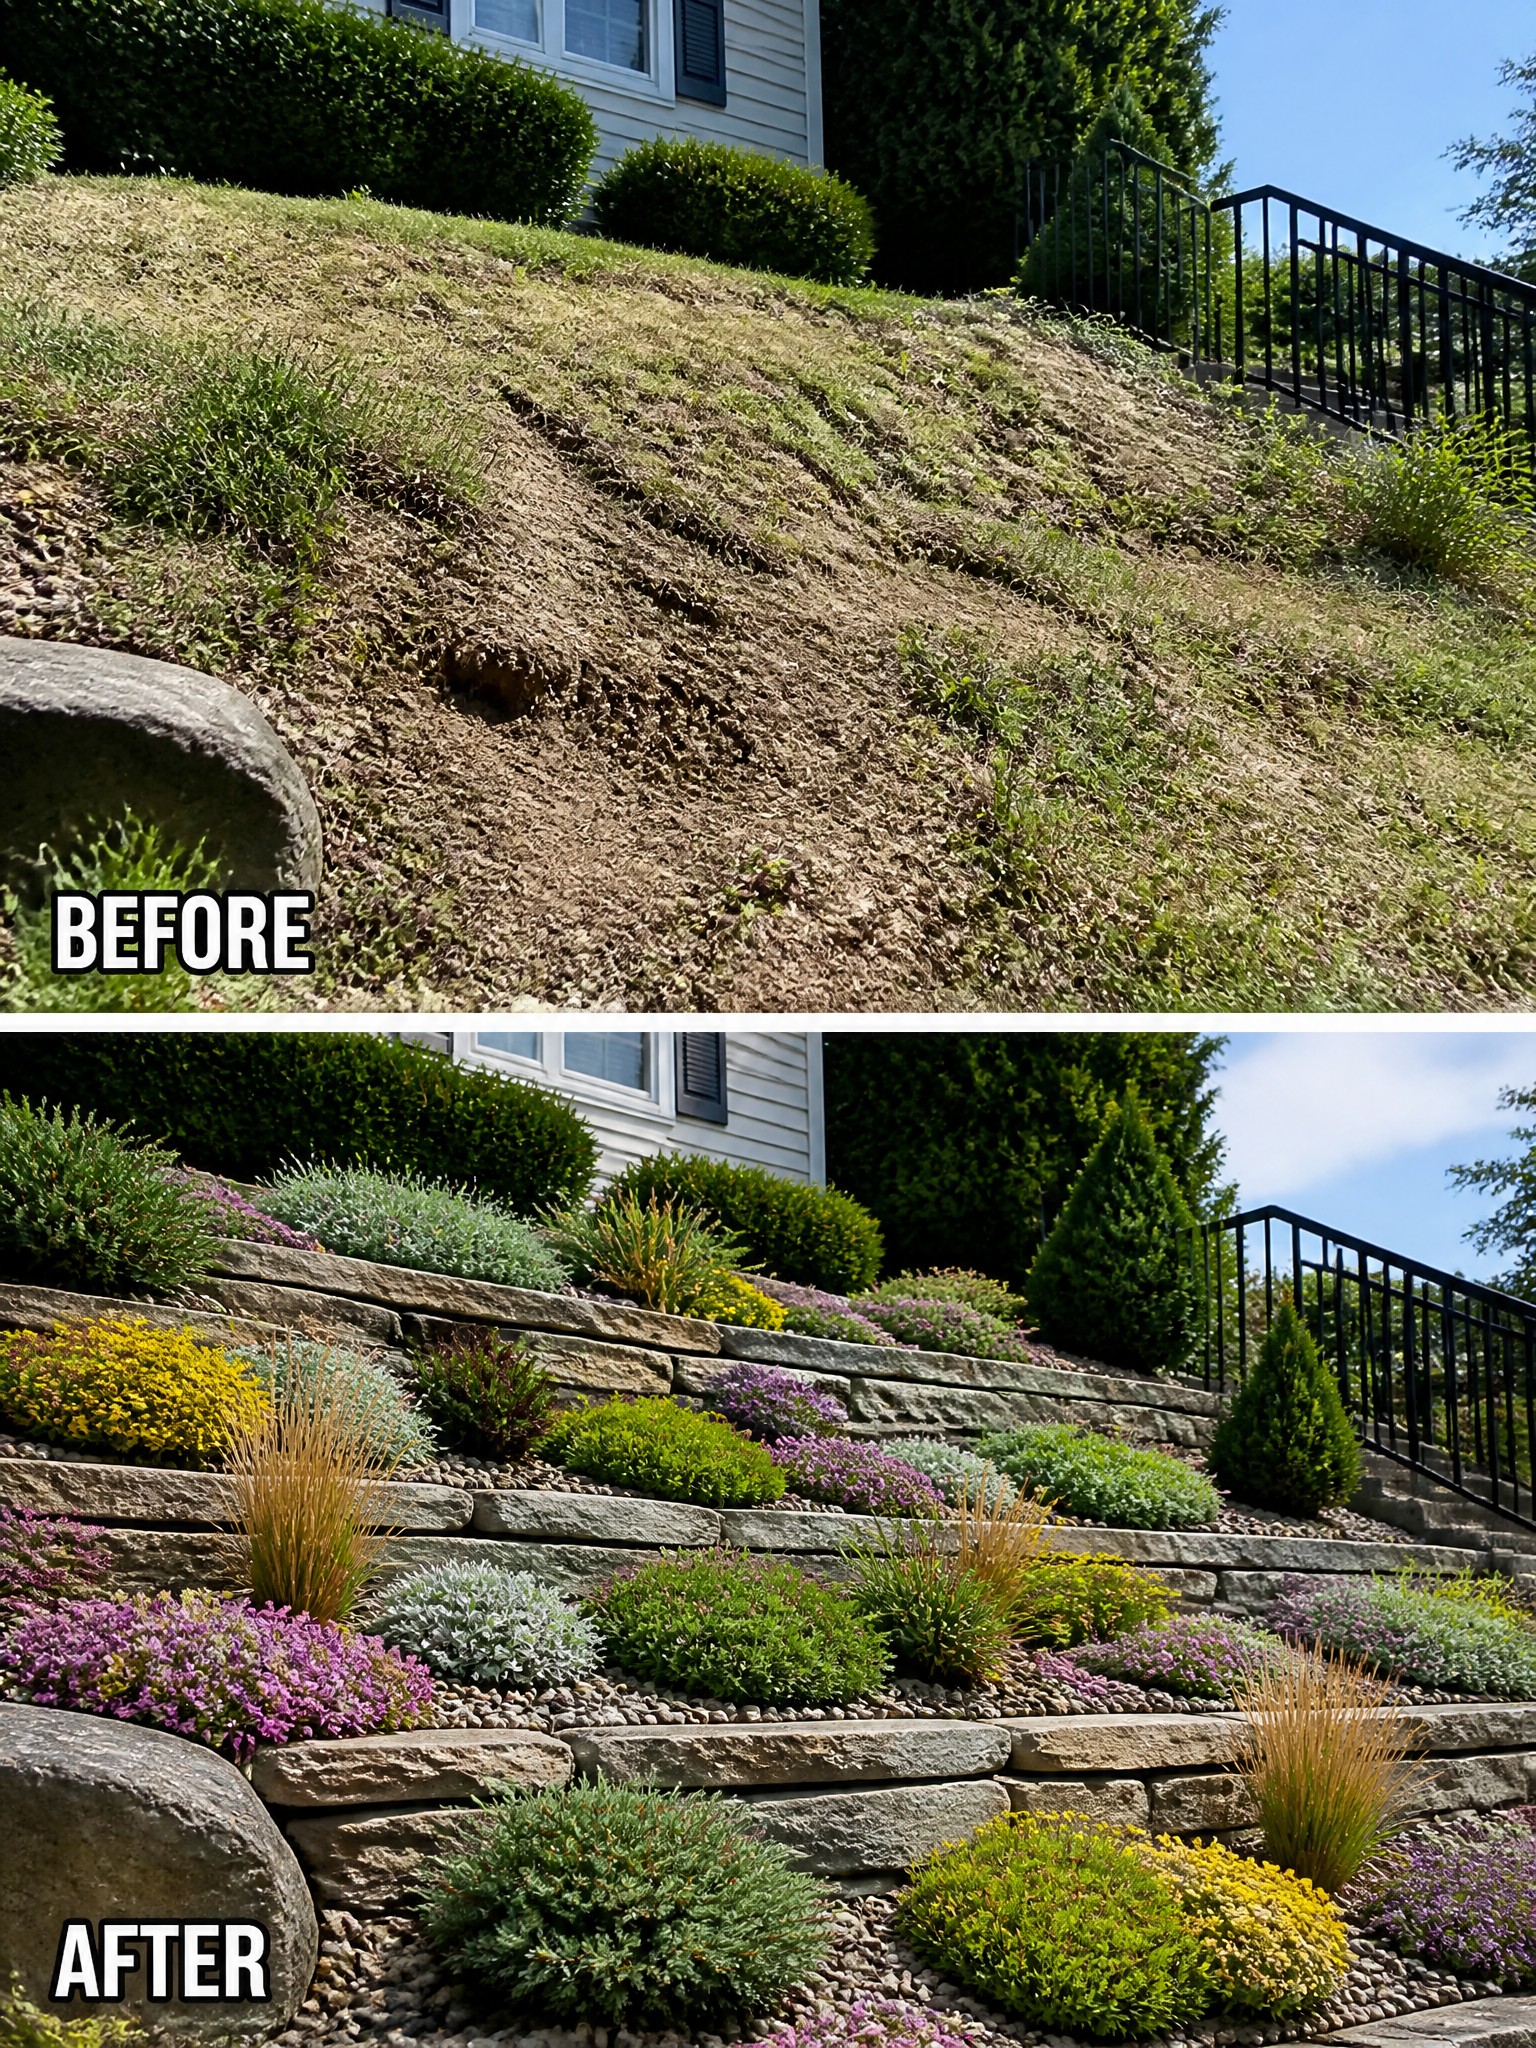
A steep bare slope often turns into an eyesore because grass struggles to hold and water runs off fast. Building low stone retaining walls turns the same slope into a series of flat planting beds that stay in place and look intentional. The change from loose dirt to stacked stone gives the yard clear lines and makes room for actual plants instead of scattered weeds.
This approach works well on any noticeable grade where mowing is difficult. Start with the walls first so the beds have solid edges, then fill them with a simple mix of ground covers and low shrubs that do not need constant trimming. The gravel mulch between plants keeps the beds looking neat even when growth is minimal.
Add Edging To Create A Low Maintenance Flower Bed
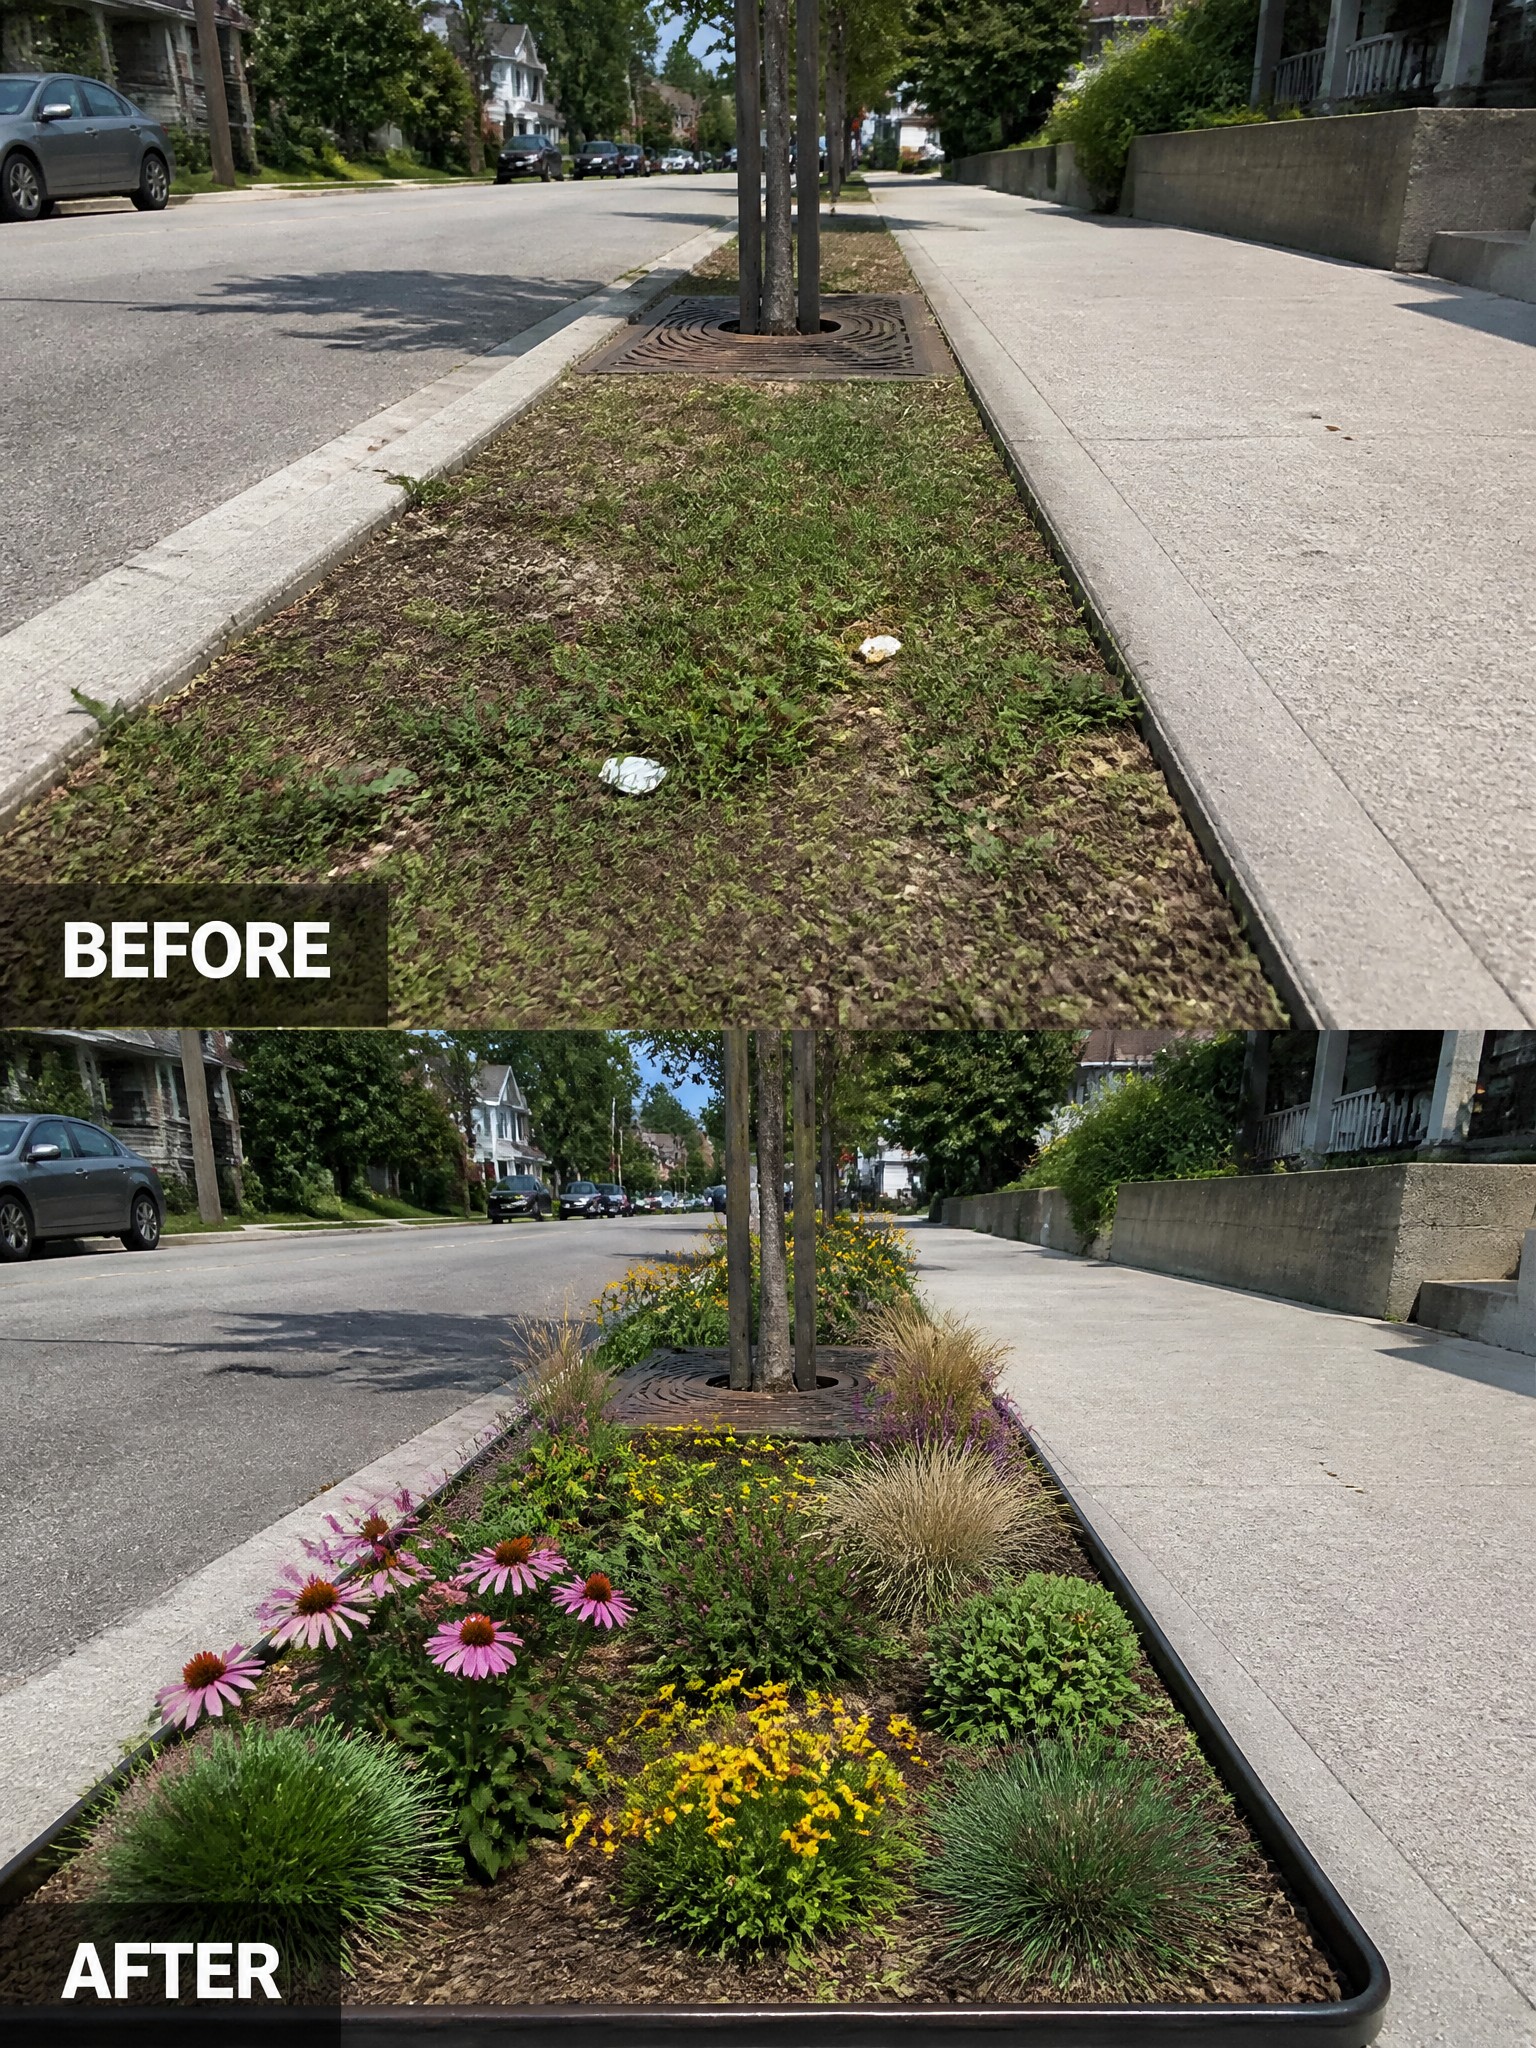
A narrow strip of grass between the sidewalk and street often ends up weedy and neglected. Adding a simple border and filling the bed with a mix of perennials turns the same space into something that looks intentional and stays manageable.
This approach works well in front yards or along sidewalks where you want color without constant upkeep. Start with a clean edge and a layer of mulch, then choose plants that fill in without needing frequent division or watering. The result stays neat even when the surrounding lawn is left more casual.
Use Gravel To Give A Raised Bed Clean Structure
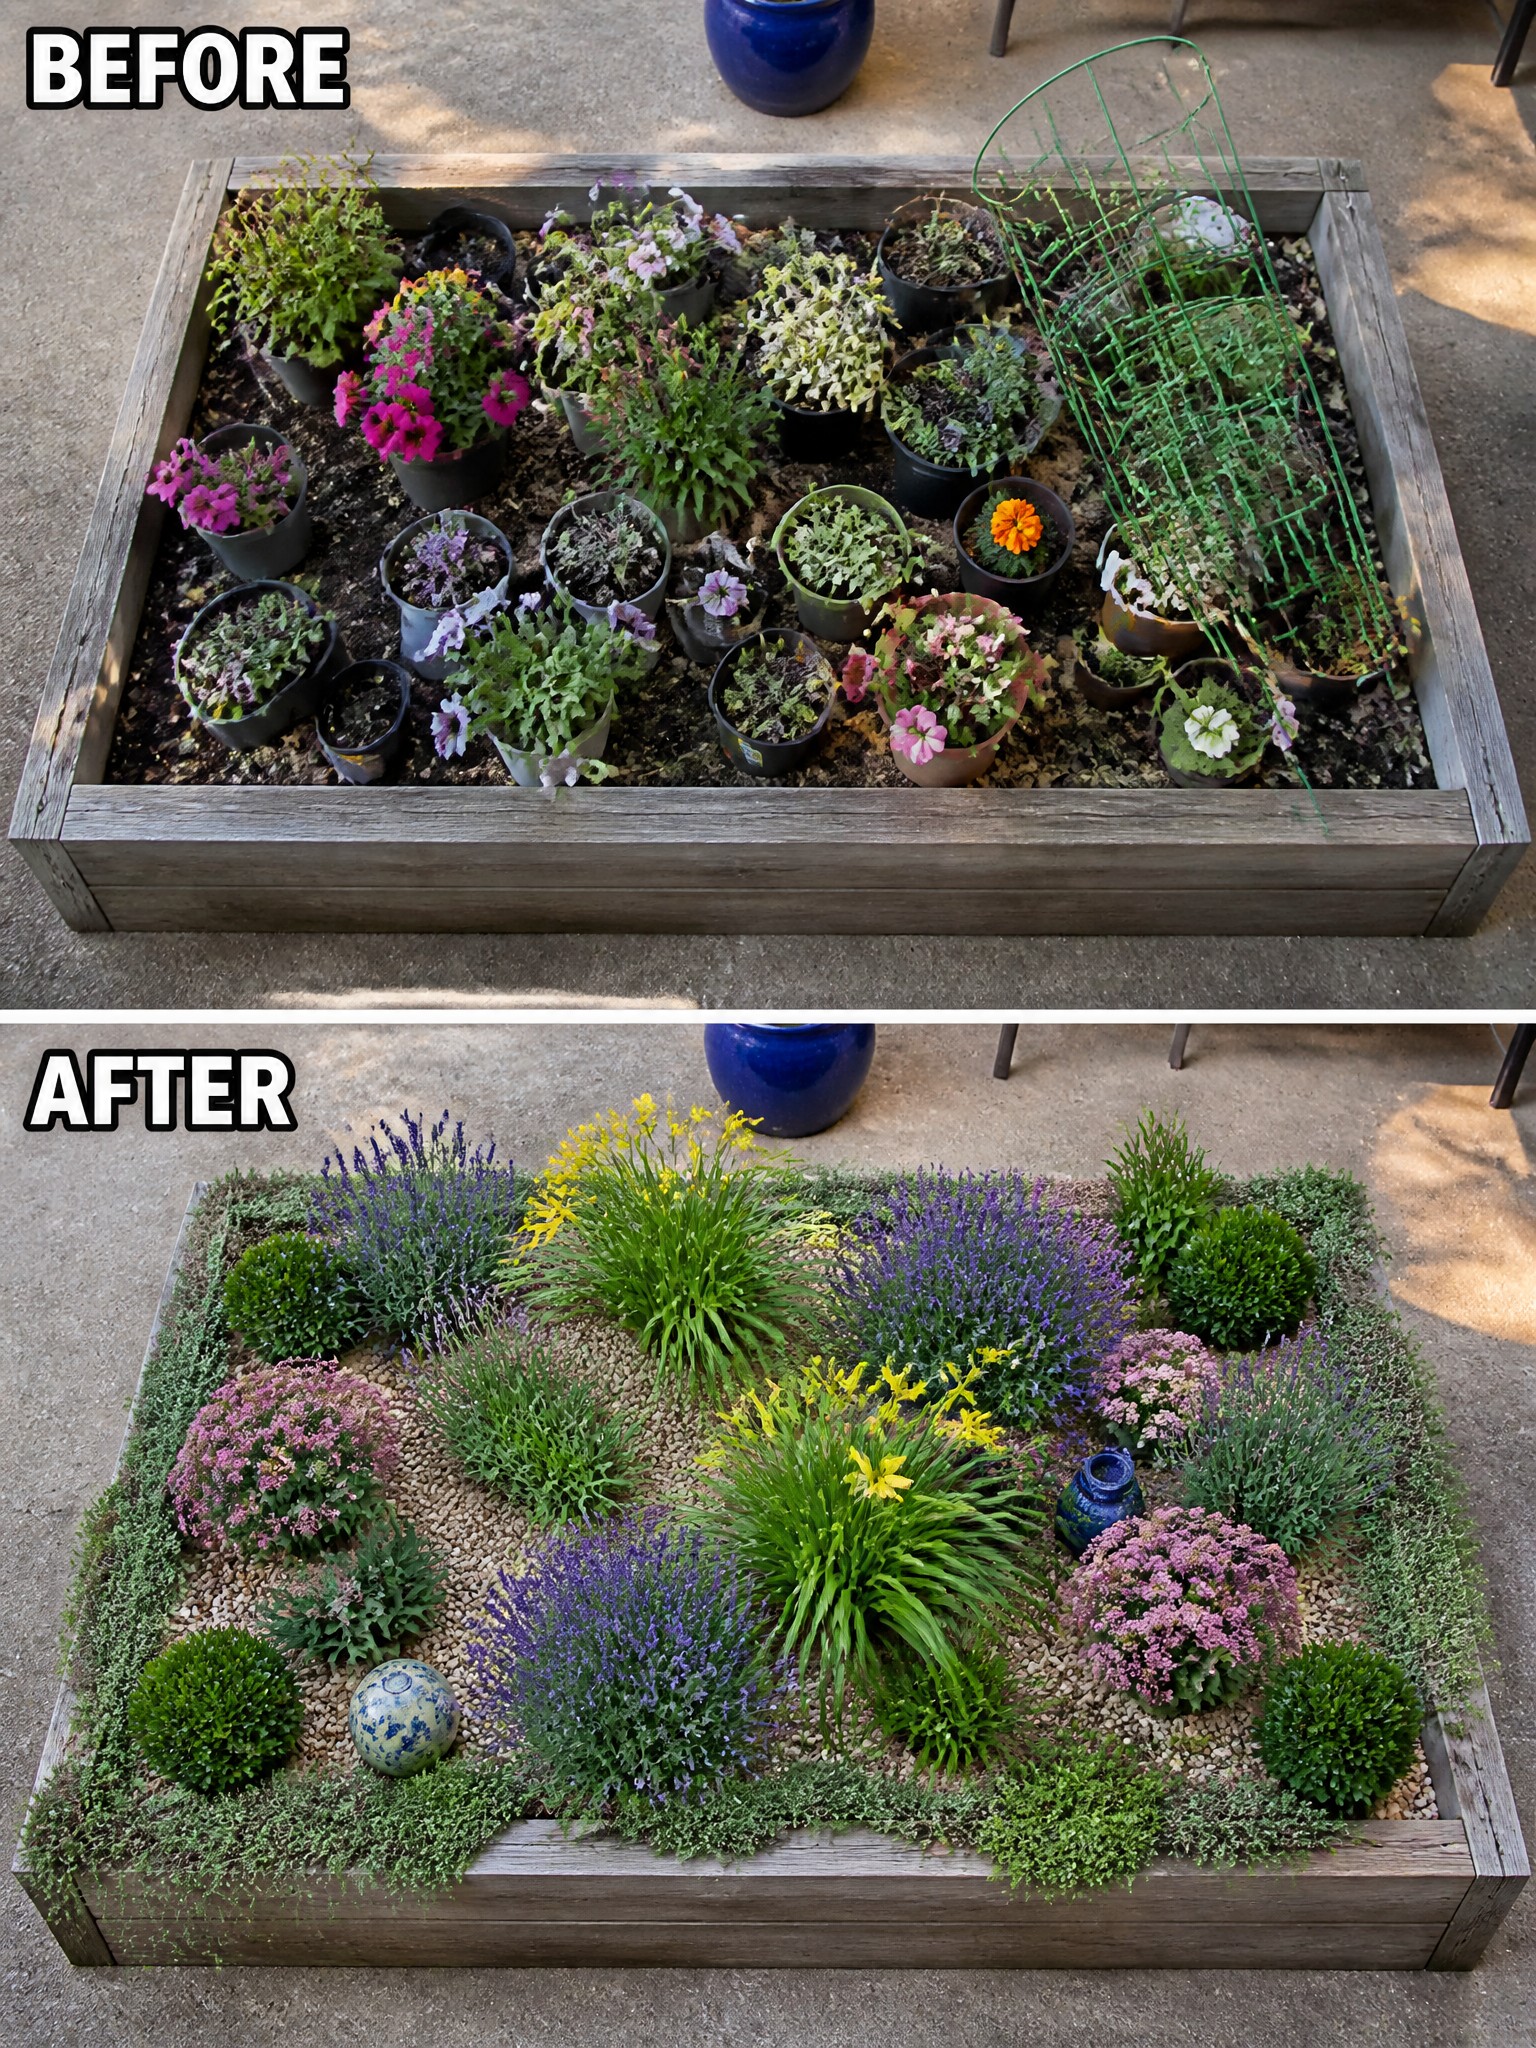
A raised bed often looks messy when it holds a bunch of mismatched pots. Clearing those out and planting straight into the soil lets the bed feel more settled. Adding gravel between the plants keeps the soil covered and gives the whole thing a tidy frame without extra edging.
This works best in small yards or on patios where space is tight. Pick a few plant types that can grow together, space them so they fill in over time, and use gravel to separate the groups. The result stays low maintenance because the gravel cuts down on weeds and holds moisture.
Create Defined Flower Beds With Layered Planting
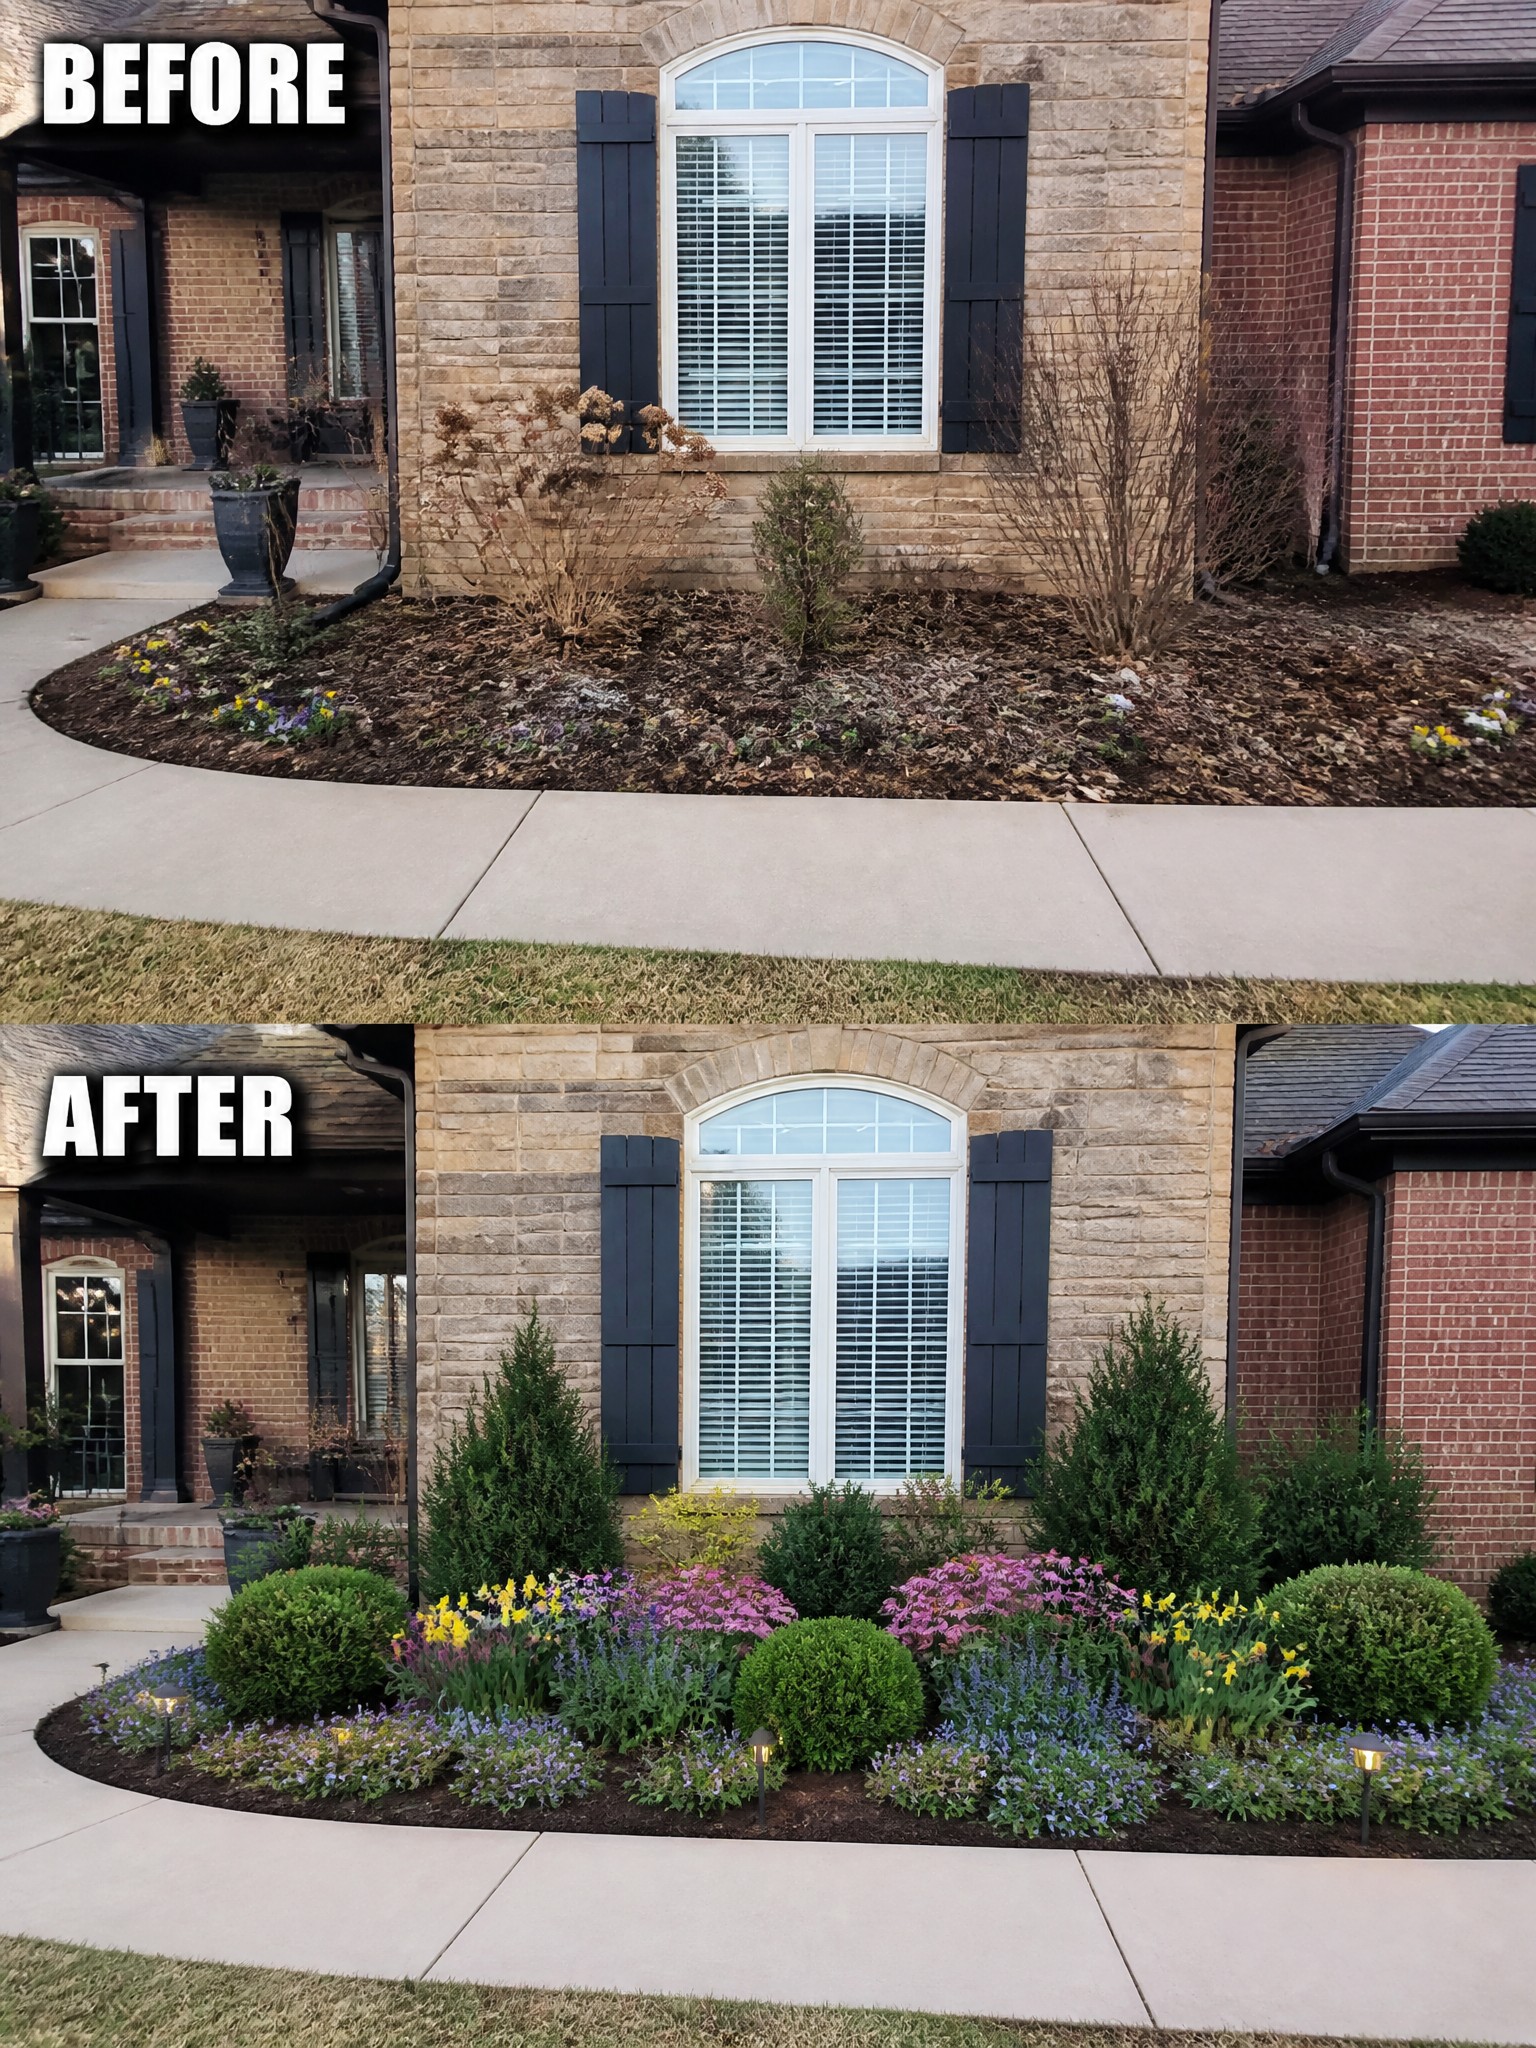
The front bed went from a scattered mix of weeds and dead stems to a clean border that looks full without feeling crowded. Placing a few evergreen shrubs at the back gives height and structure, while lower flowers and ground cover fill the front edge.
This layout works well along a house foundation where you want steady color and shape through the seasons. Start with the shrubs to set the scale, then add perennials that bloom at different times. Mulch between plants keeps weeds down and makes the bed easier to maintain over time.
Define A Bare Foundation With Simple Planting Beds
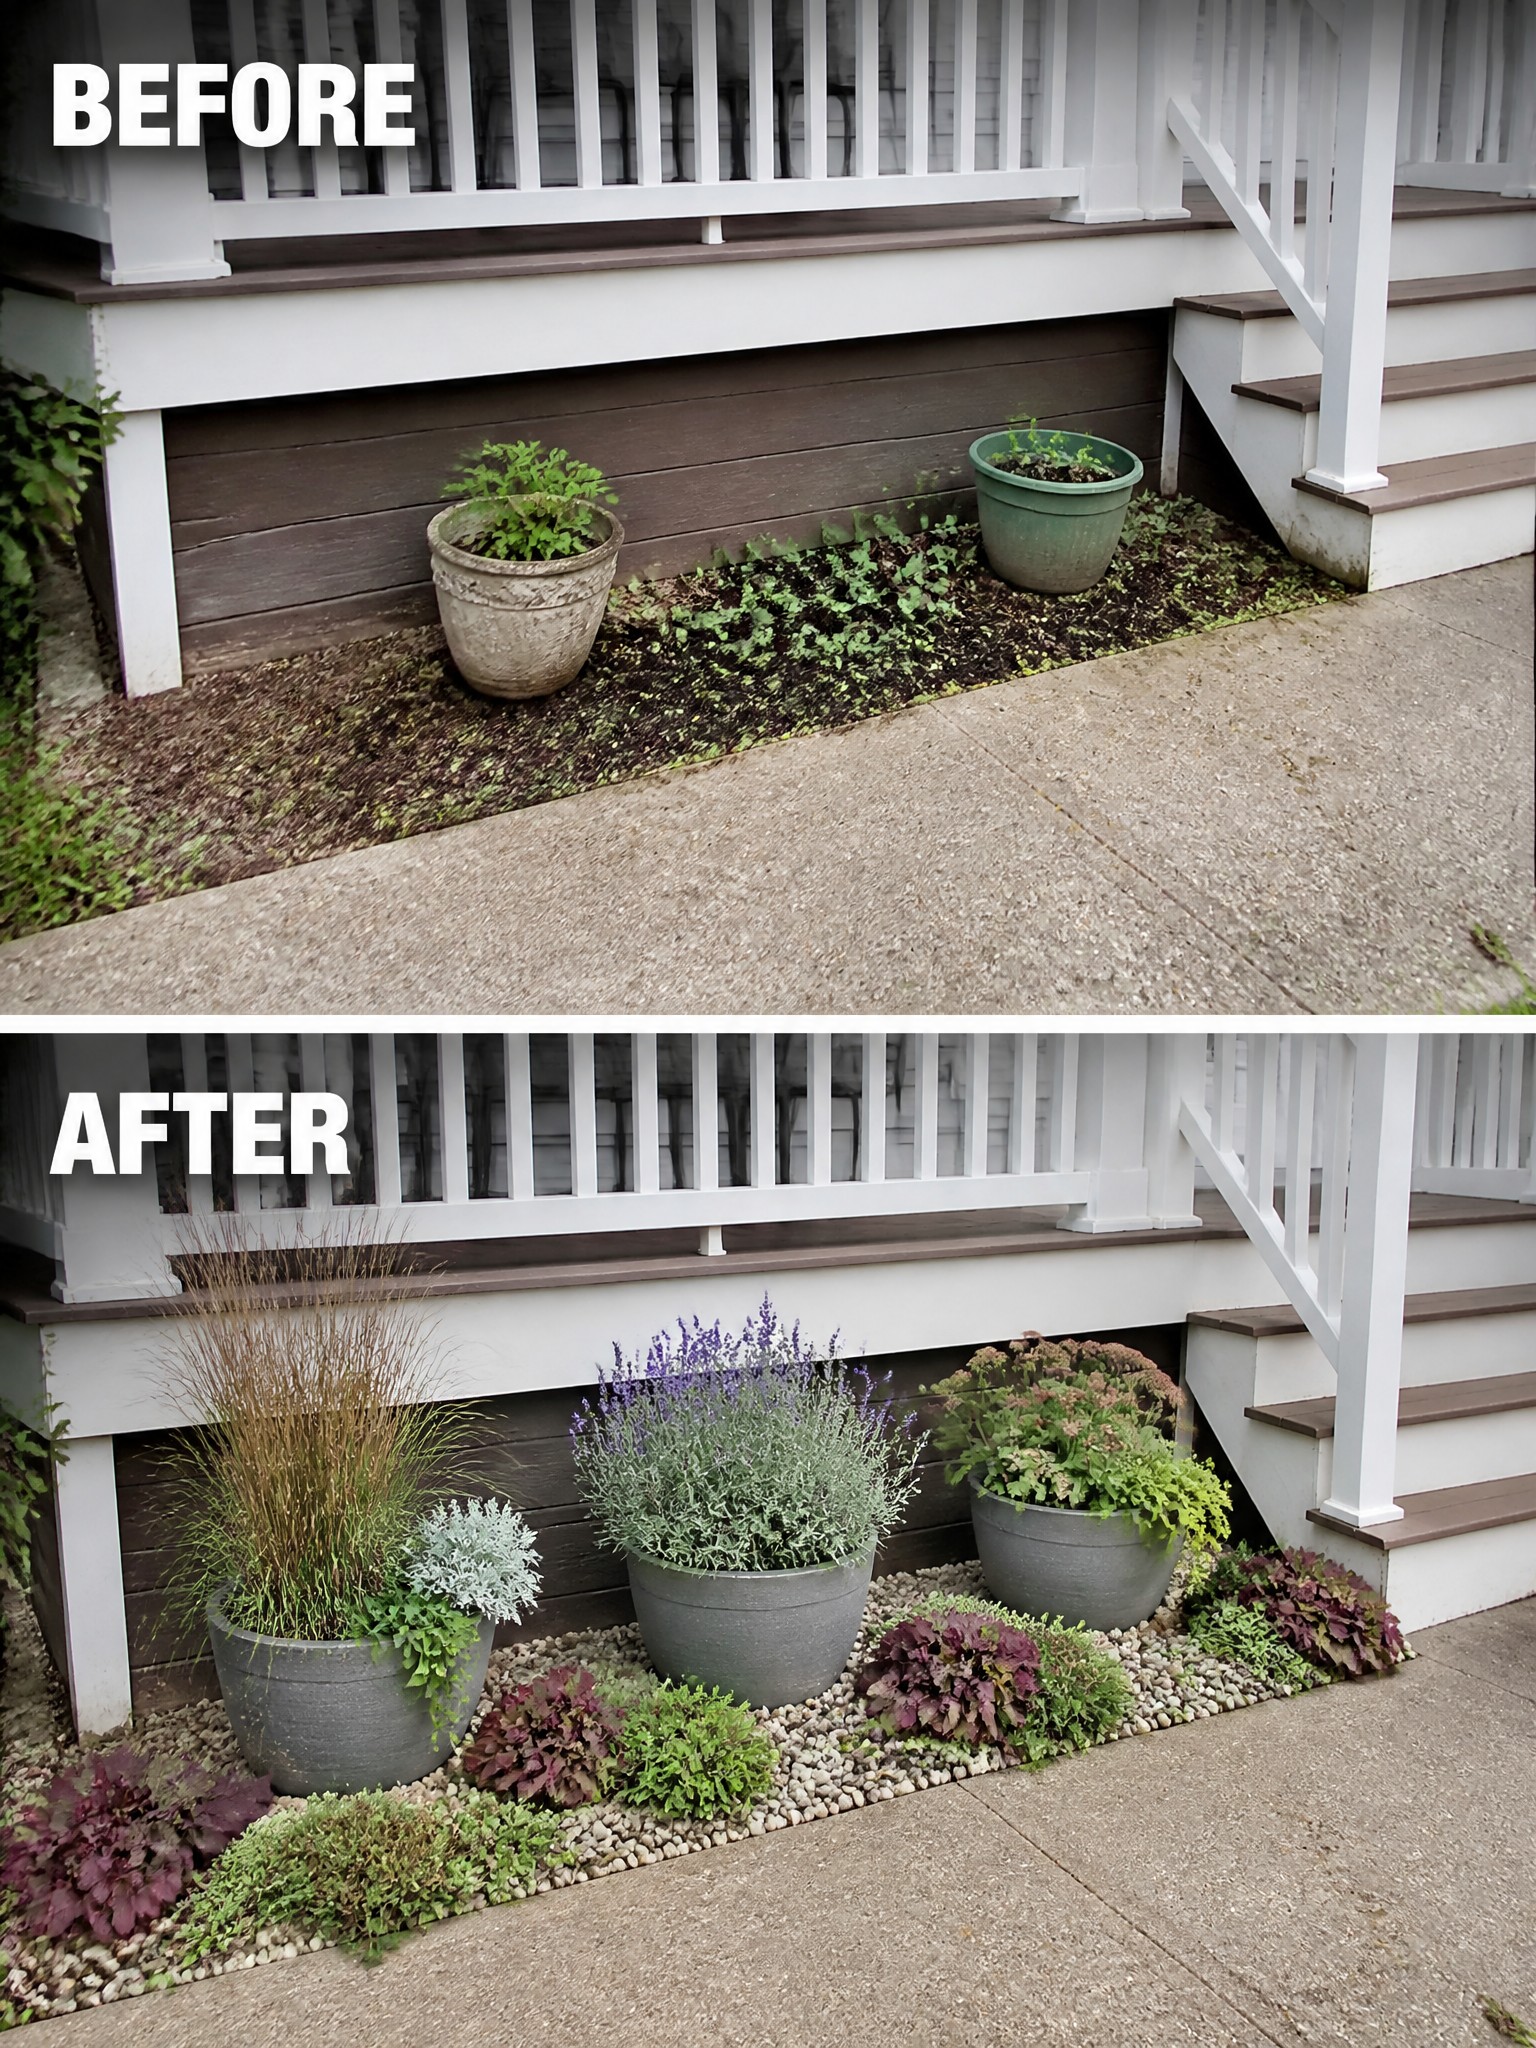
A weedy strip along the house foundation often looks neglected even when the rest of the yard is fine. The change here comes from clearing the mess first, then adding a clean gravel edge and a few larger containers. This creates a planted border that feels intentional instead of leftover space.
This idea works well on any side of the house where soil meets siding or a porch. Start with weed removal and a simple border material like gravel or river rock. Then use two or three bigger pots with a mix of heights so the bed looks full without needing constant new plants. It keeps the area looking neat year-round and stops weeds from taking over again.
Clear Overgrowth Before Adding New Garden Beds
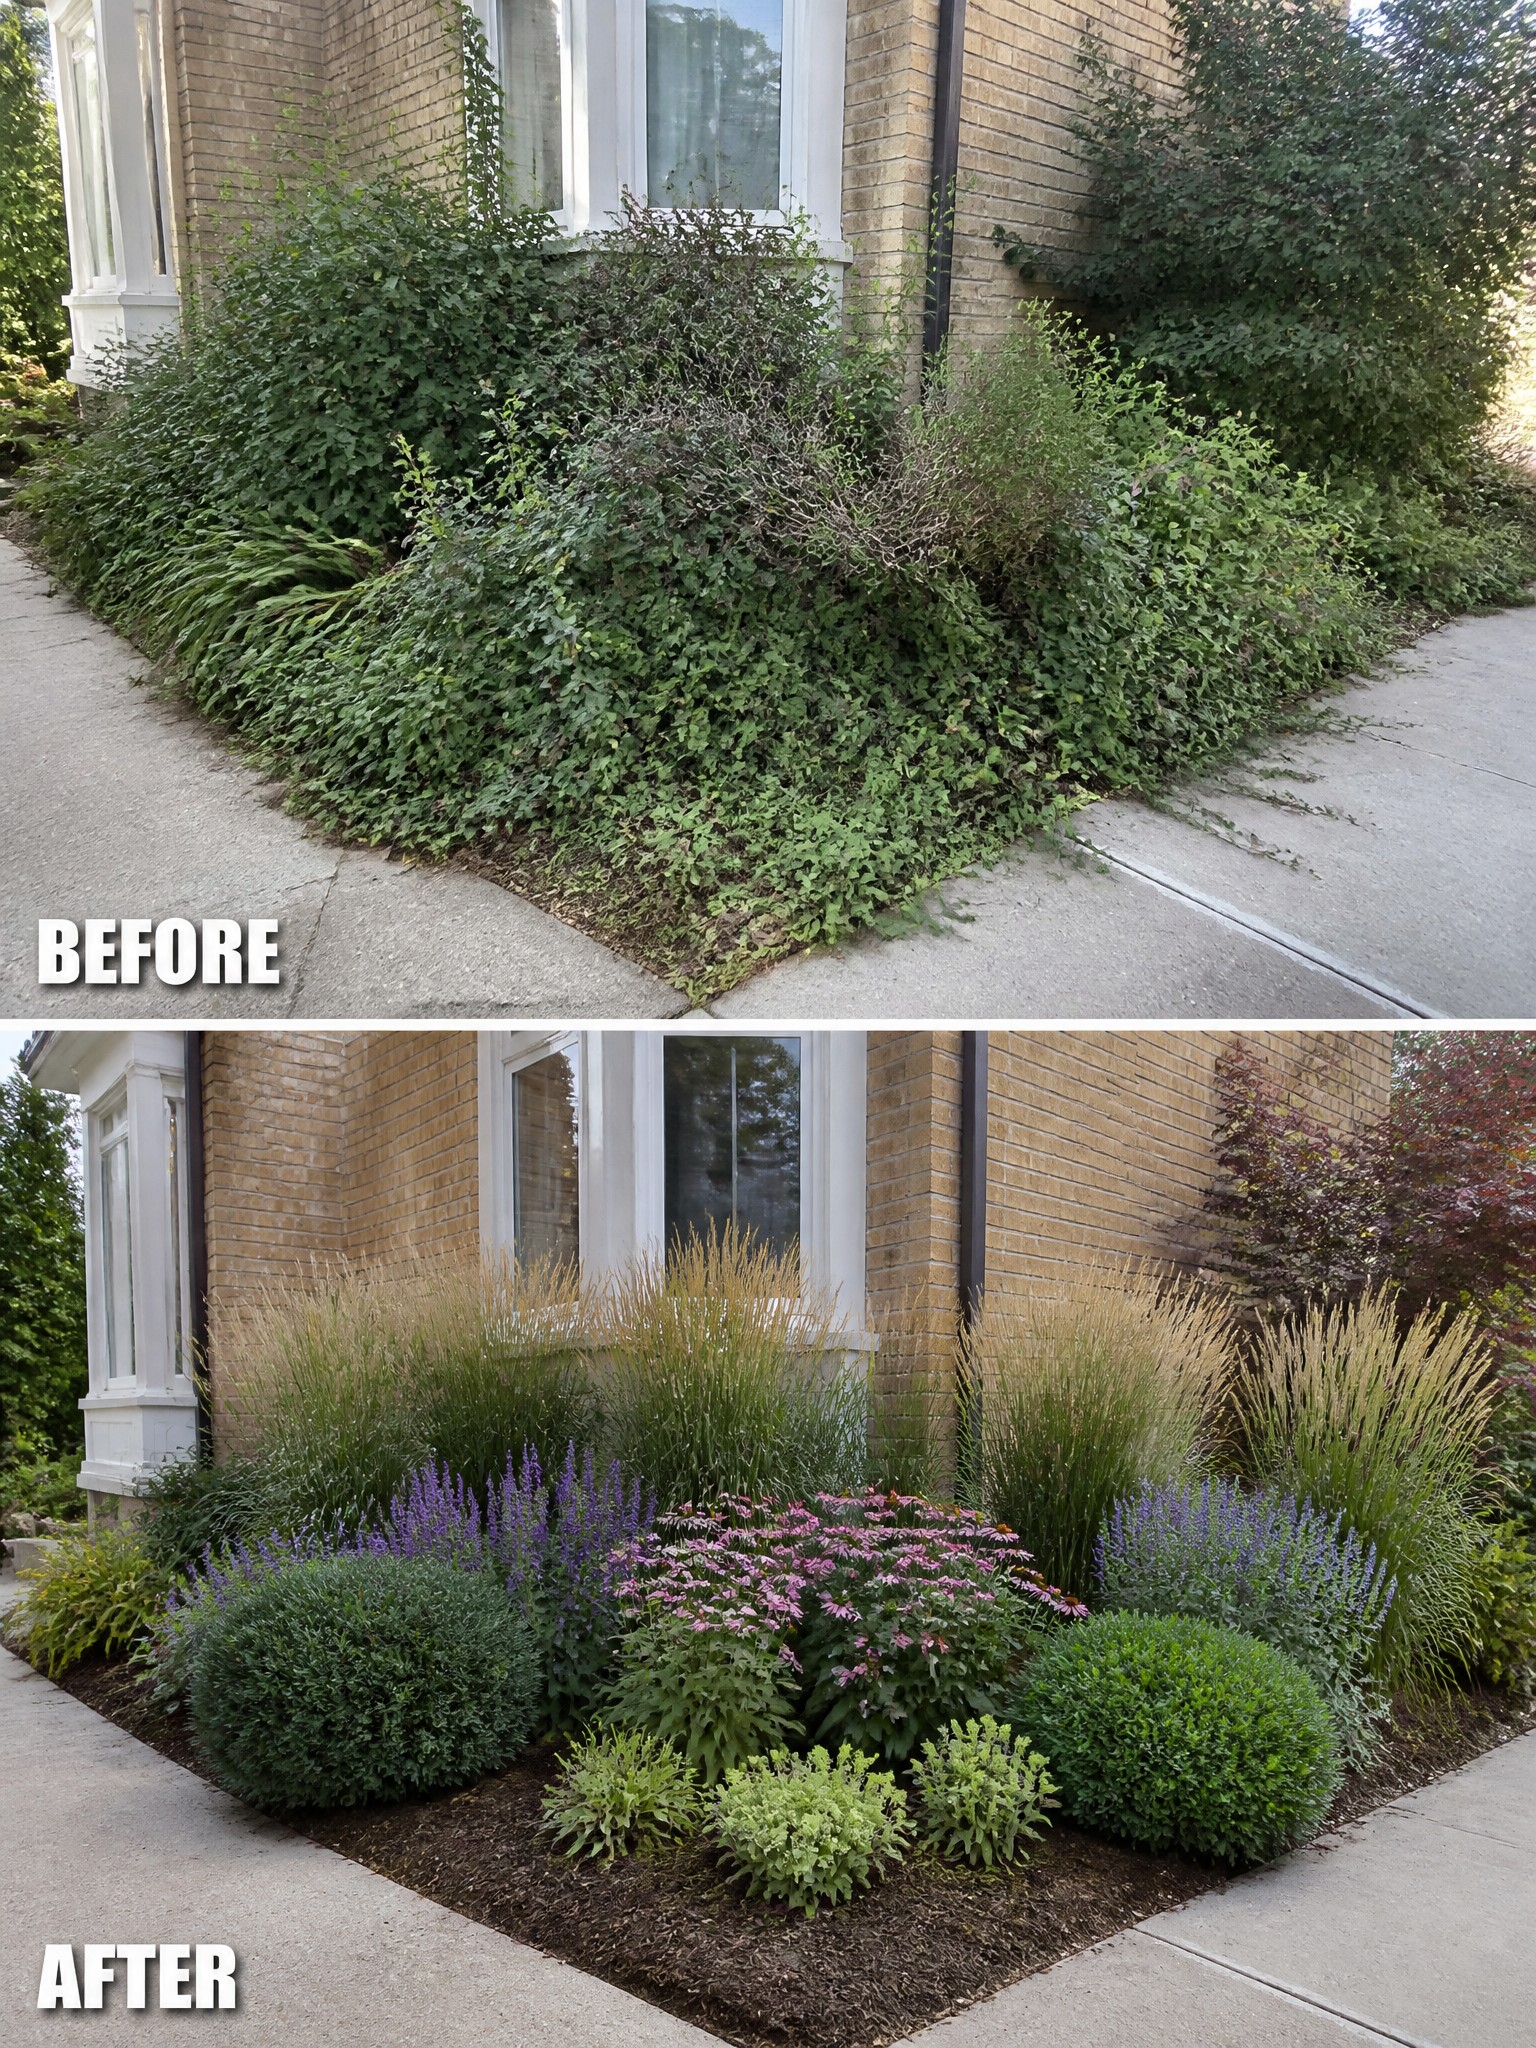
An overgrown foundation bed can quickly turn messy and spill onto sidewalks or paths. Clearing everything out first lets you start fresh with a clean edge, fresh mulch, and plants that stay in bounds. The result feels much more intentional and easier to maintain over time.
This approach works well along the front of a house where old shrubs have taken over. Remove the tangled growth, add a simple border of mulch, and choose a mix of compact shrubs, grasses, and perennials that fill the space without constant trimming. It keeps the bed looking full while staying low maintenance.
Layer Plants To Fill Out A Small Bed
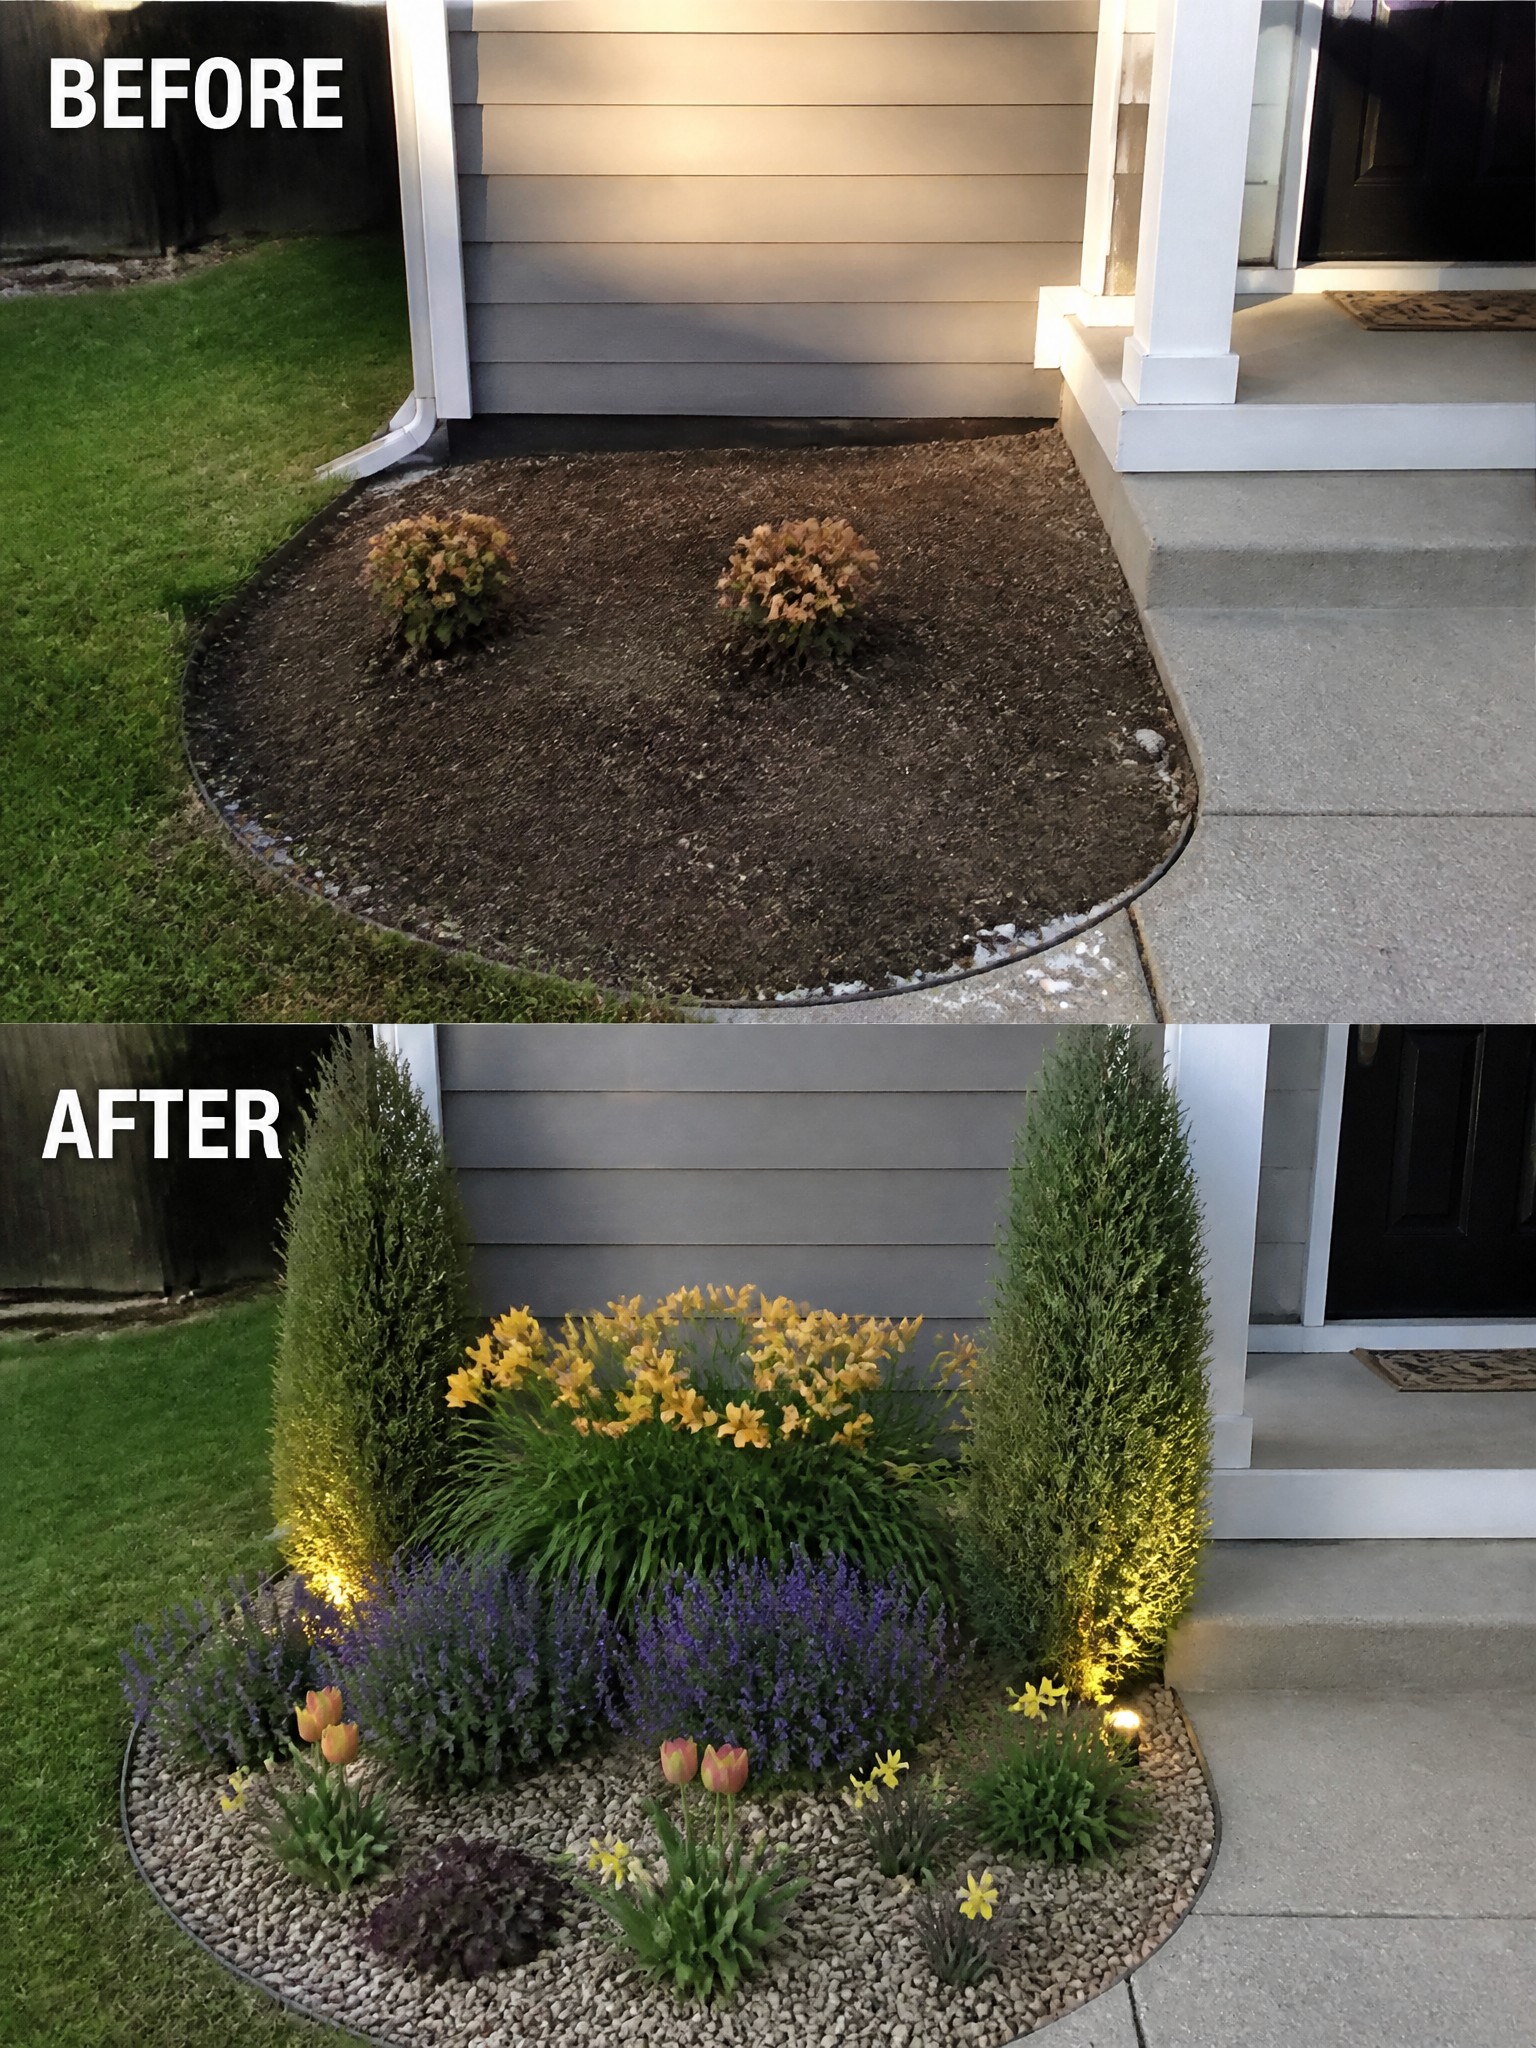
A bare mulch circle next to the front steps does not do much for the house. Adding a few tall evergreens at the back, a mix of lower flowering plants in the middle, and gravel on top gives the bed real structure and makes it look full without constant work.
This approach works well on small front beds where you want impact but not high upkeep. Start with two or three evergreens for height, then fill in with perennials that return each year. The gravel keeps weeds down and gives the whole bed a clean edge that lasts.
Use Gravel To Define A Bare Flower Bed

A strip of bare dirt next to the house was turned into a planted bed by adding gravel and grouping shrubs and flowers in simple clusters. The stone edging stayed in place, which kept the change focused and low cost.
This approach works well along foundations or walkways where you want a neat look without daily upkeep. Lay gravel first to cut down on weeds, then repeat a few plant types instead of mixing too many varieties.
Add Structure To A Narrow Flower Bed
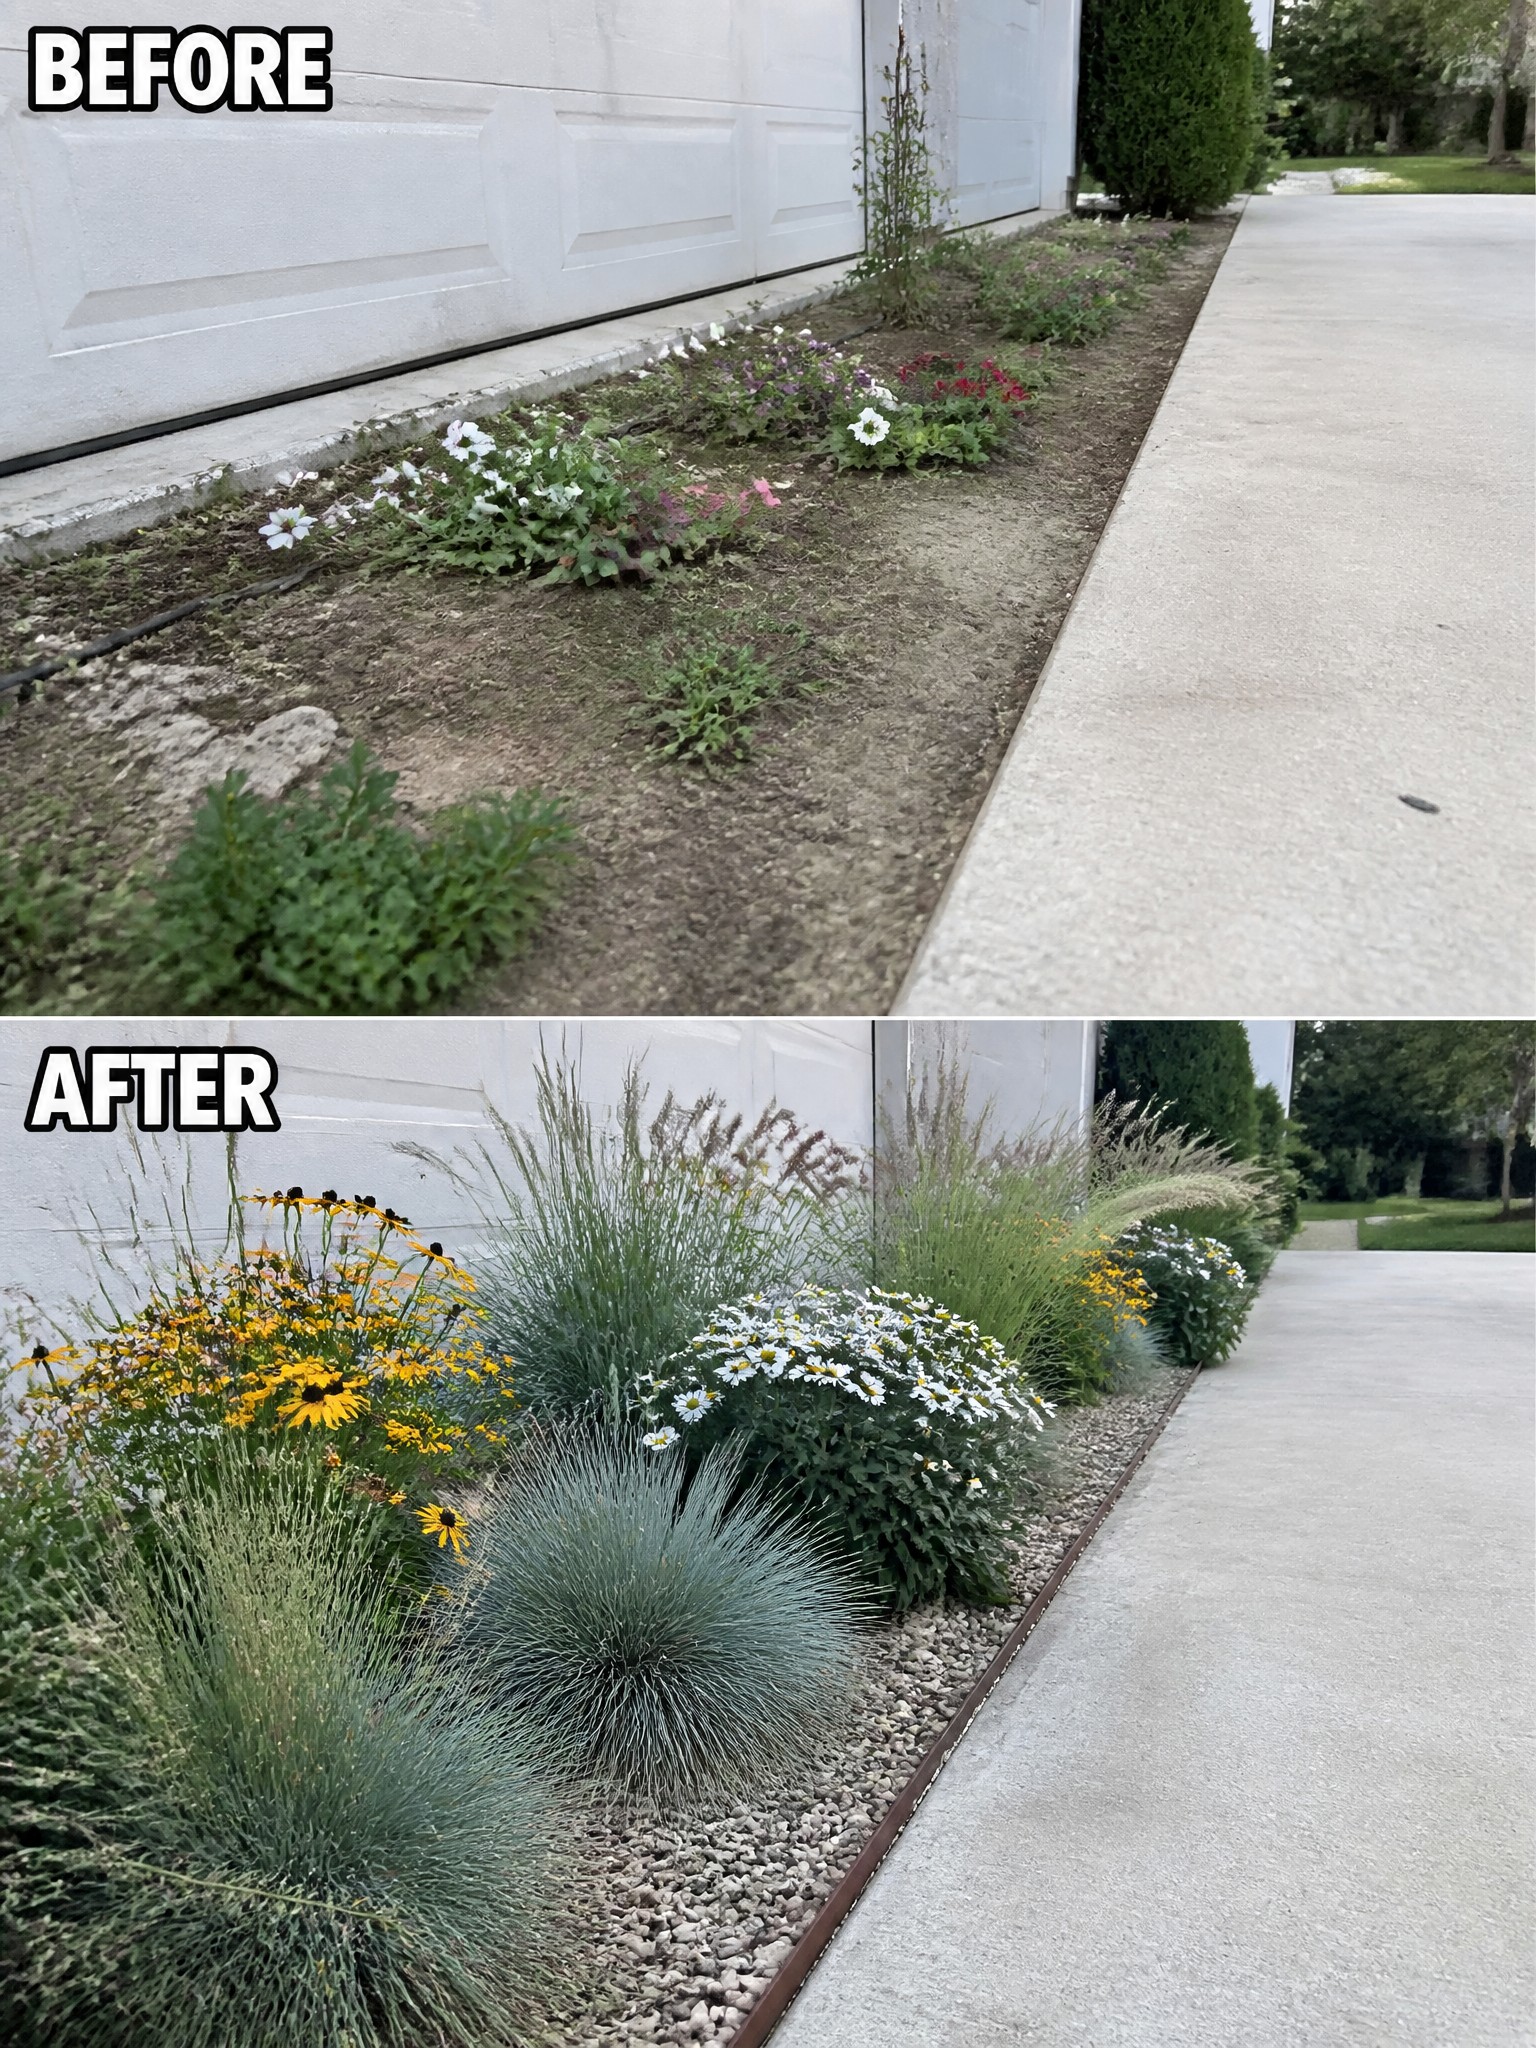
A long, narrow strip next to the driveway often ends up weedy and patchy because it gets little attention. The change here came from clearing the mess first, then planting in groups with a few reliable perennials and plenty of ornamental grasses. The gravel edge keeps everything contained and gives the bed a finished line without extra work.
This approach works well along driveways, foundation walls, or side yards where space is tight. Choose plants that spread a bit on their own and stay under two feet wide so they do not crowd the walkway. A simple gravel or mulch layer cuts down on weeding later and helps the bed look full even when the plants are still filling in.
Add Structure To An Overgrown Flower Bed
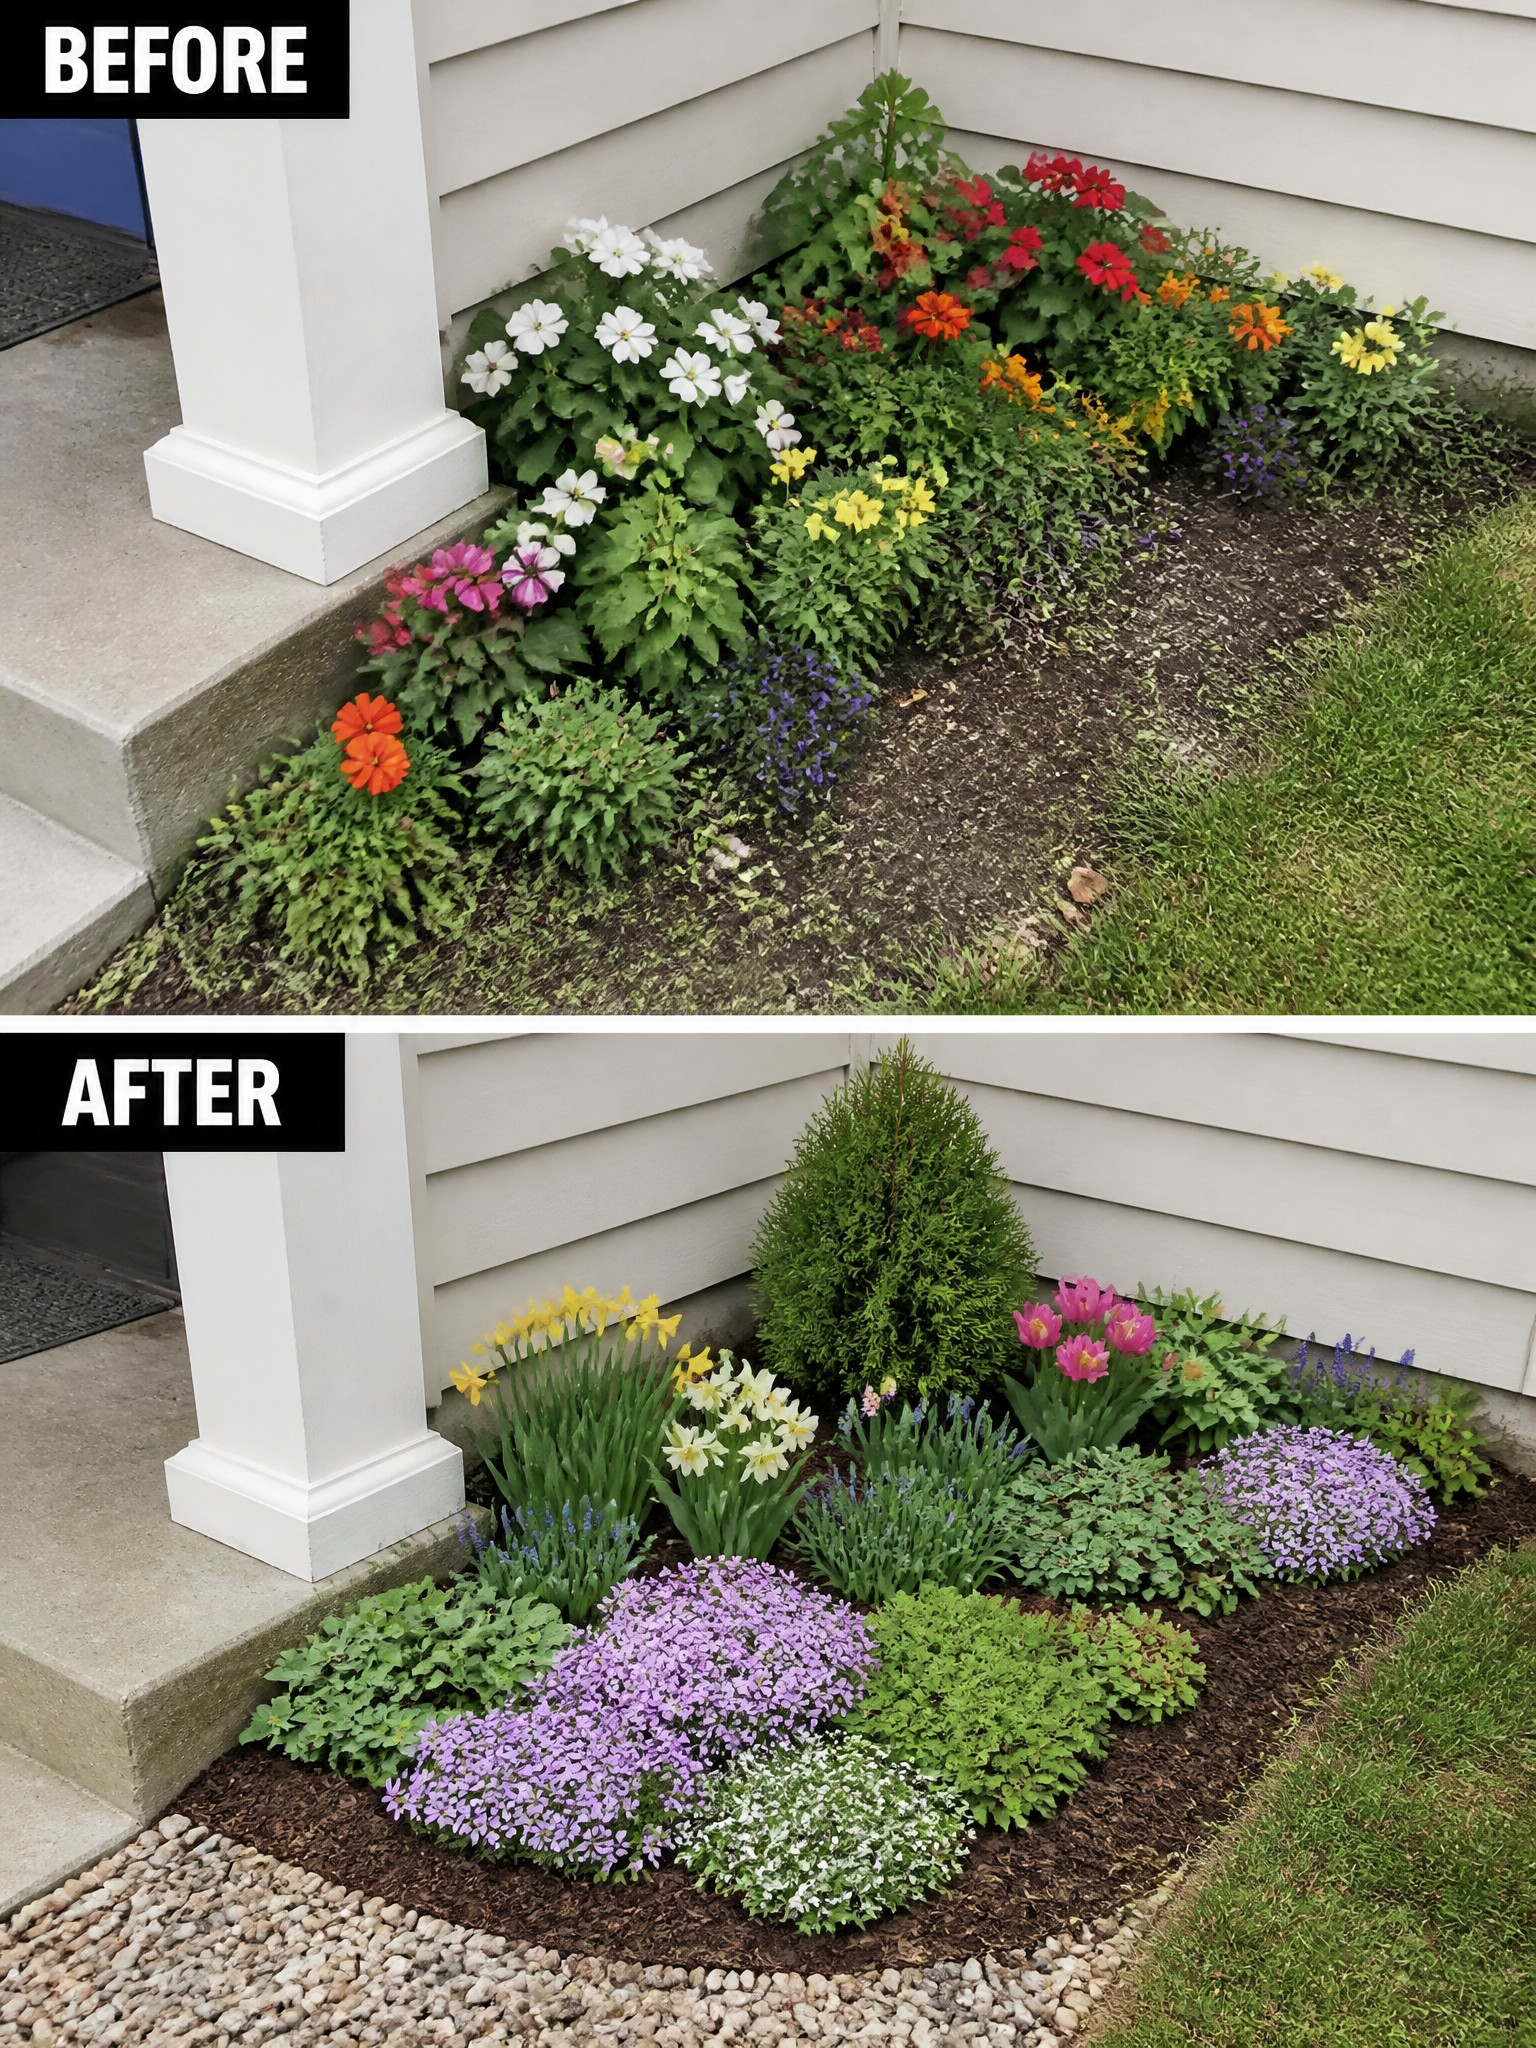
The main change was clearing out the scattered mix of plants and giving the bed a clear shape with mulch and a gravel edge. Grouping similar flowers together and adding one small evergreen for height turned the space from messy to intentional without adding a lot of new plants.
This idea works best along a house foundation where you want the area to look neat with minimal upkeep. Start by removing anything that looks out of place, then repeat a few flower colors and use mulch to keep the soil covered and weeds down.
Frequently Asked Questions
Q: How can I make sure the flower bed stays full year after year without constant replanting?
A: Choose perennials that spread on their own. Add a few spreading ground covers between the taller plants. They fill empty spots fast and keep the bed looking lush.
Q: Weeds always seem to ruin my flower beds. What works best to stop them?
A: Spread mulch thickly around every plant right after you finish planting. It stops most weeds from growing through. Hand pull the few that do appear before they spread.
Q: Does this low maintenance approach work in dry climates too?
A: Yes. Pick drought tolerant perennials and water deeply but infrequently at first. They establish strong roots and need almost no extra care after that.
Q: When should I divide the plants to keep everything healthy?
A: Wait until the bed looks crowded in spring or fall. Dig up clumps and replant the extras elsewhere or share them. This keeps growth vigorous without buying new plants.
