

I often walk past my own flower beds and see how the edges have softened over the years until the borders no longer feel deliberate.
Plants spill into each other and weeds fill the gaps, which makes the whole area look less cared for than it once did.
Small layout fixes help more than I expected.
Adding clearer edging and choosing plants that stay in scale keeps the beds looking intentional without constant trimming.
Those kinds of adjustments tend to hold up better through the seasons and make the garden feel steadier overall.
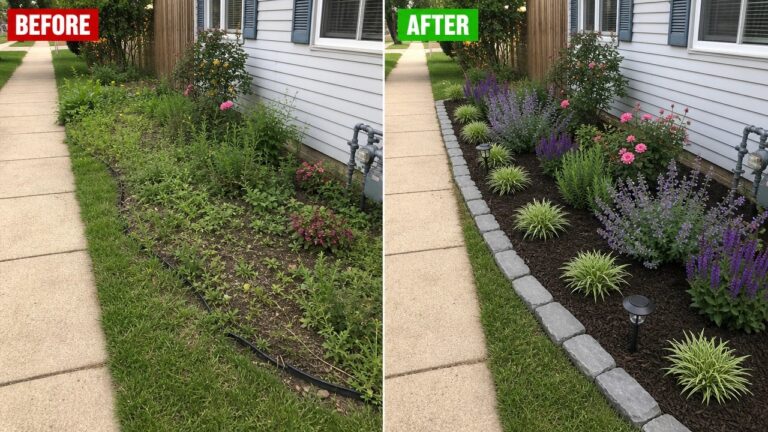
Define Garden Beds With Simple Edging

An overgrown strip next to the house and sidewalk is tough to keep under control. A clean stone edge and fresh mulch turn the same narrow bed into something that looks planned and much easier to maintain.
This idea works best along foundations or walkways where plants tend to spill out. Clear the worst growth first, put down a solid border, then fill in with a few repeating plants and mulch to hold everything in place.
Add Raised Beds To Shape A Narrow Garden Path
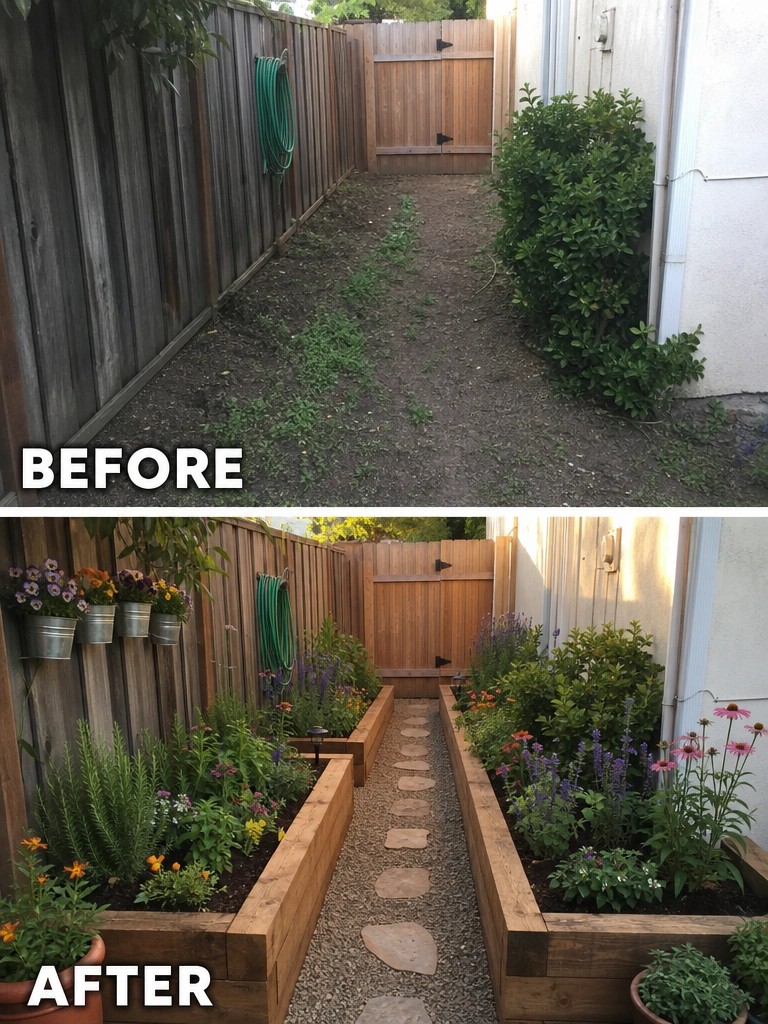
Raised beds can turn a bare dirt strip into something that actually feels like a garden. The before photo shows an empty side yard with no real planting space, just a worn path and a fence. After adding the beds, the area gains clear borders that hold soil and keep plants contained along both sides.
This idea works best in tight yards or along fences where in-ground beds would be hard to maintain. Keep the frames simple, use gravel or stepping stones for the path, and plant in layers so the beds stay full without crowding the walkway. It gives you usable flower beds without losing access through the space.
Create A Planted Border Along A Fence

An overgrown strip next to a fence often looks worse the longer it sits. Clearing the weeds first and then planting in layers turns the same narrow space into something that feels intentional. The after photo shows how a simple row of flowers and grasses can soften the fence without crowding the lawn.
This approach works best along straight edges where you need structure but do not have room for a wide bed. Choose a few repeating plants in different heights, add a couple of larger rocks for weight, and keep the front edge clean so the lawn stays easy to mow. Start small and let the plants fill in rather than trying to cover everything at once.
Define A Plain Border With Colorful Flowers

A long strip of mulch along the house often looks unfinished when it has only a few scattered plants. Filling the bed with low flowers in repeating colors gives the area clear structure and makes the front of the house feel more complete.
This approach works on any home with a straight foundation bed. Pick two or three flower colors, plant them in groups, and refresh the mulch so the bed stays neat without much extra work.
Turn A Dry Lawn Strip Into A Gravel Bed

A narrow strip of patchy grass next to a sidewalk often ends up looking tired because it gets little water and hard use. Switching it to gravel with a few larger rocks and succulents gives the space clear edges and cuts down on ongoing lawn care.
This approach works best along driveways, front walks, or property lines where grass struggles. Keep the planting simple, repeat a few plant types, and make sure the gravel layer sits a little below the curb so it stays in place.
Define Bare Spots Under Trees With Simple Beds
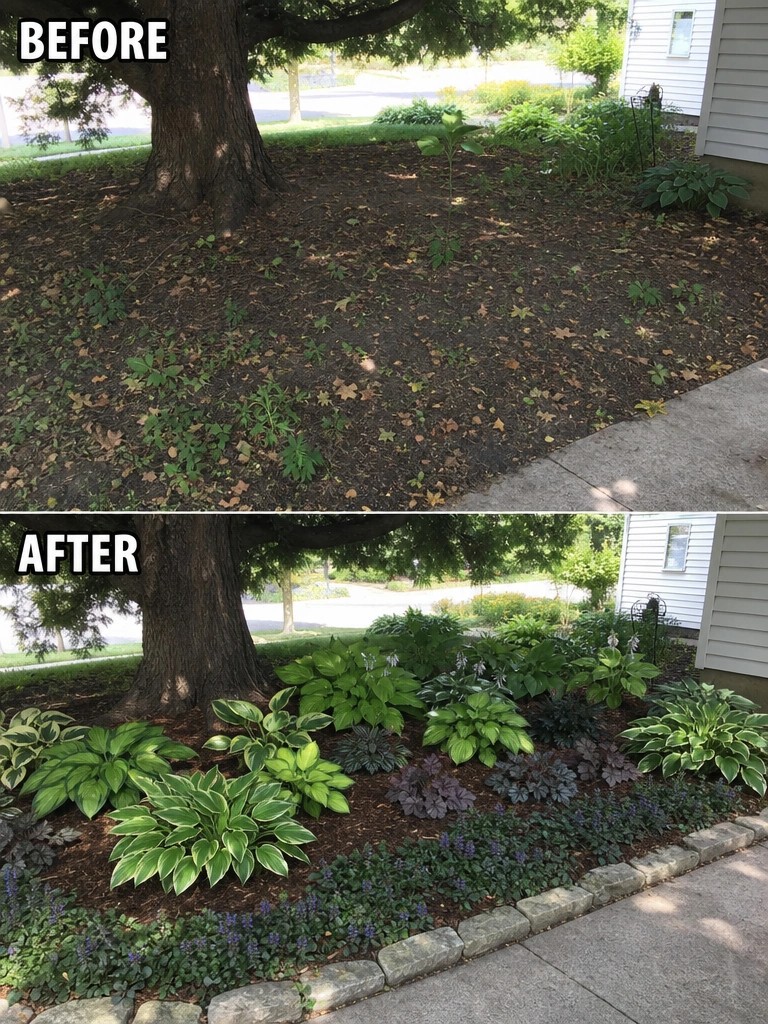
A large tree often leaves a tricky patch of ground that ends up looking patchy and neglected. Adding a clear border and filling it with shade-tolerant plants turns that same spot into a finished part of the yard instead of an afterthought. The stone edging keeps mulch in place and gives the bed a shape that is easy to maintain.
This approach works well in any yard with mature trees where grass struggles to grow. Start with a simple edge, improve the soil, and choose a mix of plants that can handle the shade. Keep the planting full but not crowded so the bed still looks neat as everything fills in.
Add Layered Planting To Define Foundation Beds
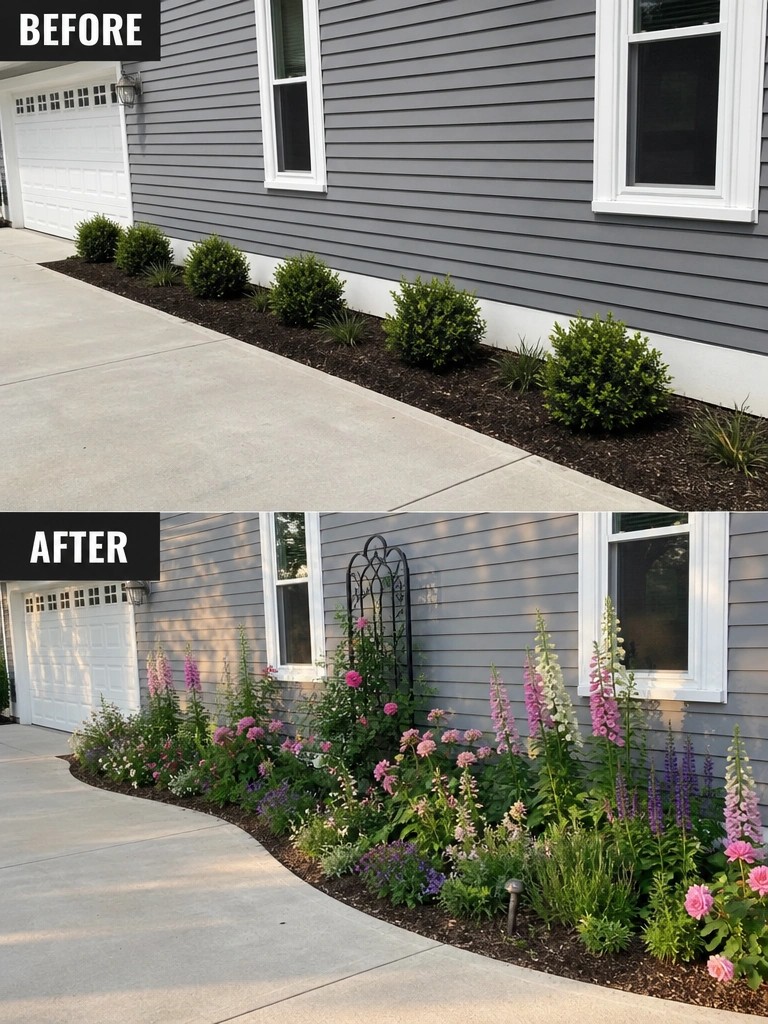
A sparse line of shrubs along the house can leave the front looking unfinished. Filling the bed with plants of different heights turns the same strip of ground into a clear border that softens the siding and adds color through the season.
This approach works best on simple, straight runs next to the house. Start with a few taller perennials toward the back, mid-height flowers in the middle, and low edging plants along the walk. Keep the bed a consistent width so it feels planned rather than crowded.
Mount Planters On A Fence For More Flower Space
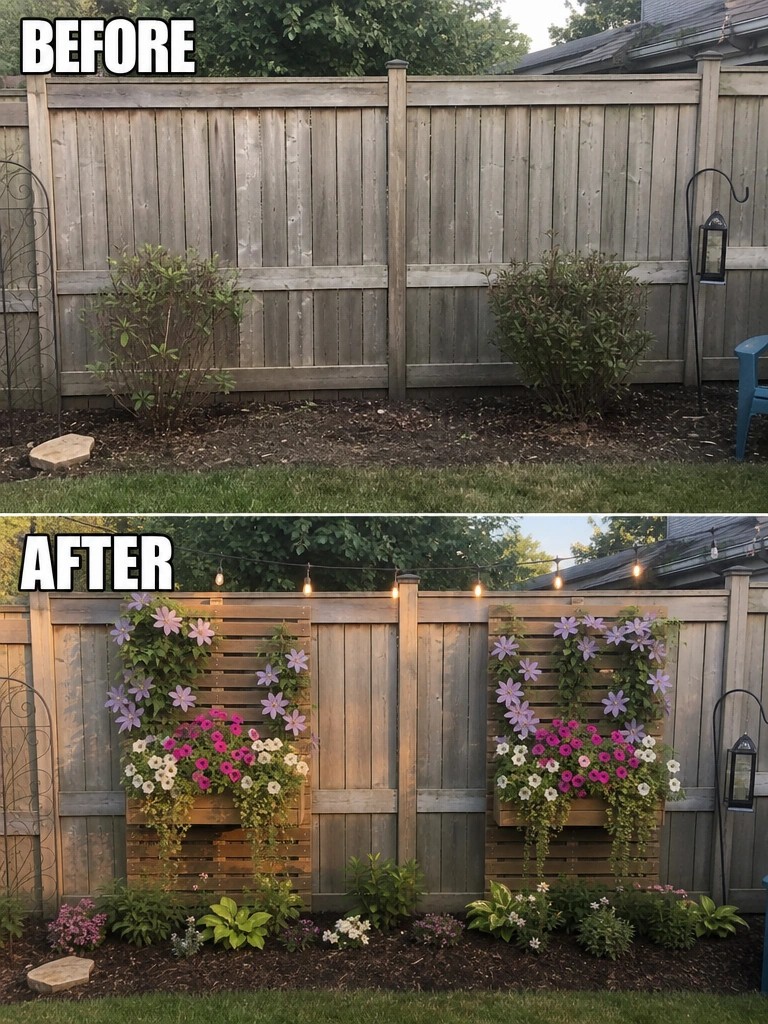
A plain fence often leaves a garden feeling flat, especially when the ground planting stays low and sparse. Mounting simple wooden planters directly on the fence adds height and gives you room for trailing flowers without taking up more yard space. The before photo shows mostly empty fence boards and a few scattered bushes, while the after shows how the same fence now supports two large planted boxes full of color.
This idea works well along a back fence or side boundary where you want more visual interest but do not have wide beds. Keep the planters at a height that is easy to water and choose flowers that handle the sun exposure on your fence. Start with just one or two boxes if you want to test the look before adding more.
Add Structure To A Sloped Yard With A Retaining Wall

A slope covered in loose rocks and bare dirt is difficult to plant and tends to erode over time. A simple retaining wall changes that by creating flat beds that hold soil in place and give plants room to grow.
This idea works well on any yard with a noticeable drop. Clear the loose material first, then build the wall to form level planting areas before adding flowers or shrubs.
Define Flower Beds With Clean Edging

The main change here is how the front beds went from a loose mix of plants spilling onto the lawn to a clear, contained shape. Adding a low hedge border and keeping the mulch inside the line gives the whole area a finished look instead of just a collection of shrubs.
This idea works best on homes where the beds have grown out of shape over time. Outline the bed first with simple edging, then add a few rounded shrubs for structure before filling in with flowers. It keeps things easier to maintain and stops the planting from looking random.
Define A Path Border With Stepping Stones
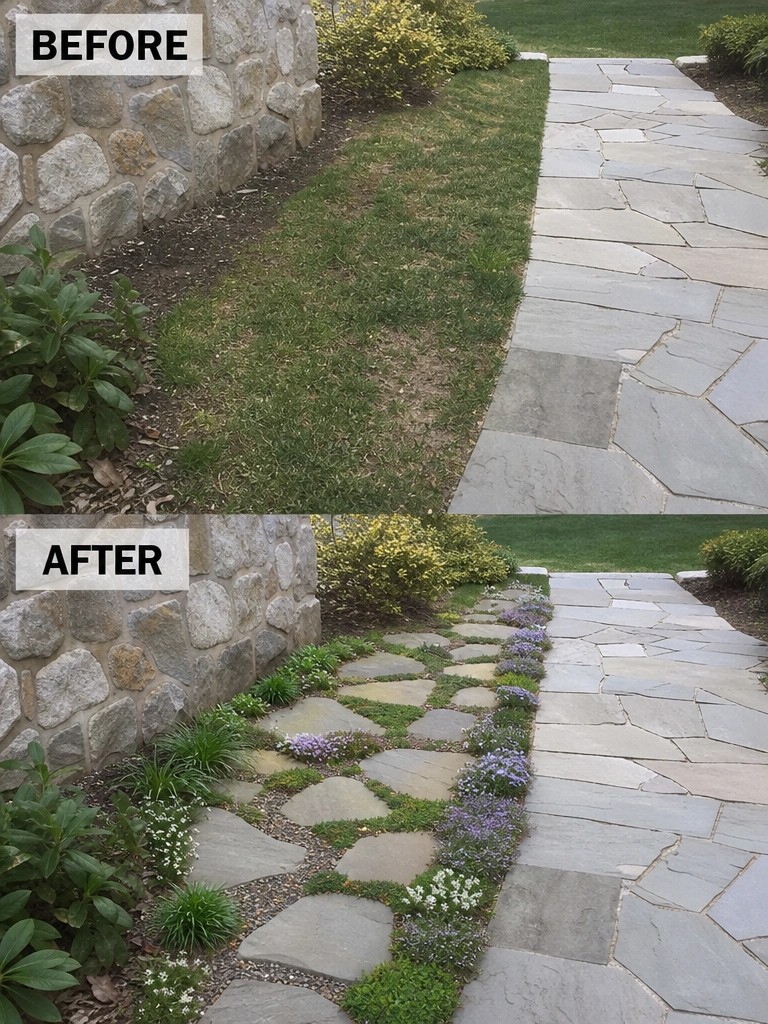
A narrow strip of grass next to a walkway often looks unfinished. Adding stepping stones creates a clear structure and turns the space into a planted border instead of just leftover lawn.
This idea works best along existing paths where you want more planting without blocking movement. Lay the stones first to set the shape, then fill around them with low ground cover and a few flowering plants that spread over time.
Add Layers To A Basic Flower Bed
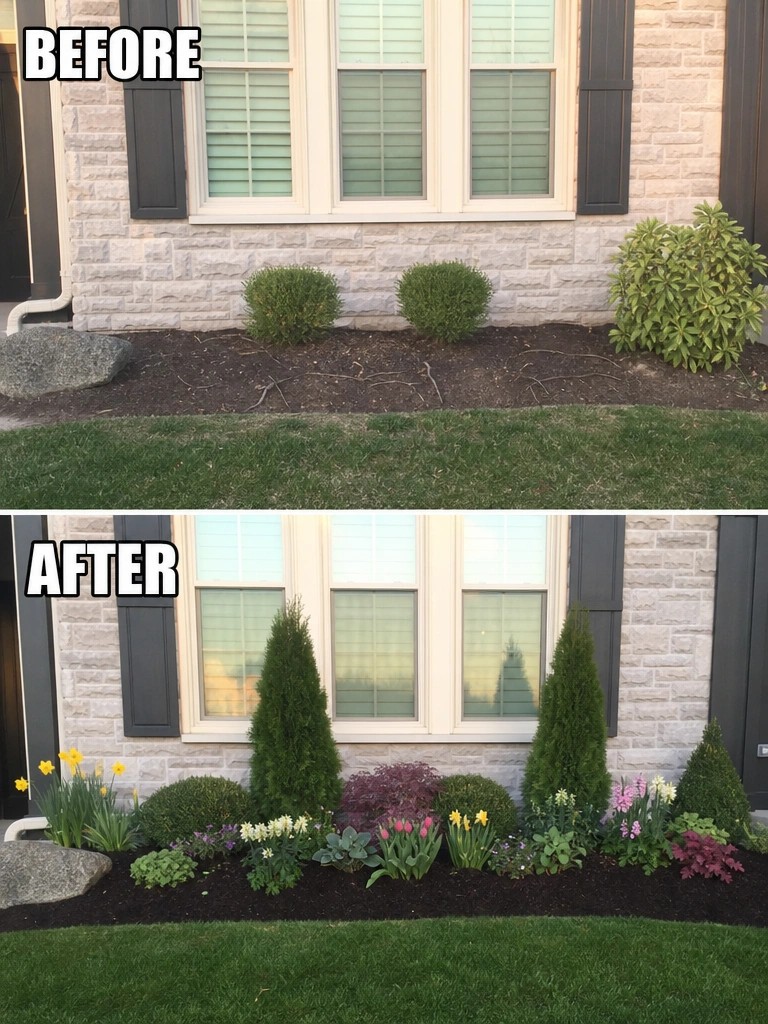
A flat row of small shrubs can look thin and unfinished against a house. The after photo shows how adding taller evergreens at the back, mid-height shrubs in the middle, and low flowers along the front gives the bed real shape and presence without needing a full redesign.
This approach works well on any narrow strip of ground in front of a home. Start with the tallest plants at the back so the bed feels full from the street, then fill in with two or three lower layers. Keep the colors simple and repeat a few plants so the bed looks planned instead of crowded.
Define A Wet Area With A Rock Stream Bed

A low spot that collects water can quickly turn into a muddy mess that is hard to mow or plant. Adding a rock-lined channel gives the water a clear path while turning the same spot into a planted garden feature. The change from an open puddle to a bordered stream makes the whole area look intentional instead of neglected.
This idea works best in yards that already have a natural dip or poor drainage. Start by shaping the edges, laying down a liner if needed, and using larger stones to hold the shape. Fill in with plants that like moisture along the sides so the bed blends into the lawn. Keep the rock work simple and let the planting do most of the softening.
Add Structure To An Overgrown Garden Border

An overgrown border often looks like a lost cause, but the real fix starts with clearing the mess and laying out clear beds. In this case the wild mix of weeds and random plants gave way to neat rows of herbs and flowers set in dark soil with simple labels. The change makes the space feel intentional instead of neglected.
This approach works well along a fence or house wall where you need both order and easy access. Start by pulling everything out, then mark straight or gently curved beds that leave room to walk. Plant in groups rather than scattering singles, and add a bench only after the beds are defined. The same steps work on a small city yard or a long suburban side yard.
Turn A Neglected Border Into A Structured Flower Bed

A bare or weedy strip next to a path often looks worse than an empty space because it draws attention to the mess. Clearing it out and planting rows of bulbs creates clean lines and steady color that runs the full length of the border.
This idea works best along sidewalks, building edges, or lawn borders where you want impact without blocking movement. Clear everything first, then plant in simple rows so the colors stay organized as the flowers come up. It suits homes with long straight edges and gives the biggest return from a single weekend of work.
Add Lighting To Highlight Garden Beds And Borders
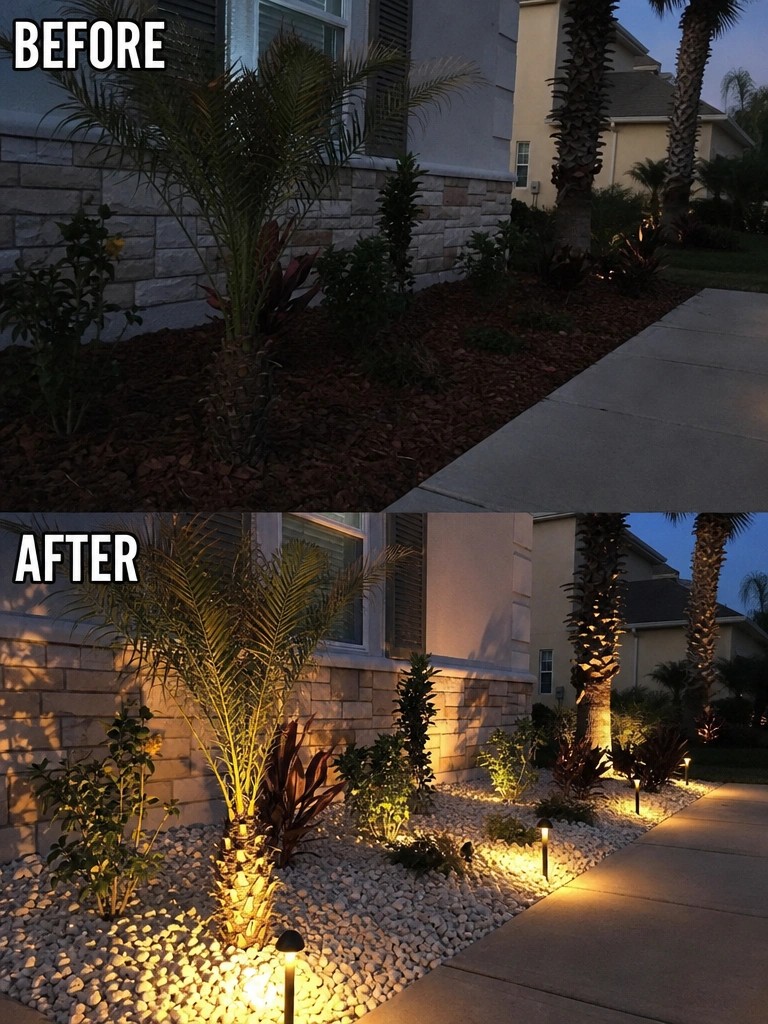
The main change here is replacing dark mulch with light gravel and adding small path lights along the edge. This simple step makes the plants stand out at night and gives the whole bed a cleaner shape instead of letting it fade into the background.
This approach works well along walkways or near the front of the house where you want a bit of visibility after dark. Start with a few low lights spaced evenly and keep the gravel or mulch light in color so the lights reflect better. It is an easy upgrade that does not require new plants or big construction.
Add Layers To A Simple Flower Bed
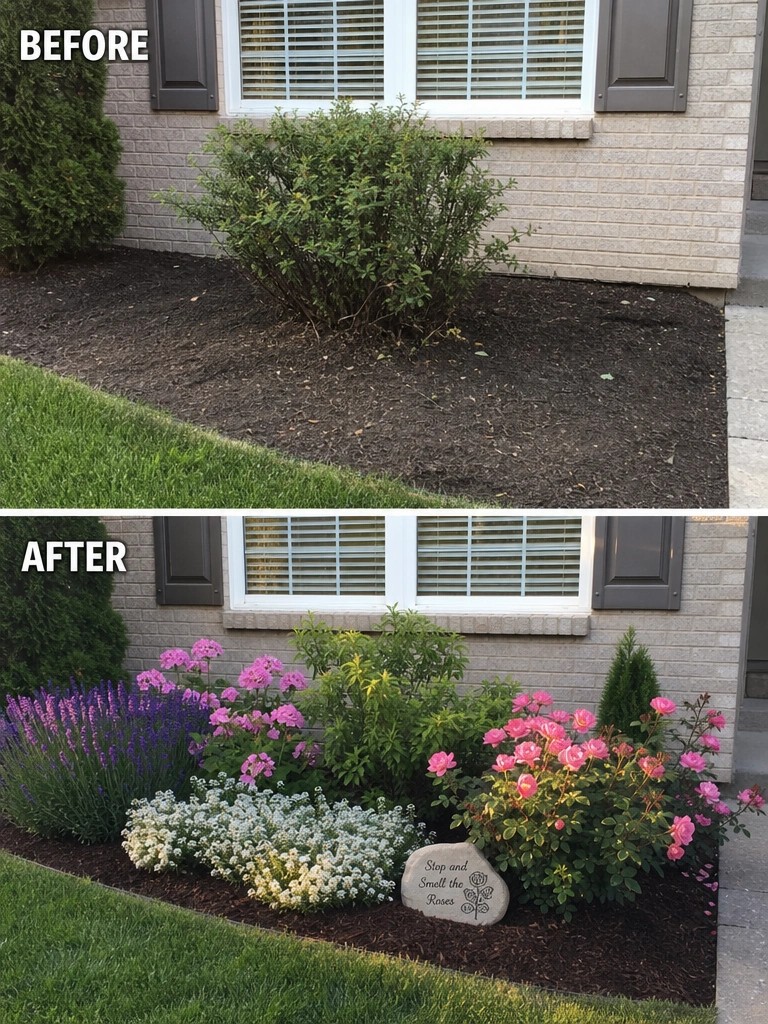
A bare stretch of mulch under a window often looks unfinished even when it is tidy. Filling the space with different heights and bloom times turns the same spot into a real garden bed instead of just ground cover. The change here came from adding taller roses on one side, lower perennials in the middle, and a spreading ground cover along the front edge.
This approach works best along the front of a house where you want color without blocking windows. Start with a few larger shrubs or roses for height, then fill in with mid-size flowers and something low to hide the soil. Keep the bed a consistent depth so it reads as one planned area rather than scattered plants.
Add Structure To An Overgrown Garden Border

Many gardens end up with borders that grow wild because there is no clear plan. Clearing the overgrowth first and then laying down mulch creates a clean edge that makes the whole area feel intentional. The after photo shows how a simple border of mulch and grouped plants turns a messy strip into something that looks maintained.
This approach works best along fences or house walls where plants tend to sprawl. Start by cutting everything back hard, then decide on a planting line before adding new shrubs and flowers. Mulch helps keep weeds down and gives the bed a finished look without much extra cost. It suits smaller yards especially well because the structure keeps things from feeling cramped.
Define Garden Borders With Proper Edging
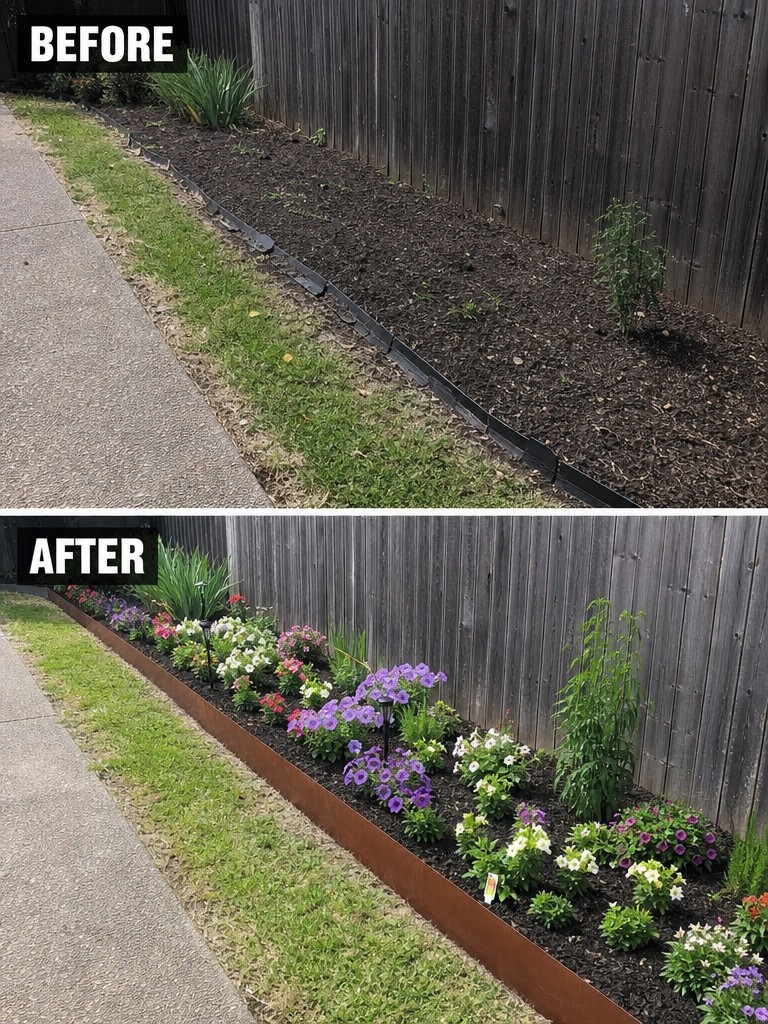
A long strip of bare soil next to a fence often looks unfinished, especially when the edging is thin plastic that shifts over time. Switching to a solid metal border and filling the bed with layered plants gives the whole area a clear shape and makes the planting feel intentional rather than scattered.
This approach works well along sidewalks or fence lines where you want the garden to look neat without a lot of extra features. Start by setting a straight, durable edge, then plant in groups so the bed fills in evenly. Keep the soil level slightly below the edging so mulch stays in place and the border stays visible.
Add Structure To An Overgrown Slope

An overgrown slope covered in ivy often looks messy and hard to maintain. Building simple stone retaining walls turns the same area into a series of flat planting beds that stay neat and easy to care for. The change from a single steep bank to several small terraces gives the plants room to show color without sliding down the hill.
This approach works well on any sloped side yard or front bank next to a driveway. Start by clearing the heavy growth, then add the lowest wall first and work upward. Keep the beds fairly narrow so they stay simple to weed and water.
Frequently Asked Questions
Q: How do I pick plants that will actually thrive in my new flower beds?
A: Start by testing your soil type and sunlight levels first. Then match plants to those conditions rather than just going for looks. This saves time on replacements later.
Q: What if my borders keep getting overgrown by weeds?
A: Lay down a thick layer of mulch right after planting. Pull any weeds by hand before they spread seeds.
Q: Can I do these remodels without hiring help?
A: Yes, break the project into small weekend tasks like edging one border at a time. Gather basic tools such as a spade and rake before you begin. Many of the ideas work well with just hand labor.
